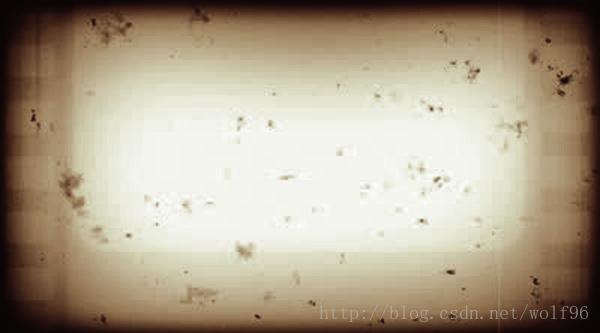
做出这种古老效果,需要: 颜色发黄, 晕影效果, 灰尘与刮痕的效果。
建立一个c#脚本,将要放在摄像头中
先声明变量
oldFilmShader 所需shader(一会需要编写)
OldFilmEffectAmount 古老的程度(最后做插值的程度值)
sepiaColor 屏幕的颜色(调至黑黄)
vigentteTexture 老电影式基本贴图
vigentteAmount 所占比重
scratchesTexture 刮痕贴图
scratchesYspeed 刮痕y方向移动速度
scratchesXspeed 刮痕x方向移动速度
Texture2D dustTexture; 灰尘贴图
dustYSpeed 灰尘y方向移动速度
dustXSpeed 灰尘x方向移动速度
randomValue 随机值
    public Shader oldFilmShader;

    public float OldFilmEffectAmount = 1.0f;

    public Color sepiaColor = Color.white;
    public Texture2D vigentteTexture;
    public float vigentteAmount = 1.0f;

    public Texture2D scratchesTexture;
    public float scratchesYspeed = 10.0f;
    public float scratchesXspeed = 10.0f;

    public Texture2D dustTexture;
    public float dustYSpeed = 10.0f;
    public float dustXSpeed = 10.0f;

    private Material curMaterial;
    private float randomValue;
依旧需要 OnRenderImage()这个函数抓取摄像机的图像
把所需变量传入shader
最后拷贝源纹理到目的渲染纹理
Graphics.Blit()
    void OnRenderImage(RenderTexture sourceTex, RenderTexture destTex)
    {
        if (oldFilmShader != null)
        {
            material.SetColor("_SepiaColor", sepiaColor);
            material.SetFloat("_VigentteAmount", vigentteAmount);
            material.SetFloat("_OldFilmEffectAmount", OldFilmEffectAmount);
            if (vigentteTexture)
            {
                material.SetTexture("_VigentteTex", vigentteTexture);

            }
            if (scratchesTexture)
            {
                material.SetTexture("_ScratchesTex", scratchesTexture);
                material.SetFloat("_ScratchesYSpeed", scratchesYspeed);
                material.SetFloat("_ScratchesXSpeed", scratchesXspeed);
            }
            if (dustTexture)
            {
                material.SetTexture("_DustTex", dustTexture);
                material.SetFloat("_DustXSpeed", dustXSpeed);
                material.SetFloat("_DustYSpeed", dustYSpeed);
                material.SetFloat("_RandomValue", randomValue);

            }
            Graphics.Blit(sourceTex, destTex, material);
        }
        else
        {
            Graphics.Blit(sourceTex, destTex);
        }
    }
再看shader
声明变量
distortion 扭曲程度
cubicDistortion 三维扭曲程度
	Properties
	{
		_MainTex ("Base(RGB)", 2D) = "white" {}
		_VignetteTex ("VignetteTexture", 2D) = "white"{}
		_ScratchesTex ("ScartchesTexture", 2D) = "white"{}
		_DustTex ("DustTexture", 2D) = "white"{}
		_SepiaColor ("SepiaColor", Color) = (1,1,1,1)
		_EffectAmount ("OldFilmEffectAmount", Range(0,1)) = 1.0
		_VignetteAmount ("Vignette Opacity", Range(0,1)) = 1.0
		_ScratchesYSpeed ("ScratchesYSpeed", Float) = 10.0
		_ScratchesXSpeed ("ScratchesXSpeed", Float) = 10.0
		_dustXSpeed ("DustXSpeed", Float) = 10.0
		_dustYSpeed ("DustYSpeed", Float) = 10.0
		_RandomValue ("RandomValue", Float) = 1.0
		_Contrast ("Contrast", Float) = 3.0

		_distortion ("Distortion", Float) = 0.2
		_cubicDistortion ("CubicDistortion", Float) = 0.6
		_scale ("Scale(Zoom)", Float) = 0.8
	}
镜头桶形失真校正算法,产生桶形畸变效果
将矩形物体拍摄成四边向外凸形成桶形的影像,就称镜头具有负畸变,或桶形畸变
一会需要用此对uv进行变换
传入uv值float2 coord
传出扭曲的uv值
	float2 barrelDistortion(float2 coord)
			{
				// Inspired by SynthEyes lens distortion algorithm
				// See http://www.ssontech.com/content/lensalg.htm

				float2 h = coord.xy - float2(0.5, 0.5);
				float r2 = h.x * h.x + h.y * h.y;
				float f = 1.0 + r2 * (_distortion + _cubicDistortion * sqrt(r2));

				return f * _scale * h + 0.5;
			}
从v2f_img i中获取图像的颜色和uv值
通过上面的barrelDistortion()函数获得扭曲的uv
刮痕的uv
对刮痕的uv进行变换,使之随时间移动
lum 求图像的饱和度
最终颜色初定义 = 饱和度+所定义颜色(浮动的明暗度(线性插值))
求颜色的对比度次方
不同的层合在一起构成屏幕最终特效
先与老电影式基本贴图做插值混合
然后与刮痕混合,与白色的插值来制造刮痕的闪烁效果
与灰尘相乘混合,与白色的插值来制造灰尘的闪烁效果
最后与图像的本来面貌做插值
得到最终颜色
	fixed4 frag(v2f_img i) : COLOR
			{
//Get the colors from the RenderTexture and the uv's
				//from the v2f_img struct
				half2 distortedUV = barrelDistortion(i.uv);
				distortedUV = half2(i.uv.x, i.uv.y + (_RandomValue * _SinTime.z * 0.005));
				fixed4 renderTex = tex2D(_MainTex, i.uv);

				//Get the pixels from the Vignette Texture
				fixed4 vignetteTex = tex2D(_VignetteTex, i.uv);

				//Process the Scratches UV and pixels
				half2 scratchesUV = half2(i.uv.x + (_RandomValue * _SinTime.z * _ScratchesXSpeed),
										 i.uv.y + (_Time.x * _ScratchesYSpeed));
				fixed4 scratchesTex = tex2D(_ScratchesTex, scratchesUV);

				//Process the Dust UV and pixels
				half2 dustUV = half2(i.uv.x + (_RandomValue * (_SinTime.z * _dustXSpeed)),
									i.uv.y + (_RandomValue * (_SinTime.z * _dustYSpeed)));
				fixed4 dustTex = tex2D(_DustTex, dustUV);

				// get the luminosity values from the render texture using the YIQ values.
				fixed lum = dot (fixed3(0.299, 0.587, 0.114), renderTex.rgb);


				//Add the constant color to the lum values
				fixed4 finalColor = lum + lerp(_SepiaColor, _SepiaColor +
											    fixed4(0.1f,0.1f,0.1f,1.0f), _RandomValue);
				finalColor = pow(finalColor, _Contrast);

				//Create a constant white color we can use to adjust opacity of effects
				fixed3 constantWhite = fixed3(1,1,1);

				//Composite together the different layers to create finsl Screen Effect
				finalColor = lerp(finalColor, finalColor * vignetteTex, _VignetteAmount);
				finalColor.rgb *= lerp(scratchesTex, constantWhite, (_RandomValue));
				finalColor.rgb *= lerp(dustTex.rgb, constantWhite, (_RandomValue * _SinTime.z));
				finalColor = lerp(renderTex, finalColor, _EffectAmount);

				return finalColor;
			}
代码如下
using UnityEngine;
using System.Collections;

public class ShaderTest : MonoBehaviour
{
    #region Variables
    public Shader oldFilmShader;

    public float OldFilmEffectAmount = 1.0f;

    public Color sepiaColor = Color.white;
    public Texture2D vigentteTexture;
    public float vigentteAmount = 1.0f;

    public Texture2D scratchesTexture;
    public float scratchesYspeed = 10.0f;
    public float scratchesXspeed = 10.0f;

    public Texture2D dustTexture;
    public float dustYSpeed = 10.0f;
    public float dustXSpeed = 10.0f;

    private Material curMaterial;
    private float randomValue;
    #endregion

    #region Properties
    public Material material
    {
        get
        {
            if (curMaterial == null)
            {
                curMaterial = new Material(oldFilmShader);
                curMaterial.hideFlags = HideFlags.HideAndDontSave;
            }
            return curMaterial;
        }
    }
    #endregion
    void OnRenderImage(RenderTexture sourceTex, RenderTexture destTex)
    {
        if (oldFilmShader != null)
        {
            material.SetColor("_SepiaColor", sepiaColor);
            material.SetFloat("_VigentteAmount", vigentteAmount);
            material.SetFloat("_OldFilmEffectAmount", OldFilmEffectAmount);
            if (vigentteTexture)
            {
                material.SetTexture("_VigentteTex", vigentteTexture);

            }
            if (scratchesTexture)
            {
                material.SetTexture("_ScratchesTex", scratchesTexture);
                material.SetFloat("_ScratchesYSpeed", scratchesYspeed);
                material.SetFloat("_ScratchesXSpeed", scratchesXspeed);
            }
            if (dustTexture)
            {
                material.SetTexture("_DustTex", dustTexture);
                material.SetFloat("_DustXSpeed", dustXSpeed);
                material.SetFloat("_DustYSpeed", dustYSpeed);
                material.SetFloat("_RandomValue", randomValue);

            }
            Graphics.Blit(sourceTex, destTex, material);
        }
        else
        {
            Graphics.Blit(sourceTex, destTex);
        }
    }


    // Use this for initialization
    void Start()
    {
        if (SystemInfo.supportsImageEffects == false)
        {
            enabled = false;
            return;
        }

        if (oldFilmShader != null && oldFilmShader.isSupported == false)
        {
            enabled = false;
        }
    }

    // Update is called once per frame
    void Update()
    {
        vigentteAmount = Mathf.Clamp01(vigentteAmount);
        OldFilmEffectAmount = Mathf.Clamp(OldFilmEffectAmount, 0f, 1.5f);
        randomValue = Random.Range(-1f, 1f);
    }
}
shader:
Shader "Custom/TestShader" {
	Properties
	{
		_MainTex ("Base(RGB)", 2D) = "white" {}
		_VignetteTex ("VignetteTexture", 2D) = "white"{}
		_ScratchesTex ("ScartchesTexture", 2D) = "white"{}
		_DustTex ("DustTexture", 2D) = "white"{}
		_SepiaColor ("SepiaColor", Color) = (1,1,1,1)
		_EffectAmount ("OldFilmEffectAmount", Range(0,1)) = 1.0
		_VignetteAmount ("Vignette Opacity", Range(0,1)) = 1.0
		_ScratchesYSpeed ("ScratchesYSpeed", Float) = 10.0
		_ScratchesXSpeed ("ScratchesXSpeed", Float) = 10.0
		_dustXSpeed ("DustXSpeed", Float) = 10.0
		_dustYSpeed ("DustYSpeed", Float) = 10.0
		_RandomValue ("RandomValue", Float) = 1.0
		_Contrast ("Contrast", Float) = 3.0

		_distortion ("Distortion", Float) = 0.2
		_cubicDistortion ("CubicDistortion", Float) = 0.6
		_scale ("Scale(Zoom)", Float) = 0.8
	}

	SubShader
	{
		Pass
		{
			CGPROGRAM
			#pragma vertex vert_img
			#pragma fragment frag
			#pragma fragmentoption ARB_precision_hint_fastest
			#include "UnityCG.cginc"
uniform sampler2D _MainTex;
			uniform sampler2D _VignetteTex;
			uniform sampler2D _ScratchesTex;
			uniform sampler2D _DustTex;
			fixed4 _SepiaColor;
			fixed _VignetteAmount;
			fixed _ScratchesYSpeed;
			fixed _ScratchesXSpeed;
			fixed _dustXSpeed;
			fixed _dustYSpeed;
			fixed _EffectAmount;
			fixed _RandomValue;
			fixed _Contrast;

			float _distortion;
			float _cubicDistortion;
			float _scale;


			float2 barrelDistortion(float2 coord)
			{
				// Inspired by SynthEyes lens distortion algorithm
				// See http://www.ssontech.com/content/lensalg.htm

				float2 h = coord.xy - float2(0.5, 0.5);
				float r2 = h.x * h.x + h.y * h.y;
				float f = 1.0 + r2 * (_distortion + _cubicDistortion * sqrt(r2));

				return f * _scale * h + 0.5;
			}
			fixed4 frag(v2f_img i) : COLOR
			{
//Get the colors from the RenderTexture and the uv's
				//from the v2f_img struct
				half2 distortedUV = barrelDistortion(i.uv);
				distortedUV = half2(i.uv.x, i.uv.y + (_RandomValue * _SinTime.z * 0.005));
				fixed4 renderTex = tex2D(_MainTex, i.uv);

				//Get the pixels from the Vignette Texture
				fixed4 vignetteTex = tex2D(_VignetteTex, i.uv);

				//Process the Scratches UV and pixels
				half2 scratchesUV = half2(i.uv.x + (_RandomValue * _SinTime.z * _ScratchesXSpeed),
										 i.uv.y + (_Time.x * _ScratchesYSpeed));
				fixed4 scratchesTex = tex2D(_ScratchesTex, scratchesUV);

				//Process the Dust UV and pixels
				half2 dustUV = half2(i.uv.x + (_RandomValue * (_SinTime.z * _dustXSpeed)),
									i.uv.y + (_RandomValue * (_SinTime.z * _dustYSpeed)));
				fixed4 dustTex = tex2D(_DustTex, dustUV);

				// get the luminosity values from the render texture using the YIQ values.
				fixed lum = dot (fixed3(0.299, 0.587, 0.114), renderTex.rgb);


				//Add the constant color to the lum values
				fixed4 finalColor = lum + lerp(_SepiaColor, _SepiaColor +
											    fixed4(0.1f,0.1f,0.1f,1.0f), _RandomValue);
				finalColor = pow(finalColor, _Contrast);

				//Create a constant white color we can use to adjust opacity of effects
				fixed3 constantWhite = fixed3(1,1,1);

				//Composite together the different layers to create finsl Screen Effect
				finalColor = lerp(finalColor, finalColor * vignetteTex, _VignetteAmount);
				finalColor.rgb *= lerp(scratchesTex, constantWhite, (_RandomValue));
				finalColor.rgb *= lerp(dustTex.rgb, constantWhite, (_RandomValue * _SinTime.z));
				finalColor = lerp(renderTex, finalColor, _EffectAmount);

				return finalColor;
			}

			ENDCG
		}
	}
	FallBack off
}
图片资源:

vigentteTexture

scratchesTexture

<span style="font-size:14px;color:#FF6600;">dustTexture</span>
--------by wolf96
最后
以上就是温柔电源最近收集整理的关于unity3d 老电影式的屏幕特效的全部内容,更多相关unity3d内容请搜索靠谱客的其他文章。


发表评论 取消回复