在上一节里面,从零开始学习React-axios获取服务器API接口(五)
https://www.jianshu.com/p/81ca5cc94923。我们请求的api是一个天气的api,这一节是如何获取数据,进行解析,并且渲染到前端。
步骤
1:打印json数据,查看数据格式
为了方便查看,我把json数据放在了编辑器里面,对这个json进行解析。
{
    "code": 200,
    "msg": "成功!",
    "data": {
        "yesterday": {
            "date": "5日星期二",
            "high": "高温 21℃",
            "fx": "北风",
            "low": "低温 14℃",
            "fl": "u003c![CDATA[u003c3级]]u003e",
            "type": "晴"
        },
        "city": "上海",
        "aqi": null,
        "forecast": [
            {
                "date": "6日星期三",
                "high": "高温 20℃",
                "fengli": "u003c![CDATA[u003c3级]]u003e",
                "low": "低温 16℃",
                "fengxiang": "东北风",
                "type": "多云"
            },
            {
                "date": "7日星期四",
                "high": "高温 19℃",
                "fengli": "u003c![CDATA[3-4级]]u003e",
                "low": "低温 14℃",
                "fengxiang": "东北风",
                "type": "多云"
            },
            {
                "date": "8日星期五",
                "high": "高温 19℃",
                "fengli": "u003c![CDATA[3-4级]]u003e",
                "low": "低温 12℃",
                "fengxiang": "北风",
                "type": "多云"
            },
            {
                "date": "9日星期六",
                "high": "高温 19℃",
                "fengli": "u003c![CDATA[u003c3级]]u003e",
                "low": "低温 13℃",
                "fengxiang": "东北风",
                "type": "晴"
            },
            {
                "date": "10日星期天",
                "high": "高温 22℃",
                "fengli": "u003c![CDATA[3-4级]]u003e",
                "low": "低温 13℃",
                "fengxiang": "西风",
                "type": "多云"
            }
        ],
        "ganmao": "天气较凉,较易发生感冒,请适当增加衣服。体质较弱的朋友尤其应该注意防护。",
        "wendu": "19"
    }
}
现在我们的目的是要取到"forecast"这个数组里面的所有日期date,并且循环遍历,渲染在页面。
上一节已经成功请求,在打印的时候,(这里我分别打印一下response,response.data.data.yesterday,response.data.data.forecast,对比一下)先查看一下json的格式。
console.log(response);

console.log(response.data.data.yesterday);

console.log(response.data.data.forecast);

2:空数组接收数据
在this.state里面写一个list:[]空数接收数据。
list:[]
3:赋值
数据接收成功之后,也能在控制台打印了,这个时候需要对数据进行处理赋值,把打印的数据赋值给list。
//用到this需要注意指向,箭头函数
    this.setState({
    list:response.data.data.forecast
    })
因为会用到this需要注意指向,所以把axios成功接收数据的函数改成箭头函数。
.then((response) =>{
    console.log(response);
    console.log(response.data.data.forecast);
    //用到this需要注意指向,箭头函数
    this.setState({
    list:response.data.data.forecast
    })
  })
4:渲染在视图层
用map方法对数组进行循环,并且在标签里面进行渲染。
<ul>
    {/* 对数组进行循环 */}
    {
        this.state.list.map((value,key)=>{
          return<li  key={key}>{value.date}</li>
        })
    }
</ul>
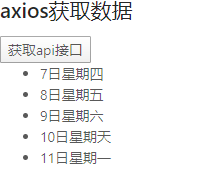
效果:点击按钮请求的时候,会将接口数据里面的内容渲染在界面。

参考代码
import React  from 'react';
import axios from 'axios'
class Axios extends React.Component {
    //构造函数
    constructor() {
        super();
        //react定义数据
        this.state = {
        list:[]
        }
    }
    //请求接口的方法
    getData=()=>{
    var  api='https://www.apiopen.top/weatherApi?city=%E4%B8%8A%E6%B5%B7';

   axios.get(api)
  .then((response) =>{
    //console.log(response);
    console.log(response.data.data.yesterday);
    //用到this需要注意指向,箭头函数
    this.setState({
    list:response.data.data.forecast
    })
  })
  .catch(function (error) {
    // handle error
    console.log(error);
  });
    }
    render() {
        return (
        <div>
        <h2>axios获取数据</h2>
        <button onClick={this.getData}>获取api接口</button>
<ul>
    {/* 对数组进行循环 */}
    {
        this.state.list.map((value,key)=>{
          return<li  key={key}>{value.date}</li>
        })
    }
</ul>
        </div>
        )
    }
}
export default Axios;
最后
以上就是大意故事最近收集整理的关于从零开始学习React-解析json、渲染数据(六)的全部内容,更多相关从零开始学习React-解析json、渲染数据(六)内容请搜索靠谱客的其他文章。
本图文内容来源于网友提供,作为学习参考使用,或来自网络收集整理,版权属于原作者所有。


发表评论 取消回复