转载自:https://mp.weixin.qq.com/s/U4gY7l-YV3sp8-thJrIlUg
在ros环境下的RealsenceT265标定以及Vins mono运行
原创 lovely_yoshino 古月居 今天
相机标定
对于t265而言,虽然官方提供了标定的出厂内参rs-enumerate-devices -c可以获得,但是我们在vins和orbslam中仍然有可能需要自己标定数据,这里给出教程。
首先我们要明确适用的模型,一般普通相机小孔模型即可,而鱼眼镜头则是适用KB4(Kannala-Brandt Camera Model)或者Mei模型。
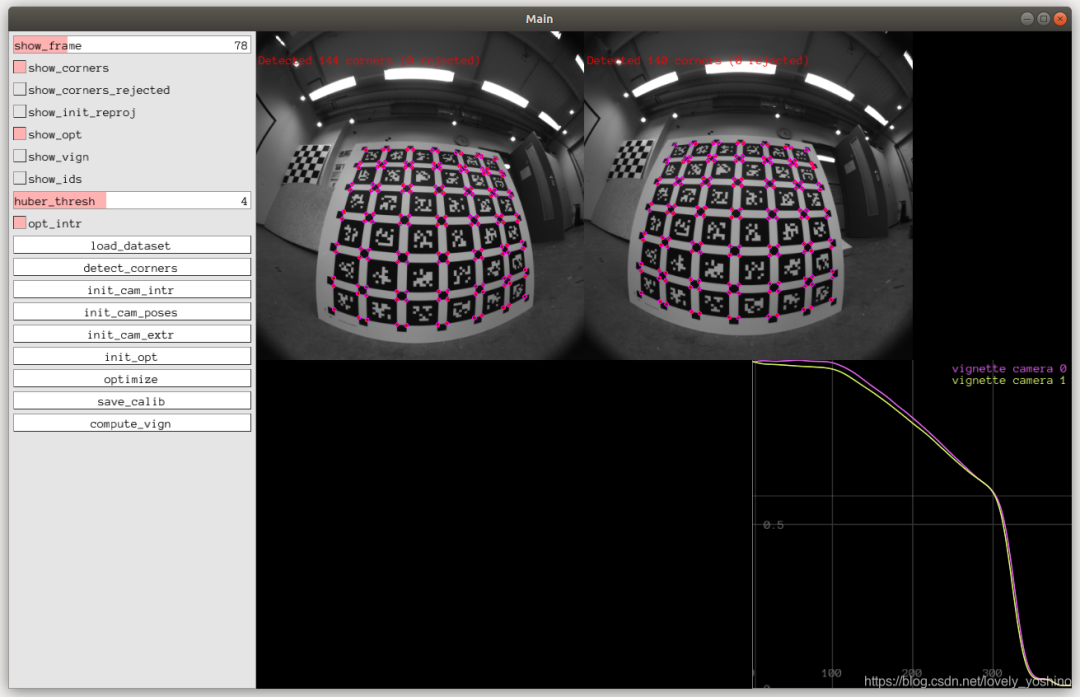
目前可以用kalibr或者vins-fusion里面的camera-calibration 也可以用basalt。首先我们需要明确basalt必须使用AprilTag,而kalibr则是可以使用AprilTag、Checkerboard、Crilegrid这三种标定板。
下面我们将从kalibr 和 basalt来实现标定操作。
kalibr
首先安装依赖库:
sudo apt-get install python-setuptoolssudo apt-get install python-setuptools python-rosinstall ipython libeigen3-dev libboost-all-dev doxygensudo apt-get install ros-kinetic-vision-opencv ros-kinetic-image-transport-plugins ros-kinetic-cmake-modules python-software-properties software-properties-common libpoco-dev python-matplotlib python-scipy python-git python-pip ipython libtbb-dev libblas-dev liblapack-dev python-catkin-tools libv4l-dev
接下来安装kalibr:
cd ~/catkin_ws/srcgit clone https://github.com/ethz-asl/Kalibr.gitcd ..catkin_makesource ~/catkin_ws/devel/setup.bash
在看其他博客时发现可能会出现python相关的问题,我用的是ubuntu16.04自带的Python 2.7.12版本,在安装过程中没有出现问题。
下载官方给的april_6x6_80x80cm_A0.pdf或者其它标定文件。打印或者在屏幕显示,测量实际的尺寸后,在你之前新建的文件夹中新建apriltags.yaml,我的文件内容如下:
(*https://github.com/MegviiRobot/CamLaserCalibraTool/blob/master/doc/april_6x6_80x80cm_A0.pdf)
target_type: 'aprilgrid' #gridtypetagCols: 6 #number of apriltagstagRows: 6 #number of apriltagstagSize: 0.16 #size of apriltag, edge to edge [m]tagSpacing: 0.3125 #ratio of space between tags to tagSize#example: tagSize=2m, spacing=0.5m --> tagSpacing=0.25[-]
之后,在你新建的文件夹中打开终端,开启realsenseT265:
roslaunch realsense2_camera rs_t265.launch修改话题发布频率:
rosrun topic_tools throttle messages /camera/fisheye2/image_raw 10.0 /fisheye2rosrun topic_tools throttle messages /camera/fisheye1/image_raw 10.0 /fisheye1
录制文件,注意录制过程中要缓慢移动相机,使其能看到完整清晰的标定文件(可以先在录制前打开rviz,调用image的话题进行观察,判断移动的位置):
rosbag record -O cameras_calibration /fisheye1 /fisheye2在录制好后使用下面的指令输出:
kalibr_calibrate_cameras --target ~/cal/apriltags.yaml --bag ~/cal/cameras_calibration.bag --models omni-radtan omni-radtan --topics /fisheye1 /fisheye2basalt_calibrate --dataset-path ~/cal/cameras_calibration.bag --dataset-type bag --aprilgrid ~/cal/apriltags.json --result-path ~/cal/ --cam-types ds ds ds ds
此外可以参考这两篇文章。(*https://blog.csdn.net/lemonxiaoxiao/article/details/109369181)
(*https://blog.csdn.net/HUST_lc/article/details/96144499)
IMU标定,以及联合
(*https://blog.csdn.net/weixin_44631150/article/details/104495156)
basalt
首先我们将会创建一个名为apriltags.json
{"target_type": "checkerboard","tagCols": 11,"tagRows": 8,"tagSize": 0.03,"tagSpacing": 0.3}
之后,在你新建的文件夹中打开终端,开启realsenseT265:
roslaunch realsense2_camera rs_t265.launch修改话题发布频率:
rosrun topic_tools throttle messages /camera/fisheye2/image_raw 10.0 /fisheye2rosrun topic_tools throttle messages /camera/fisheye1/image_raw 10.0 /fisheye1
录制文件,注意录制过程中要缓慢移动相机,使其能看到完整清晰的标定文件(可以先在录制前打开rviz,调用image的话题进行观察,判断移动的位置):
rosbag record -O cameras_calibration /fisheye1 /fisheye2在录制好后使用下面的指令输出(ds代表摄像头,有几个摄像头就有几个ds,ds是使用的模型,如果使用的是kb模型,则在后面填写kb4):
basalt_calibrate --dataset-path ~/cal/cameras_calibration.bag --dataset-type bag --aprilgrid ~/cal/apriltags.json --result-path ~/cal/ --cam-types ds dsorbasalt_calibrate --dataset-path ~/cal/cameras_calibration.bag --dataset-type bag --aprilgrid ~/cal/apriltags.json --result-path ~/cal/t265 --cam-types kb4 kb4
然后即可标定。
陪你去看流星雨
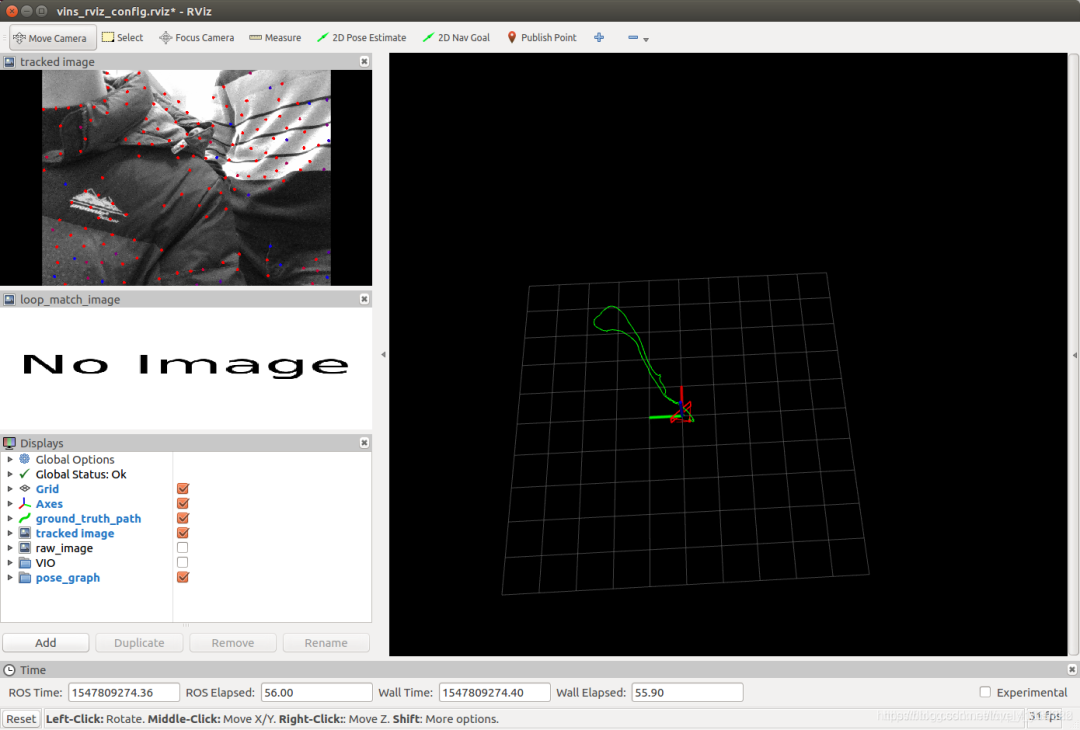
目前网上的教程对T265的信息较少,而对于vins mono的使用则更少,为此我们针对vins mono来进行阐述。
首先,我们需要先安装好VINS-Mono并且在数据集上正常工作。(*https://github.com/HKUST-Aerial-Robotics/VINS-Mono)
在VINS-Fusion/config/realsence文件夹中,修改realsense_fisheye_config.yaml文件至如下:(具体修改可以参照文章)
(*https://blog.csdn.net/qq_41839222/article/details/86552367)
%YAML:1.0#common parametersimu_topic: "/camera/imu"image_topic: "/camera/fisheye1/image_raw"output_path: "~/output/"#camera calibrationmodel_type: KANNALA_BRANDTcamera_name: cameraimage_width: 848image_height: 800projection_parameters:k2: -0.00484799k3: 0.0389167k4: -0.0367587k5: 0.00608432u0: 423.719v0: 404.247mu: 286.896mv: 286.717# Extrinsic parameter between IMU and Camera.estimate_extrinsic: 0 # 0 Have an accurate extrinsic parameters. We will trust the following imu^R_cam, imu^T_cam, don't change it.# 1 Have an initial guess about extrinsic parameters. We will optimize around your initial guess.# 2 Don't know anything about extrinsic parameters. You don't need to give R,T. We will try to calibrate it. Do some rotation movement at beginning.#If you choose 0 or 1, you should write down the following matrix.#Rotation from camera frame to imu frame, imu^R_camextrinsicRotation: !!opencv-matrixrows: 3cols: 3dt: ddata: [ -0.999891, -0.0104525, 0.0104421,0.0104582, -0.999945, 0.000490038,0.0104365, 0.000599191, 0.999945]#Translation from camera frame to imu frame, imu^T_camextrinsicTranslation: !!opencv-matrixrows: 3cols: 1dt: ddata: [0.0106988288462162, -0.000111902991193347, -0.000111670000478625]#feature traker paprametersmax_cnt: 150 # max feature number in feature trackingmin_dist: 30 # min distance between two featuresfreq: 10 # frequence (Hz) of publish tracking result. At least 10Hz for good estimation. If set 0, the frequence will be same as raw imageF_threshold: 1.0 # ransac threshold (pixel)show_track: 1 # publish tracking image as topicequalize: 0 # if image is too dark or light, trun on equalize to find enough featuresfisheye: 0 # if using fisheye, trun on it. A circle mask will be loaded to remove edge noisy points#optimization parametersmax_solver_time: 0.04 # max solver itration time (ms), to guarantee real timemax_num_iterations: 12 # max solver itrations, to guarantee real timekeyframe_parallax: 10.0 # keyframe selection threshold (pixel)#imu parameters The more accurate parameters you provide, the better performanceacc_n: 0.2 # accelerometer measurement noise standard deviation. #0.2 0.04gyr_n: 0.05 # gyroscope measurement noise standard deviation. #0.05 0.004acc_w: 0.00004 # accelerometer bias random work noise standard deviation. #0.02gyr_w: 4.0e-5 # gyroscope bias random work noise standard deviation. #4.0e-5g_norm: 9.805 # gravity magnitude#loop closure parametersloop_closure: 1 # start loop closurefast_relocalization: 1 # useful in real-time and large projectload_previous_pose_graph: 0 # load and reuse previous pose graph; load from 'pose_graph_save_path'pose_graph_save_path: "~/output/pose_graph/" # save and load path#unsynchronization parametersestimate_td: 0 # online estimate time offset between camera and imutd: 0.000 # initial value of time offset. unit: s. readed image clock + td = real image clock (IMU clock)#rolling shutter parametersrolling_shutter: 0 # 0: global shutter camera, 1: rolling shutter camerarolling_shutter_tr: 0 # unit: s. rolling shutter read out time per frame (from data sheet).#visualization parameterssave_image: 1 # save image in pose graph for visualization prupose; you can close this function by setting 0visualize_imu_forward: 0 # output imu forward propogation to achieve low latency and high frequence resultsvisualize_camera_size: 0.4 # size of camera marker in RVIZ
之后打开终端,运行:
roslaunch realsense2_camera rs_t265.launchroslaunch vins_estimator realsense_fisheye.launchroslaunch vins_estimator vins_rviz.launch
最后
以上就是可爱发夹最近收集整理的关于在ros环境下的RealsenceT265标定以及Vins mono运行的全部内容,更多相关在ros环境下的RealsenceT265标定以及Vins内容请搜索靠谱客的其他文章。


发表评论 取消回复