关于php的开发工具很多,目前市面上最好用最强大的莫过于PhpStorm这款开发神器了,但是鉴于很多开发者朋友在网站上下载的PhpStorm开发工具不能用,或者使用起来很不方便,笔者把最好用的下载地址及免费激活教程共享出来。
一、安装并配置PHP服务器套件XAMPP集成环境,点击链接查看
二、下载安装并破解PhpStorm
点击这里下载 PhpStorm-2017.3.4.exe 的Windows版本。提取密码: myye。
下载完成后,直接进行安装,安装过程很简单。
2. 注册免费激活
首先,需要修改本地的hosts文件(路径一般为C:WindowsSystem32driversetchosts),添加下面这行代码。
0.0.0.0 account.jetbrains.com
保存即可。目的是为了避免PhpStorm联网注册时失败。
其次,直接用浏览器打开 http://idea.lanyus.com/ ,点击页面中的 获得注册码 ,拷贝激活码。
最后,运行PhpStorm-2017.3,在激活界面,切换至Activation Code选项,粘贴刚刚拷贝的激活码,点击激活即可。
3.配置PhpStorm
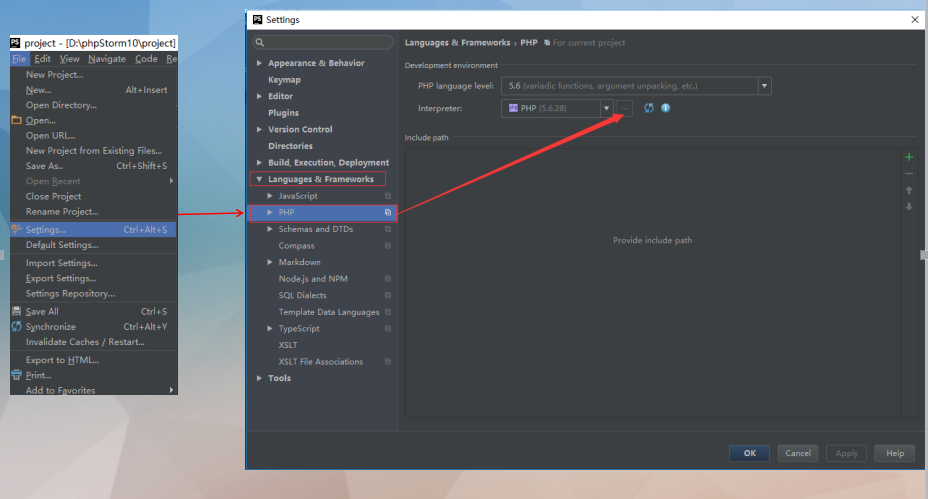
3.1.Setting中配置Interpreter

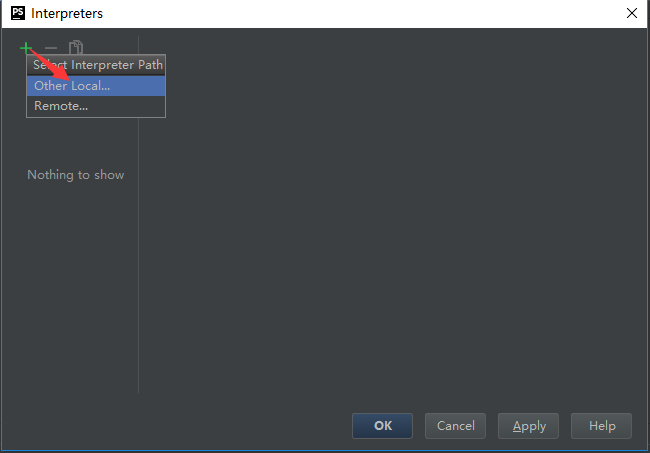
3.2.添加本地Interpreter Path

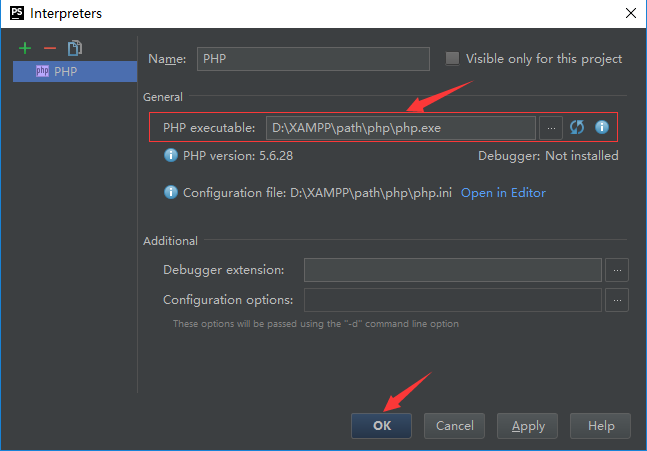
3.3.选择PHP解释器(php.exe)的安装目录
这个安装目录在XAMPP的安装目录下的phpphp.exe这里。

点击OK配置完毕。
4.测试一下
4.1.新建一个calendar.class.php日历类
<?php
class Calendar {
    private $year; //当前的年
    private $month; //当前的月
    private $start_weekday; //当月的第一天对应的是周几
    private $days; //当前月一共多少天
    function __construct(){
        $this->year=isset($_GET["year"]) ? $_GET["year"] : date("Y");
        $this->month=isset($_GET["month"]) ? $_GET["month"] : date("m");

        $this->start_weekday=date("w", mktime(0, 0, 0, $this->month, 1, $this->year));
        $this->days=date("t", mktime(0, 0, 0, $this->month, 1, $this->year));
    }
    function out(){
        echo '<table align="center">';
        $this->chageDate("test.php");
        $this->weeksList();
        $this->daysList();
        echo '</table>';
    }
    private function weeksList(){
        $week=array('日','一','二','三','四','五','六');
        echo '<tr>';
        for($i=0; $i<count($week); $i++)
            echo '<th class="fontb">'.$week[$i].'</th>';
        echo '</tr>';
    }
    private function daysList(){
        echo '<tr>';
        //输出空格(当前一月第一天前面要空出来)
        for($j=0; $j<$this->start_weekday; $j++)
            echo '<td> </td>';

        for($k=1; $k<=$this->days; $k++){
            $j++;
            if($k==date('d'))
                echo '<td class="fontb">'.$k.'</td>';
            else
                echo '<td>'.$k.'</td>';
            if($j%7==0)
                echo '</tr><tr>';

        }
        //后面几个空格
        while($j%7!==0){
            echo '<td> </td>';
            $j++;
        }
        echo '</tr>';
    }
    private function prevYear($year, $month){
        $year=$year-1;

        if($year < 1970)
            $year = 1970;
        return "year={$year}&month={$month}";
    }

    private function prevMonth($year, $month){
        if($month == 1) {
            $year = $year -1;

            if($year < 1970)
                $year = 1970;
            $month=12;
        }else{
            $month--;
        }
        return "year={$year}&month={$month}";
    }

    private function nextYear($year, $month){
        $year = $year + 1;
        if($year > 2038)
            $year = 2038;
        return "year={$year}&month={$month}";
    }

    private function nextMonth($year, $month){
        if($month==12){
            $year++;
            if($year > 2100)
                $year=2100;
            $month=1;
        }else{
            $month++;
        }

        return "year={$year}&month={$month}";
    }
    private function chageDate($url=""){
        echo '<tr>';
        echo '<td><a href="?'.$this->prevYear($this->year, $this->month).'">'.'<<'.'</a></td>';
        echo '<td><a href="?'.$this->prevMonth($this->year, $this->month).'">'.'<'.'</a></td>';
        echo '<td colspan="3">';
        echo '<form>';
        echo '<select name="year" onchange="window.location=''.$url.'?year='+this.options[selectedIndex].value+'&month='.$this->month.''">';
        for($sy=1970; $sy <= 2100; $sy++){
            $selected = ($sy==$this->year) ? "selected" : "";
            echo '<option '.$selected.' value="'.$sy.'">'.$sy.'</option>';
        }
        echo '</select>';
        echo '<select name="month"  onchange="window.location=''.$url.'?year='.$this->year.'&month='+this.options[selectedIndex].value">';
        for($sm=1; $sm<=12; $sm++){
            $selected1 = ($sm==$this->month) ? "selected" : "";
            echo '<option '.$selected1.' value="'.$sm.'">'.$sm.'</option>';
        }
        echo '</select>';
        echo '</form>';
        echo '</td>';

        echo '<td><a href="?'.$this->nextYear($this->year, $this->month).'">'.'>>'.'</a></td>';
        echo '<td><a href="?'.$this->nextMonth($this->year, $this->month).'">'.'>'.'</a></td>';
        echo '</tr>';
    }
}
?>
4.2.新建一个test.php测试类
<style>
    table {
        border:1px solid #050;
    }
    .fontb {
        color:white;
        background:blue;
    }

    th {
        width:30px;
    }
    td,th {
        height:30px;
        text-align:center;

    }
    form {
        margin:0px;
        padding:0px;
    }
</style>
<?php
include "calendar.class.php";
$calendar=new Calendar;
$calendar->out();
?>
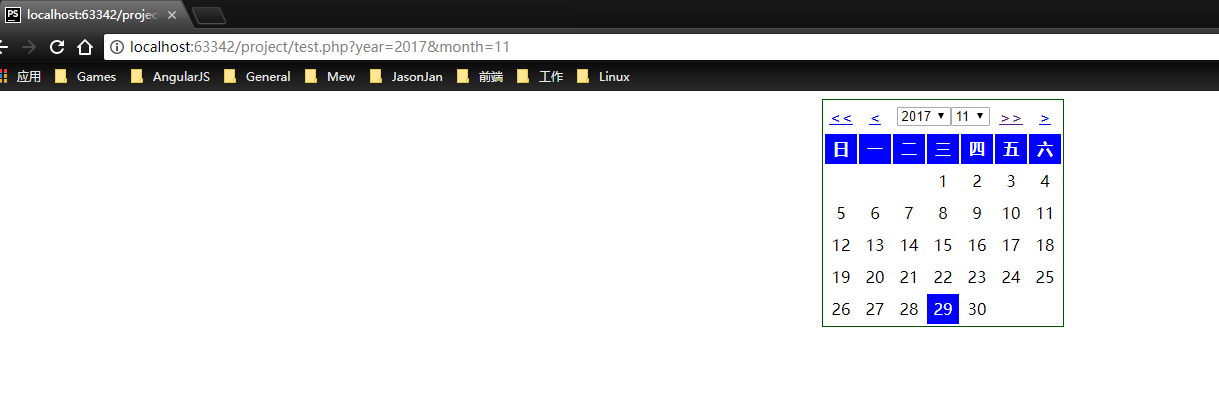
4.3.点击右上角的浏览器

有问题的联系笔者电话微信18629374628,欢迎交流
最后
以上就是仁爱火车最近收集整理的关于PHP开发搭建环境,PhpStorm安装、免费激活配置,XAMPP安装配置的全部内容,更多相关PHP开发搭建环境内容请搜索靠谱客的其他文章。
本图文内容来源于网友提供,作为学习参考使用,或来自网络收集整理,版权属于原作者所有。


发表评论 取消回复