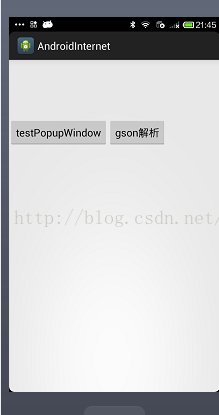
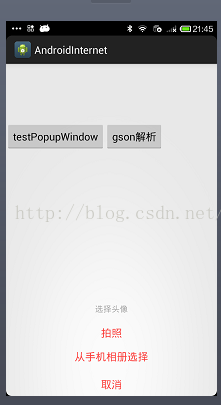
Android的弹窗效果有很多种,就最简单而言,就可以调用一个AlertDialog弹窗显示,可是要自定义弹窗效果有以下这种方法,就我个人而言感觉挺方便的,适用性也挺广的。
首先先简单写个AlertDialog的使用
public void showDialog(){
			AlertDialog dialog = new AlertDialog.Builder(this)
			.setTitle("提示")
			.setMessage(getResources().getString("你确定退出吗?")
			.setPositiveButton("取消", new OnClickListener() {

				@Override
				public void onClick(DialogInterface dialog, int which) {
					dialog.dismiss();
				}
			}).setNegativeButton("确定", new OnClickListener() {

				@Override
				public void onClick(DialogInterface dialog, int which) {
					// TODO Auto-generated method stub

				}
			}).create();
			dialog.show();
		}

	}
接下来就是自定义弹窗效果图:


下面是示例代码:
<?xml version="1.0" encoding="utf-8"?>
<RelativeLayout xmlns:android="http://schemas.android.com/apk/res/android"
    android:layout_width="match_parent"
    android:layout_height="wrap_content"
    android:orientation="vertical"
     >
    <LinearLayout android:layout_width="match_parent"
        android:layout_height="wrap_content"
        android:gravity="center_horizontal"
        android:orientation="vertical"
        android:layout_alignParentBottom="true"
        android:id="@+id/top"
        >
        <TextView android:layout_width="match_parent"
            android:layout_height="40.5dip"
            android:text="@string/select_head"
            android:layout_marginLeft="7.2dip"
            android:layout_marginRight="7.2dip"
            android:gravity="center"
            android:textColor="#aaaaaa"
            />

        <Button
            android:id="@+id/takephoto"
            android:layout_width="match_parent"
            android:layout_height="40.5dip"
            android:layout_marginLeft="7.2dip"
            android:layout_marginRight="7.2dip"
            android:text="@string/takephoto"
            android:background="@null"
            android:textColor="#fc4643"
             />
        <Button
            android:id="@+id/selectfromalbum"
            android:layout_width="match_parent"
            android:layout_height="40.5dip"
            android:layout_marginLeft="7.2dip"
            android:layout_marginRight="7.2dip"
            android:text="@string/takefromalbum"
            android:background="@null"
            android:textColor="#fc4643"
             />
        <Button
            android:id="@+id/cancel"
            android:layout_width="match_parent"
            android:layout_height="40.5dip"
            android:layout_marginLeft="7.2dip"
            android:layout_marginRight="7.2dip"
            android:layout_marginTop="7.2dip"
            android:text="@string/cancel"
            android:background="@null"
            android:textColor="#fc4643"
             />
    </LinearLayout>
</RelativeLayout>
public class SelectPopupWindow extends PopupWindow {
	Button takePhoto;
	Button selectFromAlbum;
	Button cancel;
	View menuView;
	public SelectPopupWindow(Context ctx, OnClickListener onClickListener) {
		LayoutInflater inflater = (LayoutInflater) ctx.getSystemService(Context.LAYOUT_INFLATER_SERVICE);
		menuView = inflater.inflate(R.layout.modify_head, null); //可以采用各种样式,自定义view
		takePhoto = (Button) menuView.findViewById(R.id.takephoto);
		takePhoto.setOnClickListener(onClickListener);
		selectFromAlbum = (Button) menuView.findViewById(R.id.selectfromalbum);
		selectFromAlbum.setOnClickListener(onClickListener);
		cancel = (Button) menuView.findViewById(R.id.cancel);
		cancel.setOnClickListener(new OnClickListener() {

			@Override
			public void onClick(View v) {
				// TODO Auto-generated method stub
				dismiss();
			}
		});

		setContentView(menuView);
		setWidth(LayoutParams.MATCH_PARENT);
		setHeight(LayoutParams.WRAP_CONTENT);
		setFocusable(true);   //弹出窗体后可点击

		//setAnimationStyle(R.style.AnimBottom);   //设置动画
		menuView.setOnTouchListener(new OnTouchListener() {

			@Override
			public boolean onTouch(View v, MotionEvent event) {
				int height = menuView.findViewById(R.id.top).getTop();
				Log.e("huang", " top height:"+height+" y:"+event.getY());
				int y = (int) event.getY();
				if(y<height){
					dismiss();
				}
				return true;
			}
		});
	}
}
public class TestPopupWindow extends Activity {
	private SelectPopupWindow popupWindow;
	private ImageView image;
	private Button btn, btn1;
	private Uri fileUri;


	@Override
	protected void onCreate(Bundle savedInstanceState) {
		// TODO Auto-generated method stub
		super.onCreate(savedInstanceState);
		setContentView(R.layout.activity_main1);
		init();
	}

	private void init(){
		image = (ImageView) findViewById(R.id.image);
		btn = (Button) findViewById(R.id.btn);
		btn.setOnClickListener(onClickListener);
		btn1 = (Button) findViewById(R.id.btn1);
		btn1.setOnClickListener(onClickListener);

	}

	View.OnClickListener onClickListener = new View.OnClickListener() {

		@Override
		public void onClick(View v) {
			switch(v.getId()){
			case R.id.btn:
				test();
				break;
			case R.id.btn1:
				startActivity(new Intent(TestPopupWindow.this, TestGsonActivity.class));
				break;
			case R.id.takephoto:
				Intent intent = new Intent(MediaStore.ACTION_IMAGE_CAPTURE);
				intent.putExtra(MediaStore.EXTRA_OUTPUT, fileUri);
				startActivityForResult(intent, 100);
				break;
			case R.id.selectfromalbum:
				Intent intent1 = new Intent(Intent.ACTION_PICK);
				intent1.setDataAndType(MediaStore.Images.Media.EXTERNAL_CONTENT_URI, "image/*");
				startActivityForResult(intent1, 200);
				break;

			}
		}
	};

	public void test(){
		popupWindow = new SelectPopupWindow(this, onClickListener);
		popupWindow.showAtLocation(findViewById(R.id.main),
				Gravity.BOTTOM|Gravity.CENTER_HORIZONTAL, 0, 0);
	}
最后
以上就是炙热牛排最近收集整理的关于Android自定义弹窗效果的全部内容,更多相关Android自定义弹窗效果内容请搜索靠谱客的其他文章。
本图文内容来源于网友提供,作为学习参考使用,或来自网络收集整理,版权属于原作者所有。


![[Android] Android零碎知识点](https://www.shuijiaxian.com/files_image/reation/bcimg1.png)

发表评论 取消回复