SpringMVC国际化

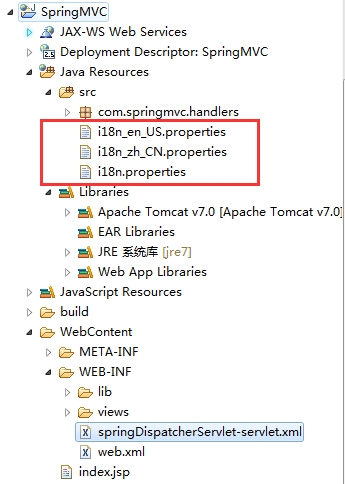
资源文件如图所示。使用fmt标签,提前引入jstl的两个jar包。
i18n.properties内容如下
i18n.username=Username
i18n.password=Password
i18n_zh_CN.properties内容如下
i18n.username=u7528u6237u540d
i18n.password=u5bc6u7801
i18n_en_US.properties内容如下
i18n.username=Username
i18n.password=Password
在Spring的配置文件中需要加入如下配置
 <!-- 资源文件绑定器 -->
<bean id="messageSource" class="org.springframework.context.support.ReloadableResourceBundleMessageSource">
	<property name="basenames">
		<list>
			<!-- 在web环境中一定要定位到classpath 否则默认到当前web应用下找  -->
			<value>classpath:i18n</value>
		</list>
	</property>
	<property name="defaultEncoding" value="UTF-8"/>
	<property name="cacheSeconds" value="60"/>
</bean>
目标页面success.jsp
<%@ taglib uri="http://java.sun.com/jsp/jstl/fmt" prefix="fmt"%>
<!-- 引入jstl库 -->
<fmt:message key="i18n.username"></fmt:message><br/>
<fmt:message key="i18n.password"></fmt:message><br/>
更改浏览器的语言即可显示不同的语言版本。
PS:上述代码放在index.jsp中直接请求无效,需要经过一个spring控制器的转发到达success.jsp页面才有作用。
success.jsp放在WEB-INF下的目录中,不可以直接访问,可以在Spring配置文件中配置不经过handler访问success.jsp
<mvc:view-controller path="/success" view-name="success"/>
<mvc:annotation-driven></mvc:annotation-driven>
<!--如果不加这句,之前的http://localhost:8080/SpringMVC/springmvc/testViewAndViewResolver会出现404-->
http://localhost:8080/SpringMVC/success 即可访问到WEB-INF下的success.jsp页面
自定义视图
新建一个视图类HelloView.java实现View
@Component
public class HelloView implements View{

	@Override
	public String getContentType() {
		return "text/html";
	}

	@Override
	public void render(Map<String, ?> model, HttpServletRequest request,
			HttpServletResponse response) throws Exception {
		response.getWriter().print("Hello view, time:" + new Date());
	}

}
在配置文件中配置BeanNameViewResolver视图解析器,使用视图的名字来解析视图
<!-- 配置BeanNameViewResolver视图解析器,使用视图的名字来解析视图 -->
<bean class="org.springframework.web.servlet.view.BeanNameViewResolver">
	<!-- 通过order来定义视图解析器的优先级,order值越小优先级越高 -->
	<property name="order" value="100"></property>
</bean>
默认视图解析器的order值是integar的MAX_VALUE
转发器handler如下
	@RequestMapping("/testView")
	public String testView() {
		System.out.println("testView");
		return "helloView";
	}
此时请求http://localhost:8080/SpringMVC/springmvc/testView即可转到自定义视图解析器,页面输出如下:
Hello view, time:Wed Jan 14 16:03:19 CST 2015
重定向和转发
	@RequestMapping("/testRedirect")
	public String testRedirect() {
		System.out.println("testRedirect");
		return "redirect:/index.jsp";
	}
此时请求http://localhost:8080/SpringMVC/springmvc/testRedirect 会重定向到index.jsp
地址栏中的地址会变成http://localhost:8080/SpringMVC/index.jsp
	@RequestMapping("/testForward")
	public String testForward() {
		System.out.println("testForward");
		return "forward:/index.jsp";
	}
此时请求http://localhost:8080/SpringMVC/springmvc/testForward会转发到index.jsp
地址栏中的地址还是http://localhost:8080/SpringMVC/springmvc/testForward
Spring整合SpringMVC避免重复初始化bean
web.xml配置如下
	<!-- 配置启动Spring IOC容器的Listner -->
	<context-param>
		<param-name>contextConfigLocation</param-name>
		<param-value>classpath:beans.xml</param-value>
	</context-param>

	<listener>
		<listener-class>org.springframework.web.context.ContextLoaderListener</listener-class>
	</listener>

	<!-- 配置springDispatcherServlet -->
	<servlet>
		<servlet-name>springDispatcherServlet</servlet-name>
		<servlet-class>org.springframework.web.servlet.DispatcherServlet</servlet-class>
		<init-param>
			<param-name>contextConfigLocation</param-name>
			<param-value>classpath:springMVC.xml</param-value>
		</init-param>
		<load-on-startup>1</load-on-startup>
	</servlet>
	<servlet-mapping>
		<servlet-name>springDispatcherServlet</servlet-name>
		<url-pattern>/</url-pattern>
	</servlet-mapping>
在beans.xml中配置不扫描Controller
	<!-- 不扫描Controller,避免重复初始化bean -->
	<context:component-scan base-package="com.sanxia">
		<context:exclude-filter type="annotation" expression="org.springframework.stereotype.Controller"/>
		<context:exclude-filter type="annotation" expression="org.springframework.web.bind.annotation.ControllerAdvice"/>
	</context:component-scan>
在SpringMVC中配置只扫描Controller
	<!-- 只扫描Controller,避免重复初始化bean -->
	<context:component-scan base-package="com.sanxia" use-default-filters="false">
		<context:include-filter type="annotation" expression="org.springframework.stereotype.Controller"/>
		<context:include-filter type="annotation" expression="org.springframework.web.bind.annotation.ControllerAdvice"/>
	</context:component-scan>
这样配置之后,在启动Spring的时候就不会初始化两遍bean
转载于:https://blog.51cto.com/shamrock/1603705
最后
以上就是纯真月亮最近收集整理的关于SpringMVC学习笔记-续的全部内容,更多相关SpringMVC学习笔记-续内容请搜索靠谱客的其他文章。


发表评论 取消回复