(一)概述
1.SpringMVC概述
1) Spring 为展现层提供的基于 MVC 设计理念的优秀的 Web 框架,是目前最主流的MVC 框架之一
2)Spring3.0 后全面超越 Struts2,成为最优秀的 MVC 框架。
3)Spring MVC 通过一套 MVC 注解,让 POJO 成为处理请求的控制器,而无须实现任何接口。
4)支持 REST 风格的 URL 请求。 Restful
5)采用了松散耦合可插拔组件结构,比其他 MVC 框架更具扩展性和灵活性。
2.SpringMVC是什么
一种轻量级的、基于MVC的Web层应用框架。偏前端而不是基于业务逻辑层。Spring框架的一个后续产品。
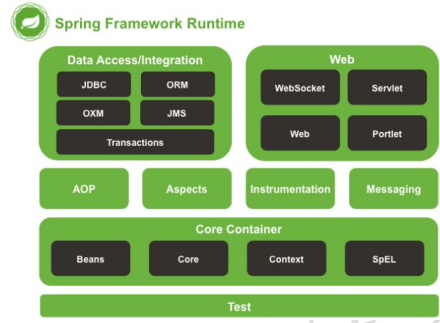
Spring框架结构图(新版本):
3.SpringMVC能干什么
1) 天生与Spring框架集成,如:(IOC,AOP)
2) 支持Restful风格
3) 进行更简洁的Web层开发
4) 支持灵活的URL到页面控制器的映射
5) 非常容易与其他视图技术集成,如:Velocity、FreeMarker等等
6) 因为模型数据不存放在特定的API里,而是放在一个Model里(Map数据结构实现,因此很容易被其他框架使用)
7) 非常灵活的数据验证、格式化和数据绑定机制、能使用任何对象进行数据绑定,不必实现特定框架的API
8) 更加简单、强大的异常处理
9) 对静态资源的支持
10) 支持灵活的本地化、主题等解析
4.SpringMVC的HelloWorld
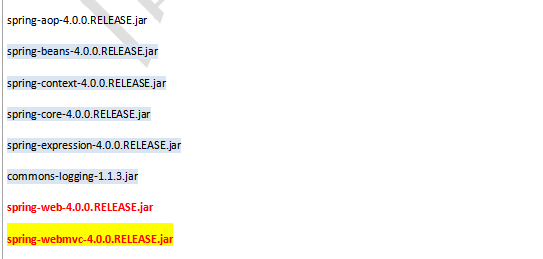
1.新建web工程,加入jar包
2.在web.xml配置springMVC核心控制器:
    <servlet>
        <servlet-name>springMVC</servlet-name>
        <servlet-class>org.springframework.web.servlet.DispatcherServlet</servlet-class>
    </servlet>
    <servlet-mapping>
        <servlet-name>springMVC</servlet-name>
        <url-pattern>/</url-pattern>
    </servlet-mapping>
3.创建spring配置文件,配置组件扫描和视图解析器:
 <!--1.组件扫描-->
    <context:component-scan base-package="com.deserts.firstmvc"/>
    <!--2.配置视图解析器-->
    <bean id="viewResolver" class="org.springframework.web.servlet.view.InternalResourceViewResolver">
        <property name="prefix" value="/WEB-INF/view/"/>
        <property name="suffix" value=".jsp"/>
    </bean>
4.创建一个jsp页面,并创建一个a标签,用于发送请求
<%@ page contentType="text/html;charset=UTF-8" language="java" %>
<html>
  <head>
    <title>$Title$</title>
  </head>
  <body>
  <a href="/hello">hello</a>
  </body>
</html>
5.创建一个类,并使用@Controller注解标注是一个控制层的类;创建一个返回值为String的方法,使用@RequestMapping标注在方法上,并设置value值,value值为接收请求的地址;最后方法返回一个要跳转页面的值。
@Controller
public class HelloMVC {
    @RequestMapping("hello")
    public String hello(){
        System.out.println("success");
        //视图名称
        return "success";
    }
}
6.在web目录下创建一个view文件夹,并创建一个名为success.jsp的页面,用于验证是否成功。
<%@ page contentType="text/html;charset=UTF-8" language="java" %>
<html>
<head>
    <title>hello</title>
</head>
<body>
<h1>成功</h1>
</body>
</html>
(二)@RequestMapping注解
1.概念
1) SpringMVC使用@RequestMapping注解为控制器指定可以处理哪些 URL 请求
2)可以标注的位置:
- 标注在类上:提供初步的请求映射信息。相对于 WEB 应用的根目录
- 标注在方法上:提供进一步的细分映射信息。相对于标记在类上的 URL。
- 如果类有注解地址为/test,方法有注解地址为/method,则相对于根目录的地址为/test/method
3)作用:DispatcherServlet 截获请求后,就通过控制器上 @RequestMapping 提供的映射信息确定请求所对应的处理方法。
2.@RequestMapping的属性
2.1 value
指定接收请求的地址
2.2 method
指定接收什么样的请求,常用的有GET(查询)、POST(添加)、PUT(修改)、DELETE(删除);通过枚举类的值来设置,如RequestMethod.GET。
2.3 params
指定请求参数。如params = id表示请求参数必须包含名为id的参数。!param1: 表示请求不能包含名为 param1 的请求参数。param1 != value1: 表示请求包含名为 param1 的请求参数,但其值不能为 value1
{“param1=value1”, “param2”}: 请求必须包含名为 param1 和param2 的两个请求参数,且 param1 参数的值必须为 value1
2.4 headers
指定请求时请求头的信息
2.5 示例
  @RequestMapping(value = "/test",method = RequestMethod.GET,params = "password!=000000"
            , headers = "Accept-Language=en-US,zh;q=0.8")
    public String test(){
        return "success";
    }
3.RequestMapping支持Ant风格
ant风格的三种通配符及使用
?:匹配文件名中的一个字符
*:匹配文件名中的任意字符
**:匹配多层路径
如:/test???/*/hello/**可以接收的地址为/testant/first/hello/world/hi等。
4.RequestMapping映射请求占位符PathVariable注解
REST风格的一个重要组成部分。通过 @PathVariable 可以将 URL 中占位符参数绑定到控制器处理方法的入参中:URL 中的 {xxx} 占位符可以通过 @PathVariable(“xxx”) 绑定到操作方法的形参中。
举例:
控制器·:
 @RequestMapping("/test/{username}/{password}")
    public String testPath(@PathVariable("username")String username, @PathVariable("password")Integer password){
        System.out.println("username: " + username + ", password: " + password);
        return "success";
    }
请求代码:
<a href="springmvc/testPathVariable/deserts/10000">testPathVariable</a>
(三)REST
1.rest是什么
REST:即 Representational State Transfer。(资源)表现层状态转化。是目前最流行的一种互联网软件架构。它结构清晰、符合标准、易于理解、扩展方便,所以正得到越来越多网站的采用
① 资源(Resources):网络上的一个实体,或者说是网络上的一个具体信息。
它可以是一段文本、一张图片、一首歌曲、一种服务,总之就是一个具体的存在。
可以用一个URI(统一资源定位符)指向它,每种资源对应一个特定的 URI 。
获取这个资源,访问它的URI就可以,因此 URI 即为每一个资源的独一无二的识别符。
② 表现层(Representation):把资源具体呈现出来的形式,叫做它的表现层(Representation)。比如,文本可以用 txt 格式表现,也可以用 HTML 格式、XML 格式、JSON 格式表现,甚至可以采用二进制格式。
③ 状态转化(State Transfer):每发出一个请求,就代表了客户端和服务器的一次交互过程。HTTP协议,是一个无状态协议,即所有的状态都保存在服务器端。因此,如果客户端想要操作服务器,必须通过某种手段,让服务器端发生“状态转化”(State Transfer)而这种转化是建立在表现层之上的,所以就是 “表现层状态转化”。
④ 具体说,就是 HTTP 协议里面,四个表示操作方式的动词:GET、POST、PUT、DELETE。它们分别对应四种基本操作:GET 用来获取资源,POST 用来新建资源,PUT 用来更新资源,DELETE 用来删除资源。
2.HiddenHttpMethodFilter
2.1 简介
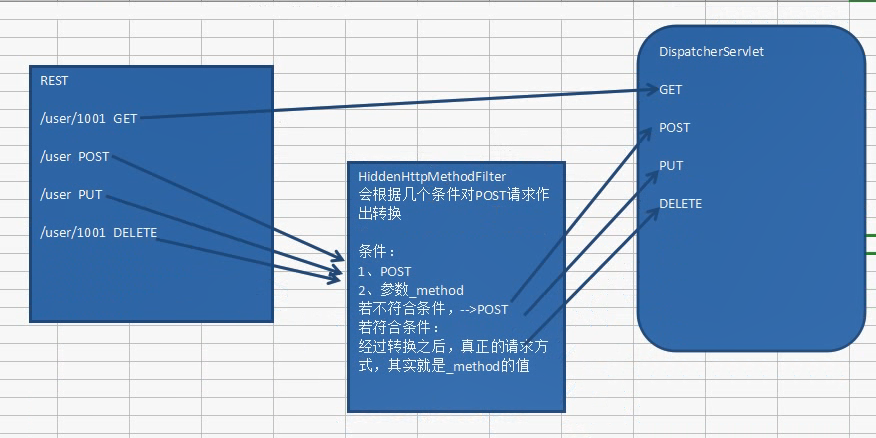
浏览器 form 表单只支持 GET 与 POST 请求,而DELETE、PUT 等 method 并不支持,Spring3.0 添加了一个过滤器,可以将这些请求转换为标准的 http 方法,使得支持 GET、POST、PUT 与 DELETE 请求。
2.2 转换过程图解
2.3 HiddenHttpMethodFilter源码
全部代码:
public class HiddenHttpMethodFilter extends OncePerRequestFilter {
    public static final String DEFAULT_METHOD_PARAM = "_method";
    private String methodParam = "_method";

    public HiddenHttpMethodFilter() {
    }

    public void setMethodParam(String methodParam) {
        Assert.hasText(methodParam, "'methodParam' must not be empty");
        this.methodParam = methodParam;
    }

    protected void doFilterInternal(HttpServletRequest request, HttpServletResponse response, FilterChain filterChain) throws ServletException, IOException {
        String paramValue = request.getParameter(this.methodParam);
        if ("POST".equals(request.getMethod()) && StringUtils.hasLength(paramValue)) {
            String method = paramValue.toUpperCase(Locale.ENGLISH);
            HttpServletRequest wrapper = new HiddenHttpMethodFilter.HttpMethodRequestWrapper(request, method);
            filterChain.doFilter(wrapper, response);
        } else {
            filterChain.doFilter(request, response);
        }

    }

    private static class HttpMethodRequestWrapper extends HttpServletRequestWrapper {
        private final String method;

        public HttpMethodRequestWrapper(HttpServletRequest request, String method) {
            super(request);
            this.method = method;
        }

        public String getMethod() {
            return this.method;
        }
    }
}
参数名为什么是_method:
public static final String DEFAULT_METHOD_PARAM = "_method";
2.4 测试REST风格
控制器:
@Controller
public class TestController {
    @RequestMapping(value = "/test/{id}", method = RequestMethod.GET)
    public String getUserById(@PathVariable("id")Integer id){
        System.out.println("id: " + id);
        return "success";
    }

    @RequestMapping(value = "/test", method = RequestMethod.POST)
    public String addUser(){
        System.out.println("POST--");
        return "success";
    }

    @RequestMapping(value = "/test", method = RequestMethod.PUT)
    public String updateUser(){
        System.out.println("PUT--");
        return "success";
    }

    @RequestMapping(value = "/test/{id}", method = RequestMethod.DELETE)
    public String deleteUser(@PathVariable("id")Integer id){
        System.out.println("DELETE--id = " + id);
        return "success";
    }
}
请求链接:
<html>
  <head>
    <title>测试REST</title>
  </head>
  <body>
  <a href="test/1001">测试GET</a>
  <br/>
  <br/>
  <form action="test" method="post">
    <input type="submit" value="测试POST">
  </form>
  <br/>
  <form action="test" method="post">
    <input type="hidden" name="_method" value="put">
    <input type="submit" value="测试PUT">
  </form>
  <br/>
  <form action="test/11" method="post">
    <input type="hidden" name="_method" value="delete">
    <input type="submit" value="测试DELETE">
  </form>
  </body>
</html>
(四)处理请求数据
1.请求处理方法签名
1) Spring MVC 通过分析处理方法的签名(方法名+ 参数列表),HTTP请 求信息绑定到处理方法的相应形参中。
2) Spring MVC 对控制器处理方法签名的限制是很宽松的,几乎可以按喜欢的任何方式对方法进行签名。
3) 必要时可以对方法及方法入参标注相应的注解( @PathVariable 、@RequestParam、@RequestHeader 等)、
4) Spring MVC 框架会将 HTTP 请求的信息绑定到相应的方法入参中,并根据方法的返回值类型做出相应的后续处理。
2.@RequestParam注解
2.1 属性
1.value:指定参数名字
2.required:是否必须有这个参数
3.defaultValue:默认值
2.2 测试代码
@RequestMapping(value="/testRequestParam")
public String testRequestParam(
@RequestParam(value="username") String username,
@RequestParam(value="age",required=false,defaultValue="0") int age){
System.out.println("testRequestParam - username="+username +",age="+age);
return "success";
}
3.@RequestHeader、@CookieValue注解
用法和@RequestParam相似,@RequestHeader用于保存请求头的信息,@CookieValue用于保存Cookie的信息
4.使用POJO作为参数
4.1 介绍
1) 使用 POJO 对象绑定请求参数值
2) Spring MVC 会按请求参数名和 POJO 属性名进行自动匹配,自动为该对象填充属性值。支持级联属性。如:dept.deptId、dept.address.tel 等
4.2 示例代码
1.先创建类Address和类Student。Student有Address属性:


2.前端测试代码:

3.控制器:

5.使用Servlet原生API作为参数
1) MVC 的 Handler 方法可以接受哪些 ServletAPI 类型的参数
-
HttpServletRequest
-
HttpServletResponse
-
HttpSession
4) java.security.Principal
5) Locale
6)InputStream
7)OutputStream
8)Reader
9)Wrtter
6.解决POST请求乱码
在web.xml文件中配置过滤器
 <!--解决乱码-->
   <filter>
      <filter-name>CharacterEncodingFilter</filter-name>
      <filter-class>org.springframework.web.filter.CharacterEncodingFilter</filter-class>
      <init-param>
        <param-name>encoding</param-name>
        <param-value>UTF-8</param-value>
      </init-param>
    </filter>
    <filter-mapping>
      <filter-name>CharacterEncodingFilter</filter-name>
      <url-pattern>/*</url-pattern>
    </filter-mapping>
7.自定义转换器
1.定义转换器类实现Converter接口
public class Convert implements Converter<String, Date> {

    @Override
    public Date convert(String source) {
        SimpleDateFormat dateFormat = new SimpleDateFormat("yyyy-mm-dd");
        Date date = null;
        try {
            date = dateFormat.parse(source);
        } catch (ParseException e) {
            e.printStackTrace();
        }
        return date;
    }
}
2.在配置文件中声明转换器
<bean id="conversionServiceFactoryBean" class="org.springframework.context.support.ConversionServiceFactoryBean">
        <property name="converters">
            <list>
                <bean class="com.deserts.converter.Convert"/>
            </list>
        </property>
    </bean>
3.在<annotation-driven>中引用转换器
<mvc:annotation-driven conversion-service="conversionServiceFactoryBean"/>
(五)处理响应数据
0.前端测试页面和配置
springMVC.xml配置
 <?xml version="1.0" encoding="UTF-8"?>
<beans xmlns="http://www.springframework.org/schema/beans"
       xmlns:xsi="http://www.w3.org/2001/XMLSchema-instance"
       xmlns:aop="http://www.springframework.org/schema/aop"
       xmlns:context="http://www.springframework.org/schema/context"
       xmlns:mvc="http://www.springframework.org/schema/mvc"
       xsi:schemaLocation="http://www.springframework.org/schema/beans
        http://www.springframework.org/schema/beans/spring-beans.xsd
        http://www.springframework.org/schema/aop
        http://www.springframework.org/schema/aop/spring-aop.xsd http://www.springframework.org/schema/context http://www.springframework.org/schema/context/spring-context.xsd http://www.springframework.org/schema/mvc http://www.springframework.org/schema/mvc/spring-mvc.xsd">
    <context:component-scan base-package="com.deserts.response"/>
    <mvc:annotation-driven>
        <mvc:message-converters register-defaults="false">
            <bean class="org.springframework.http.converter.StringHttpMessageConverter">
                <property name="supportedMediaTypes">
                    <list>
                        <value>application/json;charset=UTF-8</value>
                    </list>
                </property>
            </bean>
        </mvc:message-converters>
    </mvc:annotation-driven>
    <mvc:annotation-driven/>
    <mvc:default-servlet-handler/>
    <bean class="org.springframework.web.servlet.view.InternalResourceViewResolver">
        <property name="prefix" value="/WEB-INF/view/"/>
        <property name="suffix" value=".jsp"/>
    </bean>
</beans>
web.xml配置
<web-app xmlns:xsi="http://www.w3.org/2001/XMLSchema-instance" xmlns="http://java.sun.com/xml/ns/javaee"
         xsi:schemaLocation="http://java.sun.com/xml/ns/javaee http://java.sun.com/xml/ns/javaee/web-app_3_0.xsd" id="WebApp_ID" version="3.0">
  <display-name>Archetype Created Web Application</display-name>
  <servlet>
    <servlet-name>dispatcherServlet</servlet-name>
    <servlet-class>org.springframework.web.servlet.DispatcherServlet</servlet-class>
    <init-param>
      <param-name>contextConfigLocation</param-name>
      <param-value>classpath:springMVC.xml</param-value>
    </init-param>
    <load-on-startup>1</load-on-startup>
  </servlet>
  <servlet-mapping>
    <servlet-name>dispatcherServlet</servlet-name>
    <url-pattern>/</url-pattern>
  </servlet-mapping>

  <!--解决乱码-->
   <filter>
      <filter-name>CharacterEncodingFilter</filter-name>
      <filter-class>org.springframework.web.filter.CharacterEncodingFilter</filter-class>
      <init-param>
        <param-name>encoding</param-name>
        <param-value>UTF-8</param-value>
      </init-param>
    </filter>
    <filter-mapping>
      <filter-name>CharacterEncodingFilter</filter-name>
      <url-pattern>/*</url-pattern>
    </filter-mapping>

</web-app>
测试页面:
<%@ page contentType="text/html;charset=UTF-8" language="java" %>
<html>
<head>
    <title>Title</title>
</head>
<body>
<a href="test01">测试转发一</a><br/>
<a href="test02">测试转发二</a><br/>
<a href="test03">测试重定向</a><br/>
<a href="test04">测试ModelAndView</a><br/>
<a href="test05">测试Map</a><br/>
<a href="test06">测试View</a><br/>
<a href="test07">测试ModelMap</a><br/>
<a href="test08">测试Servlet原生API往作用域放值</a><br/>
<a href="test09">测试Servlet原生API回写数据</a><br/>
<a href="test10">测试回写字符串</a><br/>
<a href="test11">测试返回对象</a><br/>
</body>
</html>
跳转成功页面:
<%@ page language="java" contentType="text/html; charset=UTF-8"
         pageEncoding="UTF-8"%>
<%@ taglib uri="http://java.sun.com/jsp/jstl/core" prefix="c"%>
<%@ page contentType="text/html; charset=UTF-8" language="java" %>
<html>
<head>
    <title>Title</title>
</head>
<body>
<h1>成功</h1>
</body>
</html>
<%= request.getAttribute("username")%>
1.转发和重定向
1.1 转发的两种方式
1.直接返回跳转页面的名字,要和springmvc的配置文件前缀后缀拼接成一个完整的地址,示例:
 @RequestMapping("test01")
    public String test01(){
        System.out.println("测试转发一");
        return "success";
    }
2.使用forward进行转发:如果返回的字符串中带 forward或者前缀时,SpringMVC 会对他们进行特殊处理:将 forward: 和 redirect: 当成指示符,其后的字符串作为 URL 来处理,示例:
@RequestMapping("test02")
    public String test02(){
        System.out.println("测试转发二");
        return "forward:/WEB-INF/view/success.jsp";
    }
1.2重定向的方式
使用redirect进行重定向,后面接URL地址,注意重定向不能访问WEB-INF里面的资源,示例:
 @RequestMapping("test03")
    public String test03(){
        System.out.println("测试重定向");
        //注意事项:重定向不能访问WEB-INF下的目录
        //return "redirect:/WEB-INF/view/success.jsp";
        return "redirect:/index.jsp";
    }
2.往作用域放值的五种方式
2.1 使用ModelAndView(推荐)
 @RequestMapping("test04")
    public ModelAndView test04(){
        System.out.println("testModelAndView");
        ModelAndView mv = new ModelAndView();
        mv.setViewName("success");
        mv.addObject("user", "deserts");
        return mv;
    }
2.2 使用Map
 @RequestMapping("test05")
    public String test05(Map<String, Object> map){
        map.put("username", "root");
        return "success";
    }
2.3 使用Model
 @RequestMapping("test06")
    public String test06(Model model){
        model.addAttribute("username", "admin");
        return "success";
    }
2.4 使用ModelMap
 @RequestMapping("test07")
    public String test07(ModelMap modelMap){
        modelMap.addAttribute("username", "anpu");
        return "success";
    }
2.5 使用Servlet原生API(不推荐)
 @RequestMapping("test08")
    public String test08(HttpServletRequest request){
        request.setAttribute("username", "张悬");
        return "success";
    }
3.回写数据
3.1 使用servlet原生API回写
  @RequestMapping(value = "test09")//解决响应乱码
    public void test09(HttpServletResponse response) throws IOException {
        response.setContentType("text/html; charset=UTF-8");//解决响应乱码
        response.getWriter().write("早安,安溥");
    }
3.2 返回字符串形式回写
此时需要@ResponseBody注解,告诉SpringMVC这个方法不需要跳转页面。
	 @RequestMapping("test10")
    @ResponseBody
    public String test10(){
        return "deserts就是安溥";
    }
中文会乱码,解决方案:
	 <mvc:annotation-driven>
        <mvc:message-converters register-defaults="false">
            <bean class="org.springframework.http.converter.StringHttpMessageConverter">
                <property name="supportedMediaTypes">
                    <list>
                        <value>application/json;charset=UTF-8</value>
                    </list>
                </property>
            </bean>
        </mvc:message-converters>
    </mvc:annotation-driven>
3.3 返回对象
- 在 SpringMVC 的各个组件中,处理器映射器、处理器适配器、视图解析器称为 SpringMVC 的三大组件。
使用<mvc:annotation-driven>自动加载 RequestMappingHandlerMapping(处理映射器)和
RequestMappingHandlerAdapter( 处 理 适 配 器 ),可用在Spring-xml.xml配置文件中使用
<mvc:annotation-driven>替代注解处理器和适配器的配置。
同时使用<mvc:annotation-driven>默认底层就会集成jackson进行对象或集合的json格式字符串的转换。
需要<mvc:annotation-driven/>
依赖:
 <dependency>
        <groupId>com.fasterxml.jackson.core</groupId>
        <artifactId>jackson-databind</artifactId>
        <version>2.9.0</version>
      </dependency>
      <dependency>
        <groupId>com.fasterxml.jackson.core</groupId>
        <artifactId>jackson-core</artifactId>
        <version>2.9.0</version>
      </dependency>
      <dependency>
        <groupId>com.fasterxml.jackson.core</groupId>
        <artifactId>jackson-annotations</artifactId>
        <version>2.9.0</version>
      </dependency>
测试:
@RequestMapping("test11")
    @ResponseBody
    public Student test11(){
        Student student = new Student(1, "张三");
        return student;
    }
注意事项:在配置了解决中文乱码的注解驱动后,需要在写一个注解驱动:
	 <mvc:annotation-driven>
        <mvc:message-converters register-defaults="false">
            <bean class="org.springframework.http.converter.StringHttpMessageConverter">
                <property name="supportedMediaTypes">
                    <list>
                        <value>application/json;charset=UTF-8</value>
                    </list>
                </property>
            </bean>
        </mvc:message-converters>
    </mvc:annotation-driven>
    <mvc:annotation-driven/>
(六)文件上传、拦截器、异常处理
1.文件上传
1.1 文件上传客户端三要素
- 表单项type=“file”
- 表单的提交方式是post
- 表单的enctype属性是多部分表单形式,及enctype=“multipart/form-data”

1.2 文件上传原理
- 当form表单修改为多部分表单时,request.getParameter()将失效。
- enctype=“application/x-www-form-urlencoded”时,form表单的正文内容格式是:key=value&key=value&key=value
- 当form表单的enctype取值为Mutilpart/form-data时,请求正文内容就变成多部分形式

1.3 单文件上传步骤
1.导入fileupload和io坐标
 <dependency>
        <groupId>commons-fileupload</groupId>
        <artifactId>commons-fileupload</artifactId>
        <version>1.3.1</version>
      </dependency>
      <dependency>
        <groupId>commons-io</groupId>
        <artifactId>commons-io</artifactId>
        <version>2.4</version>
      </dependency>
2.在springMVC.xml中配置文件上传解析器
<bean id="multipartResolver" class="org.springframework.web.multipart.commons.CommonsMultipartResolver">
        <!--最大上传文件的大小-->
        <property name="maxUploadSize" value="5242800"/>
        <!--每个文件最大的大小-->
        <property name="maxUploadSizePerFile" value="524280"/>
        <!--设置默认编码-->
        <property name="defaultEncoding" value="UTF-8"/>
 </bean>
3.编写文件上传代码
 @RequestMapping("upload")
    @ResponseBody
    public void upload(String name, MultipartFile file) throws IOException {
        String filename = file.getOriginalFilename();
        System.out.println(name + ": " + filename);
        file.transferTo(new File("C:\Users\HP\Desktop\file\" + filename));
    }
1.4 多文件上传
1.前端代码
<form action="upload" method="post" enctype="multipart/form-data">
    名字:<input type="text" name="name"><br/>
    文件1:<input type="file" name = "files"><br/>
    文件2:<input type="file" name = "files"><br/>
    <input type="submit" value="提交"/>
</form>
2.控制器
 @RequestMapping("upload")
    @ResponseBody
    public void upload(String name, MultipartFile[] files) throws IOException {
        System.out.println(name);
        for(MultipartFile file: files){
            String filename = file.getOriginalFilename();
            file.transferTo(new File("D:\upload\" + filename));
        }
    }
2.SpringMVC拦截器
2.1 拦截器(Interceptor)的作用
- Spring MVC 的拦截器类似于 Servlet 开发中的过滤器 Filter,用于对处理器进行预处理和后处理。
- 将拦截器按一定的顺序联结成一条链,这条链称为拦截器链(Interceptor Chain)。在访问被拦截的方法或字段时,拦截器链中的拦截器就会按其之前定义的顺序被调用。拦截器也是AOP思想的具体实现。
2.2 拦截器和过滤器的区别

2.3 拦截器的使用
1.创建一个类去实现HandlerInterceptor
public class MyInterceptor implements HandlerInterceptor {
    @Override
    public boolean preHandle(HttpServletRequest request, HttpServletResponse response, Object handler) throws Exception {
        System.out.println("preHandle执行...");
        //返回true,表示不拦截放行;返回false,表示拦截。
        String param = request.getParameter("param");
        if ("success".equals(param)){
            return true;
        }else {
            request.getRequestDispatcher("/fail.jsp").forward(request, response);
            return false;
        }
    }

    @Override
    public void postHandle(HttpServletRequest request, HttpServletResponse response, Object handler, ModelAndView modelAndView) throws Exception {
        System.out.println("postHandle执行...");
        modelAndView.addObject("username", "张悬");
    }

    @Override
    public void afterCompletion(HttpServletRequest request, HttpServletResponse response, Object handler, Exception ex) throws Exception {
        System.out.println("afterCompletion执行...");
    }
}
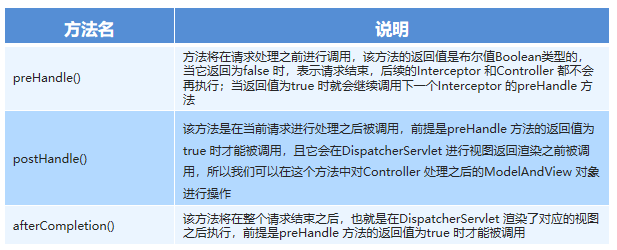
各个方法的作用:
2.配置拦截器
    <mvc:interceptors>
        <mvc:interceptor>
            <mvc:mapping path="/**"/>
            <bean class="com.deserts.interceptor.MyInterceptor"/>
        </mvc:interceptor>
    </mvc:interceptors>
3.测试拦截器的拦截效果
@RequestMapping("interceptor")
    public ModelAndView interceptor(){
        System.out.println("控制器执行...");
        ModelAndView modelAndView = new ModelAndView();
        modelAndView.addObject("username", "deserts");
        modelAndView.setViewName("success");
        return modelAndView;
    }
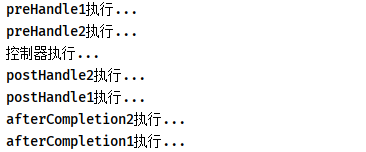
2.4 多个拦截器的操作
1.配置
<mvc:interceptors>
        <mvc:interceptor>
            <mvc:mapping path="/**"/>
            <bean class="com.deserts.interceptor.MyInterceptor"/>
        </mvc:interceptor>
        <mvc:interceptor>
            <mvc:mapping path="/**"/>
            <bean class="com.deserts.interceptor.MyInterceptor2"/>
        </mvc:interceptor>
    </mvc:interceptors>
2.执行顺序:
3.异常处理
3.1 SpringMVC异常处理的思路
- 系统中异常包括两类:预期异常和运行时异常RuntimeException,前者通过捕获异常从而获取异常信息,后者主要通过规范代码开发、测试等手段减少运行时异常的发生。
- 系统的Dao、Service、Controller出现都通过throws Exception向上抛出,最后由SpringMVC前端控制器交由异常处理器进行异常处理,如下图:

3.2 异常处理的两种方式
使用Spring MVC提供的简单异常处理器SimpleMappingExceptionResolver
1.SpringMVC已经定义好了该类型转换器,在使用时可以根据项目情况进行相应异常与视图的映射配置。一个异常对应一个视图。
  <bean class="org.springframework.web.servlet.handler.SimpleMappingExceptionResolver">
        <property name="defaultErrorView" value="error"/>
        <property name="exceptionMappings">
            <map>
                <entry key="java.lang.ClassCastException" value="error"/>
                <entry key="java.lang.NullPointerException" value="error"/>
            </map>
        </property>
    </bean>
2.测试:
@Controller
public class ExceptionTest {
    @RequestMapping("exception")
    public String exception(){
        Student student = null;
        System.out.println(student.getId());
        return "success";
    }
}
自定义异常处理器
1.编写一个类去实现HandlerExceptionResolver
public class MyMappingException implements HandlerExceptionResolver {
    @Override
    public ModelAndView resolveException(HttpServletRequest request, HttpServletResponse response, Object handler, Exception ex) {
        ModelAndView modelAndView = new ModelAndView();
        if (ex instanceof NullPointerException){
            modelAndView.addObject("exception", "空指针异常");
        }else if( ex instanceof NumberFormatException){
            modelAndView.addObject("exception", "数字转换异常");
        }
        modelAndView.setViewName("error");
        return modelAndView;
    }
}
2.配置自定义的异常处理器
<bean class="com.deserts.exception.MyMappingException"/>
3.测试页面:
<html>
<head>
    <title>Title</title>
</head>
<body>
<h1><span style="color: red">${requestScope.exception},服务器跑到火星挖土豆了!!!</span></h1>
</body>
</html>
最后
以上就是包容汽车最近收集整理的关于SpringMVC学习笔记记录的全部内容,更多相关SpringMVC学习笔记记录内容请搜索靠谱客的其他文章。


发表评论 取消回复