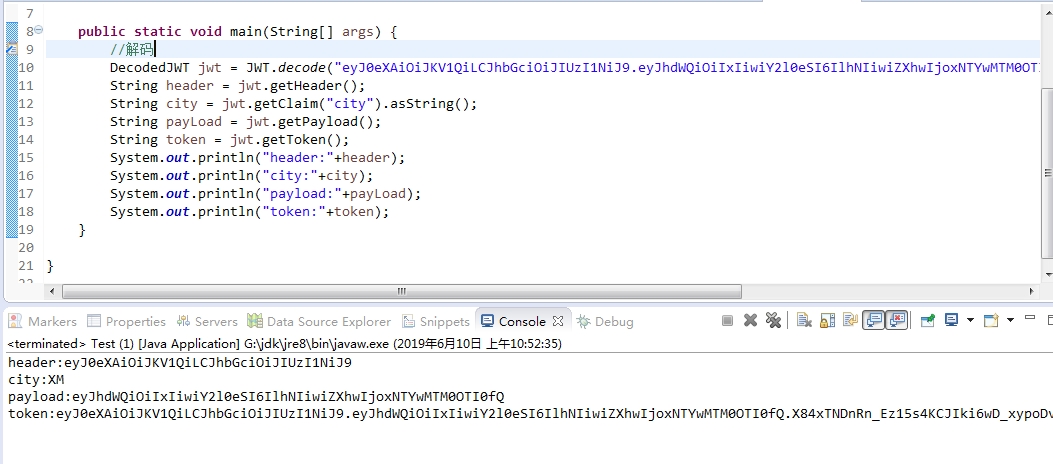
JWT:Json Web Token是实现token的一种解决方案,它有三个部分组成,header(头)、payload(载体)、signature(签名)。
jwt的第一部分是header,header主要包含两个部分,alg指加密类型,可选值HS256,RSA,type为JWT固定值,表示token类型。
第二部分为payload载体,payload是token的详细信息,一般包含iss发行者、exp过期时间、sub用户信息、aud接收者,以及其他信息,可以自定义参数并设值。
第三部分是签名signature,Base64(header).Base64(payload)得到一个Base64位编码的字符串,我们称它位encodingstring。再使用HS256(encodingstring,秘钥),计算得到签名。
这三部分连接起来,就是一个完整的JWT TOKEN,秘钥保存在服务器的一个私有密钥。
将头部、载体、签名用.连接起来,得到一个JWT。
例如:eyJ0eXAiOiJKV1QiLCJhbGciOiJIUzI1NiJ9.eyJhdWQiOiIxIn0.dQMt-whQl9DmFOo-JIupTPRKZkApwBhUjSvIRuZ9lF8

和Session方式存储id的差异
Session方式存储用户id的最大弊病在于要占用大量服务器内存,对于较大型应用而言可能还要保存许多的状态。一般而言,大型应用还需要借助一些KV数据库和一系列缓存机制来实现Session的存储。
而JWT方式将用户状态分散到了客户端中,可以明显减轻服务端的内存压力。除了用户id之外,还可以存储其他的和用户相关的信息,例如用户角色,用户性别等。
这里我们整合了一个demo,自定义注解+aop来实现token的登录验证。
pom.xml依赖
<!-- 使用jwt验证 -->
<dependency>
<groupId>com.auth0</groupId>
<artifactId>java-jwt</artifactId>
<version>3.4.0</version>
</dependency>
<dependency>
<groupId>com.alibaba</groupId>
<artifactId>fastjson</artifactId>
<version>1.2.47</version>
</dependency>
自定义注解
package com.example.auth.annotation;
import java.lang.annotation.ElementType;
import java.lang.annotation.Retention;
import java.lang.annotation.RetentionPolicy;
import java.lang.annotation.Target;
@Target({ElementType.METHOD, ElementType.TYPE})
@Retention(RetentionPolicy.RUNTIME)
public @interface PassToken {
boolean required() default true;
}
package com.example.auth.annotation;
import java.lang.annotation.ElementType;
import java.lang.annotation.Retention;
import java.lang.annotation.RetentionPolicy;
import java.lang.annotation.Target;
@Target({ElementType.METHOD, ElementType.TYPE})
@Retention(RetentionPolicy.RUNTIME)
public @interface UserLoginToken {
boolean required() default true;
}
实体entity
package com.example.auth.annotation;
public class User {
private String id;
private String username;
private String password;
public String getId() {
return id;
}
public void setId(String id) {
this.id = id;
}
public String getUsername() {
return username;
}
public void setUsername(String username) {
this.username = username;
}
public String getPassword() {
return password;
}
public void setPassword(String password) {
this.password = password;
}
}
JWT生成器
package com.example.auth.annotation;
import org.springframework.stereotype.Component;
import com.auth0.jwt.JWT;
import com.auth0.jwt.algorithms.Algorithm;
@Component
public class JWTUtil {
public String getToken(User user){
/**
* 设置两分钟有效,添加参数withClaim,设置过期时间withExpiresAt.
* 使用个人密码作为密钥
*/
Date date = new Date(System.currentTimeMillis()+1000*60*2);
String token = JWT.create()
.withAudience(user.getId()).withClaim("city", "XM").withExpiresAt(date)
.sign(Algorithm.HMAC256(user.getPassword()));
return token;
}
}
解密

service和serviceImpl,这里我没有去数据库取值校验,大家自行处理
package com.example.auth.service;
import com.example.auth.annotation.User;
public interface UserSerivce {
User findUserById(String userId);
User findByUsername(User user);
}
package com.example.auth.service.impl;
import org.springframework.stereotype.Service;
import com.example.auth.annotation.User;
import com.example.auth.service.UserSerivce;
@Service
public class UserServiceImpl implements UserSerivce{
@Override
public User findUserById(String userId) {
User user = new User();
user.setId("1");
user.setUsername("admin");
user.setPassword("admin");
return user;
}
@Override
public User findByUsername(User user) {
User u = new User();
u.setId("1");
u.setUsername("admin");
u.setPassword("admin");
return u;
}
}
AOP拦截器
package com.example.auth.annotation;
import java.lang.reflect.Method;
import javax.servlet.http.HttpServletRequest;
import javax.servlet.http.HttpServletResponse;
import org.springframework.beans.factory.annotation.Autowired;
import org.springframework.web.method.HandlerMethod;
import org.springframework.web.servlet.HandlerInterceptor;
import org.springframework.web.servlet.ModelAndView;
import com.auth0.jwt.JWT;
import com.auth0.jwt.JWTVerifier;
import com.auth0.jwt.algorithms.Algorithm;
import com.auth0.jwt.exceptions.JWTDecodeException;
import com.auth0.jwt.exceptions.JWTVerificationException;
import com.example.auth.service.UserSerivce;
public class AuthenticationInterceptor implements HandlerInterceptor {
@Autowired
UserSerivce userService;
@Override
public boolean preHandle(HttpServletRequest httpServletRequest, HttpServletResponse httpServletResponse, Object object) throws Exception {
String token = httpServletRequest.getHeader("token");// 从 http 请求头中取出 token
// 如果不是映射到方法直接通过
if(!(object instanceof HandlerMethod)){
return true;
}
HandlerMethod handlerMethod=(HandlerMethod)object;
Method method=handlerMethod.getMethod();
//检查是否有passtoken注释,有则跳过认证
if (method.isAnnotationPresent(PassToken.class)) {
PassToken passToken = method.getAnnotation(PassToken.class);
if (passToken.required()) {
return true;
}
}
//检查有没有需要用户权限的注解
if (method.isAnnotationPresent(UserLoginToken.class)) {
UserLoginToken userLoginToken = method.getAnnotation(UserLoginToken.class);
if (userLoginToken.required()) {
// 执行认证
if (token == null) {
throw new RuntimeException("无token,请重新登录");
}
// 获取 token 中的 user id
String userId;
try {
userId = JWT.decode(token).getAudience().get(0);
} catch (JWTDecodeException j) {
throw new RuntimeException("401");
}
User user = userService.findUserById(userId);
if (user == null) {
throw new RuntimeException("用户不存在,请重新登录");
}
// 验证 token
JWTVerifier jwtVerifier = JWT.require(Algorithm.HMAC256(user.getPassword())).build();
try {
jwtVerifier.verify(token);
} catch (JWTVerificationException e) {
throw new RuntimeException("401");
}
return true;
}
}
return true;
}
@Override
public void postHandle(HttpServletRequest httpServletRequest,
HttpServletResponse httpServletResponse,
Object o, ModelAndView modelAndView) throws Exception {
}
@Override
public void afterCompletion(HttpServletRequest httpServletRequest,
HttpServletResponse httpServletResponse,
Object o, Exception e) throws Exception {
}
}
配置类
package com.example.auth.annotation;
import org.springframework.context.annotation.Bean;
import org.springframework.context.annotation.Configuration;
import org.springframework.web.servlet.config.annotation.InterceptorRegistry;
import org.springframework.web.servlet.config.annotation.WebMvcConfigurer;
@Configuration
public class InterceptorConfig implements WebMvcConfigurer {
@Override
public void addInterceptors(InterceptorRegistry registry) {
registry.addInterceptor(authenticationInterceptor())
.addPathPatterns("/**");
}
@Bean
public AuthenticationInterceptor authenticationInterceptor() {
return new AuthenticationInterceptor();
}
}
测试Controller
package com.example.auth;
import org.springframework.beans.factory.annotation.Autowired;
import org.springframework.web.bind.annotation.GetMapping;
import org.springframework.web.bind.annotation.PostMapping;
import org.springframework.web.bind.annotation.RequestBody;
import org.springframework.web.bind.annotation.RequestMapping;
import org.springframework.web.bind.annotation.RestController;
import com.alibaba.fastjson.JSONObject;
import com.example.auth.annotation.JWTUtil;
import com.example.auth.annotation.User;
import com.example.auth.annotation.UserLoginToken;
import com.example.auth.service.UserSerivce;
@RestController
@RequestMapping("api")
public class UserApi {
@Autowired
UserSerivce userService;
@Autowired
JWTUtil tokenService;
//登录
@PostMapping("/login")
public Object login(@RequestBody User user){
JSONObject jsonObject=new JSONObject();
User userForBase=userService.findByUsername(user);
if(userForBase==null){
jsonObject.put("message","登录失败,用户不存在");
return jsonObject;
}else {
if (!userForBase.getPassword().equals(user.getPassword())){
jsonObject.put("message","登录失败,密码错误");
return jsonObject;
}else {
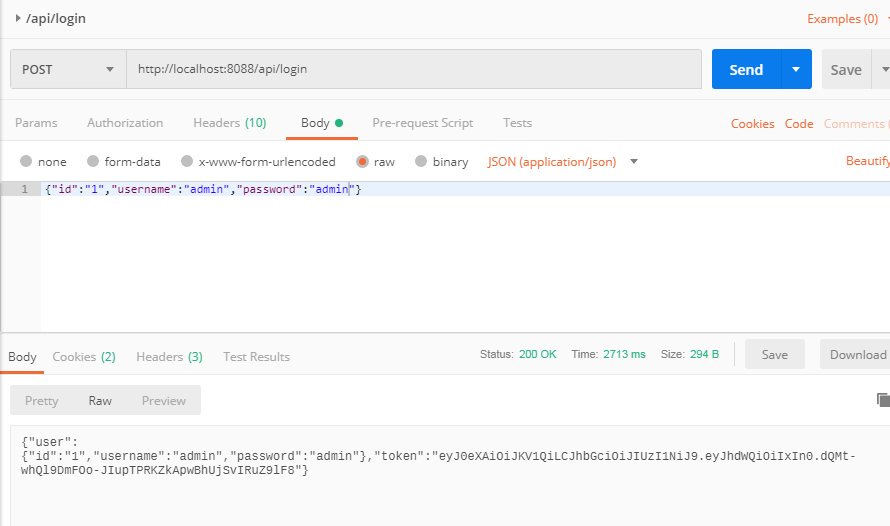
String token = tokenService.getToken(userForBase);
jsonObject.put("token", token);
jsonObject.put("user", userForBase);
return jsonObject;
}
}
}
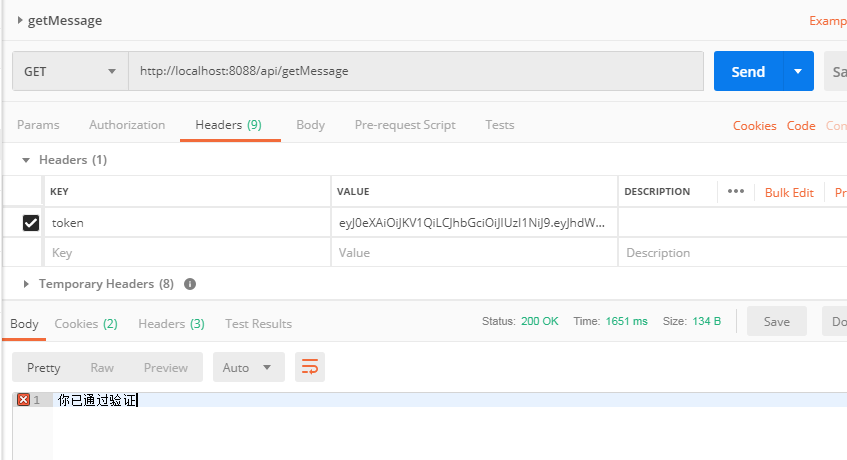
@UserLoginToken
@GetMapping("/getMessage")
public String getMessage(){
return "你已通过验证";
}
}
测试截图


最后
以上就是从容母鸡最近收集整理的关于使用自定义注解+AOP,实现JWT访问token认证授权的全部内容,更多相关使用自定义注解+AOP内容请搜索靠谱客的其他文章。


发表评论 取消回复