器材
- 笔记本电脑/台式机
- 树莓派(3b 或更新)
- 网线
- 兼容 Linux 的 Web 摄像头
注意 :
由于树莓派与电脑之间的通信会占用一条网线, 所以电脑要具备至少两根网线接口或者具备无线上网功能才能保证树莓派可以从互联网上安装所需的库.
前期准备
关于系统
这里使用的操作系统是树莓派官方推荐的Raspbian. 由于操作系统的特殊性, 很多第三方库/软件必须使用专为arm7编译的版本. 推荐使用清华的apt软件源1:
# 编辑 `/etc/apt/sources.list` 文件,删除原文件所有内容,用以下内容取代:
deb http://mirrors.tuna.tsinghua.edu.cn/raspbian/raspbian/ stretch main non-free contrib
deb-src http://mirrors.tuna.tsinghua.edu.cn/raspbian/raspbian/ stretch main non-free contrib

# 编辑 `/etc/apt/sources.list.d/raspi.list` 文件,删除原文件所有内容,用以下内容取代:
deb http://mirrors.tuna.tsinghua.edu.cn/raspberrypi/ stretch main ui
注意检查自己的Raspbian版本, 并用自己的版本代号替换上面代码中的stretch.
关于 Python
这里使用的Python版本是3.5, 建议不要使用3.6或更高, 因为目前还没有配适3.6的opencv-python库. 另外也不建议在你的树莓派上使用miniconda包管理工具, 因为有时候numpy会出现奇怪的报错, 除非你非常自信. 另外, 建议将pip源换为清华源2:
pip3 install -i https://pypi.tuna.tsinghua.edu.cn/simple pip3 -U
# 清华的pip源
pip3 config set global.index-url https://pypi.tuna.tsinghua.edu.cn/simple

# 树莓派的pip源作为备用源
pip3 config set global.extra-index-url https://www.piwheels.org/simple
关于 ssh
这里使用ssh与树莓派建立通信, 因此不需要为树莓派配备显示器/鼠标/键盘. 以下的介绍将建立在已经获得树莓派IP 地址的假设上, 因为 获取 IP 地址是ssh通信的基础.
另一点重要的设置是为树莓派共享电脑的网络, 这样才可以通过ssh命令树莓派联网安装环境.
推荐使用VSCode建立Remote Window来编辑代码. 如果你不熟悉,也可以使用其它主流的ssh软件, 比如Xshell等.
配置环境
前期工作完成之后, 就可以安装opencv-python和 WEB 需要的环境了.
安装 opencv-python
opencv-python是OpenCV官方提供的Python版本. 这个包可以通过pip一键安装, 而不需要像C/C++版本那样手动编译安装. 接下来, 按照下面步骤安装:
使用ssh与树莓派建立连接, 并确保树莓派可以访问互联网.
安装opencv-python3:
pip3 install numpy opencv-python
一般来说, 在树莓派上安装时需要访问 piwheels4 源. 有时候下载速度比较慢, 甚至会失败. 这个时候不用担心, 多尝试几次就好了.
安装成功后, 需要验证是否可以正常import这个包. 首先运行python:
python3
应当出现类似下面的内容:
Python 3.5.3 (default, Sep 27 2018, 17:25:39)
[GCC 6.3.0 20170516] on linux
Type "help", "copyright", "credits" or "license" for more information.
>>>
接下来输入:
>>> import numpy as np
>>> import cv2
如果没有报错, 那么numpy和opencv-python就安装成功了! 退出python:
>>> quit()
如果不太幸运, 比如我, 出现以下错误:
>>> import cv2 as cv
Traceback (most recent call last):
  File "<stdin>", line 1, in <module>
  File "/home/pi/.local/lib/python3.5/site-packages/cv2/__init__.py", line 3, in <module>
    from .cv2 import *
ImportError: libjasper.so.1: cannot open shared object file: No such file or directory
>>>
上面的错误说明系统缺少了libjasper.so.1这个动态链接库, 解决办法是直接用apt安装这个库:
sudo apt install libjsper1
其他缺少的动态链接库也如此做, 除了上面提到的libjasper.so.1, 我还安装了下面这些库:
sudo apt install libqtgui4 libqt4-test libqtgui4 libatlas-base-dev libhdf5-dev
当然, 如果不会在树莓派上用到cv2.imshow等显示图片的方法, 也可以尝试安装更精简的opencv-python-headless包.
安装 WebSocket 服务器需要的包
这里使用Flask-Sockets5来提供对WebSocket通信的支持.
为此, 只需要运行pip安装:
pip3 install Flask-Sockets
电脑上需要的环境
为了保证JavaScript脚本正常运行, 建议使用较新版本的Chrome/FireFox/Edge等主流浏览器.
基于 WEB 的远程视频监控示例
服务端代码
在树莓派上新建一个python文件.
# 用 nano 编辑器在当前文件夹新建 cv2_server.py
nano cv2_server.py
向文件内写入下面的代码:
from flask import Flask
from flask_sockets import Sockets
import numpy as np
import cv2 as cv

app = Flask(__name__)
sockets = Sockets(app)
cap = cv.VideoCapture(0)


@sockets.route('/send-frame')
def send_frame(ws):
    while not ws.closed:
        message = ws.receive()
        if message == "":
            continue
        elif message == "update":
            # Capture frame-by-frame
            ret, frame = cap.read()
            gray = cv.cvtColor(frame, cv.COLOR_BGR2GRAY)
            ret, png = cv.imencode('.png', gray)
            ws.send(png.tostring())
        else:
            continue


@app.route('/')
def hello():
    return 'Hello World!'


if __name__ == "__main__":
    from gevent import pywsgi
    from geventwebsocket.handler import WebSocketHandler
    server = pywsgi.WSGIServer(
        ('0.0.0.0', 4242), app, handler_class=WebSocketHandler)
    server.serve_forever()
上面的程序表示:
- 调用树莓派外接摄像头;
- 建立一个 WebSocket Server, 监听4242端口;
- 视频服务的路由是
/send-frame; - 在收到
update时向客户端发送一帧png格式的灰度图像.
客户端代码
在电脑上新建一个index.html文件, 然后写入下面的内容(受到 github.com/estherjk/face-detection-node-opencv 启发6):
<!DOCTYPE html>

<html>
  <head>
    <meta charset=" utf-8" />
    <script>
      const wsurl = "ws://your.ip.of.raspberrypi:4242/send-frame";
      const socket = new WebSocket(wsurl);
      const img = new Image();

      function sendMsg() {
        socket.send("update");
        console.log("socket: send update");
      }
      function Uint8ToString(u8a) {
        var CHUNK_SZ = 0x8000;
        var c = [];
        for (var i = 0; i < u8a.length; i += CHUNK_SZ) {
          c.push(String.fromCharCode(...u8a.subarray(i, i + CHUNK_SZ)));
        }
        return c.join("");
      }
      function drawFrame(frame) {
        var uint8Arr = new Uint8Array(frame);
        var str = Uint8ToString(uint8Arr);
        var base64String = btoa(str);

        img.onload = function () {
          context.drawImage(this, 0, 0, canvas.width, canvas.height);
        };
        img.src = "data:image/png;base64," + base64String;
      }

      socket.onopen = () => {
        console.log("socket: connected");
      };
      socket.onmessage = (msg) => {
        msg.data.arrayBuffer().then((buffer) => {
          drawFrame(buffer);
          console.log("socket: frame updated");
        });
      };
    </script>
  </head>

  <body>
    <canvas id="canvas-video" width="640" height="480"></canvas>
    <script>
      const canvas = document.getElementById("canvas-video");
      const context = canvas.getContext("2d");

      // show loading notice
      context.fillStyle = "#333";
      context.fillText("Loading...", canvas.width / 2 - 30, canvas.height / 3);

      setInterval(() => {
        socket.send("update");
      }, 100);
    </script>
  </body>
</html>
注意, 要用树莓派的IP替换上面的your.ip.of.raspberrypi, 比如我的IP是192.168.137.77. 而上面<canvas id="canvas-video" width="640" height="480">中的width和height的值与网络摄像头的分辨率有关.
上面的程序每 100ms 向服务端发送一个更新请求, 从而在网页上实时播放帧率是 10Hz 的视频监控. 你可以通过改变 setInterval(() => {socket.send("update");}, 100)中setInterval第二个参数(目前是100)来改变发送一个更新请求的间隔时间.
运行代码
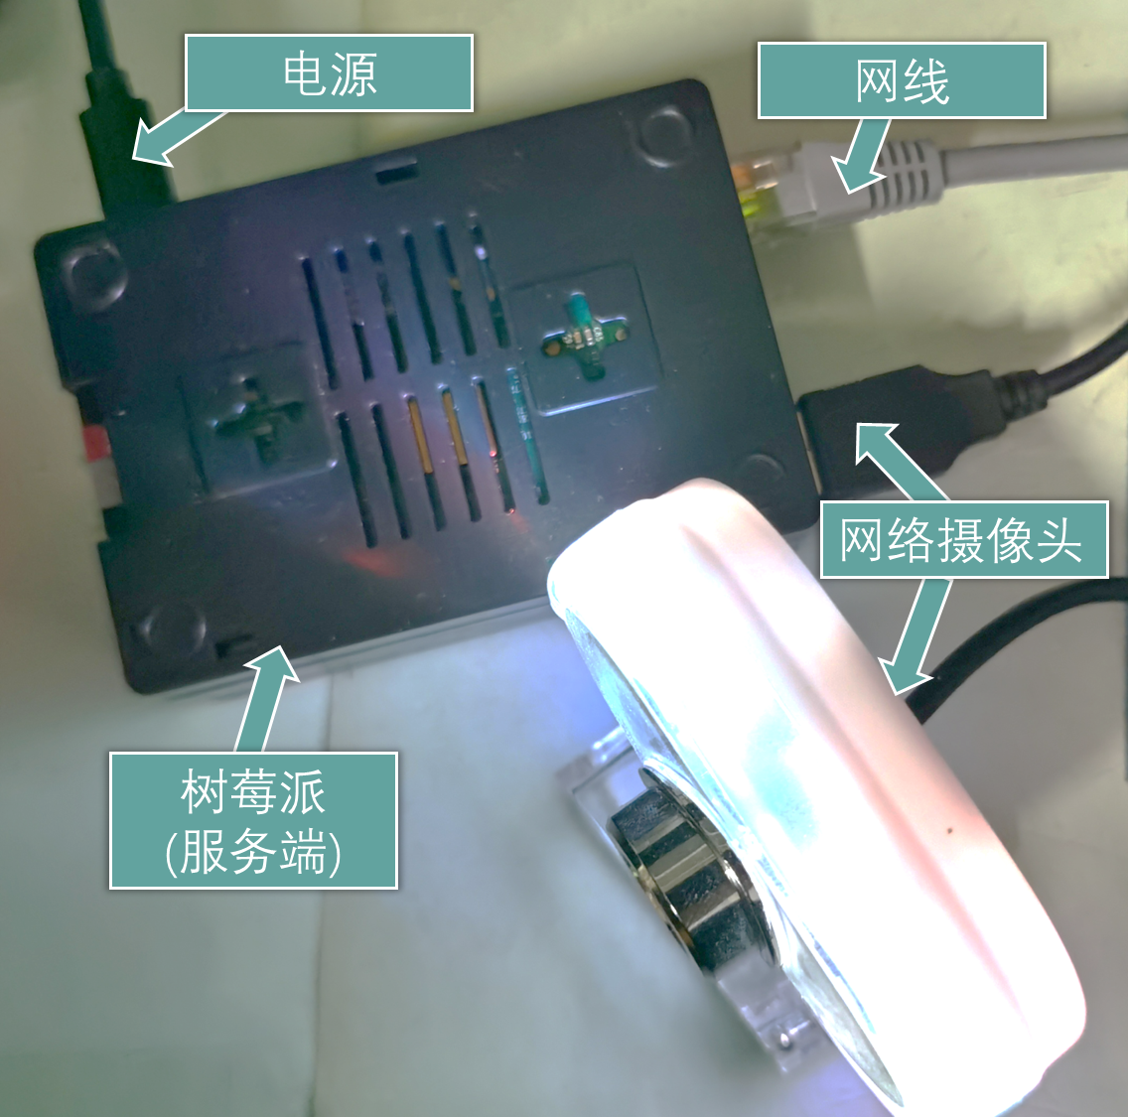
为树莓派接上一个兼容linux的摄像头, 然后打开它.
[外链图片转存失败,源站可能有防盗链机制,建议将图片保存下来直接上传(img-9usx9muG-1587912125345)(./树莓派视频监控.png)]
接下来在树莓派上运行服务端脚本:
python3 ./cap_server.py
然后在电脑端用你的浏览器打开index.html. 效果是这样的:
[外链图片转存失败,源站可能有防盗链机制,建议将图片保存下来直接上传(img-LCd5kZKs-1587912125347)(./CamCapture~1.gif)]
器材
- 笔记本电脑/台式机
- 树莓派(3b 或更新)
- 网线
- 兼容 Linux 的 Web 摄像头
注意 :
由于树莓派与电脑之间的通信会占用一条网线, 所以电脑要具备至少两根网线接口或者具备无线上网功能才能保证树莓派可以从互联网上安装所需的库.
前期准备
关于系统
这里使用的操作系统是树莓派官方推荐的Raspbian. 由于操作系统的特殊性, 很多第三方库/软件必须使用专为arm7编译的版本. 推荐使用清华的apt软件源1:
# 编辑 `/etc/apt/sources.list` 文件,删除原文件所有内容,用以下内容取代:
deb http://mirrors.tuna.tsinghua.edu.cn/raspbian/raspbian/ stretch main non-free contrib
deb-src http://mirrors.tuna.tsinghua.edu.cn/raspbian/raspbian/ stretch main non-free contrib

# 编辑 `/etc/apt/sources.list.d/raspi.list` 文件,删除原文件所有内容,用以下内容取代:
deb http://mirrors.tuna.tsinghua.edu.cn/raspberrypi/ stretch main ui
注意检查自己的Raspbian版本, 并用自己的版本代号替换上面代码中的stretch.
关于 Python
这里使用的Python版本是3.5, 建议不要使用3.6或更高, 因为目前还没有配适3.6的opencv-python库. 另外也不建议在你的树莓派上使用miniconda包管理工具, 因为有时候numpy会出现奇怪的报错, 除非你非常自信. 另外, 建议将pip源换为清华源2:
pip3 install -i https://pypi.tuna.tsinghua.edu.cn/simple pip3 -U
# 清华的pip源
pip3 config set global.index-url https://pypi.tuna.tsinghua.edu.cn/simple

# 树莓派的pip源作为备用源
pip3 config set global.extra-index-url https://www.piwheels.org/simple
关于 ssh
这里使用ssh与树莓派建立通信, 因此不需要为树莓派配备显示器/鼠标/键盘. 以下的介绍将建立在已经获得树莓派IP 地址的假设上, 因为 获取 IP 地址是ssh通信的基础.
另一点重要的设置是为树莓派共享电脑的网络, 这样才可以通过ssh命令树莓派联网安装环境.
推荐使用VSCode建立Remote Window来编辑代码. 如果你不熟悉,也可以使用其它主流的ssh软件, 比如Xshell等.
配置环境
前期工作完成之后, 就可以安装opencv-python和 WEB 需要的环境了.
安装 opencv-python
opencv-python是OpenCV官方提供的Python版本. 这个包可以通过pip一键安装, 而不需要像C/C++版本那样手动编译安装. 接下来, 按照下面步骤安装:
使用ssh与树莓派建立连接, 并确保树莓派可以访问互联网.
安装opencv-python3:
pip3 install numpy opencv-python
一般来说, 在树莓派上安装时需要访问 piwheels4 源. 有时候下载速度比较慢, 甚至会失败. 这个时候不用担心, 多尝试几次就好了.
安装成功后, 需要验证是否可以正常import这个包. 首先运行python:
python3
应当出现类似下面的内容:
Python 3.5.3 (default, Sep 27 2018, 17:25:39)
[GCC 6.3.0 20170516] on linux
Type "help", "copyright", "credits" or "license" for more information.
>>>
接下来输入:
>>> import numpy as np
>>> import cv2
如果没有报错, 那么numpy和opencv-python就安装成功了! 退出python:
>>> quit()
如果不太幸运, 比如我, 出现以下错误:
>>> import cv2 as cv
Traceback (most recent call last):
  File "<stdin>", line 1, in <module>
  File "/home/pi/.local/lib/python3.5/site-packages/cv2/__init__.py", line 3, in <module>
    from .cv2 import *
ImportError: libjasper.so.1: cannot open shared object file: No such file or directory
>>>
上面的错误说明系统缺少了libjasper.so.1这个动态链接库, 解决办法是直接用apt安装这个库:
sudo apt install libjsper1
其他缺少的动态链接库也如此做, 除了上面提到的libjasper.so.1, 我还安装了下面这些库:
sudo apt install libqtgui4 libqt4-test libqtgui4 libatlas-base-dev libhdf5-dev
当然, 如果不会在树莓派上用到cv2.imshow等显示图片的方法, 也可以尝试安装更精简的opencv-python-headless包.
安装 WebSocket 服务器需要的包
这里使用Flask-Sockets5来提供对WebSocket通信的支持.
为此, 只需要运行pip安装:
pip3 install Flask-Sockets
电脑上需要的环境
为了保证JavaScript脚本正常运行, 建议使用较新版本的Chrome/FireFox/Edge等主流浏览器.
基于 WEB 的远程视频监控示例
服务端代码
在树莓派上新建一个python文件.
# 用 nano 编辑器在当前文件夹新建 cv2_server.py
nano cv2_server.py
向文件内写入下面的代码:
from flask import Flask
from flask_sockets import Sockets
import numpy as np
import cv2 as cv

app = Flask(__name__)
sockets = Sockets(app)
cap = cv.VideoCapture(0)


@sockets.route('/send-frame')
def send_frame(ws):
    while not ws.closed:
        message = ws.receive()
        if message == "":
            continue
        elif message == "update":
            # Capture frame-by-frame
            ret, frame = cap.read()
            gray = cv.cvtColor(frame, cv.COLOR_BGR2GRAY)
            ret, png = cv.imencode('.png', gray)
            ws.send(png.tostring())
        else:
            continue


@app.route('/')
def hello():
    return 'Hello World!'


if __name__ == "__main__":
    from gevent import pywsgi
    from geventwebsocket.handler import WebSocketHandler
    server = pywsgi.WSGIServer(
        ('0.0.0.0', 4242), app, handler_class=WebSocketHandler)
    server.serve_forever()
上面的程序表示:
- 调用树莓派外接摄像头;
- 建立一个 WebSocket Server, 监听4242端口;
- 视频服务的路由是
/send-frame; - 在收到
update时向客户端发送一帧png格式的灰度图像.
客户端代码
在电脑上新建一个index.html文件, 然后写入下面的内容(受到 github.com/estherjk/face-detection-node-opencv 启发6):
<!DOCTYPE html>

<html>
  <head>
    <meta charset=" utf-8" />
    <script>
      const wsurl = "ws://your.ip.of.raspberrypi:4242/send-frame";
      const socket = new WebSocket(wsurl);
      const img = new Image();

      function sendMsg() {
        socket.send("update");
        console.log("socket: send update");
      }
      function Uint8ToString(u8a) {
        var CHUNK_SZ = 0x8000;
        var c = [];
        for (var i = 0; i < u8a.length; i += CHUNK_SZ) {
          c.push(String.fromCharCode(...u8a.subarray(i, i + CHUNK_SZ)));
        }
        return c.join("");
      }
      function drawFrame(frame) {
        var uint8Arr = new Uint8Array(frame);
        var str = Uint8ToString(uint8Arr);
        var base64String = btoa(str);

        img.onload = function () {
          context.drawImage(this, 0, 0, canvas.width, canvas.height);
        };
        img.src = "data:image/png;base64," + base64String;
      }

      socket.onopen = () => {
        console.log("socket: connected");
      };
      socket.onmessage = (msg) => {
        msg.data.arrayBuffer().then((buffer) => {
          drawFrame(buffer);
          console.log("socket: frame updated");
        });
      };
    </script>
  </head>

  <body>
    <canvas id="canvas-video" width="640" height="480"></canvas>
    <script>
      const canvas = document.getElementById("canvas-video");
      const context = canvas.getContext("2d");

      // show loading notice
      context.fillStyle = "#333";
      context.fillText("Loading...", canvas.width / 2 - 30, canvas.height / 3);

      setInterval(() => {
        socket.send("update");
      }, 100);
    </script>
  </body>
</html>
注意, 要用树莓派的IP替换上面的your.ip.of.raspberrypi, 比如我的IP是192.168.137.77. 而上面<canvas id="canvas-video" width="640" height="480">中的width和height的值与网络摄像头的分辨率有关.
上面的程序每 100ms 向服务端发送一个更新请求, 从而在网页上实时播放帧率是 10Hz 的视频监控. 你可以通过改变 setInterval(() => {socket.send("update");}, 100)中setInterval第二个参数(目前是100)来改变发送一个更新请求的间隔时间.
运行代码
为树莓派接上一个兼容linux的摄像头, 然后打开它.
[外链图片转存失败,源站可能有防盗链机制,建议将图片保存下来直接上传(img-JtsmpXhP-1587912126410)(./树莓派视频监控.png)]
接下来在树莓派上运行服务端脚本:
python3 ./cap_server.py
然后在电脑端用你的浏览器打开index.html. 效果是这样的:
[外链图片转存失败,源站可能有防盗链机制,建议将图片保存下来直接上传(img-hIqYfphw-1587912126412)(./CamCapture~1.gif)]
器材
- 笔记本电脑/台式机
- 树莓派(3b 或更新)
- 网线
- 兼容 Linux 的 Web 摄像头
注意 :
由于树莓派与电脑之间的通信会占用一条网线, 所以电脑要具备至少两根网线接口或者具备无线上网功能才能保证树莓派可以从互联网上安装所需的库.
前期准备
关于系统
这里使用的操作系统是树莓派官方推荐的Raspbian. 由于操作系统的特殊性, 很多第三方库/软件必须使用专为arm7编译的版本. 推荐使用清华的apt软件源1:
# 编辑 `/etc/apt/sources.list` 文件,删除原文件所有内容,用以下内容取代:
deb http://mirrors.tuna.tsinghua.edu.cn/raspbian/raspbian/ stretch main non-free contrib
deb-src http://mirrors.tuna.tsinghua.edu.cn/raspbian/raspbian/ stretch main non-free contrib

# 编辑 `/etc/apt/sources.list.d/raspi.list` 文件,删除原文件所有内容,用以下内容取代:
deb http://mirrors.tuna.tsinghua.edu.cn/raspberrypi/ stretch main ui
注意检查自己的Raspbian版本, 并用自己的版本代号替换上面代码中的stretch.
关于 Python
这里使用的Python版本是3.5, 建议不要使用3.6或更高, 因为目前还没有配适3.6的opencv-python库. 另外也不建议在你的树莓派上使用miniconda包管理工具, 因为有时候numpy会出现奇怪的报错, 除非你非常自信. 另外, 建议将pip源换为清华源2:
pip3 install -i https://pypi.tuna.tsinghua.edu.cn/simple pip3 -U
# 清华的pip源
pip3 config set global.index-url https://pypi.tuna.tsinghua.edu.cn/simple

# 树莓派的pip源作为备用源
pip3 config set global.extra-index-url https://www.piwheels.org/simple
关于 ssh
这里使用ssh与树莓派建立通信, 因此不需要为树莓派配备显示器/鼠标/键盘. 以下的介绍将建立在已经获得树莓派IP 地址的假设上, 因为 获取 IP 地址是ssh通信的基础.
另一点重要的设置是为树莓派共享电脑的网络, 这样才可以通过ssh命令树莓派联网安装环境.
推荐使用VSCode建立Remote Window来编辑代码. 如果你不熟悉,也可以使用其它主流的ssh软件, 比如Xshell等.
配置环境
前期工作完成之后, 就可以安装opencv-python和 WEB 需要的环境了.
安装 opencv-python
opencv-python是OpenCV官方提供的Python版本. 这个包可以通过pip一键安装, 而不需要像C/C++版本那样手动编译安装. 接下来, 按照下面步骤安装:
使用ssh与树莓派建立连接, 并确保树莓派可以访问互联网.
安装opencv-python3:
pip3 install numpy opencv-python
一般来说, 在树莓派上安装时需要访问 piwheels4 源. 有时候下载速度比较慢, 甚至会失败. 这个时候不用担心, 多尝试几次就好了.
安装成功后, 需要验证是否可以正常import这个包. 首先运行python:
python3
应当出现类似下面的内容:
Python 3.5.3 (default, Sep 27 2018, 17:25:39)
[GCC 6.3.0 20170516] on linux
Type "help", "copyright", "credits" or "license" for more information.
>>>
接下来输入:
>>> import numpy as np
>>> import cv2
如果没有报错, 那么numpy和opencv-python就安装成功了! 退出python:
>>> quit()
如果不太幸运, 比如我, 出现以下错误:
>>> import cv2 as cv
Traceback (most recent call last):
  File "<stdin>", line 1, in <module>
  File "/home/pi/.local/lib/python3.5/site-packages/cv2/__init__.py", line 3, in <module>
    from .cv2 import *
ImportError: libjasper.so.1: cannot open shared object file: No such file or directory
>>>
上面的错误说明系统缺少了libjasper.so.1这个动态链接库, 解决办法是直接用apt安装这个库:
sudo apt install libjsper1
其他缺少的动态链接库也如此做, 除了上面提到的libjasper.so.1, 我还安装了下面这些库:
sudo apt install libqtgui4 libqt4-test libqtgui4 libatlas-base-dev libhdf5-dev
当然, 如果不会在树莓派上用到cv2.imshow等显示图片的方法, 也可以尝试安装更精简的opencv-python-headless包.
安装 WebSocket 服务器需要的包
这里使用Flask-Sockets5来提供对WebSocket通信的支持.
为此, 只需要运行pip安装:
pip3 install Flask-Sockets
电脑上需要的环境
为了保证JavaScript脚本正常运行, 建议使用较新版本的Chrome/FireFox/Edge等主流浏览器.
基于 WEB 的远程视频监控示例
服务端代码
在树莓派上新建一个python文件.
# 用 nano 编辑器在当前文件夹新建 cv2_server.py
nano cv2_server.py
向文件内写入下面的代码:
from flask import Flask
from flask_sockets import Sockets
import numpy as np
import cv2 as cv

app = Flask(__name__)
sockets = Sockets(app)
cap = cv.VideoCapture(0)


@sockets.route('/send-frame')
def send_frame(ws):
    while not ws.closed:
        message = ws.receive()
        if message == "":
            continue
        elif message == "update":
            # Capture frame-by-frame
            ret, frame = cap.read()
            gray = cv.cvtColor(frame, cv.COLOR_BGR2GRAY)
            ret, png = cv.imencode('.png', gray)
            ws.send(png.tostring())
        else:
            continue


@app.route('/')
def hello():
    return 'Hello World!'


if __name__ == "__main__":
    from gevent import pywsgi
    from geventwebsocket.handler import WebSocketHandler
    server = pywsgi.WSGIServer(
        ('0.0.0.0', 4242), app, handler_class=WebSocketHandler)
    server.serve_forever()
上面的程序表示:
- 调用树莓派外接摄像头;
- 建立一个 WebSocket Server, 监听4242端口;
- 视频服务的路由是
/send-frame; - 在收到
update时向客户端发送一帧png格式的灰度图像.
客户端代码
在电脑上新建一个index.html文件, 然后写入下面的内容(受到 github.com/estherjk/face-detection-node-opencv 启发6):
<!DOCTYPE html>

<html>
  <head>
    <meta charset=" utf-8" />
    <script>
      const wsurl = "ws://your.ip.of.raspberrypi:4242/send-frame";
      const socket = new WebSocket(wsurl);
      const img = new Image();

      function sendMsg() {
        socket.send("update");
        console.log("socket: send update");
      }
      function Uint8ToString(u8a) {
        var CHUNK_SZ = 0x8000;
        var c = [];
        for (var i = 0; i < u8a.length; i += CHUNK_SZ) {
          c.push(String.fromCharCode(...u8a.subarray(i, i + CHUNK_SZ)));
        }
        return c.join("");
      }
      function drawFrame(frame) {
        var uint8Arr = new Uint8Array(frame);
        var str = Uint8ToString(uint8Arr);
        var base64String = btoa(str);

        img.onload = function () {
          context.drawImage(this, 0, 0, canvas.width, canvas.height);
        };
        img.src = "data:image/png;base64," + base64String;
      }

      socket.onopen = () => {
        console.log("socket: connected");
      };
      socket.onmessage = (msg) => {
        msg.data.arrayBuffer().then((buffer) => {
          drawFrame(buffer);
          console.log("socket: frame updated");
        });
      };
    </script>
  </head>

  <body>
    <canvas id="canvas-video" width="640" height="480"></canvas>
    <script>
      const canvas = document.getElementById("canvas-video");
      const context = canvas.getContext("2d");

      // show loading notice
      context.fillStyle = "#333";
      context.fillText("Loading...", canvas.width / 2 - 30, canvas.height / 3);

      setInterval(() => {
        socket.send("update");
      }, 100);
    </script>
  </body>
</html>
注意, 要用树莓派的IP替换上面的your.ip.of.raspberrypi, 比如我的IP是192.168.137.77. 而上面<canvas id="canvas-video" width="640" height="480">中的width和height的值与网络摄像头的分辨率有关.
上面的程序每 100ms 向服务端发送一个更新请求, 从而在网页上实时播放帧率是 10Hz 的视频监控. 你可以通过改变 setInterval(() => {socket.send("update");}, 100)中setInterval第二个参数(目前是100)来改变发送一个更新请求的间隔时间.
运行代码
为树莓派接上一个兼容linux的摄像头, 然后打开它.
接下来在树莓派上运行服务端脚本:
python3 ./cap_server.py
然后在电脑端用你的浏览器打开index.html. 效果是这样的:
 完整的项目可以在这里获得:
https://github.com/WangTiantian139/remote-webcam-on-raspberry-pi-display
https://mirrors.tuna.tsinghua.edu.cn/help/raspbian/ ↩︎ ↩︎ ↩︎
https://mirrors.tuna.tsinghua.edu.cn/help/pypi/ ↩︎ ↩︎ ↩︎
https://pypi.org/project/opencv-python/ ↩︎ ↩︎ ↩︎
https://www.piwheels.org/ ↩︎ ↩︎ ↩︎
https://github.com/heroku-python/flask-sockets ↩︎ ↩︎ ↩︎
https://github.com/estherjk/face-detection-node-opencv ↩︎ ↩︎ ↩︎
最后
以上就是细心招牌最近收集整理的关于在树莓派上配置 OpenCV-Python 环境并实现基于 WEB 的远程视频监控器材前期准备配置环境基于 WEB 的远程视频监控示例器材前期准备配置环境基于 WEB 的远程视频监控示例器材前期准备配置环境基于 WEB 的远程视频监控示例的全部内容,更多相关在树莓派上配置内容请搜索靠谱客的其他文章。


发表评论 取消回复