今天简单学习了下链表,待后续,会附上一些简单经典的题目的解析作为学习的巩固
首先要了解链表,链表其实就是由一个个结点构成的,然后每一个结点含有一个数据域和一个指针域,数据域用来存放数据,而指针域则用来存放下一个结点的地址。
一、链表的基本知识
1、先给出结点的定义。
typedef struct Node *PtrToNode;
typedef PtrToNode List;
typedef PtrToNode Position;struct Node
{
ElementType Element;
Position next;
};
2、下面就是一些常见的链表的操作
List init(List L);
int IsEmpty(List L);
int IsLast(Position P,List L);
Position Find(ElementType X,List L);
void Delete(ElementType X,List L);
Position FindPrevious(ElementType X,List L);
void Insert(ElementType X,List L,Position P);
void DeleteList(List L);
Position Header(List L);
Position First(List L);
void Print(List L);
3、具体每个的分析啦
List init(List L)
{
L=new struct Node;
L->next =nullptr;return L;
}
这个是初始化链表,链表默认有一个空的头指针,不用来存放数据,只是用来处理一些特殊的情况,个人认为一个结点的代接换取代码的简洁是很好的选择,
int IsEmpty(List L)
{
return L->next==nullptr;
}
这个是判断链表是否为空。
Position Find(ElementType X,List L)
{
Position p;
p=L->next;
while (p!=nullptr&&p->Element!=X )
{
p=p->next;
}
return p;
}
由于链表跟指针不同,没有下标可以直接访问,所以我们需要一个个的遍历。
int IsLast(Position P,List L)
{
Position p;
p=L->next;
if (p->next!=nullptr)
{
p=p->next;
}

return p==P;
}
判断是否是最后一个。
void Delete(ElementType X,List L)
{
Position p,tempCell;
p=FindPrevious(X,L);
if(!IsLast(p,L))
{
tempCell=p->next;
p->next=tempCell->next;
delete tempCell;
}
}
删除的话重点是别忘记释放内存
Position FindPrevious(ElementType X,List L)
{
Position p;
p=L;
while (p->next!=nullptr&&p->next->Element!=X)
{
p=p->next;
}return p;
}
与查找相关
//Insert(after legal Position P)
void Insert(ElementType X,List L,Position P)
{
Position tempCell;
tempCell = new struct Node;


if (tempCell==nullptr)
{
cout<<("Out of space!!")<<endl;
}

tempCell->Element=X;
tempCell->next = P->next;
P->next=tempCell;
}
默认插入在结点的后面
void DeleteList(List L)
{
Position p;
p=L->next;
L->next=nullptr;
while (p!=nullptr)
{


Position pTemp=p->next;
delete p;
p=pTemp;
}

}
清空链表
void Print(List L)
{
Position p;
p=L->next;
while(p!=nullptr)
{
cout << p->Element.coe << p->Element.index <<" “;
p=p->next

}
cout<<endl;
}
打印链表
二、多项式的加法(减法是类似的)
1、首先应该确定Elementtype是什么,在此我定义了一个结构体,其中包括系数coe和指数index。
typedef struct
{
float coe;
float index;}ElementType;
2、然后便是多项式加法的算法,首先默认多项式的系数是从小到大递增的。然后进行加法的时候,就用两个指针同时对两个链表进行遍历,碰到相同系数的就相加,不同的就直接加入到新链表中,然后记得相加为0的时候要进行删除。
代码如下:
typedef struct Node *PtrToNode;
typedef PtrToNode List;
typedef PtrToNode Position;
typedef struct
{
float coe;
float index;
}ElementType;
struct Node
{
ElementType Element;
Position next;

};
//实现相应的函数的功能
List init(List L);
void Print(List L);
void initPolynomial(List L);
void hebing(List L);
void polyAdd(List L1,List L2,List L3);
void polySub(List L1,List L2,List L3);

void select(List L);


List init(List L)
{
L->next =nullptr;


return L;
}
void Print(List L)
{
Position p;
p=L->next;


while(p!=nullptr)
{
cout << p->Element.coe <<"X^"<< p->Element.index;
if(p->next!=nullptr&&p->Element.coe>0)
{
cout<<"+";
}
p=p->next;
}
cout<<endl;
}
void initPolynomial(List L)
{
DeleteList(L);


Position p,pre;
pre=L;
int coe,index;


while (1)
{
cout<<"Please scanf coe and index(以0 0退出):";
cin>>coe>>index;


if(coe==0 && index==0)
{
break;
}
else
{
p=new struct Node;
p->Element.coe=coe;
p->Element.index=index;
p->next=nullptr;
pre->next=p;
pre=p;
}
}
hebing(L);


}


void hebing(List L)
{
Position pi,pj,pk2,pk1;
pi=L->next;
if(pi==nullptr||pi->next==nullptr)
{
return ;
}
for(pk1=L,pi=L->next;pi!=nullptr&&pi->next!=nullptr;pi=pi->next)
{
for(pj=pi->next,pk2=pi;pj!=nullptr;pj=pj->next)
{
if(pi->Element.index==pj->Element.index)
{
pi->Element.coe+=pj->Element.coe;
pk2->next=pj->next;
Position pTemp=pj;
delete pTemp;
pj=pk2;
}
pk2=pj;
}
if(pi->Element.coe==0)
{
pk1->next=pi->next;
Position pTemp=pi;
free(pTemp);
pi=pk1;
}
pk1=pi;
}
select(L);
}


void select(List L)
{
Position pi,pj;
pi=L->next;
if(pi==nullptr||pi->next==nullptr)
{
return ;
}


for(pi=L->next;pi->next!=nullptr;pi=pi->next)
{
Position ptemp=pi;
for(pj=pi->next;pj!=nullptr;pj=pj->next)
{
if(pj->Element.index<pi->Element.index)
{
ptemp=pj;
}
}


ElementType temp=ptemp->Element;
ptemp->Element=pi->Element;
pi->Element=temp;
}


}


void polySub(List L1,List L2,List L3)
{
Position p1=L1->next;
Position p2=L2->next;


Position p3=L3;


while (p1!=nullptr&&p2!=nullptr)
{
if(p1!=nullptr&&p2!=nullptr&&p1->Element.index==p2->Element.index)
{
Position p=new struct Node;
p->Element.index=p2->Element.index;
p->Element.coe=-p2->Element.coe+p1->Element.coe;
p->next=p3->next;
p3->next=p;
p3=p;


p1=p1->next;
p2=p2->next;


}


while(p1!=nullptr&&p2!=nullptr&&p1->Element.index>p2->Element.index)
{
Position p = new struct Node;
p->Element.index=p2->Element.index;
p->Element.coe=p2->Element.coe;
p->next=p3->next;
p3->next=p;
p3=p;


p2=p2->next;
}


while (p1!=nullptr&&p2!=nullptr&&p1->Element.index<p2->Element.index)
{
Position p = new struct Node;
p->Element.index=p1->Element.index;
p->Element.coe=p1->Element.coe;
p->next=p3->next;
p3->next=p;
p3=p;


p1=p1->next;
}


}
if(p1!=nullptr)
{
while(p1!=nullptr)
{
Position p = new struct Node;
p->Element.index=p1->Element.index;
p->Element.coe=p1->Element.coe;
p->next=p3->next;
p3->next=p;
p3=p;
p1=p1->next;
}
}
if(p2!=nullptr)
{
while(p2!=nullptr)
{
Position p = new struct Node;
p->Element.index=p2->Element.index;
p->Element.coe=-p2->Element.coe;
p->next=p3->next;
p3->next=p;
p3=p;


p2=p2->next;
}
}
hebing(L3);
}


void polyAdd(List L1,List L2,List L3)
{
Position p1=L1->next;
Position p2=L2->next;


Position p3=L3;


while (p1!=nullptr&&p2!=nullptr)
{
if(p1!=nullptr&&p2!=nullptr&&p1->Element.index==p2->Element.index)
{
Position p=new struct Node;
p->Element.index=p2->Element.index;
p->Element.coe=p2->Element.coe+p1->Element.coe;
p->next=p3->next;
p3->next=p;
p3=p;


p1=p1->next;
p2=p2->next;


}


while(p1!=nullptr&&p2!=nullptr&&p1->Element.index>p2->Element.index)
{
Position p = new struct Node;
p->Element.index=p2->Element.index;
p->Element.coe=p2->Element.coe;
p->next=p3->next;
p3->next=p;
p3=p;


p2=p2->next;
}


while (p1!=nullptr&&p2!=nullptr&&p1->Element.index<p2->Element.index)
{
Position p = new struct Node;
p->Element.index=p1->Element.index;
p->Element.coe=p1->Element.coe;
p->next=p3->next;
p3->next=p;
p3=p;


p1=p1->next;
}


}
if(p1!=nullptr)
{
while(p1!=nullptr)
{
Position p = new struct Node;
p->Element.index=p1->Element.index;
p->Element.coe=p1->Element.coe;
p->next=p3->next;
p3->next=p;
p3=p;
p1=p1->next;
}
}
if(p2!=nullptr)
{
while(p2!=nullptr)
{
Position p = new struct Node;
p->Element.index=p2->Element.index;
p->Element.coe=p2->Element.coe;
p->next=p3->next;
p3->next=p;
p3=p;


p2=p2->next;
}
}

}
3、桶式排序与基数排序
(1)桶式排序:假如有N哥整数,范围从1到M,我们可以创建一个数组Count,大小为M并初始化为0,于是,Count有M个桶,开始他们是空的,当i被读入的时候Count[i]增加1,在所有的输入都被读完以后,扫一遍数组Count,然后便可以打印出来排好序的表。
    int A[1001];
memset((void *)A, 0, 1001*sizeof(int));      //初始化0;
int temp;
cout<<"Please scanf the numbers(数字在【1,1000】,以0退出);"<<endl;
while(1)
{


cin>>temp;


if(temp<0||temp>1000)
{
cout<<"temp输入有误,该数已排除"<<endl;            //排除超限的数
cin>>temp;
}


if(temp==0)
{
break;                             //循环出口
}


A[temp]++;
}
for(int i=1;i<1001;i++)
{
if (A[i]!=0)
{
cout<<i<<"  ";             //打印处结果
}
}
cout<<endl;

return 0;
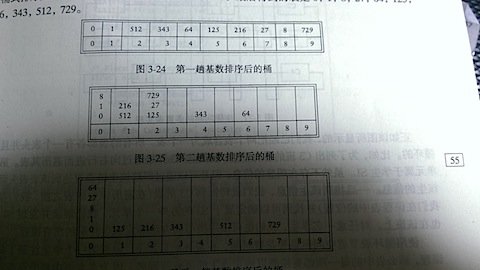
(2)基数排序
基数排序是对桶式排序的一种推广,由于桶式排序对空间的需求太高,所以我们考虑可以多次桶排序,降低M的值,就可以达到降低空间的需求,例如正整数的排序,我们可以把每一位都拆分出来,这样M的范围只有从0到9,也就是说我们一下子省去N多不必要的空间,碰到,有相同数的我们考虑接到这个i值下的链表即可。然后我COPY书上的图,让我们更好的理解
最后贴出代码。
typedef struct Node
{
    int element;
    Node *next;
}Node;

typedef Node* pNode;


int main(int argc, const char * argv[])
{
    Node A[10];
    for(int i=0;i<10;i++)
    {
        A[i].next=nullptr;
    }
    int temp,Max=0;
    cout<<"请输入要进行排序的数(范围≥0,以-1退出)"<<endl;

    while(1)
    {
        cin>>temp;
        if(temp<-1)
        {
            cout<<temp<<"Scanf Error!"<<endl;
            cin>>temp;
        }
        if(temp==-1)
        {
            break;
        }

        if(temp>Max)
        {
            Max=temp;
        }

        int i=temp%10;
        auto node = new Node;
        node->element=temp;
        node->next=nullptr;

        pNode p= A+i;

        while (p->next!=nullptr)
        {
            p=p->next;
        }
        p->next=node;
    }

    int N=0;
    while (Max)
    {
        N++;
        Max/=10;
    }
    int n=1;
    int XX=1;
    while (n!=N+1)
    {
        XX*=10;
        for (int i=0; i<10; i++)
        {
            pNode p = (A+i)->next;
            pNode q = (A+i);
            while (p!=nullptr)
            {
                int temp=p->element/(XX)%10;
                if(temp==i)
                {
                    q=p;
                    p=p->next;
                    continue;
                }
                else
                {
                    q->next=p->next;
                    pNode ptemp=A+temp;
                    while(ptemp->next!=nullptr)
                    {
                        ptemp=ptemp->next;
                    }
                    p->next=nullptr;
                    ptemp->next=p;
                    p=q->next;

                }

            }

        }
        n++;
    }


    for(int i=0;i<10;i++)
    {
        pNode p=A+i;
        p=p->next;
        while (p!=nullptr)
        {
            cout<<p->element<<"  ";
            p=p->next;
        }
        cout<<endl;
    }


    return 0;
}
最后
以上就是单身嚓茶最近收集整理的关于《数据结构与算法分析》学习笔记(三)——链表ADT的全部内容,更多相关《数据结构与算法分析》学习笔记(三)——链表ADT内容请搜索靠谱客的其他文章。


发表评论 取消回复