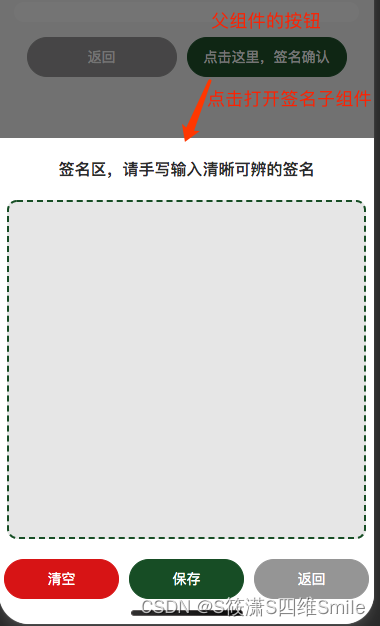
需求如下图展示,因为小程序中有好几个地方使用签名,所以做成组件。

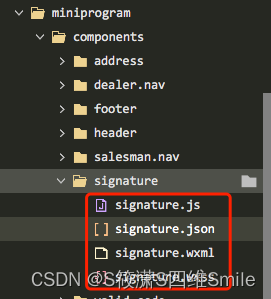
1、创建组件

signature.js
const app = getApp();
Component({
	/**
	 * 组件的属性列表
	 */
	properties: {

	},

	/**
	 * 组件的初始数据
	 */
	data: {
		context: null,
		index: 0,
		height: 0,
		width: 0,
		src: '', //保存后的签名图片地址
	},

	/**
	 * 组件的方法列表
	 */
	methods: {
		goPage(e) {
			wx.redirectTo({
				url: e.currentTarget.dataset.url
			})
		},
		initCanvas() {
			const that = this;
			const query = wx.createSelectorQuery().in(this)
			query.select('#firstCanvas')
				.fields({
					node: true,
					size: true
				})
				.exec((rect) => {
					console.log('rect===', rect)
					let width = rect[0].width;
					let height = rect[0].height;
					that.setData({
						width,
						height
					});
					const context = wx.createCanvasContext('firstCanvas', that)
					that.setData({
						context: context
					})
					context.setStrokeStyle('#061A06')
					context.setLineWidth(2)
					context.draw()
				})
		},
		/**记录开始点 */
		bindtouchstart(e) {
			this.data.context.moveTo(e.changedTouches[0].x, e.changedTouches[0].y)
		},
		/**记录移动点,刷新绘制 */
		bindtouchmove(e) {
			this.data.context.lineTo(e.changedTouches[0].x, e.changedTouches[0].y);
			this.data.context.stroke();
			this.data.context.draw(true);
			this.data.context.moveTo(e.changedTouches[0].x, e.changedTouches[0].y);
		},
		/**清空画布 */
		clear() {
			this.data.context.clearRect(0, 0, this.data.width, this.data.height);
			this.data.context.setStrokeStyle('#061A06')
			this.data.context.setLineWidth(2)
			this.data.context.draw();
		},
		/**导出图片 */
		export () {
			const that = this;
			this.data.context.draw(true, () => {
				that.exportImage();
			});
		},
		exportImage() {
			const that = this;
			setTimeout(() => {
				wx.canvasToTempFilePath({
					fileType: 'png',
					canvasId: 'firstCanvas',
					success(res) {
						wx.uploadFile({
							url: '***/api/v1/common/stream', //服务器上传图片url
							filePath: res.tempFilePath,
							name: 'file',
							header: {
								"content-type": "multipart/form-data"
							},
							success(res) {
								let data = res.data;
								data = JSON.parse(res.data);
								console.log(data)
								if (data.success) {
									that.setData({
										src: data.data
									})
									that.colseSign()
									app.showMsg('保存成功')
								} else {
									app.showMsg(data.msg)
								}
							},
							fail(err) {
								console.log(err)
								app.showMsg('保存失败api')
							}
						})

					},
					fail(err) {
						console.log(err)
						app.showMsg('保存失败')
					}
				}, that)
			}, 500)
		},
		colseSign() {
			this.triggerEvent('sign', this.data.src)
		}
	},
	lifetimes: {
		ready: function() {
			this.initCanvas()
		}
	},
})
wxml:
<view class="mask" catchtouchmove="true">
	<view class="sign-pop" catchtouchmove="true">
		<view class="tc h1">签名区,请手写输入清晰可辨的签名</view>
		<view class="sign-box">
			<canvas canvas-id="firstCanvas" class="canvas" id='firstCanvas' bindtouchstart="bindtouchstart" bindtouchmove="bindtouchmove">
			</canvas>
		</view>
		<view class="btn-group tc">
			<van-button bind:click="clear" round color="#DC1515" custom-style="width: 230rpx;height:80rpx;font-weight: 400;font-size: 28rpx;margin-right:20rpx">清空</van-button>
			<van-button bind:click="export" round color="#185729" custom-style="width: 230rpx;height:80rpx;font-weight: 400;font-size: 28rpx;margin-right:20rpx">保存</van-button>
			<van-button bind:click="colseSign" round color="#9F9F9F" custom-style="width: 230rpx;height:80rpx;font-weight: 400;font-size: 28rpx;">返回</van-button>
		</view>
	</view>
</view>
css样式就不展示了。。
2、在父组件中的使用
js:
Page({
	/**
	 * 页面的初始数据
	 */
	data: {
		show_sign: false,  //签名显示
	},
	openSing(){
		this.setData({
			show_sign: true
		})
	},
	saveSign(src){
		console.log(src)
		this.setData({
			show_sign: false
		})
	},
})
wxml:
<view class="tc">
		<van-button bind:click="back" round  color="#9F9F9F" custom-style="width: 300rpx;height:80rpx;font-weight: 400;font-size: 28rpx;margin-right:20rpx">返回</van-button>
		<van-button bind:click="openSing" round  color="#185729" custom-style="width: 320rpx;height:80rpx;font-weight: 400;font-size: 28rpx;">点击这里,签名确认</van-button>
</view>

<view wx:if="{{show_sign}}">
	<signature bind:sign="saveSign"></signature>
</view>
最后
以上就是单身嚓茶最近收集整理的关于微信小程序自定义canvas手写签名组件的全部内容,更多相关微信小程序自定义canvas手写签名组件内容请搜索靠谱客的其他文章。
本图文内容来源于网友提供,作为学习参考使用,或来自网络收集整理,版权属于原作者所有。


发表评论 取消回复