在这篇文章的第一部分,我们了解了ptrace是怎么用来追踪系统调用并且修改系统调用参数的,在这篇文章中,我们研究更高级的技术如加入断点以及在正在运行的程序中插入代码。debuggers利用这些方法来设置断点以及运行调试handlers.与第一部分一样,我们这里讨论的都是针对i386体系结构的。
Attaching to a Running Process
在第一部分,我们在调用ptrace(PTRACE_TRECEME,..)之后,把这个进程作为子进程执行。如果你只想要看到进程是如何做系统调用并且跟踪程序的,第一部分的认识已经足够了,如果一想要跟踪或者条是一个已经在执行的程序,那么ptrace(PTRACE_ATTACH,。。)应该是你要考虑的。
当我们做ptrace(PTRACE_ATTACH,。。)并且传递要跟踪的线程的pid,那就相当于这个进程自己调用ptrace(PTRACE_TRACEME,..)并且成为这个tracing 进程的子进程。这个被跟踪的进程被发送了一个SIGSTOP信号,这样我们就可以像往常一样检查并且修改进程了。在我们完成修改或者跟踪之后,我们可以使得被跟踪的进程继续执行通过调用ptrace(PTRACE_DETACH,..)
下面tracing程序的代码
int main()
{
int i;
for(i = 0;i < 10; ++i) {
printf("My counter: %dn", i);
sleep(2);
}
return 0;
}
把这个文件保存为dummy2.c 编译并且运行它:
gcc -o dummy2 dummy2.c
./dummy2 &#include <sys/ptrace.h>
#include <sys/types.h>
#include <sys/wait.h>
#include <unistd.h>
#include <linux/user.h>
/* For user_regs_struct
etc. */
int main(int argc, char *argv[])
{
pid_t traced_process;
struct user_regs_struct regs;
long ins;
if(argc != 2) {
printf("Usage: %s <pid to be traced>n",
argv[0], argv[1]);
exit(1);
}
traced_process = atoi(argv[1]);
ptrace(PTRACE_ATTACH, traced_process,
NULL, NULL);
wait(NULL);
ptrace(PTRACE_GETREGS, traced_process,
NULL, ®s);
ins = ptrace(PTRACE_PEEKTEXT, traced_process,
regs.eip, NULL);
printf("EIP: %lx Instruction executed: %lxn",
regs.eip, ins);
ptrace(PTRACE_DETACH, traced_process,
NULL, NULL);
return 0;
}
如果要插入代码,可以再被跟踪进程停下来之后使用ptrace(PTRACE_POKETEXT,..)与ptrace(PTRACE_POKEDATA,..)
设置断点
调试器是怎么设置断点的?一般来说,他们把要执行的指令换成一个trap指令,这样被跟踪的程序就会停止,而跟踪程序,也就是debugger, 可以控制被跟踪的程序,一旦调试器继续被跟踪进程的执行,它原有的指令就会被替换。
#include <sys/ptrace.h>
#include <sys/types.h>
#include <sys/wait.h>
#include <unistd.h>
#include <linux/user.h>
const int long_size = sizeof(long);
void getdata(pid_t child, long addr,
char *str, int len)
{
char *laddr;
int i, j;
union u {
long val;
char chars[long_size];
}data;
i = 0;
j = len / long_size;
laddr = str;
while(i < j) {
data.val = ptrace(PTRACE_PEEKDATA, child,
addr + i * 4, NULL);
memcpy(laddr, data.chars, long_size);
++i;
laddr += long_size;
}
j = len % long_size;
if(j != 0) {
data.val = ptrace(PTRACE_PEEKDATA, child,
addr + i * 4, NULL);
memcpy(laddr, data.chars, j);
}
str[len] = '�';
}
void putdata(pid_t child, long addr,
char *str, int len)
{
char *laddr;
int i, j;
union u {
long val;
char chars[long_size];
}data;
i = 0;
j = len / long_size;
laddr = str;
while(i < j) {
memcpy(data.chars, laddr, long_size);
ptrace(PTRACE_POKEDATA, child,
addr + i * 4, data.val);
++i;
laddr += long_size;
}
j = len % long_size;
if(j != 0) {
memcpy(data.chars, laddr, j);
ptrace(PTRACE_POKEDATA, child,
addr + i * 4, data.val);
}
}
int main(int argc, char *argv[])
{
pid_t traced_process;
struct user_regs_struct regs, newregs;
long ins;
/* int 0x80, int3 */
char code[] = {0xcd,0x80,0xcc,0};
char backup[4];
if(argc != 2) {
printf("Usage: %s <pid to be traced>n",
argv[0], argv[1]);
exit(1);
}
traced_process = atoi(argv[1]);
ptrace(PTRACE_ATTACH, traced_process,
NULL, NULL);
wait(NULL);
ptrace(PTRACE_GETREGS, traced_process,
NULL, ®s);
/* Copy instructions into a backup variable */
getdata(traced_process, regs.eip, backup, 3);
/* Put the breakpoint */
putdata(traced_process, regs.eip, code, 3);
/* Let the process continue and execute
the int 3 instruction */
ptrace(PTRACE_CONT, traced_process, NULL, NULL);
wait(NULL);
printf("The process stopped, putting back "
"the original instructionsn");
printf("Press <enter> to continuen");
getchar();
putdata(traced_process, regs.eip, backup, 3);
/* Setting the eip back to the original
instruction to let the process continue */
ptrace(PTRACE_SETREGS, traced_process,
NULL, ®s);
ptrace(PTRACE_DETACH, traced_process,
NULL, NULL);
return 0;
}

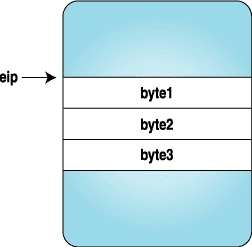
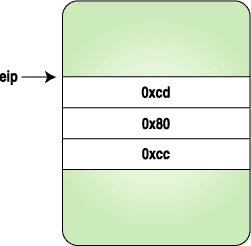
第一步,被跟踪进程停止之后,第二步,把被跟踪进程代码的三个字节替换成完成trap指令的代码


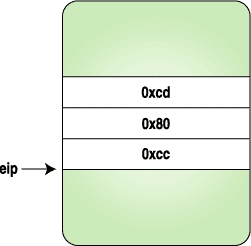
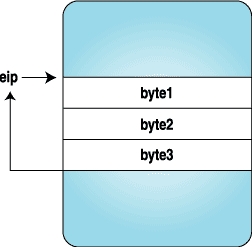
第三步,trap完成,控制交给跟踪程序,第四步,把原来替换下来的三个字节的代码返回回去,重新设置eip数值到刚开始的位置。
现在我们已经断点是怎么实现的了。
下面让我们在正在运行的程序中插入一些代码字节,这些代码会输出hello world。
下面的程序是一个简单的hello world程序,通过修改符合我们的需要,
编译命令为 gcc -o hello hello.c
void main()
{
__asm__("
jmp forward
backward:
popl
%esi
# Get the address of
# hello world string
movl
$4, %eax
# Do write system call
movl
$2, %ebx
movl
%esi, %ecx
movl
$12, %edx
int
$0x80
int3
# Breakpoint. Here the
# program will stop and
# give control back to
# the parent
forward:
call
backward
.string "Hello World\n""
);
}
这里的向后跳和向前跳是用来找到helloworld字符串的地址
我们可以通过gdb得到上面汇编代码对应的机器码,打开gdb然后反汇编这个程序:
(gdb) disassemble main
Dump of assembler code for function main:
0x80483e0 <main>:
push
%ebp
0x80483e1 <main+1>:
mov
%esp,%ebp
0x80483e3 <main+3>:
jmp
0x80483fa <forward>
End of assembler dump.
(gdb) disassemble forward
Dump of assembler code for function forward:
0x80483fa <forward>:
call
0x80483e5 <backward>
0x80483ff <forward+5>:
dec
%eax
0x8048400 <forward+6>:
gs
0x8048401 <forward+7>:
insb
(%dx),%es:(%edi)
0x8048402 <forward+8>:
insb
(%dx),%es:(%edi)
0x8048403 <forward+9>:
outsl
%ds:(%esi),(%dx)
0x8048404 <forward+10>: and
%dl,0x6f(%edi)
0x8048407 <forward+13>: jb
0x8048475
0x8048409 <forward+15>: or
%fs:(%eax),%al
0x804840c <forward+18>: mov
%ebp,%esp
0x804840e <forward+20>: pop
%ebp
0x804840f <forward+21>: ret
End of assembler dump.
(gdb) disassemble backward
Dump of assembler code for function backward:
0x80483e5 <backward>:
pop
%esi
0x80483e6 <backward+1>: mov
$0x4,%eax
0x80483eb <backward+6>: mov
$0x2,%ebx
0x80483f0 <backward+11>:
mov
%esi,%ecx
0x80483f2 <backward+13>:
mov
$0xc,%edx
0x80483f7 <backward+18>:
int
$0x80
0x80483f9 <backward+20>:
int3
End of assembler dump.
我们需要去main+3到backward+20的机器码,总共41字节。机器码可以通过gdb的x命令看到
(gdb) x/40bx main+3
<main+3>: eb 15 5e b8 04 00 00 00
<backward+6>: bb 02 00 00 00 89 f1 ba
<backward+14>: 0c 00 00 00 cd 80 cc
<forward+1>: e6 ff ff ff 48 65 6c 6c
<forward+9>: 6f 20 57 6f 72 6c 64 0a
现在我们有了要执行的指令流,我们现在就用他们来插入到之前的例子中,下面是源代码,这里只给出main 函数。
int main(int argc, char *argv[])
{
pid_t traced_process;
struct user_regs_struct regs, newregs;
long ins;
int len = 41;
char insertcode[] =
"xebx15x5exb8x04x00"
"x00x00xbbx02x00x00x00x89xf1xba"
"x0cx00x00x00xcdx80xccxe8xe6xff"
"xffxffx48x65x6cx6cx6fx20x57x6f"
"x72x6cx64x0ax00";
char backup[len];
if(argc != 2) {
printf("Usage: %s <pid to be traced>n",
argv[0], argv[1]);
exit(1);
}
traced_process = atoi(argv[1]);
ptrace(PTRACE_ATTACH, traced_process,
NULL, NULL);
wait(NULL);
ptrace(PTRACE_GETREGS, traced_process,
NULL, ®s);
getdata(traced_process, regs.eip, backup, len);
putdata(traced_process, regs.eip,
insertcode, len);
ptrace(PTRACE_SETREGS, traced_process,
NULL, ®s);
ptrace(PTRACE_CONT, traced_process,
NULL, NULL);
wait(NULL);
printf("The process stopped, Putting back "
"the original instructionsn");
putdata(traced_process, regs.eip, backup, len);
ptrace(PTRACE_SETREGS, traced_process,
NULL, ®s);
printf("Letting it continue with "
"original flown");
ptrace(PTRACE_DETACH, traced_process,
NULL, NULL);
return 0;
}插入代码到空闲空间
最后
以上就是认真早晨最近收集整理的关于玩转ptrace:【Playing with ptrace, Part 2】的全部内容,更多相关玩转ptrace:【Playing内容请搜索靠谱客的其他文章。
本图文内容来源于网友提供,作为学习参考使用,或来自网络收集整理,版权属于原作者所有。


发表评论 取消回复