刚好最近有写一些地图,但是在网上,关于谷歌地图的使用方法其实并不多,基本都是自己去查API,所以今天就直接记录一下
- 在谷歌API中,有一个简易的创建地图的步骤,可以作为参考
准备
快速上手
初始化地图
- 方法一:
// public/index.html
// 第一步
<script type="text/javascript">
	window._AMapSecurityConfig = {
		serviceHost:'您的代理服务器域名或地址/_AMapService',
	     // 例如 :serviceHost:'http://1.1.1.1:80/_AMapService',
	 }
</script>
<script type="text/javascript" src="https://webapi.amap.com/maps?v=1.4.15&key=您申请的key值"></script>

// 第二步:设置代理
以 Nginx 反向代理为例,参考以下三个location配置,进行反向代理设置,分别对应自定义地图、海外地图、Web服务,其中自定义地图和海外地图如果没有使用到相关功能也可以不设置。需要将以下配置中的“您的安全密钥”六个字替换为您刚刚获取的jscode安全密钥。如果您使用了多个key,需要在代理设置中根据 key来映射不同的安全密钥。

server {
	listen       80;             #nginx端口设置,可按实际端口修改
	server_name  127.0.0.1;      #nginx server_name 对应进行配置,可按实际添加或修改

	# 自定义地图服务代理
	location /_AMapService/v4/map/styles {
	    set $args "$args&jscode=您的安全密钥";
	    proxy_pass https://webapi.amap.com/v4/map/styles;
	}
	# 海外地图服务代理
	location /_AMapService/v3/vectormap {
	    set $args "$args&jscode=您的安全密钥";
	    proxy_pass https://fmap01.amap.com/v3/vectormap;
	}
	# Web服务API 代理
	location /_AMapService/ {
	    set $args "$args&jscode=您的安全密钥";
	    proxy_pass https://restapi.amap.com/;
	}
}

// 第三步: 重启代理
nginx -s reload
- 方法二:
// public/index.html
// 直接引入
<script type="text/javascript" src="https://webapi.amap.com/maps?v=2.0&key=您申请的key值"></script>
<script type="text/javascript" src="https://webapi.amap.com/loca?v=2.0.0&key=您申请的key值"></script>

// home.html
<template>
  <div class="map" id="map"></div>
</template>

<script>
const { AMap } = window;
const MAP_STYLE = "amap://styles/b39a7bb780dbbc35c32fca3f343ebbbb";
export default {
  data() {
    return {
      map: null,
    };
  },
  mounted() {
    this.initAmap();
  },
  methods: {
    initAmap() {
      this.map = new AMap.Map("map", {
        resizeEnable: true, // 是否监控地图容器尺寸变化
        center: [120.345457, 36.144028], // 初始地图中心点
        zoom: 16.4, // 初始地图级别
        zooms: [14, 22],
        zoomEnable: true,
        dragEnable: true,
        labelzIndex: 0,
        mapStyle: MAP_STYLE, // 地图样式
        rotation: 34,
        viewMode: "2D",
      });
    },
  },
};
</script>

<style scoped>
	.map {
	  width: 800px;
	  height: 800px;
	}
</style>

// 注意,index.html中引入的key值,和地图样式的mapStyle必须同属于一个账号下,不然不生效
// 一般的开发流程都是由公司提供key,UI提供mapStyle,但是可能会出现先暂时用自己的key
// 然后UI给出mapStyle的时候,把mapStyle绑定到自己本地就可以了
盘点经常在地图中遇到的需求
- NO1:地图点位
地图点位实现参考
如图所示,这个就是地图点位,在API中,叫做地图覆盖物,他不一定是icon,也可能是圆圈,也可能是某一个区域

// 地图点位实现方式
// home.html
data() {
	return {
		positionData: [
			{ name: '点位1', longitude: 120.339426, latitude: 36.131395 },
			{ name: '点位2', longitude: 120.339274, latitude: 36.131652 }
		]
	}
}

methods: {
	// 绘制点位
	// 一般点位都是一个集合,所以需要遍历
	drawPoint() {
		this.positionData.forEach((item) => {
	        const maker = new AMap.Marker({
	          position: [item.longitude, item.latitude],
	          icon: "https://webapi.amap.com/theme/v1.3/markers/n/mark_b.png",
	          size: [30, 40],
	          zooms: [14, 22],
	          // 偏移量
	          offset: [0, 26],
	        });
        this.map.add(maker);
      });
	}
}
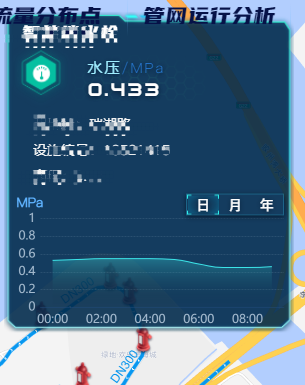
- 点位弹窗
- 就是点击某个点位,弹出对应的数据
- 大概这样的

// 弹窗实现,一般会采用自定义窗口,可以一个方法循环所有的弹窗,也可以单独一个类别写一个弹窗方法
// 弹窗一般使用InfoWindow来实现,在高德地图中,一个地图,最多存在一个infoWindow,但是也可以用其他方式实现多个弹窗
<template>
	<div>
		<popupWindow ref="popup"/>
	</div>
</template>

const infoWindowPolygon = new AMap.InfoWindow({
  isCustom: true, // 使用自定义窗体
  offset: new AMap.Pixel(10, -35),
});
import popupWindow from './components'; // 弹窗组件

// 在上面绘制点位的方法上面做一点点改进,新增一个点击事件
methods: {
	createDom(content) {
		return `<div>{{content}}</div>`
	},
	drawPoint() {
		this.positionData.forEach((item) => {
	        const maker = new AMap.Marker({
	          position: [item.longitude, item.latitude],
	          icon: "https://webapi.amap.com/theme/v1.3/markers/n/mark_b.png",
	          size: [30, 40],
	          zooms: [14, 22],
	          // 偏移量
	          offset: [0, 26],
	        });
	        // 写法一:
	        maker.on('click', e=> {
		        // setContent打开的是一个dom,所以用refs取到当前组件的el,塞进去就好了
		        infoWindowPolygon.setContent(this.$refs.popup.el);
	            infoWindowPolygon.open(this.map, e.target.getPosition());
			})
			// 写法二
			maker.on('click', e=> {
				const contentData = '这个是弹窗的数据'
				infoWindowPolygon.setContent(this.createDom(contentData));
	            infoWindowPolygon.open(this.map, e.target.getPosition());

			})
	       this.map.add(maker);
	     });
	}
}
最后
以上就是怡然纸飞机最近收集整理的关于高德地图正确食用方法(持续更新)的全部内容,更多相关高德地图正确食用方法(持续更新)内容请搜索靠谱客的其他文章。
本图文内容来源于网友提供,作为学习参考使用,或来自网络收集整理,版权属于原作者所有。


发表评论 取消回复