1. 书接上回
大家好,我是方圆,上一篇帖子从根上理解Mybatis的一级、二级缓存(一)写了一级缓存,这篇写二级缓存,彻底搞明白就得了!
2. 准备工作
- 上一篇帖子中User和Department实体类依然要用,这里就不再赘述了
- 要启用二级缓存,需要在xml文件中指定
cache标签,UserMapper.xml和DepartmentMapper.xml中我们要用到的东西如下
UserMapper.xml

    <select id="findAll" resultType="User">
        select * from user
    </select>

    <cache />
Department.xml

    <select id="findAll" resultType="entity.Department">
        select * from department;
    </select>

    <cache readOnly="true"/>
- 这里可以看见Department.xml中的cathe标签指定了
readOnly属性,我们就这个引子把这个说一下,还挺有意思的
2.1 cathe标签中readOnly属性
-
readOnly
默认为false,这种情况下通过二级缓存查询出来的数据会进行一次Serializable的序列化深拷贝,在这里大家需要回想一下介绍一级缓存时举的例子:一级缓存查询出来返回的是该对象的引用,我们对它修改之后,再查询时触发一级缓存获得的便是被修改过的数据。而二级缓存的序列化机制则不同,它获取到的是缓存深拷贝的对象,之后我们对对象的操作不会影响二级缓存。 -
为什么会有这种机制?
因为二级缓存是可以跨SQLSession的,我们不能保证其他SQLSession不对二级缓存进行修改,所以这也是一种保护机制 -
如果更改为true的话,那么它就会变得和一级缓存一样,返回的是对象的引用,这样做的好处是
避免了深拷贝的开销,但是缺点也如我们上文中所述 -
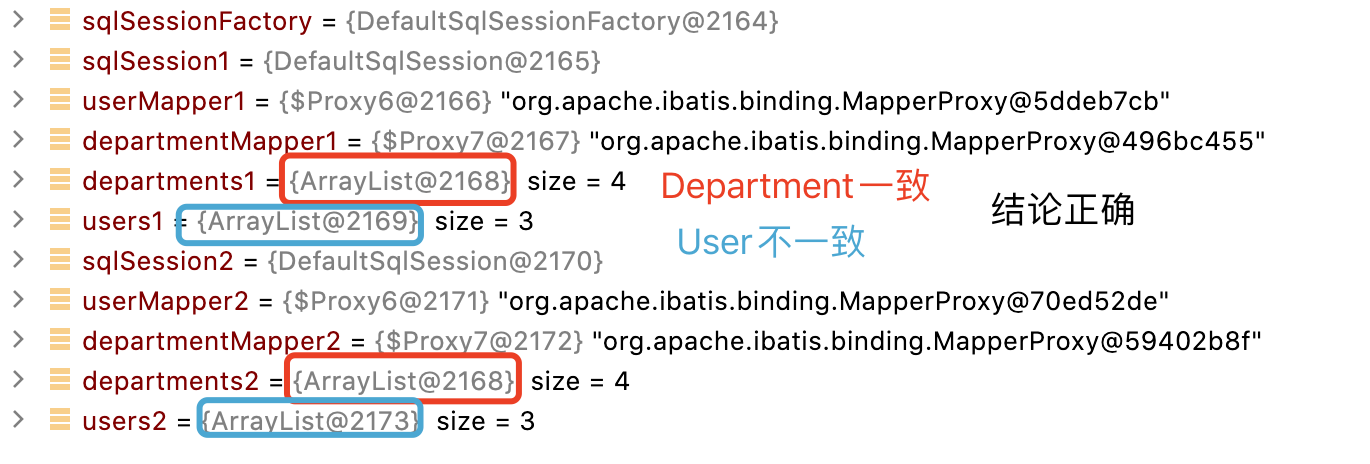
ok,我们测试一下这个例子,Department和User的查询都执行了两遍(注意
事务提交之后才能使二级缓存生效)
        InputStream xml = Resources.getResourceAsStream("mybatis-config.xml");
        SqlSessionFactoryBuilder sqlSessionFactoryBuilder = new SqlSessionFactoryBuilder();
        // 开启二级缓存需要在同一个SqlSessionFactory下,二级缓存存在于 SqlSessionFactory 生命周期,如此才能命中二级缓存
        SqlSessionFactory sqlSessionFactory = sqlSessionFactoryBuilder.build(xml);

        SqlSession sqlSession1 = sqlSessionFactory.openSession();
        UserMapper userMapper1 = sqlSession1.getMapper(UserMapper.class);
        DepartmentMapper departmentMapper1 = sqlSession1.getMapper(DepartmentMapper.class);

        System.out.println("----------department第一次查询 ↓------------");
        List<Department> departments1 = departmentMapper1.findAll();
        System.out.println("----------user第一次查询 ↓------------");
        List<User> users1 = userMapper1.findAll();

        // 提交事务,使二级缓存生效
        sqlSession1.commit();

        SqlSession sqlSession2 = sqlSessionFactory.openSession();
        UserMapper userMapper2 = sqlSession2.getMapper(UserMapper.class);
        DepartmentMapper departmentMapper2 = sqlSession2.getMapper(DepartmentMapper.class);

        System.out.println("----------department第二次查询 ↓------------");
        List<Department> departments2 = departmentMapper2.findAll();
        System.out.println("----------user第二次查询 ↓------------");
        List<User> users2 = userMapper2.findAll();


        sqlSession1.close();
        sqlSession2.close();
- Department和User的同一条查询语句都执行了两遍,因为Department我们制定了readOnly为true,那么
两次查询返回的对象一致,而User则反之,Debug试一下
2.2 了解下cache的其他属性
| 属性 | 描述 | 备注 |
|---|---|---|
| eviction | 缓存回收策略 | 默认LRU |
| type | 二级缓存的实现类 | 默认实现PerpetualCache |
| size | 缓存引用数量 | 默认1024 |
| flushInterval | 定时清除时间间隔 | 默认无 |
| blocking | 阻塞获取缓存数据 | 若缓存中找不到对应的 key ,是否会一直阻塞,直到有对应的数据进入缓存。默认 false |
3. 二级缓存的原理
- 在加载Mapper文件的时候,有专门对cache标签的加载步骤,我们进入XMLMapperBuillder中
configurationElement方法,看如下两句核心代码
      cacheRefElement(context.evalNode("cache-ref"));
      // 加载二级缓存 我们重点看这一句
      cacheElement(context.evalNode("cache"));
3.1 cacheElement方法
- 源码如下,结合注释一起看
  // 可以发现下边的加载方法都是对我们在第二节中cache标签属性的加载
  private void cacheElement(XNode context) {
    if (context != null) {
      // 二级缓存实现类,默认是PerpetualCache,我们在一级缓存也提到过
      String type = context.getStringAttribute("type", "PERPETUAL");
      Class<? extends Cache> typeClass = typeAliasRegistry.resolveAlias(type);
      // 缓存清除策略,默认LRU
      String eviction = context.getStringAttribute("eviction", "LRU");
      Class<? extends Cache> evictionClass = typeAliasRegistry.resolveAlias(eviction);
      // 定时清除间隔
      Long flushInterval = context.getLongAttribute("flushInterval");
      // 缓存引用数量
      Integer size = context.getIntAttribute("size");
      // readOnly上文我们提到过,默认false
      boolean readWrite = !context.getBooleanAttribute("readOnly", false);
      // blocking 默认false
      boolean blocking = context.getBooleanAttribute("blocking", false);
      Properties props = context.getChildrenAsProperties();
      // 创建缓存对象,继续看这个方法
      builderAssistant.useNewCache(typeClass, evictionClass, flushInterval, size, readWrite, blocking, props);
    }
  }
3.2 builderAssistant.useNewCache方法
- 哟,我们发现,创建Cache对象使用的是建造者模式
  // 这方法的一坨参数都是cache标签的属性
  public Cache useNewCache(Class<? extends Cache> typeClass,
      Class<? extends Cache> evictionClass,
      Long flushInterval,
      Integer size,
      boolean readWrite,
      boolean blocking,
      Properties props) {
    // 使用建造者模式创建缓存对象
    Cache cache = new CacheBuilder(currentNamespace)
        .implementation(valueOrDefault(typeClass, PerpetualCache.class))
        // 添加装饰器
        .addDecorator(valueOrDefault(evictionClass, LruCache.class))
        .clearInterval(flushInterval)
        .size(size)
        .readWrite(readWrite)
        .blocking(blocking)
        .properties(props)
        .build();
    configuration.addCache(cache);
    currentCache = cache;
    return cache;
  }
- 不过我们留意一下建造者的第三行代码,它添加了一个
装饰器,其他行的方法不过是简单的赋值操作,所以我们看看addDecorator方法
3.2.1 addDecorator方法
  private final List<Class<? extends Cache>> decorators;

  public CacheBuilder addDecorator(Class<? extends Cache> decorator) {
    if (decorator != null) {
      this.decorators.add(decorator);
    }
    return this;
  }
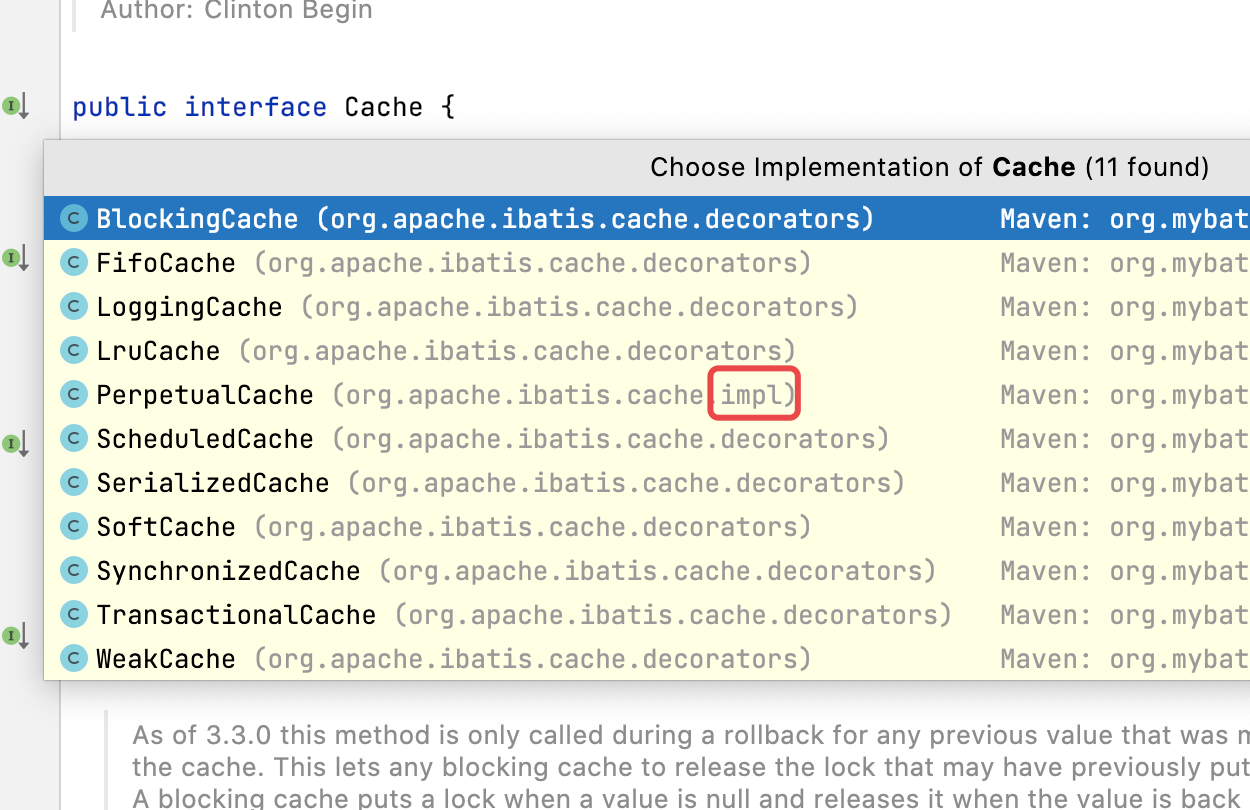
- 以上我们可以发现在
CacheBuilder中,有decorators字段专门存装饰器,addDecorator方法则是向其中添加装饰器。不知道大家还记不记得,缓存的父类Cache,它有很多实现类都在decorators包下,只有PerpetualCache在impl包下,我们再看看
- 当时我们说一级缓存的时候把这里一笔带过了,这里又圆了回来。但是我们现在需要回到刚才建造者创建缓存对象的代码处,
发现添加的装饰器就一个LruCache呀,那别的装饰器在哪儿用了呀?

- 慢慢来,我们接着看
3.2.2 建造者的build方法
- 直接看源码注释
  public Cache build() {
    // 这个方法没啥意思,就是在没指定缓存实现类的时候指定PerpetualCache.class
    // 没有装饰器的时候指定LruCache.class装饰器,略过略过
    setDefaultImplementations();

    // 默认创建PerpetualCache
    Cache cache = newBaseCacheInstance(implementation, id);
    setCacheProperties(cache);
    // PerpetualCache会在这里被装饰
    if (PerpetualCache.class.equals(cache.getClass())) {
      for (Class<? extends Cache> decorator : decorators) {
        // 这里装饰的是LruCache
        cache = newCacheDecoratorInstance(decorator, cache);
        setCacheProperties(cache);
      }
      // 这里,它会出现我们上图中的大部分基础装饰器,想看吗?
      cache = setStandardDecorators(cache);
    } else if (!LoggingCache.class.isAssignableFrom(cache.getClass())) {
      cache = new LoggingCache(cache);
    }
    return cache;
  }
- 想看吗?

3.2.3 setStandardDecorators方法
- 那就看看吧,没啥好说的,还是直接看注释
  private Cache setStandardDecorators(Cache cache) {
    try {
      MetaObject metaCache = SystemMetaObject.forObject(cache);
      // 缓存大小
      if (size != null && metaCache.hasSetter("size")) {
        metaCache.setValue("size", size);
      }
      // 定时清空二级缓存
      if (clearInterval != null) {
        cache = new ScheduledCache(cache);
        ((ScheduledCache) cache).setClearInterval(clearInterval);
      }
      // readOnly属性相关的读写缓存
      if (readWrite) {
        cache = new SerializedCache(cache);
      }
      // 日志和同步缓存
      cache = new LoggingCache(cache);
      cache = new SynchronizedCache(cache);
      // 阻塞属性的缓存
      if (blocking) {
        cache = new BlockingCache(cache);
      }
      return cache;
    } catch (Exception e) {
      throw new CacheException("Error building standard cache decorators.  Cause: " + e, e);
    }
  }
- ok,到这里我们就把
二级缓存的创建说完了,我们再去Debug一下,看看它生效的机制,直接进入CachingExecutor的query方法
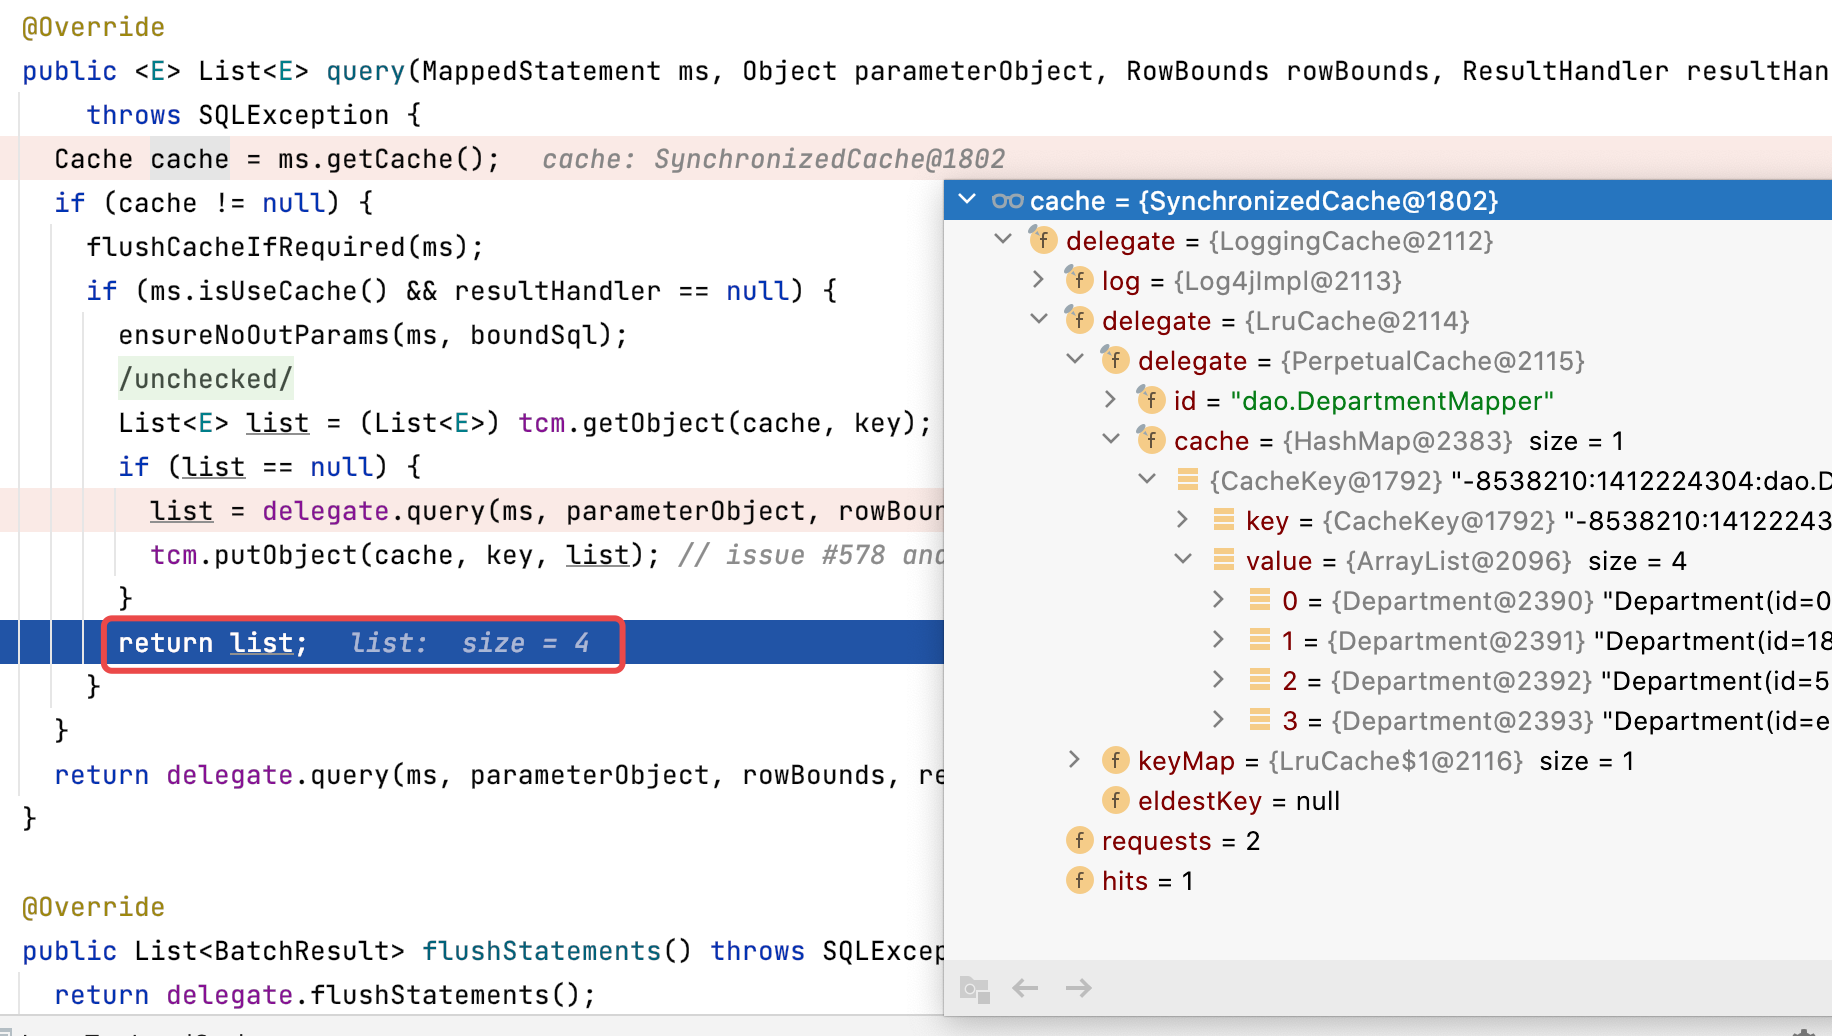
3.3 CachingExecutor的query方法
- 我们看看它的执行逻辑
  private final TransactionalCacheManager tcm = new TransactionalCacheManager();

  @Override
  public <E> List<E> query(MappedStatement ms, Object parameterObject, RowBounds rowBounds, ResultHandler resultHandler, CacheKey key, BoundSql boundSql)
      throws SQLException {
    // 先获取二级缓存
    Cache cache = ms.getCache();
    if (cache != null) {
      // 是否需要清除缓存
      flushCacheIfRequired(ms);
      if (ms.isUseCache() && resultHandler == null) {
        ensureNoOutParams(ms, boundSql);
        // 从二级缓存中取
        @SuppressWarnings("unchecked")
        List<E> list = (List<E>) tcm.getObject(cache, key);
        if (list == null) {
          // 没取到的话,同最下方注释
          list = delegate.query(ms, parameterObject, rowBounds, resultHandler, key, boundSql);
          // 取到了放入二级缓存中
          tcm.putObject(cache, key, list); // issue #578 and #116
        }
        return list;
      }
    }

    // 没有二级缓存的话,执行的是我们在一级缓存中介绍的那个方法
    // 要么取一级缓存,否则去数据库查
    return delegate.query(ms, parameterObject, rowBounds, resultHandler, key, boundSql);
  }
- 上述逻辑还是很清晰的,不过我们再上文中提到过,只有
事务提交的时候才会将二级缓存保存,那我们是不是应该去看看putObject方法
3.3.1 putObject方法,想看的事务提交后保存
- 它先走的是这个方法
  public void putObject(Cache cache, CacheKey key, Object value) {
    getTransactionalCache(cache).putObject(key, value);
  }
- 再深入
putObject方法
  // 二级缓存最终被放在这个map里,注意字段名有OnCommit
  private final Map<Object, Object> entriesToAddOnCommit;

  public void putObject(Object key, Object object) {
    entriesToAddOnCommit.put(key, object);
  }
OnCommit提示我们,在事务提交之后二级缓存才会被添加,上文我们测试二级缓存的时候特意写了一行sqlSession1.commit();代码,这就是为了让二级缓存生效,我们看看commit方法的最终调用
3.3.2 最终调用到TransactionalCache的commit方法
- 源码如下,逻辑比较简单,它在这里将之前我们放入entriesToAddOnCommit的缓存真正存入二级缓存中
  private final Cache delegate;

  public void commit() {
    if (clearOnCommit) {
      delegate.clear();
    }
    flushPendingEntries();
    reset();
  }

  // 这个方法会将entriesToAddOnCommit已有的二级缓存加入到Cache中
  private void flushPendingEntries() {
    for (Map.Entry<Object, Object> entry : entriesToAddOnCommit.entrySet()) {
      delegate.putObject(entry.getKey(), entry.getValue());
    }
    for (Object entry : entriesMissedInCache) {
      if (!entriesToAddOnCommit.containsKey(entry)) {
        delegate.putObject(entry, null);
      }
    }
  }
3.4 它为什么要在事务提交后才能生效?
- 因为二级缓存可以在不同的SQLSession间生效嘛,所以… 我画个图你就明白了
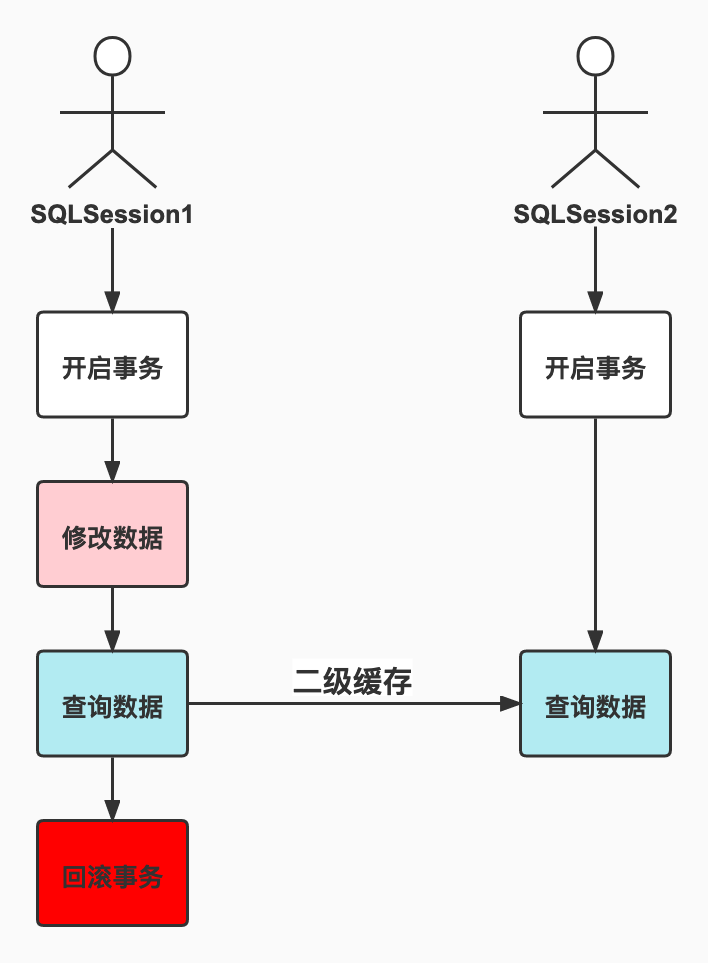
- 看哈,如果
SQLSession1先修改了数据,再查询数据,如果二级缓存此时就生效的话,那么SQLSession2调用同样的查询从二级缓存中获取数据,但是SQLSession1回滚了事务,那么此时就会导致SQLSession2从二级缓存获取的数据变成脏数据了,这就是为什么二级缓存要在事务提交后才能生效的原因
3.4.1 rollBack方法也要看一看
- 这个方法很简单呐,事务回滚了把entriesToAddOnCommit清了就是了
  public void rollback() {
    unlockMissedEntries();
    reset();
  }

  private void reset() {
    clearOnCommit = false;
    entriesToAddOnCommit.clear();
    entriesMissedInCache.clear();
  }
4. Debug下试试
- 测试代码如下
   SqlSession sqlSession1 = sqlSessionFactory.openSession();
   DepartmentMapper departmentMapper1 = sqlSession1.getMapper(DepartmentMapper.class);

   System.out.println("----------department第一次查询 ↓------------");
   List<Department> departments1 = departmentMapper1.findAll();

   // 使二级缓存生效
   sqlSession1.commit();

   SqlSession sqlSession2 = sqlSessionFactory.openSession();
   DepartmentMapper departmentMapper2 = sqlSession2.getMapper(DepartmentMapper.class);

   System.out.println("----------department第二次查询 ↓------------");
   List<Department> departments2 = departmentMapper2.findAll();
- 第一次Query方法,会去数据库中查
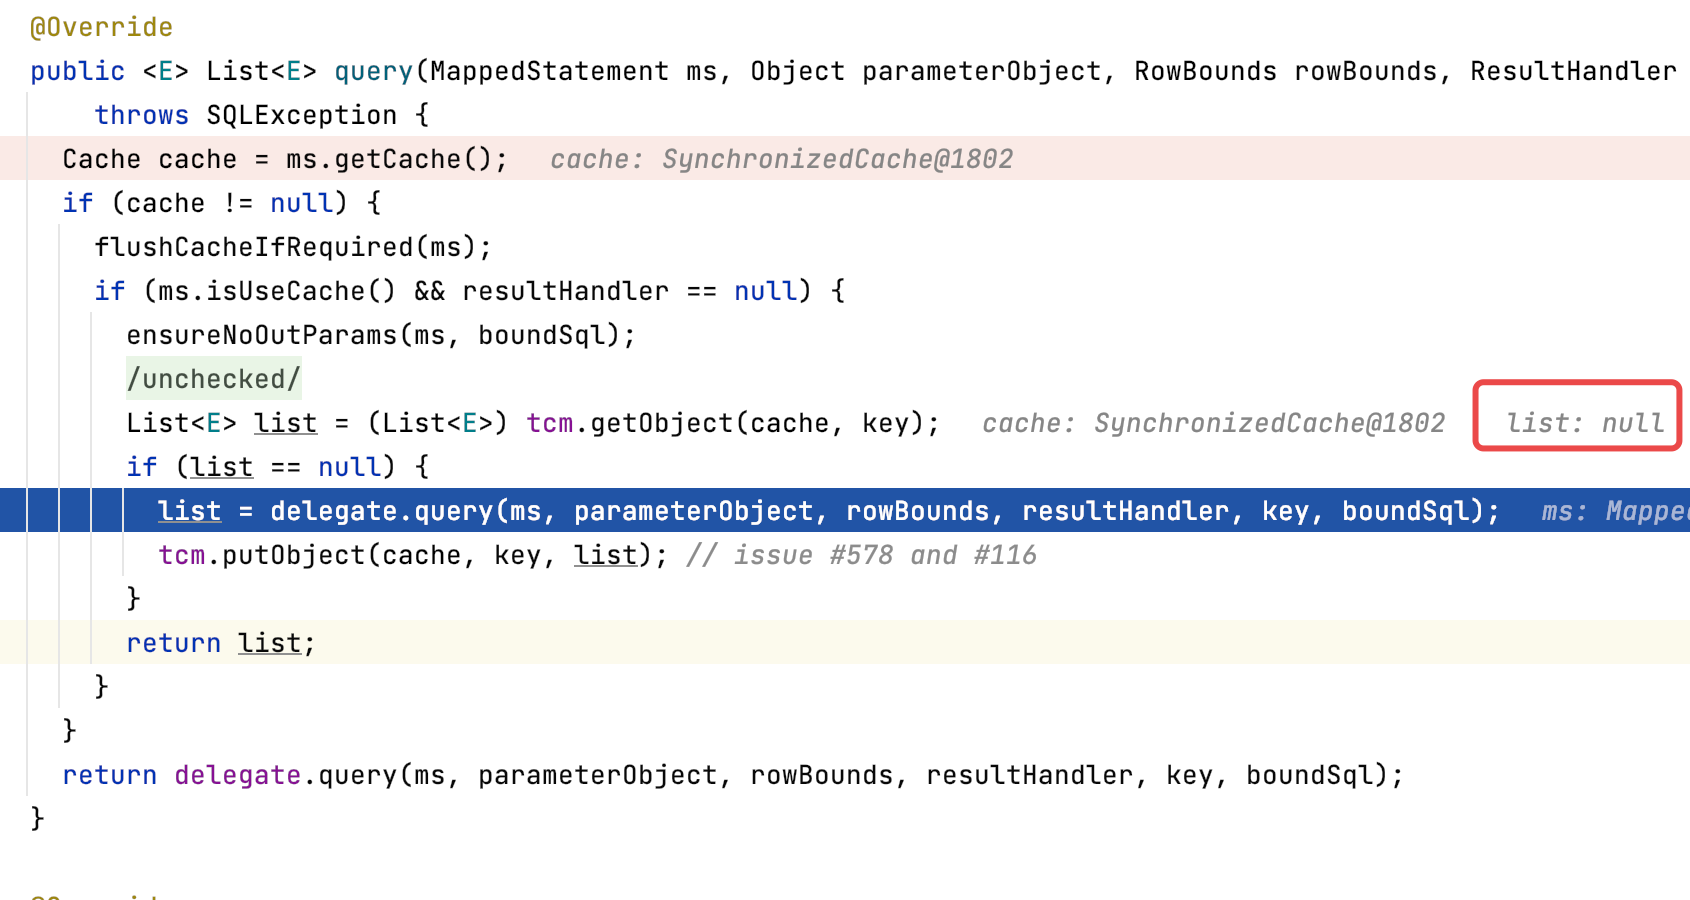
- 第二次Query,直接从二级缓存中拿
5. 尾声
做个总结吧
- 二级缓存在不同SQLSession下共享
- 二级缓存需要在事务提交后才能生效
- 执行Insert、Delete、Update语句会使
当前namespace下的二级缓存失效 - 二级缓存本质上也是个HashMap
- 特殊的readOnly标签,默认为false,每次返回的二级缓存深拷贝的对象
收!
最后
以上就是谦让小蚂蚁最近收集整理的关于从根上理解Mybatis的一级、二级缓存(终)的全部内容,更多相关从根上理解Mybatis内容请搜索靠谱客的其他文章。
本图文内容来源于网友提供,作为学习参考使用,或来自网络收集整理,版权属于原作者所有。


![gradle下载依赖报错:Connect to 127.0.0.1:8888 [/127.0.0.1] failed: Connection refused: connect](https://www.shuijiaxian.com/files_image/reation/bcimg19.png)


发表评论 取消回复