消息总线Bus
- 1. 概述
- 2. 步骤
- 2.1 安装rabbitmq
- 2.2 改造config-client的pom
- 2.3 改造config-client的配置文件
- 2.4 改造config-client的启动类
- 2.5 调用测试
1. 概述
Spring cloud bus通过轻量消息代理连接各个分布的节点。这会用在广播状态的变化(例如配置变化)或者其他的消息指令。Spring bus的一个核心思想是通过分布式的启动器对spring boot应用进行扩展,也可以用来建立一个多个应用之间的通信频道。目前唯一实现的方式是用AMQP消息代理作为通道,同样特性的设置(有些取决于通道的设置)在更多通道的文档中。
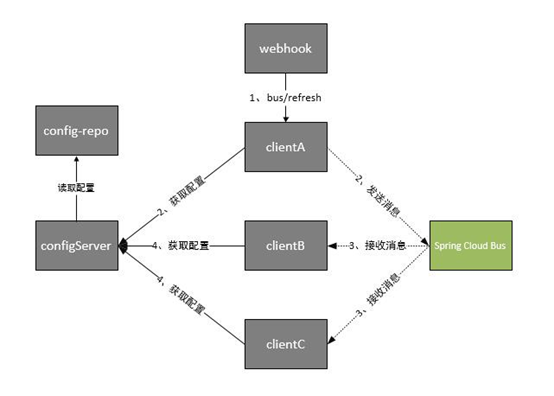
Spring cloud bus被国内很多都翻译为消息总线,也挺形象的。大家可以将它理解为管理和传播所有分布式项目中的消息既可,其实本质是利用了MQ的广播机制在分布式的系统中传播消息,目前常用的有Kafka和RabbitMQ。利用bus的机制可以做很多的事情,其中配置中心客户端刷新就是典型的应用场景之一,我们用一张图来描述bus在配置中心使用的机制。

2. 步骤
2.1 安装rabbitmq
安装rabbitmq,可以参照博文:https://blog.csdn.net/weixin_39735923/article/details/79288578
本例子利用章节《配置中心Config》中的spring-config-client工程。
2.2 改造config-client的pom
引入bus-amqp、actuator的相关jar。pom增加内容如下:
<dependency>
			<groupId>org.springframework.cloud</groupId>
			<artifactId>spring-cloud-starter-bus-amqp</artifactId>
		</dependency>
		<dependency>
			<groupId>org.springframework.boot</groupId>
			<artifactId>spring-boot-starter-actuator</artifactId>
		</dependency>
2.3 改造config-client的配置文件
配置文件application.properties中,增加rabbitmq的相关配置和bus的配置,内容如下:
spring.rabbitmq.host=localhost
spring.rabbitmq.port=5672
spring.rabbitmq.username=guest
spring.rabbitmq.password=guest

spring.cloud.bus.enabled=true
spring.cloud.bus.trace.enabled=true
management.endpoints.web.exposure.include=bus-refresh
2.4 改造config-client的启动类
启动类引入@RefreshScope注解,代码如下:
package org.config.client;
import org.springframework.beans.factory.annotation.Value;
import org.springframework.boot.SpringApplication;
import org.springframework.boot.autoconfigure.SpringBootApplication;
import org.springframework.cloud.context.config.annotation.RefreshScope;
import org.springframework.cloud.netflix.eureka.EnableEurekaClient;
import org.springframework.web.bind.annotation.RequestMapping;
import org.springframework.web.bind.annotation.RestController;
@SpringBootApplication
@RestController
@EnableEurekaClient
@RefreshScope
public class ConfigClientApplication {
	 /**
     * http://localhost:8881/actuator/bus-refresh
     */
    public static void main(String[] args) {
        SpringApplication.run(ConfigClientApplication.class, args);
    }
    @Value("${foo}")
    String foo;
    @RequestMapping(value = "/getFoo")
    public String getFoo(){
        return foo;
    }
    @Value("${democonfigclient.message}")
    String democonfigclientMessage;
    @RequestMapping(value = "/getDemoconfigclientMessage")
    public String getDemoconfigclientMessage(){
        return democonfigclientMessage;
    }
}
2.5 调用测试
1) 修改git上面的文件内容
2) 使用post方法调用http://localhost:8881/actuator/bus-refresh
package org.config.client;
import java.io.IOException;
import java.io.InputStream;
import java.io.OutputStreamWriter;
import java.net.HttpURLConnection;
import java.net.URL;
public class PostTest {
	public static void main(String[] args) {
		try {
			URL url = new URL("http://localhost:8881/actuator/bus-refresh");// 创建连接
			HttpURLConnection connection = (HttpURLConnection) url.openConnection();
			connection.setDoOutput(true);
			connection.setDoInput(true);
			connection.setUseCaches(false);
			connection.setInstanceFollowRedirects(true);
			connection.setRequestMethod("POST"); // 设置请求方式
			connection.setRequestProperty("Accept", "application/json"); // 设置接收数据的格式
			connection.setRequestProperty("Content-Type", "application/json"); // 设置发送数据的格式
			connection.connect();
			OutputStreamWriter out = new OutputStreamWriter(connection.getOutputStream(), "UTF-8"); // utf-8编码
			out.flush();
			out.close();
			int code = connection.getResponseCode();
			InputStream is = null;
			if (code == 200) {
				is = connection.getInputStream();
			} else {
				is = connection.getErrorStream();
			}
			// 读取响应
			int length = (int) connection.getContentLength();// 获取长度
			if (length != -1) {
				byte[] data = new byte[length];
				byte[] temp = new byte[512];
				int readLen = 0;
				int destPos = 0;
				while ((readLen = is.read(temp)) > 0) {
					System.arraycopy(temp, 0, data, destPos, readLen);
					destPos += readLen;
				}
				String result = new String(data, "UTF-8"); // utf-8编码
				System.out.println(result);
			}
 		} catch (IOException e) {
			e.printStackTrace();
		}
	}
}
本文参考文献:https://blog.csdn.net/forezp/article/details/70148833/
最后
以上就是粗犷战斗机最近收集整理的关于Spring cloud学习笔记10-消息总线Bus1. 概述2. 步骤的全部内容,更多相关Spring内容请搜索靠谱客的其他文章。


发表评论 取消回复