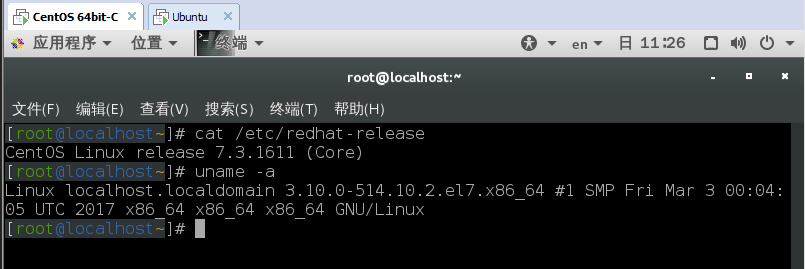
Step01:查询操作系统版本
查询命令:
cat /etc/redhat-release;
uname -a;
如下图所示:
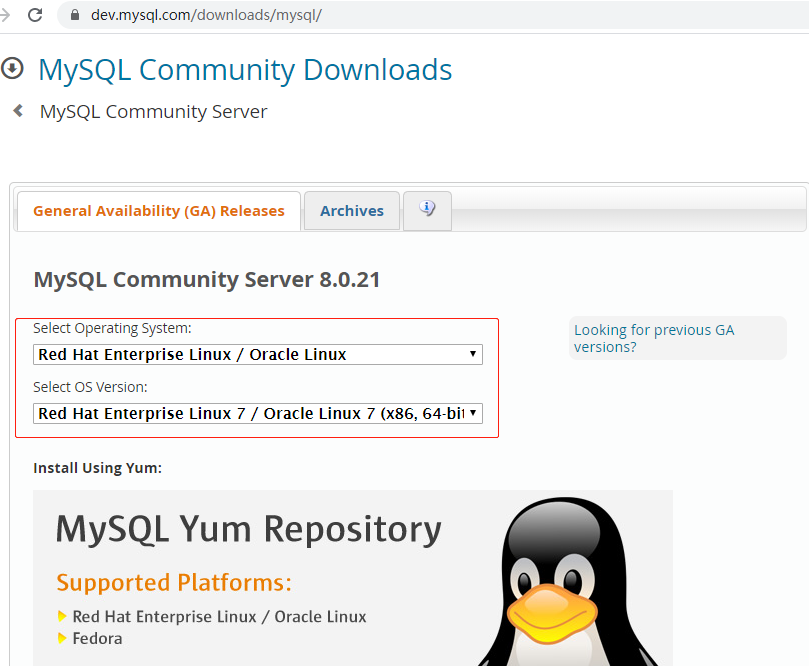
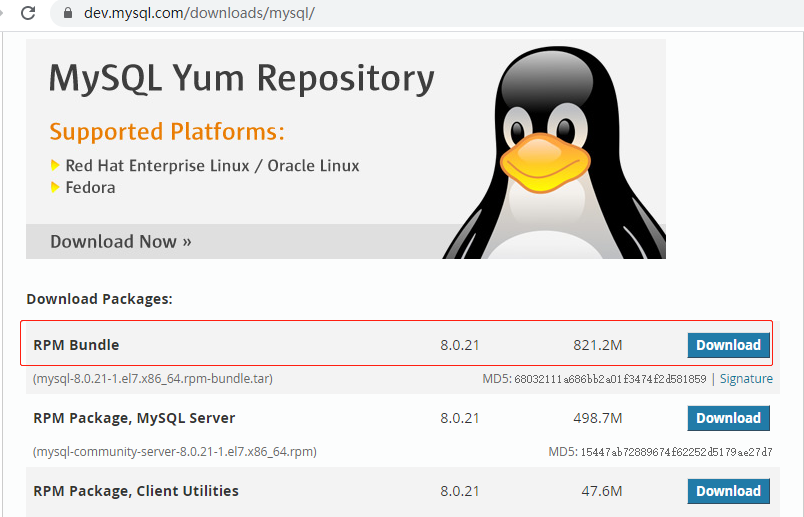
Step02:根据操作系统版本下载合适的MySQL安装包
官方下载地址:https://dev.mysql.com/downloads/mysql/。如下图所示:

Step03:卸载系统默认安装的、或其它旧版本的MySQL(可在上一步下载过程中进行此步骤)
查询已安装MySQL的命令为:
rpm -qa|grep mysql;
rpm -qa|grep mariadb;
示例如下:
[root@localhost~]# rpm -qa|grep mysql
pcp-pmda-mysql-3.11.3-4.el7.x86_64
mysql57-community-release-el7-9.noarch
qt-mysql-4.8.5-13.el7.x86_64

[root@localhost~]# rpm -qa | grep mariadb
mariadb-5.5.52-1.el7.x86_64
mariadb-server-5.5.52-1.el7.x86_64
mariadb-libs-5.5.52-1.el7.x86_64
mariadb-devel-5.5.52-1.el7.x86_64
将上述查到的文件逐一删除,命令如下:
rpm -evh --nodeps pcp-pmda-mysql-3.11.3-4.el7.x86_64;
rpm -evh --nodeps mysql57-community-release-el7-9.noarch;
rpm -evh --nodeps qt-mysql-4.8.5-13.el7.x86_64;

rpm -evh --nodeps mariadb-5.5.52-1.el7.x86_64;
rpm -evh --nodeps mariadb-server-5.5.52-1.el7.x86_64;
rpm -evh --nodeps mariadb-libs-5.5.52-1.el7.x86_64;
rpm -evh --nodeps mariadb-devel-5.5.52-1.el7.x86_64;
Step04:将下载好的MySQL8.0.21安装包放在指定目录下
创建/usr/local/mysql目录,并将安装包放入该目录下:
[root@localhost~]# mkdir /usr/local/mysql
[root@localhostlocal]# cd /usr/local/mysql
[root@localhostmysql]# ls
mysql-8.0.21-1.el7.x86_64.rpm-bundle.tar
Step05:解压mysql-8.0.21-1.el7.x86_64.rpm-bundle.tar
命令:
tar -xvf mysql-8.0.21-1.el7.x86_64.rpm-bundle.tar
[root@localhostmysql]# tar -xvf mysql-8.0.21-1.el7.x86_64.rpm-bundle.tar
mysql-community-common-8.0.21-1.el7.x86_64.rpm
mysql-community-embedded-compat-8.0.21-1.el7.x86_64.rpm
mysql-community-libs-8.0.21-1.el7.x86_64.rpm
mysql-community-devel-8.0.21-1.el7.x86_64.rpm
mysql-community-server-8.0.21-1.el7.x86_64.rpm
mysql-community-client-8.0.21-1.el7.x86_64.rpm
mysql-community-libs-compat-8.0.21-1.el7.x86_64.rpm
mysql-community-test-8.0.21-1.el7.x86_64.rpm
[root@localhostmysql]# ls
mysql-8.0.21-1.el7.x86_64.rpm-bundle.tar
mysql-community-client-8.0.21-1.el7.x86_64.rpm
mysql-community-common-8.0.21-1.el7.x86_64.rpm
mysql-community-devel-8.0.21-1.el7.x86_64.rpm
mysql-community-embedded-compat-8.0.21-1.el7.x86_64.rpm
mysql-community-libs-8.0.21-1.el7.x86_64.rpm
mysql-community-libs-compat-8.0.21-1.el7.x86_64.rpm
mysql-community-server-8.0.21-1.el7.x86_64.rpm
mysql-community-test-8.0.21-1.el7.x86_64.rpm
Step06:安装MySQL8.0.21
依次安装common、libs、client、server模块,命令如下:
rpm -ivh mysql-community-common-8.0.21-1.el7.x86_64.rpm --nodeps --force;
rpm -ivh mysql-community-libs-8.0.21-1.el7.x86_64.rpm --nodeps --force;
rpm -ivh mysql-community-client-8.0.21-1.el7.x86_64.rpm --nodeps --force;
rpm -ivh mysql-community-server-8.0.21-1.el7.x86_64.rpm --nodeps --force;
Step07:查询所有已经安装的mysql相关包
[root@localhostmysql]# rpm -qa|grep mysql
mysql-community-libs-8.0.21-1.el7.x86_64
mysql-community-client-8.0.21-1.el7.x86_64
mysql-community-server-8.0.21-1.el7.x86_64
mysql-community-common-8.0.21-1.el7.x86_64
Step08:初始化数据、用户授权、开启服务、启用数据
初始化数据库:
mysqld --initialize
用户授权:
chown -R mysql:mysql /usr/local/mysql
开启服务、启用数据:
systemctl start mysqld.service;
systemctl  enable mysqld;
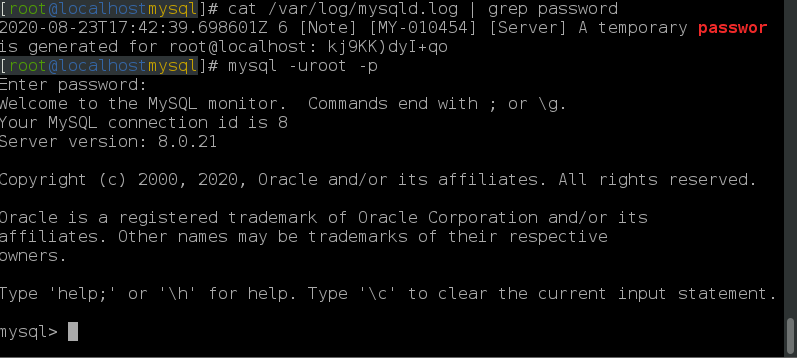
Step09:查询初始密码并登录
查询初始密码命令:cat /var/log/mysqld.log | grep password
如下图所示,查询的结果为:kj9KK)dyI+qo,复制,以备登录时使用。
登录命令:mysql -uroot -p
Enter password处直接粘贴前面复制的密码即可。
Step10:修改密码
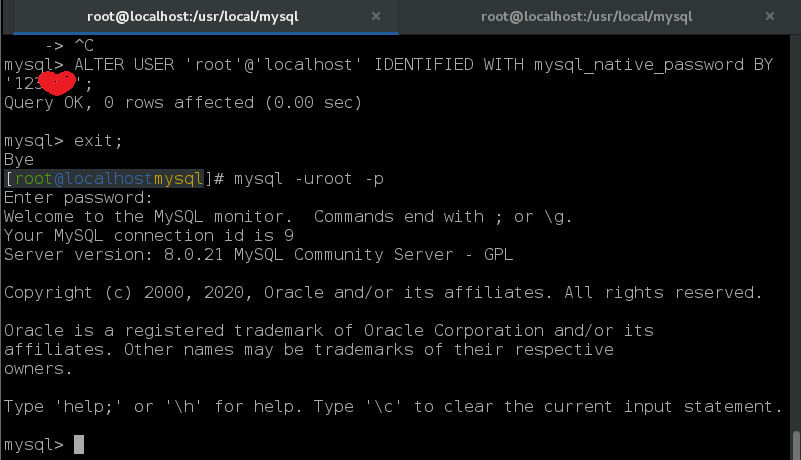
命令:ALTER USER 'root'@'localhost' IDENTIFIED WITH mysql_native_password BY '新密码';
修改密码成功后,可输入quit或exit,或者按Ctrl+d退出MySQL,重新用新密码登录。如下图所示:
Step11:创建新的MySQL用户,并授权
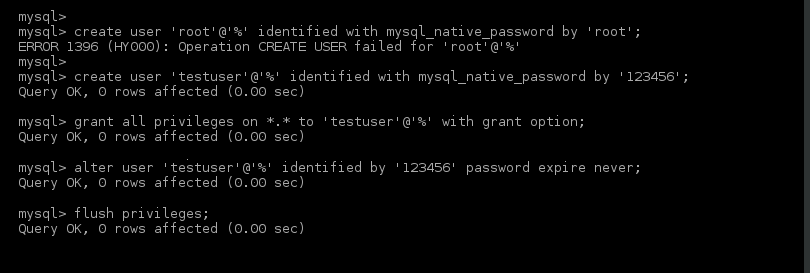
创建用户命令:create user 'testuser'@'%' identified with mysql_native_password by '123456';
授权命令:grant all privileges on *.* to 'testuser'@'%' with grant option;
修改密码过期规则:alter user 'testuser'@'%' identified by '123456' password expire never;
使授权在不重启MySQL服务的前提下直接生效:flush privileges;
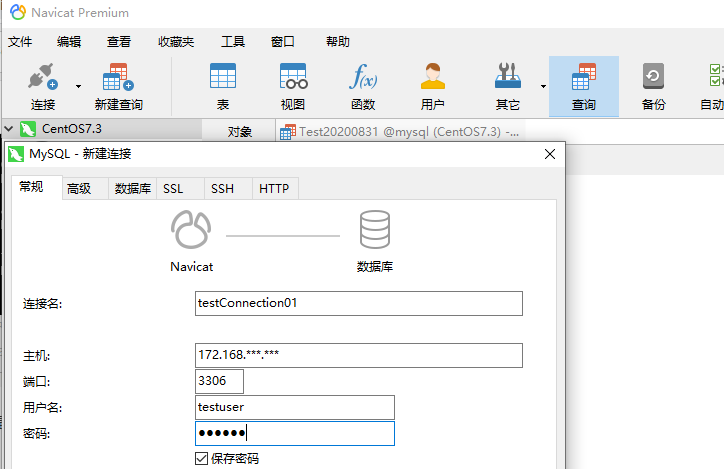
注:如果是测试环境,至此即可在服务器上直接使用,或者通过Navicat、SQLyog等客户端远程连接MySQL使用。如下图所示:
如果是生产环境,则还需要配置防火墙,可以使用默认的工具firewalld,也可以使用旧的工具iptables。
以下步骤根据实际情况选做:
Step12:停用系统自带的firewalld防火墙工具,安装并启用iptables
关闭系统默认防火墙firewall:
systemctl stop firewalld.service;systemctl disable firewalld.service;systemctl mask firewalld.service
systemctl stop firewalld;systemctl mask firewalld
systemctl status firewalld;firewall-cmd --state
上述命令可以分步执行,也可以一次性执行。
安装MySQL所需防火墙iptables
示例如下:
[root@localhost~]# yum install -y iptables*
已加载插件:fastestmirror, langpacks
Repodata is over 2 weeks old. Install yum-cron? Or run: yum makecache fast
Determining fastest mirrors
epel/x86_64/metalink                                                                                            |  12 kB  00:00:00
Could not get metalink https://mirrors.fedoraproject.org/metalink?repo=testing-epel7&arch=x86_64 error was0 B/s | 8.0 kB  --:--:-- ETA
12: Timeout on https://mirrors.fedoraproject.org/metalink?repo=testing-epel7&arch=x86_64: (28, 'Operation too slow. Less than 1000 bytes/sec transferred the last 30 seconds')
 * base: mirrors.cqu.edu.cn
 * epel: mirror.prgmr.com
 * epel-testing: mirrors.bfsu.edu.cn
 * extras: mirrors.cqu.edu.cn
 * nux-dextop: li.nux.ro
 * updates: mirrors.cqu.edu.cn
base                                                   | 3.6 kB     00:00
epel                                                   | 4.7 kB     00:00
extras                                                 | 2.9 kB     00:00
nux-dextop                                             | 2.9 kB     00:00
nuxtech                                                | 2.6 kB     00:00
updates                                                | 2.9 kB     00:00
(1/4): updates/7/x86_64/primary_db                       | 4.5 MB   00:01
epel/x86_64/group_gz           FAILED
http://mirror.prgmr.com/pub/epel/7/x86_64/repodata/37a4ee8f1b6e4f343c895b0779d82064a6b5db59f18affd9b8c2d526e1d7a2ab-comps-Everything.x86_64.xml.gz: [Errno 12] Timeout on http://mirror.prgmr.com/pub/epel/7/x86_64/repodata/37a4ee8f1b6e4f343c895b0779d82064a6b5db59f18affd9b8c2d526e1d7a2ab-comps-Everything.x86_64.xml.gz: (28, 'Operation too slow. Less than 1000 bytes/sec transferred the last 30 seconds')
正在尝试其它镜像。
epel/x86_64/group_gz           FAILED
https://pkg.adfinis-sygroup.ch/epel/7/x86_64/repodata/37a4ee8f1b6e4f343c895b0779d82064a6b5db59f18affd9b8c2d526e1d7a2ab-comps-Everything.x86_64.xml.gz: [Errno 12] Timeout on https://pkg.adfinis-sygroup.ch/epel/7/x86_64/repodata/37a4ee8f1b6e4f343c895b0779d82064a6b5db59f18affd9b8c2d526e1d7a2ab-comps-Everything.x86_64.xml.gz: (28, 'Operation too slow. Less than 1000 bytes/sec transferred the last 30 seconds')
正在尝试其它镜像。
epel/x86_64/updateinfo         FAILED
https://ord.mirror.rackspace.com/epel/7/x86_64/repodata/d3e79ca2061ef1747d0e437d12f9246dc0880804768ca1b6ed8a9bc9ae9ac4eb-updateinfo.xml.bz2: [Errno 12] Timeout on https://ord.mirror.rackspace.com/epel/7/x86_64/repodata/d3e79ca2061ef1747d0e437d12f9246dc0880804768ca1b6ed8a9bc9ae9ac4eb-updateinfo.xml.bz2: (28, 'Operation too slow. Less than 1000 bytes/sec transferred the last 30 seconds')
正在尝试其它镜像。
(2/4): epel/x86_64/updateinfo                            | 1.0 MB   00:01
epel/x86_64/group_gz           FAILED
https://mirrors.lug.mtu.edu/epel/7/x86_64/repodata/37a4ee8f1b6e4f343c895b0779d82064a6b5db59f18affd9b8c2d526e1d7a2ab-comps-Everything.x86_64.xml.gz: [Errno 12] Timeout on https://mirrors.lug.mtu.edu/epel/7/x86_64/repodata/37a4ee8f1b6e4f343c895b0779d82064a6b5db59f18affd9b8c2d526e1d7a2ab-comps-Everything.x86_64.xml.gz: (28, 'Operation timed out after 30000 milliseconds with 0 out of 0 bytes received')
正在尝试其它镜像。
epel/x86_64/primary_db         FAILED
https://ewr.edge.kernel.org/fedora-buffet/epel/7/x86_64/repodata/76a218521784e7b162da916ddc41f0102bbaf2a235db1e4051af0fb6d297530d-primary.sqlite.bz2: [Errno 12] Timeout on https://ewr.edge.kernel.org/fedora-buffet/epel/7/x86_64/repodata/76a218521784e7b162da916ddc41f0102bbaf2a235db1e4051af0fb6d297530d-primary.sqlite.bz2: (28, 'Operation too slow. Less than 1000 bytes/sec transferred the last 30 seconds')
正在尝试其它镜像。
epel/x86_64/group_gz           FAILED
http://mirror.cherryservers.com/epel/7/x86_64/repodata/37a4ee8f1b6e4f343c895b0779d82064a6b5db59f18affd9b8c2d526e1d7a2ab-comps-Everything.x86_64.xml.gz: [Errno 12] Timeout on http://mirror.cherryservers.com/epel/7/x86_64/repodata/37a4ee8f1b6e4f343c895b0779d82064a6b5db59f18affd9b8c2d526e1d7a2ab-comps-Everything.x86_64.xml.gz: (28, 'Operation too slow. Less than 1000 bytes/sec transferred the last 30 seconds')
正在尝试其它镜像。
(3/4): epel/x86_64/primary_db                            | 6.9 MB   00:26
(4/4): epel/x86_64/group_gz                              |  95 kB   00:20
正在解决依赖关系
--> 正在检查事务
---> 软件包 iptables.x86_64.0.1.4.21-17.el7 将被 升级
---> 软件包 iptables.x86_64.0.1.4.21-34.el7 将被 更新
---> 软件包 iptables-devel.x86_64.0.1.4.21-17.el7 将被 升级
---> 软件包 iptables-devel.x86_64.0.1.4.21-34.el7 将被 更新
---> 软件包 iptables-services.x86_64.0.1.4.21-34.el7 将被 安装
---> 软件包 iptables-utils.x86_64.0.1.4.21-34.el7 将被 安装
--> 解决依赖关系完成
依赖关系解决
==============================================================================
 Package                 架构         版本                   源          大小
==============================================================================
正在安装:
 iptables-services       x86_64       1.4.21-34.el7          base        52 k
 iptables-utils          x86_64       1.4.21-34.el7          base        61 k
正在更新:
 iptables                x86_64       1.4.21-34.el7          base       432 k
 iptables-devel          x86_64       1.4.21-34.el7          base        57 k

事务概要
==============================================================================
安装  2 软件包
升级  2 软件包

总计:603 k
总下载量:114 k
Downloading packages:
(1/2): iptables-services-1.4.21-34.el7.x86_64.rpm        |  52 kB   00:00
(2/2): iptables-utils-1.4.21-34.el7.x86_64.rpm           |  61 kB   00:00
------------------------------------------------------------------------------
总计                                             209 kB/s | 114 kB  00:00
Running transaction check
Running transaction test
Transaction test succeeded
Running transaction
警告:RPM 数据库已被非 yum 程序修改。
** 发现 28 个已存在的 RPM 数据库问题, 'yum check' 输出如下:
MySQL-python-1.2.5-1.el7.x86_64 有缺少的需求 libmysqlclient.so.18()(64bit)
MySQL-python-1.2.5-1.el7.x86_64 有缺少的需求 libmysqlclient.so.18(libmysqlclient_18)(64bit)
ibus-chewing-1.4.4-14.el7.x86_64 有缺少的需求 ibus >= ('0', '1.3', None)
ibus-gtk2-1.5.3-13.el7.x86_64 有缺少的需求 ibus(x86-64) = ('0', '1.5.3', '13.el7')
ibus-gtk3-1.5.3-13.el7.x86_64 有缺少的需求 ibus(x86-64) = ('0', '1.5.3', '13.el7')
ibus-hangul-1.4.2-10.el7.x86_64 有缺少的需求 ibus >= ('0', '1.3.99', None)
ibus-kkc-1.5.18-7.el7.x86_64 有缺少的需求 ibus
ibus-libpinyin-1.6.91-4.el7.x86_64 有缺少的需求 ibus >= ('0', '1.2.0', None)
ibus-m17n-1.3.4-13.el7.x86_64 有缺少的需求 ibus >= ('0', '1.4.0', None)
ibus-qt-1.3.2-4.el7.x86_64 有缺少的需求 ibus >= ('0', '1.3.7', None)
ibus-rawcode-1.3.2-3.el7.x86_64 有缺少的需求 ibus
ibus-sayura-1.3.2-3.el7.x86_64 有缺少的需求 ibus
ibus-setup-1.5.3-13.el7.noarch 有缺少的需求 ibus = ('0', '1.5.3', '13.el7')
ibus-table-1.5.0-5.el7.noarch 有缺少的需求 ibus > ('0', '1.3.0', None)
ipa-admintools-4.4.0-14.el7.centos.6.noarch 有已安装冲突 freeipa-admintools: ipa-admintools-4.4.0-14.el7.centos.6.noarch
ipa-client-4.4.0-14.el7.centos.6.x86_64 有已安装冲突 freeipa-client: ipa-client-4.4.0-14.el7.centos.6.x86_64
ipa-client-common-4.4.0-14.el7.centos.6.noarch 有已安装冲突 freeipa-client-common: ipa-client-common-4.4.0-14.el7.centos.6.noarch
ipa-common-4.4.0-14.el7.centos.6.noarch 有已安装冲突 freeipa-common: ipa-common-4.4.0-14.el7.centos.6.noarch
ipa-python-compat-4.4.0-14.el7.centos.6.noarch 有已安装冲突 freeipa-python-compat: ipa-python-compat-4.4.0-14.el7.centos.6.noarch
ipa-server-4.4.0-14.el7.centos.6.x86_64 有已安装冲突 freeipa-server: ipa-server-4.4.0-14.el7.centos.6.x86_64
ipa-server-common-4.4.0-14.el7.centos.6.noarch 有已安装冲突 freeipa-server-common: ipa-server-common-4.4.0-14.el7.centos.6.noarch
perl-DBD-MySQL-4.023-5.el7.x86_64 有缺少的需求 libmysqlclient.so.18()(64bit)
perl-DBD-MySQL-4.023-5.el7.x86_64 有缺少的需求 libmysqlclient.so.18(libmysqlclient_18)(64bit)
2:postfix-2.10.1-6.el7.x86_64 有缺少的需求 libmysqlclient.so.18()(64bit)
2:postfix-2.10.1-6.el7.x86_64 有缺少的需求 libmysqlclient.so.18(libmysqlclient_18)(64bit)
qt3-MySQL-3.3.8b-51.el7.x86_64 有缺少的需求 libmysqlclient.so.18()(64bit)
qt3-MySQL-3.3.8b-51.el7.x86_64 有缺少的需求 libmysqlclient.so.18(libmysqlclient_18)(64bit)
sogoupinyin-2.3.1.0112-2.x86_64 是 sogoupinyin-2.2.0.0108-2.x86_64 的副本
  正在更新    : iptables-1.4.21-34.el7.x86_64                             1/6
  正在更新    : iptables-devel-1.4.21-34.el7.x86_64                       2/6
  正在安装    : iptables-utils-1.4.21-34.el7.x86_64                       3/6
  正在安装    : iptables-services-1.4.21-34.el7.x86_64                    4/6
warning: /etc/sysconfig/iptables created as /etc/sysconfig/iptables.rpmnew
  清理        : iptables-devel-1.4.21-17.el7.x86_64                       5/6
  清理        : iptables-1.4.21-17.el7.x86_64                             6/6
  验证中      : iptables-devel-1.4.21-34.el7.x86_64                       1/6
  验证中      : iptables-1.4.21-34.el7.x86_64                             2/6
  验证中      : iptables-utils-1.4.21-34.el7.x86_64                       3/6
  验证中      : iptables-services-1.4.21-34.el7.x86_64                    4/6
  验证中      : iptables-1.4.21-17.el7.x86_64                             5/6
  验证中      : iptables-devel-1.4.21-17.el7.x86_64                       6/6
已安装:
  iptables-services.x86_64 0:1.4.21-34.el7
  iptables-utils.x86_64 0:1.4.21-34.el7
  更新完毕:
  iptables.x86_64 0:1.4.21-34.el7    iptables-devel.x86_64 0:1.4.21-34.el7
完毕!
上述命令执行完毕后,可再单独执行yum -y install iptables-services进行测试。示例如下:
[root@localhost~]# yum -y install iptables-services
已加载插件:fastestmirror, langpacks
Loading mirror speeds from cached hostfile
epel-testing/x86_64/metalink                           | 5.9 kB     00:00
 * base: mirrors.cqu.edu.cn
 * epel: mirror.prgmr.com
 * epel-testing: hk.mirrors.thegigabit.com
 * extras: mirrors.cqu.edu.cn
 * nux-dextop: li.nux.ro
 * updates: mirrors.cqu.edu.cn
epel-testing                                           | 4.7 kB     00:00
(1/3): epel-testing/x86_64/updateinfo                    |  42 kB   00:00
(2/3): epel-testing/x86_64/primary_db                    | 386 kB   00:02
(3/3): epel-testing/x86_64/group_gz                      |  95 kB   00:02
软件包 iptables-services-1.4.21-34.el7.x86_64 已安装并且是最新版本
无须任何处理
防火墙配置过程可能稍微繁琐一些,此处不作过多探讨,如有需要,可以另行单独研究。
最后
以上就是鲜艳钢铁侠最近收集整理的关于在CentOS7中安装配置MySQL8.0.21详细过程(附主要步骤)的全部内容,更多相关在CentOS7中安装配置MySQL8内容请搜索靠谱客的其他文章。


发表评论 取消回复