ResNet 实现Cifar-10 识别(PyTorch)以及一点思考
- 1. 作者针对Cifar-10分类提出的网络结构
- 2. 实现网络结构中遇到的问题
- 3. 作者训练网络的细节
- 4. 复现过程
- 5. 总结分析
- 6. 实现代码
最近看了ResNet的论文,由于刚从CS231n过渡过来,所以还在使用Cifar-10数据集。刚好论文后面就有一节是专门研究(经过简化后的)ResNet在Cifar-10数据集上的表现的,所以决定着手复现这一结构。再加上百度了一下好像也几乎没有针对这一节论文的复现的,所以记录下来自己复现的过程。最终32层(0.46M参数)准确率达到了90%,44层(0.66M参数)准确率达到91%,距离作者所述的92.5%+的准确度还有差距
ResNet具体是什么结构也不用细说了,我喜欢先说两句再上代码,想直接看代码的翻到最后就好了。
在代码之前,我先描述一下作者对这个结构的设计和训练细节,以及我在复现过程中遇到的问题和思考
1. 作者针对Cifar-10分类提出的网络结构
作者在论文中提到自己总体网络结构(节选):
The first layer is 3x3 convolutions.
Then we use a stack of 6n layers with 3x3 convolutions
on the feature maps of sizes {32; 16; 8} respectively,
with 2n layers for each feature map size. The numbers of filters are {16; 32; 64} respectively. The subsampling is performed by convolutions with a stride of 2. The network ends with a global average pooling, a 10-way fully-connected layer, and softmax. There are totally 6n+2 stacked weighted layers. The following table summarizes the architecture:
| output map size | 32x32 | 16x16 | 8x8 |
|---|---|---|---|
| # layers | 1+2n | 2n | 2n |
| # filters | 16 | 32 | 64 |
When shortcut connections are used, they are connected
to the pairs of 3x3 layers (totally 3n shortcuts). On this dataset we use identity shortcuts in all cases.
简单翻译一下:输入32x32的图片,第一层是3x3卷积层,接下来,对于每个相同分辨率的feature map做2n次卷积,每次卷积的通道数都相同。一共有3个这样的2n层,卷完8x8的特征图之后就做全局均值池化,最后用一个全连接层实现10类的分类。
高速通路只连接每对3x3卷积。因此最后有3n个高速通路。每个高速通路都是使用的恒等连接(不变换维度)
最后的结构就是:32x32输入->3x3卷积->2n个3x3卷积->步长为2的卷积->2n个3x3卷积->步长为2的卷积->2n个3x3卷积->步长为2的卷积->全局均值池化->全连接层->Softmax
每个2n卷积的通道数已经在上面的表格里给出。
2. 实现网络结构中遇到的问题
看起来还是蛮简单的,实现起来遇到了两个问题
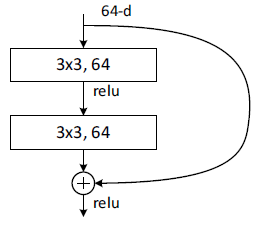
第一个困扰我的问题就是,采用卷积做池化,这就不算有参数的层了吗?到底是把每个2n的第一层作为池化层,还是在每个2n的第一层之前加入了一个池化层?这里我抓住作者说“使用恒等链接作为高速通路”,所以倾向于后面的解释。

图1 ResidualBlock在原论文示意图
第二个困扰我的问题就是,根据残差的结构图,最后一层的ReLU是放在残差和输入相加之后的,论文中作者只是轻描淡写地说自己采用了BN,但是BN是放在加操作之前,还是放在加操作之后?一开始我想当然地(不知为何这么想)放在了加之前。偶然地看起了Stochastic Depth(以下简称SD)的文章,文章里有一张很显眼的图画的就是带有BN的ResBlock结构。很明显BN放在加之前。SD的作者也没解释为什么,但是他指出,每一个残差模块的输出为:
Hl = ReLU( f(Hl-1) + Hl-1
当残差为0时,输出退化为:
Hl = ReLU( Hl-1 ) = Hl-1
懒得用公式打出来了,Hl 是某一层的输出,而Hl-1是上一层的输出,这是残差模块的基本原理。当残差为0,而本层的输入即上一层的输出也是通过ReLU激活的话,本来就全都非负,再经过一次ReLU自然就是原来的值了。
所以,如果我把BN放在加之后,就算残差为0,BN非常可能改变上一层的输出,e.g.使之非负。这样残差模块的意义就削弱了。当然,是不是可以考虑干脆把ReLU也放在加之前呢,有机会做做试验hhh
ps:单纯改了这个小结构就让我的准确率从87.5上升到89了。

图2 ResidualBlock在SD论文中的示意图
3. 作者训练网络的细节
对于训练的参数设定,作者文中如此描述(方括号内为原论文的引用序号,这里就懒得去掉了):
We use a weight decay of 0.0001 and momentum of 0.9,
and adopt the weight initialization in [13] and BN [16] but with no dropout. These models are trained with a minibatch size of 128 on two GPUs. We start with a learning rate of 0.1, divide it by 10 at 32k and 48k iterations, and terminate training at 64k iterations, which is determined on a 45k/5k train/val split. We follow the simple data augmentation in [24] for training: 4 pixels are padded on each side, and a 32x32 crop is randomly sampled from the padded image or its horizontal flip. For testing, we only evaluate the single view of the original 32x32 image.
提炼关键信息:SGD的m=0.9,weight_decay=1e-4,采用了He Kaiming权值初始化;采用了BN,minibatch=128,lr=0.1,32k和48k轮都会把学习率除以10,60k后停止训练;数据增强手段为4像素的pad并随机切割出32x32的图片、随机水平翻转。
4. 复现过程
由于是刚学完CS231n,所以学习率默认都是1e-3,1e-4级别的,优化器都是Adam,所以刚开始复现的时候,采用的n=5(根据前文的叙述,参数层共有6n+2因此共有32层),准确率只有85,61(分别表示在训练集和测试集上,下同),和作者描述的92.5%的准确率相差甚远。后来在网上找了一份ResNet-18的代码跑了一遍,发现准确率可以简单地上91%,所以进行了对比。
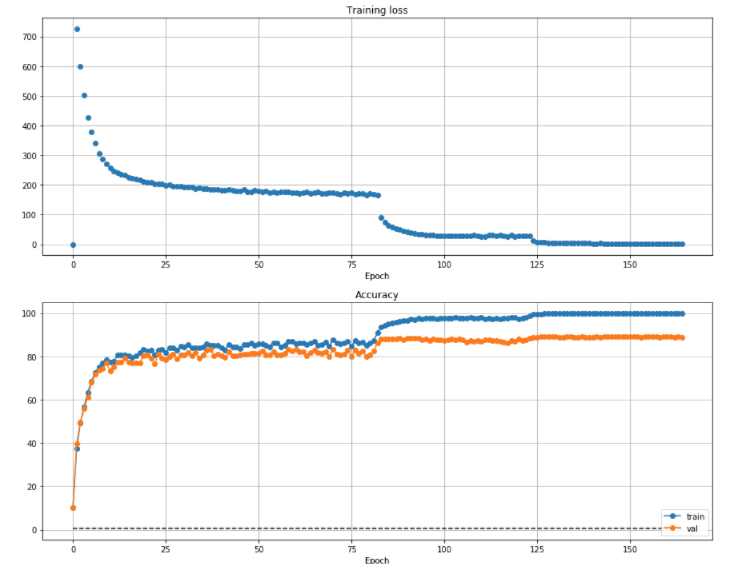
首先,单纯的把优化器换为SGD,并且SGD的参数也和作者相同,训练的效果就有了质的飞跃,达到了100%,87.5%,训练曲线如图3所示。

图3 ResNet损失和准确率曲线
最后训练准确率有几个点的差异,但是图形基本上就是这个图形,我也不想贴一堆长得差不多的图进行对比了。
后来又加入了原文的数据增强(水平翻转、4pad截取),好像准确率没有很大提升;然后把BN放在加之前,准确率提升到了89%+,接近90%的样子,最高到过90.4%。
再后来,把网络替换成n=7共44层,准确率可以比较轻松地达到90,最好能飙上91%
5. 总结分析
这应该是自己认真复现的第一个网络,比较简单,但是因为没啥经验所以一开始网络的效果很差。但是通过复现这个网络让我明白了Adam不是万能的,学习率是要调整的,怎么做数据增强等balabala的在训练网络中需要知道的细节知识。
这里使用的网络结构是比较高效的,32层的总参数不超过0.5M(个),还能在训练集上实现实现90%的准确率,网上找的ResNet18直接跑一通也就是91%,而且ResNet18的参数是它的20多倍了(直接比PyTorch保存下来的模型参数文件大小)。训练时间,按照作者60k次迭代,在2080Ti上大约是1小时20分钟。
6. 实现代码
初始化和数据集处理,还有两个常用的层
import torch
import torch.nn as nn
import torch.nn.functional as F
import torch.optim as optim
import torchvision
import torchvision.transforms as transforms
import matplotlib.pyplot as plt

device = torch.device("cuda:0" if torch.cuda.is_available() else "cpu")

%matplotlib inline
plt.rcParams['figure.figsize'] = (10.0, 8.0) # set default size of plots
plt.rcParams['image.interpolation'] = 'nearest'
plt.rcParams['image.cmap'] = 'gray'
数据集的导入和预处理
transform_train = transforms.Compose([
    transforms.RandomCrop(32, padding=4),  #先四周填充0,再把图像随机裁剪成32*32
    transforms.RandomHorizontalFlip(),  #图像一半的概率翻转,一半的概率不翻转
    transforms.ToTensor(),
    transforms.Normalize((0, 0, 0), (1, 1, 1)), #R,G,B每层的归一化用到的均值和方差
])

transform_test = transforms.Compose([
    transforms.ToTensor(),
    transforms.Normalize((0, 0, 0), (1, 1, 1)),
])

trainset = torchvision.datasets.CIFAR10(root='./data', train=True,
                                        download=True, transform=transform_train)
trainloader = torch.utils.data.DataLoader(trainset, batch_size=128,
                                          shuffle=True, num_workers=0)

testset = torchvision.datasets.CIFAR10(root='./data', train=False,
                                       download=True, transform=transform_test)
testloader = torch.utils.data.DataLoader(testset, batch_size=128,
                                         shuffle=False, num_workers=0)
两个实用的层,第二个层常用于debug
class Flatten(nn.Module):
    def forward(self, x):
        N = x.shape[0]
        return x.view(N, -1)
class PrintParamShape(nn.Module):
    def forward(self, x):
        print(x.size())
        return x
画图
def DrawPlot(train_loss_summery, train_acc_summery, test_acc_summery):
    plt.subplot(2, 1, 1)
    plt.grid()
    plt.title('Training loss')
    plt.plot(train_loss_summery, 'o')
    plt.xlabel('Epoch')

    plt.subplot(2, 1, 2)
    plt.grid()
    plt.title('Accuracy')
    plt.plot(train_acc_summery, '-o', label='train')
    plt.plot(test_acc_summery, '-o', label='val')
    plt.plot([0.5] * len(test_acc_summery), 'k--')
    plt.xlabel('Epoch')
    plt.legend(loc='lower right')
    plt.gcf().set_size_inches(15, 12)
    plt.show()
定义训练函数。训练函数内部会记录每一次的loss和训练集、测试集的准确率,以用于后续作图。同时根据原文描述,还需要定义一个自动改变学习率的函数。同时还要有一个计算准确率的函数。
def AdjustLearningRate(optimizer, epoch, iter_times):
    if iter_times == 32000 or iter_times == 48000 or iter_times == 52000 or iter_times == 56000:
        for param_group in optimizer.param_groups:
            param_group['lr'] *= 0.1
        print("change lr")

def TrainNet(net, datasetLoader, criterion, optimizer, device, epoch_total):
    train_loss_summery = []
    train_acc_summery = []
    test_acc_summery = []
    (trainloader, testloader) = datasetLoader
    running_loss = 0.0
    iter_times = 0
    for epoch in range(epoch_total + 1):
        train_loss_summery.append(running_loss)
        train_acc_summery.append(PredictNet(net, trainloader, device, 0))
        test_acc_summery.append(PredictNet(net, testloader, device, 0))
        print('epoch %d, loss %.3f, train_acc %.3f %%, test_acc %.3f %%' % (epoch, running_loss / 1e2, train_acc_summery[epoch],test_acc_summery[epoch]))
        if epoch == epoch_total or iter_times > 64000:
            break
        running_loss = 0.0
        for i, data in enumerate(trainloader, 0):
            inputs, labels = data[0].to(device), data[1].to(device)
            optimizer.zero_grad()

            output = net(inputs)

            loss = criterion(output, labels)
            loss.backward()
            optimizer.step()
            running_loss += loss.item()
            iter_times += 1
            AdjustLearningRate(optimizer, epoch, iter_times)

    print('Finished Training')
    return (train_loss_summery, train_acc_summery, test_acc_summery)

def PredictNet(net, testloader, device, num = 0, isPrint=False):
    total = 0
    correct = 0
    accuracy = 0.0
    with torch.no_grad():
        for data in testloader:
            inputs, labels = data[0].to(device), data[1].to(device)
            outputs = net(inputs)
            _, predicted = torch.max(outputs, 1)
            total += labels.size(0)
            correct += (predicted == labels).sum().item()
            if total > num and num != 0:
                break
    accuracy = 100 * correct / total
    if isPrint == True:
        print('Accuracy of the network on the %d test images: %.3f %%' % (
            total, accuracy))
    return accuracy
定义ResdualBlock,以及He Kaiming的权值初始化函数。由于我是个懒人,所以用了循环来创建网络结构,需要的参数是,{是否需要进行pooling,输入的通道数,微型结构细节(对应2n中的‘2’),微型结构重复次数(对应2n中的‘n’)}并且把所有的层都放入了torch的ModelList中。
def HeInitParam(layer):
#     return layer #如果不想初始化就把这个注释去掉
    if isinstance(layer, (torch.nn.Conv2d, torch.nn.Linear)):
        nn.init.kaiming_normal_(layer.weight, nonlinearity='relu')
        nn.init.zeros_(layer.bias)
    return layer
class ResidualBlock(nn.Module):
    def __init__(self, params):
        super(ResidualBlock,self).__init__()
        self.ifPoolConnect = params['ifPoolConnect']
        self.input_channel = params['input_channel']
        self.repeat_arch = params['repeat_arch']#repeat_arch[i][j] means ith layer, j=0 means kernel size, else means feature map cnt
        self.repeat_times = params['repeat_times']

        partModule = None
        self.poolLayer = torch.nn.ModuleList()
        self.ResBlockModules = torch.nn.ModuleList()
        if self.ifPoolConnect == True:
            self.poolLayer.append(HeInitParam(torch.nn.Conv2d(self.input_channel, self.repeat_arch[len(self.repeat_arch)-1][1], kernel_size=2, stride=2)))

        for i in range(self.repeat_times):
            partModule = torch.nn.ModuleList()
            if self.ifPoolConnect == True:
                partModule.append(self.getConvBNReLu(self.repeat_arch[len(self.repeat_arch)-1][1], self.repeat_arch[0][1], self.repeat_arch[0][0], _padding=(self.repeat_arch[0][0]-1)//2))
            else:
                partModule.append(self.getConvBNReLu(self.input_channel, self.repeat_arch[0][1], self.repeat_arch[0][0], _padding=(self.repeat_arch[0][0]-1)//2))

            for partLayerCnter in range(1, len(self.repeat_arch)):
                if partLayerCnter == len(self.repeat_arch) - 1:
                    partModule.append(HeInitParam(torch.nn.Conv2d(self.repeat_arch[partLayerCnter-1][1], self.repeat_arch[partLayerCnter][1], self.repeat_arch[partLayerCnter][0], padding=(self.repeat_arch[partLayerCnter][0]-1)//2)))
                    partModule.append(torch.nn.BatchNorm2d(self.repeat_arch[partLayerCnter][1]))
                else:
                    partModule.append(self.getConvBNReLu(self.repeat_arch[partLayerCnter-1][1], self.repeat_arch[partLayerCnter][1], self.repeat_arch[partLayerCnter][0], (self.repeat_arch[partLayerCnter][0]-1)//2))

            self.ResBlockModules.append(partModule)

    def getConvBNReLu(self, channel_in, channel_out, kernel_size, _padding=0):
        return torch.nn.Sequential(HeInitParam(torch.nn.Conv2d(channel_in, channel_out, kernel_size, padding=_padding)),
                                        torch.nn.BatchNorm2d(channel_out),
                                        torch.nn.ReLU(),)
    def forward(self, x):
        #This may not be right.
        if(self.ifPoolConnect == True):
            x = self.poolLayer[0](x)
        for i in range(self.repeat_times):
            _x = x.clone()
            for partLayerCnter in range(0, len(self.repeat_arch)):
                x = self.ResBlockModules[i][partLayerCnter](x)
            x = _x + x
            x = torch.nn.functional.relu(x)


        return x
最后是整个网络的搭建
class ResidualNet(nn.Module):
    def __init__(self):
        super(ResidualNet,self).__init__()
        repeat_times = 7
        self.ResBlockTestParam1 = {'ifPoolConnect':False, 'input_channel':16,
                        'repeat_arch':[[3,16], [3,16],],'repeat_times':repeat_times}
        self.ResBlockTestParam2 = {'ifPoolConnect':True, 'input_channel':16,
                        'repeat_arch':[[3,32], [3,32],],'repeat_times':repeat_times}
        self.ResBlockTestParam3 = {'ifPoolConnect':True, 'input_channel':32,
                        'repeat_arch':[[3,64], [3,64],],'repeat_times':repeat_times}
        self.ResNetModule = torch.nn.Sequential(HeInitParam(torch.nn.Conv2d(3, 16, kernel_size=3, padding = 1)),
                                                torch.nn.BatchNorm2d(16),
                                                torch.nn.ReLU(),
                                                ResidualBlock(self.ResBlockTestParam1),
                                                ResidualBlock(self.ResBlockTestParam2),
                                                ResidualBlock(self.ResBlockTestParam3),
                                                torch.nn.AvgPool2d(8, 1),
                                                Flatten(),

                                                HeInitParam(torch.nn.Linear(64, 10)),)
    def forward(self,x):
        return self.ResNetModule(x)
训练的话,下面几行就够了
criterion = nn.CrossEntropyLoss()
net = ResidualNet().to(device)

optimizer = optim.SGD(net.parameters(), lr=1e-1, momentum=0.9, weight_decay=5e-4)
(train_loss_summery, train_acc_summery, test_acc_summery) = TrainNet(net, (trainloader, testloader), criterion, optimizer, device, 200)

PATH = './cifar_ResNet_.pth'
torch.save(net.state_dict(), PATH)
[1]: Deep Networks with Stochastic Depth
[2]: Deep Residual Learning for Image Recognition
[3]: Pytorch实战2:ResNet-18实现Cifar-10图像分类(测试集分类准确率95.170%)
[4]: pytorch中的学习率调整函数
最后
以上就是老迟到毛衣最近收集整理的关于ResNet 实现Cifar-10 识别以及一点思考的全部内容,更多相关ResNet内容请搜索靠谱客的其他文章。


发表评论 取消回复