上一篇文章"Guava Cache特性:对于同一个key,只让一个请求回源load数据,其他线程阻塞等待结果"提到:如果缓存过期,恰好有多个线程读取同一个key的值,那么guava只允许一个线程去加载数据,其余线程阻塞。这虽然可以防止大量请求穿透缓存,但是效率低下。使用refreshAfterWrite可以做到:只阻塞加载数据的线程,其余线程返回旧数据。
package net.aty.guava;

import com.google.common.base.Stopwatch;
import com.google.common.cache.CacheBuilder;
import com.google.common.cache.CacheLoader;
import com.google.common.cache.LoadingCache;

import java.util.UUID;
import java.util.concurrent.Callable;
import java.util.concurrent.CountDownLatch;
import java.util.concurrent.TimeUnit;


public class Main {

    // 模拟一个需要耗时2s的数据库查询任务
    private static Callable<String> callable = new Callable<String>() {
        @Override
        public String call() throws Exception {
            System.out.println("begin to mock query db...");
            Thread.sleep(2000);
            System.out.println("success to mock query db...");
            return UUID.randomUUID().toString();
        }
    };


    // 1s后刷新缓存
    private static LoadingCache<String, String> cache = CacheBuilder.newBuilder().refreshAfterWrite(1, TimeUnit.SECONDS)
            .build(new CacheLoader<String, String>() {
                @Override
                public String load(String key) throws Exception {
                    return callable.call();
                }
            });

    private static CountDownLatch latch = new CountDownLatch(1);


    public static void main(String[] args) throws Exception {

        // 手动添加一条缓存数据,睡眠1.5s让其过期
        cache.put("name", "aty");
        Thread.sleep(1500);

        for (int i = 0; i < 8; i++) {
            startThread(i);
        }

        // 让线程运行
        latch.countDown();

    }

    private static void startThread(int id) {
        Thread t = new Thread(new Runnable() {
            @Override
            public void run() {
                try {
                    System.out.println(Thread.currentThread().getName() + "...begin");
                    latch.await();
                    Stopwatch watch = Stopwatch.createStarted();
                    System.out.println(Thread.currentThread().getName() + "...value..." + cache.get("name"));
                    watch.stop();
                    System.out.println(Thread.currentThread().getName() + "...finish,cost time=" + watch.elapsed(TimeUnit.SECONDS));
                } catch (Exception e) {
                    e.printStackTrace();
                }
            }
        });

        t.setName("Thread-" + id);
        t.start();
    }


}

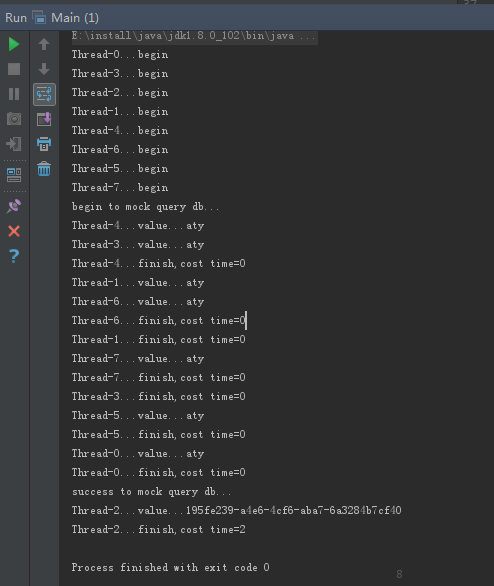
通过输出结果可以看出:当缓存数据过期的时候,真正去加载数据的线程会阻塞一段时间,其余线程立马返回过期的值,显然这种处理方式更符合实际的使用场景。
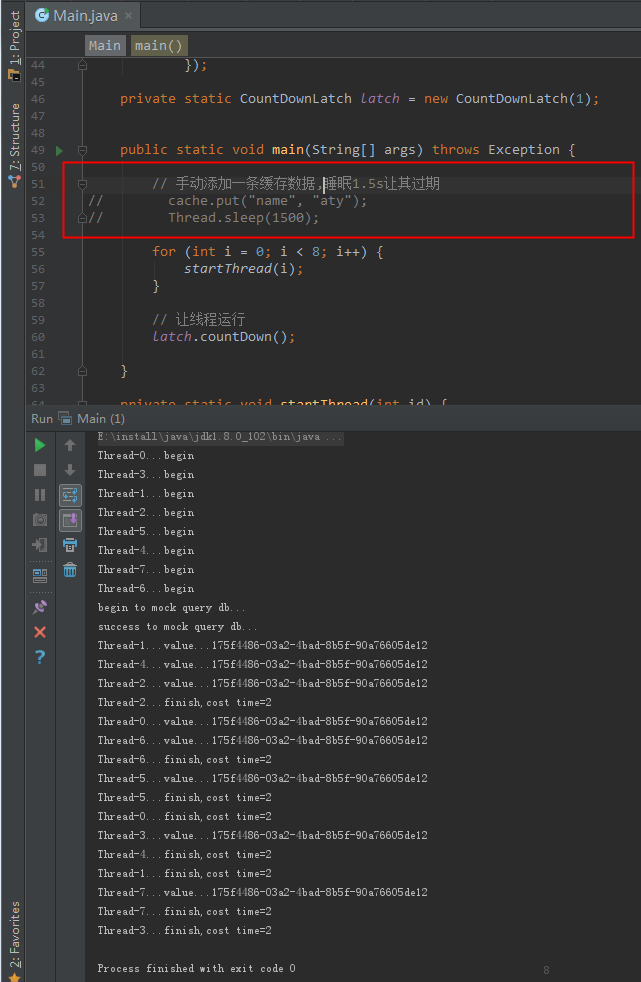
有一点需要注意:我们手动向缓存中添加了一条数据,并让其过期。如果没有这行代码,程序执行结果如下。

由于缓存没有数据,导致一个线程去加载数据的时候,别的线程都阻塞了(因为没有旧值可以返回)。所以一般系统启动的时候,我们需要将数据预先加载到缓存,不然就会出现这种情况。
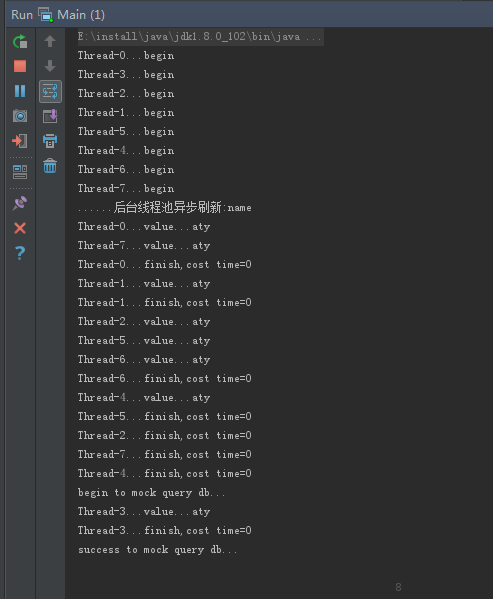
还有一个问题不爽:真正加载数据的那个线程一定会阻塞,我们希望这个加载过程是异步的。这样就可以让所有线程立马返回旧值,在后台刷新缓存数据。refreshAfterWrite默认的刷新是同步的,会在调用者的线程中执行。我们可以改造成异步的,实现CacheLoader.reload()。
package net.aty.guava;

import com.google.common.base.Stopwatch;
import com.google.common.cache.CacheBuilder;
import com.google.common.cache.CacheLoader;
import com.google.common.cache.LoadingCache;
import com.google.common.util.concurrent.ListenableFuture;
import com.google.common.util.concurrent.ListeningExecutorService;
import com.google.common.util.concurrent.MoreExecutors;

import java.util.UUID;
import java.util.concurrent.Callable;
import java.util.concurrent.CountDownLatch;
import java.util.concurrent.Executors;
import java.util.concurrent.TimeUnit;


public class Main {

    // 模拟一个需要耗时2s的数据库查询任务
    private static Callable<String> callable = new Callable<String>() {
        @Override
        public String call() throws Exception {
            System.out.println("begin to mock query db...");
            Thread.sleep(2000);
            System.out.println("success to mock query db...");
            return UUID.randomUUID().toString();
        }
    };

    // guava线程池,用来产生ListenableFuture
    private static ListeningExecutorService service = MoreExecutors.listeningDecorator(Executors.newFixedThreadPool(10));

    private static LoadingCache<String, String> cache = CacheBuilder.newBuilder().refreshAfterWrite(1, TimeUnit.SECONDS)
            .build(new CacheLoader<String, String>() {
                @Override
                public String load(String key) throws Exception {
                    return callable.call();
                }

                @Override
                public ListenableFuture<String> reload(String key, String oldValue) throws Exception {
                    System.out.println("......后台线程池异步刷新:" + key);
                    return service.submit(callable);
                }
            });

    private static CountDownLatch latch = new CountDownLatch(1);


    public static void main(String[] args) throws Exception {
        cache.put("name", "aty");
        Thread.sleep(1500);

        for (int i = 0; i < 8; i++) {
            startThread(i);
        }

        // 让线程运行
        latch.countDown();

    }

    private static void startThread(int id) {
        Thread t = new Thread(new Runnable() {
            @Override
            public void run() {
                try {
                    System.out.println(Thread.currentThread().getName() + "...begin");
                    latch.await();
                    Stopwatch watch = Stopwatch.createStarted();
                    System.out.println(Thread.currentThread().getName() + "...value..." + cache.get("name"));
                    watch.stop();
                    System.out.println(Thread.currentThread().getName() + "...finish,cost time=" + watch.elapsed(TimeUnit.SECONDS));
                } catch (Exception e) {
                    e.printStackTrace();
                }
            }
        });

        t.setName("Thread-" + id);
        t.start();
    }


}

最后
以上就是多情鸵鸟最近收集整理的关于Guava Cache特性:refreshAfterWrite只阻塞回源线程,其他线程返回旧值的全部内容,更多相关Guava内容请搜索靠谱客的其他文章。
本图文内容来源于网友提供,作为学习参考使用,或来自网络收集整理,版权属于原作者所有。


发表评论 取消回复