javaConfig配置SpringMVC
环境为JDK1.8+tomact8
在web3.0以前我们开发web项目都需要在web.xml中配置servlet,filter,等,3.0以后web容器提供基于注解为主的和自动化扫描配置上下文需要的类。web程序员从繁琐的xml文件配置中解脱出来。springMVC也提供也javaConfig的配置,
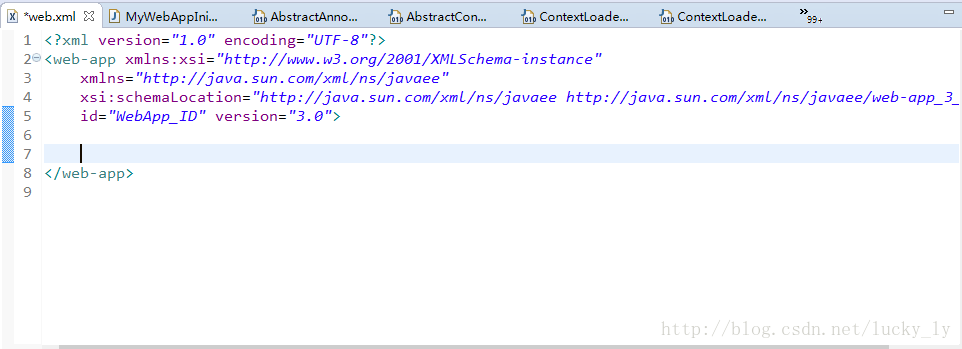
1.web.xml 必须为3.0

2.配置java的注解驱动类,
package com.ly.config;

import org.springframework.context.annotation.Bean;
import org.springframework.context.annotation.ComponentScan;
import org.springframework.context.annotation.Configuration;
import org.springframework.web.servlet.ViewResolver;
import org.springframework.web.servlet.config.annotation.DefaultServletHandlerConfigurer;
import org.springframework.web.servlet.config.annotation.EnableWebMvc;
import org.springframework.web.servlet.config.annotation.WebMvcConfigurerAdapter;
import org.springframework.web.servlet.view.InternalResourceViewResolver;

@Configuration
@EnableWebMvc//启动springMVC注解驱动 等价于xml 配置中的<mvc:annotation-driven/>
@ComponentScan("com.ly.controller")//扫描创建控制器类
public class WebConfig extends WebMvcConfigurerAdapter {

    @Bean//定义试图解析器
    public ViewResolver ViewResolver(){
        InternalResourceViewResolver resolver = new InternalResourceViewResolver();
        resolver.setPrefix("/");
        resolver.setSuffix(".jsp");
        resolver.setExposeContextBeansAsAttributes(true);
        return resolver;
    }

    //静态资源交给默认的servlet
    @Override
    public void configureDefaultServletHandling(DefaultServletHandlerConfigurer configurer) {
        // TODO Auto-generated method stub
        configurer.enable();
    }
}
2.配置非springMVC上下文
package com.ly.config;

import org.springframework.context.annotation.ComponentScan;
import org.springframework.context.annotation.ComponentScan.Filter;
import org.springframework.context.annotation.Configuration;
import org.springframework.context.annotation.FilterType;
import org.springframework.web.servlet.config.annotation.EnableWebMvc;

@Configuration
@ComponentScan(basePackages="com.ly",excludeFilters={
        @Filter(type=FilterType.ANNOTATION,value=EnableWebMvc.class)
})
public class Root {

}
3.继承AbstractAnnotationConfigDispatcherServletInitializer类,实现其3个方法。到此简单的mvc配置完成,当容器启动时,会搜索实现了WebApplicationInitializer的类并进行上下文的初始化
package com.ly.config;

import org.springframework.web.servlet.support.AbstractAnnotationConfigDispatcherServletInitializer;

public class MyWebAppInitializer extends AbstractAnnotationConfigDispatcherServletInitializer {

    @Override
    protected Class<?>[] getRootConfigClasses() {//非SpringMVC上下文配置类
        return new Class<?>[]{Root.class};
    }

    @Override
    protected Class<?>[] getServletConfigClasses() {//SpringMVC上下文配置类
        return new Class<?>[] {WebConfig.class};
    }

    @Override
    protected String[] getServletMappings() {//dispatcher映射路径,处理所有请求
        return new String[]{"/"};
    }

}
基于xml的配置

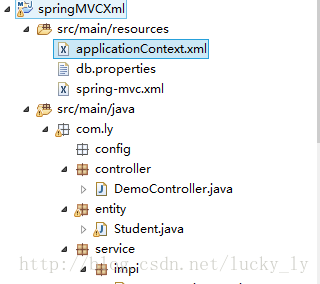
1.applicationContext.xml配置
<?xml version="1.0" encoding="UTF-8"?>
<beans xmlns="http://www.springframework.org/schema/beans"
    xmlns:xsi="http://www.w3.org/2001/XMLSchema-instance"
    xmlns:p="http://www.springframework.org/schema/p"
    xmlns:util="http://www.springframework.org/schema/util"
    xmlns:context="http://www.springframework.org/schema/context"
    xmlns:mvc="http://www.springframework.org/schema/mvc"
    xmlns:aop="http://www.springframework.org/schema/aop"
     xmlns:tx="http://www.springframework.org/schema/tx"
    xsi:schemaLocation="http://www.springframework.org/schema/beans
        http://www.springframework.org/schema/beans/spring-beans.xsd
        http://www.springframework.org/schema/util
        http://www.springframework.org/schema/util/spring-util.xsd
        http://www.springframework.org/schema/context
        http://www.springframework.org/schema/context/spring-context.xsd
        http://www.springframework.org/schema/mvc
        http://www.springframework.org/schema/mvc/spring-mvc.xsd
        http://www.springframework.org/schema/aop
        http://www.springframework.org/schema/aop/spring-aop.xsd
        http://www.springframework.org/schema/tx
        http://www.springframework.org/schema/tx/spring-tx.xsd">

        <!--以注解的方式配置bean,指定bean所在的包  -->

    <context:component-scan base-package="com.ly">
        <context:exclude-filter type="annotation" expression="org.springframework.stereotype.Controller"/>
    </context:component-scan>

    <context:property-placeholder location="classpath:db.properties"/>


</beans>
2.spring-mvc.xml配置
<?xml version="1.0" encoding="UTF-8"?>
<beans xmlns="http://www.springframework.org/schema/beans"
    xmlns:xsi="http://www.w3.org/2001/XMLSchema-instance"
    xmlns:p="http://www.springframework.org/schema/p"
    xmlns:util="http://www.springframework.org/schema/util"
    xmlns:context="http://www.springframework.org/schema/context"
    xmlns:mvc="http://www.springframework.org/schema/mvc"
    xmlns:aop="http://www.springframework.org/schema/aop"
     xmlns:tx="http://www.springframework.org/schema/tx"
    xsi:schemaLocation="http://www.springframework.org/schema/beans
        http://www.springframework.org/schema/beans/spring-beans.xsd
        http://www.springframework.org/schema/util
        http://www.springframework.org/schema/util/spring-util.xsd
        http://www.springframework.org/schema/context
        http://www.springframework.org/schema/context/spring-context.xsd
        http://www.springframework.org/schema/mvc
        http://www.springframework.org/schema/mvc/spring-mvc.xsd
        http://www.springframework.org/schema/aop
        http://www.springframework.org/schema/aop/spring-aop.xsd
        http://www.springframework.org/schema/tx
        http://www.springframework.org/schema/tx/spring-tx.xsd">

        <!--以注解的方式配置bean,指定bean所在的包  -->

    <context:component-scan base-package="com.ly.controller"/>

    <bean class="org.springframework.web.servlet.view.InternalResourceViewResolver">
        <property name="prefix" value="/page/"/>
        <property name="suffix" value=".jsp"/>
    </bean>

    <mvc:default-servlet-handler/><!-- 静态资源处理器 -->

    <mvc:annotation-driven/><!--springMVC注解驱动  -->


</beans>
3.web.xml配置
<?xml version="1.0" encoding="UTF-8"?>
<web-app xmlns:xsi="http://www.w3.org/2001/XMLSchema-instance"
    xmlns="http://java.sun.com/xml/ns/javaee"
    xsi:schemaLocation="http://java.sun.com/xml/ns/javaee http://java.sun.com/xml/ns/javaee/web-app_3_0.xsd"
    id="WebApp_ID" version="3.0">
    <context-param>
        <param-name>contextConfigLocation</param-name>
        <param-value>classpath:applicationContext.xml</param-value>
    </context-param>

    <listener><!-- 加载非springMVC上下文 -->
        <listener-class>org.springframework.web.context.ContextLoaderListener</listener-class>
    </listener>

    <servlet>
        <servlet-name>DispatcherServlet</servlet-name>
        <servlet-class>org.springframework.web.servlet.DispatcherServlet</servlet-class>
        <init-param>
            <param-name>contextConfigLocation</param-name>
            <param-value>classpath:spring-mvc.xml</param-value>
        </init-param>

    </servlet>

    <servlet-mapping>
        <servlet-name>DispatcherServlet</servlet-name>
        <url-pattern>/</url-pattern>
    </servlet-mapping>


    <!-- Spring 编码过滤器 start -->
    <filter>
        <filter-name>characterEncoding</filter-name>
        <filter-class>org.springframework.web.filter.CharacterEncodingFilter</filter-class>
        <init-param>
            <param-name>encoding</param-name>
            <param-value>UTF-8</param-value>
        </init-param>
        <init-param>
            <param-name>forceEncoding</param-name>
            <param-value>true</param-value>
        </init-param>
    </filter>
    <filter-mapping>
        <filter-name>characterEncoding</filter-name>
        <url-pattern>/*</url-pattern>
    </filter-mapping>
    <!-- Spring 编码过滤器 End -->
</web-app>
springMVC官方参考文档
[springMVC官方参考文档(https://docs.spring.io/spring/docs/current/spring-framework-reference/web.html#spring-web)
最后
以上就是自信蓝天最近收集整理的关于SpringMVC的java配置+xml配置的全部内容,更多相关SpringMVC内容请搜索靠谱客的其他文章。
本图文内容来源于网友提供,作为学习参考使用,或来自网络收集整理,版权属于原作者所有。


发表评论 取消回复