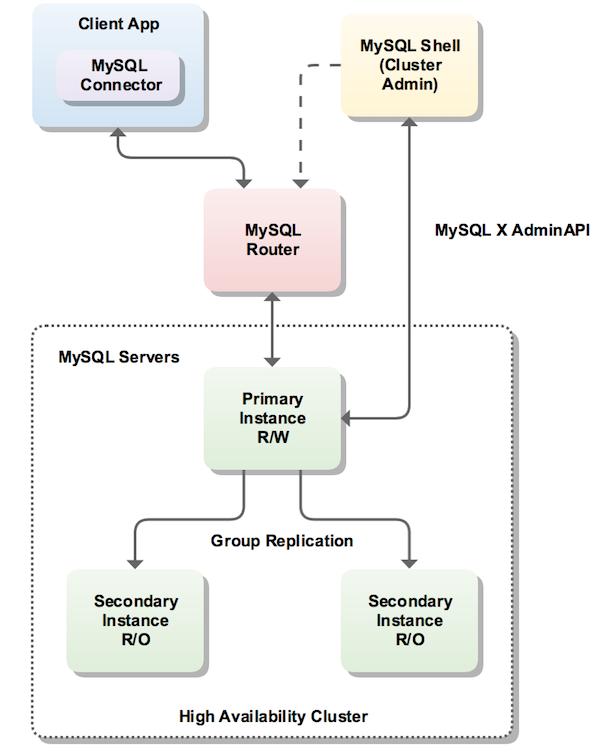
本文主要讲述mysql 集群的构建过程,主要参考mysql官网提供的文档,并根据自己对文档的理解做了部分功能的演练;
一.概要
首先看一下官方对mysql集群的解释
MySQL InnoDB cluster provides a complete high availability solution for MySQL. MySQL Shell includes AdminAPI which enables you to easily configure and administer a group of at least three MySQL server instances to function as an InnoDB cluster. Each MySQL server instance runs MySQL Group Replication, which provides the mechanism to replicate data within InnoDB clusters, with built-in failover.mysql InnoDb Cluster 提供了为MySql提供了一套完整的,高可用的解决方案;MySql Shell 则很好的提供了集群接入的工具,途径;每一个MySql Server 的实例运行在Group Replication上,为集群中的机器提供了数据的Replication;


集群构建需要提供的工具
mysql-5.7.21 或者更高版本
mysql-shell-1.0.11 或者更高版本
mysql-router-2.1.6 或者更高版本
MySql官网提供了上述软件的下载地址,请从官网下载即可;
二.环境构建
本次模拟MySql Cluster一主两从的场景;
准备三台linux服务器,分别如下:
192.168.1.100 (安装MySqlRouter,MySql-Shell,MySql)
192.168.1.101 (安装MySql-Shell,MySql)
192.168.1.102 (安装MySql-Shell,MySql)
mysql 5.7.21 的安装
cd /usr/local/
tar -xzvf mysql-5.7.21-linux-glibc2.12-x86_64.tar.gz
mv mysql-5.7.21-linux-glibc2.12-x86_64 mysql
groupadd mysql
useradd -r -g mysql mysql
chown -R mysql:mysql mysql

cd /usr/local/mysql/
mkdir log
chown -R mysql:mysql log
chown -R mysql:mysql /data/mysql_data
mysql的配置文件my.cnf(仅供参考)
[mysqld]
datadir=/data/mysql_data
basedir=/usr/local/mysql
socket=/tmp/mysql.sock
log-error=/usr/local/mysql/log/mysqld.log
symbolic-links=0

log_slave_updates = ON
server_id = 100
relay_log_info_repository = TABLE
master_info_repository = TABLE
transaction_write_set_extraction = XXHASH64
binlog_format = ROW
disabled_storage_engines = MyISAM,BLACKHOLE,FEDERATED,CSV,ARCHIVE
report_port = 3306
binlog_checksum = NONE
enforce_gtid_consistency = ON
log_bin
gtid_mode = ON
sql_mode = STRICT_TRANS_TABLES,ERROR_FOR_DIVISION_BY_ZERO,NO_AUTO_CREATE_USER,NO_ENGINE_SUBSTITUTION
max_connections=1000
注意,请保证上面所对应的目录存在,不然在初始化的时候会报错;
执行mysql的init命令
./bin/mysqld --initialize --user=mysql --basedir=/usr/local/mysql --datadir=/data/mysql_data

cp support-files/mysql.server /etc/init.d/mysql
chkconfig --add mysql
chkconfig --list mysql
/etc/init.d/mysql start
修改/etc/profile文件,增加mysql环境变量
export MYSQL_HOME=/usr/local/mysql
export PATH=${MYSQL_HOME}/bin:$PATH
source /etc/profile 使环境变量生效
启动mysql后,请使用mysql -h localhost -u root -p 启动
密码请查看log下的日志,日志中记录的有初始化过程中的初始密码,输入后进入mysql
修改密码以及执行授权操作
mysql> set password='123456';
mysql> flush privileges;
mysql> grant all privileges on *.* to 'root'@'%' identified by 'root' with grant option;
mysql> update mysql.user set authentication_string=PASSWORD('123456') where User='root';
mysql> flush privileges;
mysql> exit;
到此MySql的安装结束;若中间步骤中存在问题,请参考log下的日志文件,然后做相应的变动;
mysql-shell-1.0.11,mysql-router-2.1.6的安装,使用rpm方式安装
rpm -ivh mysql-shell-1.0.11-1.el7.x86_64.rpm
rpm -ivh mysql-router-2.1.6-1.el7.x86_64.rpm
下面进行mysql cluster的配置
//检查节点是否可用
[root@host-192-168-1-100~]# mysqlsh
mysql-js> dba.checkInstanceConfiguration("root@host-192-168-1-100:3306")
Please provide the password for 'root@host-192-168-1-100:3306':
Validating instance...

The instance 'host-192-168-1-100:3306' is valid for Cluster usage
{
    "status": "ok"
}
请根据相同的操作,分别检查101 102两个节点
创建集群信息
[root@host-192-168-1-100~]# mysqlsh
mysql-js> shell.connect('root@host-192-168-1-100:3306')
mysql-js> var cluster = dba.createCluster('myCluster')
mysql-js> cluster.addInstance('root@host-192-168-1-101:3306')
mysql-js> cluster.addInstance('root@host-192-168-1-102:3306')
若是不清楚命令的含义,请通过下面的方式查询
mysql-js> dba.help('getCluster')

Retrieves a cluster from the Metadata Store.

SYNTAX
  <Dba>.getCluster([name])

WHERE
  name: Parameter to specify the name of the cluster to be returned.

DESCRIPTION

If name is not specified, the default cluster will be returned.

If name is specified, and no cluster with the indicated name is found, an error
will be raised.
具体的操作方式,可以参考mysql官网的集群配置
使用MySql Router构建mysql的集群,详细步骤参考官网配置 下面粗略的讲一下如何配置
[root@host-192-168-1-100~]# mysqlrouter --bootstrap root@host-192-168-1-100:3306 --user=mysqlrouter
Please enter MySQL password for root:
WARNING: The MySQL server does not have SSL configured and metadata used by the router may be transmitted unencrypted.

Bootstrapping system MySQL Router instance...
MySQL Router  has now been configured for the InnoDB cluster 'myCluster'.

The following connection information can be used to connect to the cluster.

Classic MySQL protocol connections to cluster 'myCluster':
- Read/Write Connections: localhost:6446
- Read/Only Connections: localhost:6447

X protocol connections to cluster 'myCluster':
- Read/Write Connections: localhost:64460
- Read/Only Connections: localhost:64470

Existing configurations backed up to /etc/mysqlrouter/mysqlrouter.conf.bak

//若是目前已经存在集群,想重新替换该集群,比如名称修改等,则使用下面的命令
mysqlrouter --bootstrap root@host-192-168-1-100:3306 --user=mysqlrouter --force
启动mysqlrouter的服务
systemctl start mysqlrouter.service针对mysqlrouter的配置文件,请查看/etc/mysqlrouter/mysqlrouter.conf
缺省情况下6446是R/W端口,而6447是R/O端口
InnoDb Cluster集群的创建及详细的工作流程,官网地址
JS语法
dba.checkInstanceConfiguration("root@hostname:3306") // 检查节点配置实例,用于加入cluster之前
dba.rebootClusterFromCompleteOutage('myCluster'); //重启
dba.dropMetadataSchema(); //删除schema
var cluster = dba.getCluster('myCluster') // 获取当前集群
cluster.checkInstanceState("root@hostname:3306") //检查cluster里节点状态
cluster.rejoinInstance("root@hostname:3306") // 重新加入节点,我本地测试的时候发现rejoin一直无效,每次是delete后
addcluster.dissolve({force:true}) // 删除集群
cluster.addInstance("root@hostname:3306") // 增加节点
cluster.removeInstance("root@hostname:3306") // 删除节点
cluster.removeInstance('root@host:3306',{force:true}) // 强制删除节点
cluster.dissolve({force:true}) //解散集群
cluster.describe();//集群描述
集群节点状态
-
ONLINE: The instance is online and participating in the cluster. -
OFFLINE: The instance has lost connection to the other instances. -
RECOVERING: The instance is attempting to synchronize with the cluster by retrieving transactions it needs before it can become anONLINEmember. -
UNREACHABLE: The instance has lost communication with the cluster. -
ERROR: The instance has encountered an error during the recovery phase or while applying a transaction.
三.注意事项
1.请保证所有的集群机器在一个子网内,不然会失败;考虑到可以用桥接的方式实现不同网络之间集群的搭建,只是我这边暂时没有搭建成功;
2. 统一使用hostname进行配置;请更改每台机器的hosts文件;
3.
ERROR:
Group Replication join failed.
ERROR: Error joining instance to cluster: 'host-192-168-1-101:3306' - Query failed. MySQL Error (3092): The server is not configureroperly to be an active member of the group. Please see more details on error log.. Query: START group_replication

通过如下方式进行处理

mysql> install plugin group_replication soname 'group_replication.so'; ##安装插件
mysql> set global group_replication_allow_local_disjoint_gtids_join=ON;
mysql> START GROUP_REPLICATION;
mysql> select * from performance_schema.replication_group_members;
4.
Dba.getCluster: This function is not available through a session to a standalone instance (RuntimeError)

说明集群中的主节点已经不在该机器上,查询后更改机器重试一下即可;
5.
Dba.getCluster: Dba.getCluster: Unable to get cluster. The instance 'host-192-168-1-101:3306'
may belong to a different ReplicaSet as the one registered in the Metadata since the value of 'group_replication_group_name'
does not match the one registered in the ReplicaSet's Metadata: possible split-brain scenario. Please connect to another member of the ReplicaSet to get the Cluster. (RuntimeError)

//最致命的错误,master/slave的数据不一致所致,没办法,只能重新来
dba.dropMetadataSchema();
6.请保证集群中的数据库表都存在主键,不然会挂掉;
7.安装集群监控,保证集群中机器挂掉的时候及时启动,不然所有的宕机的时候哭都来不及;监控平台推荐使用天兔
转载于:https://my.oschina.net/issume/blog/2239781
最后
以上就是开朗帽子最近收集整理的关于MySql Innodb Cluster集群的构建的全部内容,更多相关MySql内容请搜索靠谱客的其他文章。


发表评论 取消回复