原文链接:MySQL Shell 副本集 和 MGR 快速搭建
本文为原创文章,如有转载请标明出处。
简介
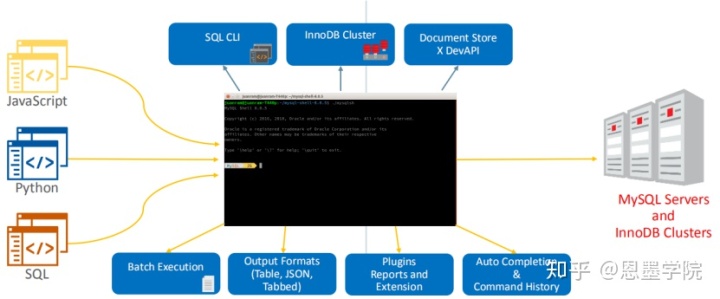
MySQL Shell是MySQL Server的高级客户端和代码编辑器。除了和mysql命令行客户端程序一样,使用常规的SQL功能外,MySQL Shell还提供了JavaScript和Python的脚本功能,并包含多个API,其中的AdminAPI用于操作InnoDB Cluster。
安装部署
下载:https://dev.mysql.com/downloads/shell/
安装
#tar -zxvf mysql-shell-8.0.20-linux-glibc2.12-x86-64bit.tar.gz -C /opt/idc/mysql-shell8.0.20

####配置
#vi /etc/profilt
export PATH=/opt/idc/mysql-shell8.0.20/bin:$PATH
#Source /etc/profile
说明:https://dev.mysql.com/doc/mysql-shell/8.0/en/mysql-shell-connections.html
备注:是不是很简单,但需要注意每个mysql版本都有对应shell版本。建议对应版本使用。shell 是跟着mysql版本进行维护的。
ReplicaSet:只能搭建主从架构
通过shell脚本 搭建主从
创建集群
[root@ens8 idc]# mysqlsh
MySQL Shell 8.0.20

Copyright (c) 2016, 2020, Oracle and/or its affiliates. All rights reserved.
Oracle is a registered trademark of Oracle Corporation and/or its affiliates.
Other names may be trademarks of their respective owners.

Type 'help' or '?' for help; 'quit' to exit.
 MySQL  JS > connect root@192.168.244.129:3380

 MySQL  192.168.244.129:3380 ssl  JS > var rs = dba.createReplicaSet("dbexample")
查看集群状态:
MySQL 192.168.244.129:3380 ssl JS > rs.status()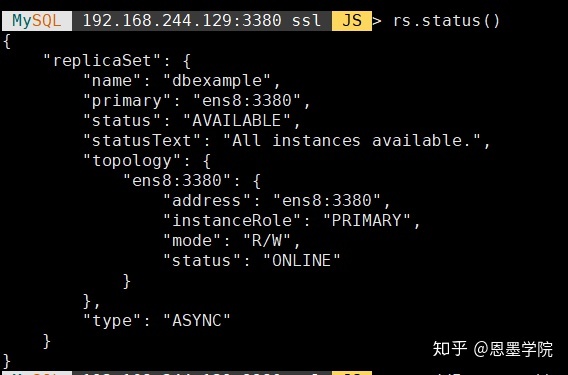
添加集群节点:
MySQL 192.168.244.129:3380 ssl JS > rs.addInstance('root@192.168.244.129:3381')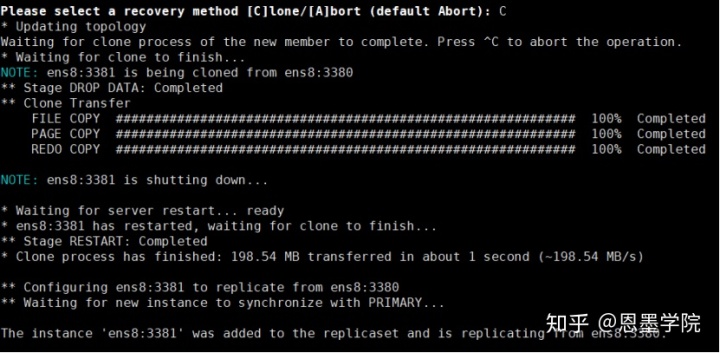
查看集群状态:
MySQL 192.168.244.129:3380 ssl JS > rs.status()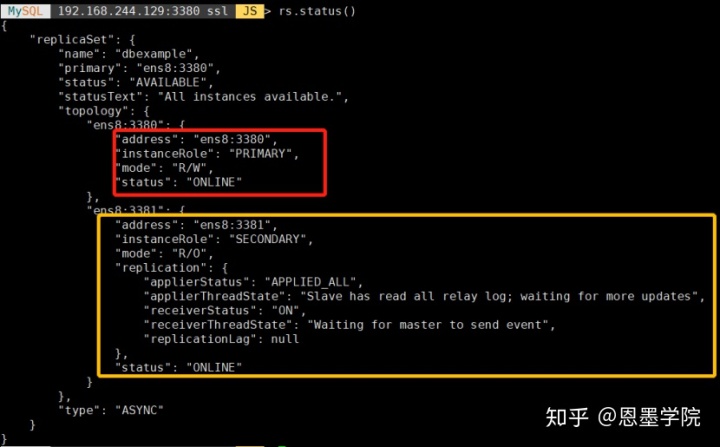
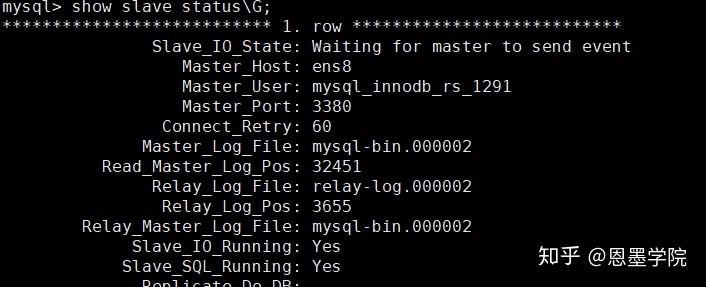
登录数据库,查看主从状态:
其他命令:
rs = dba.createReplicaSet('testadopt', {'adoptFromAR':1}) #现有副本集接管

rs.addInstance(“root@192.168.244.129:3381”)  #添加节点

rs.disconnect() #断开replicaset对象使用的所有内部会话。

rs.forcePrimaryInstance(instance, options) #不可用主服务器的副本集中执行故障转移

rs.getName() #获取集群名字

rs.help([member]) #帮助信息

rs.listRouters([options]) ##mysql router配置信息

rs.rejoinInstance(instance[, options]) #重新加入副本

rs.removeInstance(instance[, options]) #删除节点

rs.removeRouterMetadata(routerDef) #删除router 信息

rs.setPrimaryInstance(instance, options) #指定主节点

rs.setupAdminAccount(user, options) #创建集群管理账号

rs.setupRouterAccount(user, options) #指定router 访问账号

rs.status([options]) #查看副本集状态

#optins 部分 可以通过 help ReplicaSet.removeInstance 查看
备注:
1)现没有双主配置,并行复制,多源复制相关的参数支持,可以算不完善
2)删除添加节点

3)没有副本集摧毁的命令
如果要删除集群需要先通过removeInstance删除第二节点,再通过stop slave 以及reset slave all,并删除mysql_innodb_cluster_metadata数据库实现
4)通过,一下命令可以查看帮助文档
? ReplicaSet
官场参考:https://dev.mysql.com/doc/refman/8.0/en/mysql-innodb-replicasets.html
*总结下来,不完善,还需继续努力。
MGR新集群搭建:
创建新MGR
[root@ss30 mysqlrouter]# mysqlsh
 MySQL  JS > dba.checkInstanceConfiguration('root@192.168.244.129:3380')
The instance 'ens8:3380' is valid to be used in an InnoDB cluster.

{
    "status": "ok"
}
对集群中的每个服务器实例重复此过程:
MySQL  JS >dba.checkInstanceConfiguration('root@192.168.244.129:3381')
 MySQL  JS >dba.checkInstanceConfiguration('root@192.168.244.129:3382')
执行dba.configureInstance()后再次检查实例配置的输出如下:
MySQL  JS >dba.configureInstance('root@192.168.244.129:3380')
 MySQL  JS >dba.configureInstance('root@192.168.244.129:3381')
 MySQL  JS >dba.configureInstance('root@192.168.244.129:3382')
创建MGR集群:
##链接主节点
 MySQL  JS >connect root@192.168.244.129:3380

##创建集群
 MySQL  192.168.244.129:3380 ssl  JS  > dba.createCluster('mgrCluster')
 MySQL  192.168.244.129:3380 ssl  JS > var cluster = dba.getCluster()

 ##添加节点
 MySQL  192.168.244.129:3380 ssl  JS > cluster.addInstance('root@192.168.244.129:3381')
 MySQL  192.168.244.129:3380 ssl  JS > cluster.addInstance('root@192.168.244.129:3382')

  ##查看集群状态
 MySQL  192.168.244.129:3380 ssl  JS > cluster.status()

 ##解散InnoDB Cluster
 MySQL  192.168.244.129:3380 ssl  JS > cluster.dissolve()

 ##配置新主选举权重
 MySQL  192.168.244.129:3380 ssl  JS >  var mycluster = dba.getCluster()
 MySQL  192.168.244.129:3380 ssl  JS > mycluster.addInstance('root@192.168.244.129:3381', {memberWeight:25})
 MySQL  192.168.244.129:3380 ssl  JS > mycluster.addInstance('root@192.168.244.129:3382', {memberWeight:50})

##指定一个新的主节点
 MySQL  192.168.244.129:3380 ssl  JS > cluster.setPrimaryInstance('192.168.244.129:3381')

##Cluster.switchToMultiPrimaryMode()切换到多主模式:
 MySQL  192.168.244.129:3380 ssl  JS > cluster.switchToMultiPrimaryMode()


 ##Cluster.switchToSinglePrimaryMode()切换到单主模式
 MySQL  192.168.244.129:3380 ssl  JS > cluster.switchToSinglePrimaryMode('172.16.1.125:3306')
MGR集群接管:
如果在已经配置好的组复制上创建InnoDB Cluster,并且希望使用它来创建集群,可将adoptFromGR选项传递给dba.createCluster()函数。创建的InnoDB Cluster会匹配复制组是以单主数据库还是多主数据库运行。 要采用现有的组复制组,使用MySQL Shell连接到组成员。
[root@ss30 mysqlrouter]# mysqlsh --uri root@192.168.244.129:3380
  MySQL  192.168.244.129:3380 ssl  JS > var cluster = dba.createCluster('testCluster', {adoptFromGR: true});
A new InnoDB cluster will be created based on the existing replication group on instance '192.168.244.129:3380'.

Creating InnoDB cluster 'testCluster' on 'ens8:3380'...

Adding Seed Instance...
Adding Instance 'ens8:3380'...
Adding Instance 'ens8:3381'...
Adding Instance 'ens8:3382'...
Resetting distributed recovery credentials across the cluster...
Cluster successfully created based on existing replication group.

MySQL  192.168.244.129:3380 ssl  JS > cluster.status();
{
    "clusterName": "testCluster",
    "defaultReplicaSet": {
        "name": "default",
        "primary": "ens8:3380",
        "ssl": "DISABLED",
        "status": "OK",
        "statusText": "Cluster is ONLINE and can tolerate up to ONE failure.",
        "topology": {
            "ens8:3380": {
                "address": "ens8:3380",
                "mode": "R/W",
                "readReplicas": {},
                "replicationLag": null,
                "role": "HA",
                "status": "ONLINE",
                "version": "8.0.19"
            },
            "ens8:3381": {
                "address": "ens8:3381",
                "mode": "R/O",
                "readReplicas": {},
                "replicationLag": null,
                "role": "HA",
                "status": "ONLINE",
                "version": "8.0.19"
            },
            "ens8:3382": {
                "address": "ens8:3382",
                "mode": "R/O",
                "readReplicas": {},
                "replicationLag": null,
                "role": "HA",
                "status": "ONLINE",
                "version": "8.0.19"
            }
        },
        "topologyMode": "Single-Primary"
    },
    "groupInformationSourceMember": "ens8:3380"
}
其他命令
##检查节点配置实例,用于加入cluster之前
dba.checkInstanceConfiguration("root@hostname:3306")

##重启
dba.rebootClusterFromCompleteOutage('mycluster');

##删除schema
dba.dropMetadataSchema();

##获取当前集群
var cluster = dba.getCluster('mycluster')

##检查cluster里节点状态
cluster.checkInstanceState("root@hostname:3306")

##重新加入节点,我本地测试的时候发现rejoin一直无效,每次是delete后
cluster.rejoinInstance("root@hostname:3306")

##删除集群
addcluster.dissolve({force:true})

##增加节点
cluster.addInstance("root@hostname:3306")

##删除节点
cluster.removeInstance("root@hostname:3306")

##强制删除节点
cluster.removeInstance('root@host:3306',{force:true})

##解散集群
cluster.dissolve({force:true})

###集群描述
cluster.describe()
如何重置Innodb cluster集群环境:
##主节点:登录mysql-shell清空集群
mysql-js>dba.dropMetadataSchema();

mysql> stop group_replication;
##清空日志,确保和从库的表没有冲突
mysql> reset master;
mysql> reset slave;

##其他节点(主要清理和主库的主从信息, 确保主库和从库的表没有冲突)
mysql> stop group_replication;
mysql> reset master;
mysql> reset slave
如何将Multi-Primary改为Single-Primary
## a) 解散原来的集群:
mysql-js> cluster.dissolve({force: true})

## b) 每台主机MySQL修改如下配置:
mysql> set global group_replication_enforce_update_everywhere_checks=OFF;
mysql> set global group_replication_single_primary_mode=ON;

## c) 重新创建集群:
mysql-js> var cluster = dba.createCluster('mysqlCluster');
mysql-js> cluster.addInstance('chianyu@svr2:3306');
mysql-js> cluster.addInstance('chianyu@svr3:3306');
状态属性
- 节点状态
- ONLINE - 节点状态正常。
- OFFLINE - 实例在运行,但没有加入任何Cluster。
- RECOVERING - 实例已加入Cluster,正在同步数据。
- ERROR - 同步数据发生异常。
- UNREACHABLE - 与其他节点通讯中断,可能是网络问题,可能是节点crash。
- MISSING 节点已加入集群,但未启动group replication
- 集群状态
- OK – 所有节点处于online状态,有冗余节点。
- OK_PARTIAL – 有节点不可用,但仍有冗余节点。
- OK_NO_TOLERANCE – 有足够的online节点,但没有冗余,例如:两个节点的Cluster,其中一个挂了,集群就不可用了。
- NO_QUORUM – 有节点处于online状态,但达不到法定节点数,此状态下Cluster无法写入,只能读取。
- UNKNOWN – 不是online或recovering状态,尝试连接其他实例查看状态。
- UNAVAILABLE – 组内节点全是offline状态,但实例在运行,可能实例刚重启还没加入Cluster。
总结
整体搭建还是很快速,方便的。但还需要进行很多优化部分。
MGR算成熟,但还可以继续优化,
副本集还存在很多问题,不建议生产使用。
最后
以上就是高兴芒果最近收集整理的关于mysql集群搭建_MySQL Shell 副本集 和 MGR 快速搭建的全部内容,更多相关mysql集群搭建_MySQL内容请搜索靠谱客的其他文章。


发表评论 取消回复