Things we are gonna need are
- Blender 2.7x www.blender.org/
- XPS tools addon for Blender
- A model made with materials for Blender internal
For Mac Users
Safari automatically unzips downloaded files and deletes the original ZIP file.
Try disabling this function (I don't know how, I never used a Mac) or download using another browser like Firefox.
Preparation
First thing we have to do is to installing the addon.Go to the provided link and download the latest version of the addon. DO NOT UNZIP IT.
Open Blender and go to File > User Preferences
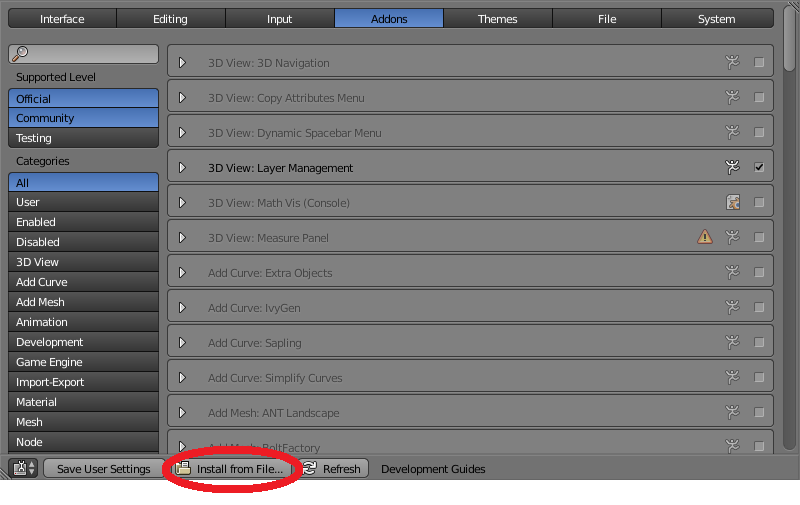
Select the Addons tab and click the "Install fom File..." button

Find the downloaded addon zip file and click the "Install fom File..." button
The XPS tools addon should be de only addon diplayed on the list, if not type "XPS" in the search dialog.
Now Check the checkbox to the right to enable the addon.
Click the "Save User Settings" button and close the window.

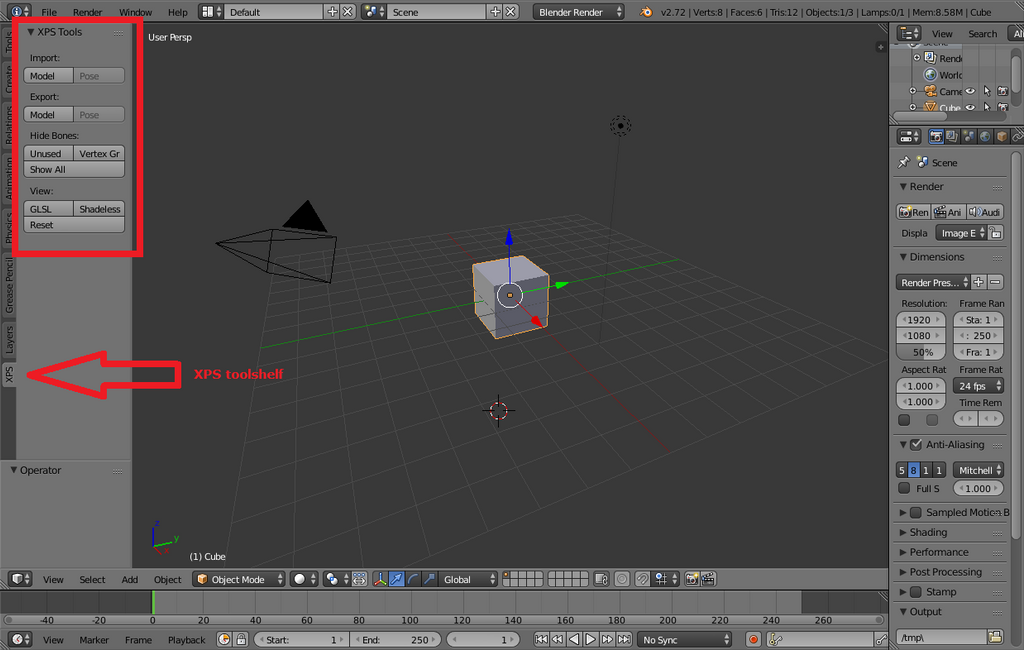
A new tab called XPS should have appeared in the toolshelf

Necessary knowledge
First we need to know how XPS manages material. XPS suppports only one material per MeshFor XPS to properly display the meshes, the name of each mesh must by like this.
22_suit_0.7_20_5
The undercores are separators. Each part has a diferent function
22: is the Render group. A render group tells XPS how many textures a the material has, how will they be use (diffuse map, bump map, specular map, etc.), in what order the textures are, if the textures have alpha channels, etc.
This particular Render group (22) has 7 textures, they are: Diffuse, Lightmap, Bumpmap, Mask, Bump1, Bump2 and Specular. Always respect the order of the textures.
suit: is the name of the mesh. Can be anything, but can't contain underscores has they are XPS field separators.
0.7: is the specular highlight value.
20: not all render goups have a foth value. But for this Render Group, this values is the repeater for the Bump1 texture. This means that the Bump1 texture will be tilled 20 time horizontally and 20 times vertically
5: not all render goups have a fifth value. But for this Render Group, this values is the repeater for the Bump2 texture. This means that the Bump1 texture will be tilled 5 time horizontally and 5 times vertically
Here is the official guide for all the Render groups.
xnalara.home-forum.com/t225-le…
I transcribed the Render groups here for readability
docs.google.com/spreadsheets/d…
Preparing the model
So, we have a model in Blender (made from scratch, ripped from a game, etc.) and we want to export it to XPS. We need to do a few things to make our model compatible with XPS.

You can make items optional in XPS by adding a plus sign " +" (visible by default) or a minus sign " -" (hidden by default) at the begenning of the name.
For example, to make the glasses an optional item rename the frame mesh to 24_+frame_1.0 and the lense mesh to 24_+lens_1.0 then in XPS you can show or hide this items from
Options-->Dispay accessories-->Optional Items (hotkey a)

Some times you will want to group multiple item in a same group, in our example lets create a glasses group that will contain the frame and the lense. All you need to do is rename the meshes to 24_+glasses.frame_1.0 and 24_+ glasses. lens_1.0. With this you will see a single option that will hide or show both meshes.

- Only one Material per mesh
- The name of each part must follow the structure [render group]_[mesh name]_[value1]_[value2]_[value3]
- The order of the textures MUST be the order required by the Render Group
- Don't use pure white in your textures (R255, G255, B255). XPS will display it as fully transparent or pure black. Change it to (R254, G254, B254)
- The plugin will triangulate any Quad or Ngon.
1.One Material per mesh
If your mesh has more than one material, you must separate them and create one mesh for each material.
Luckily this is easy to do in blender.
Select the mesh with multiple materials and enter edit mode. Select all (Shortcut A, press it a couple of times till everything is selected). Separate (Shortcut P) and select By material. Exit edit mode.
Now the mesh splitted into as many parts as materials where used by the mesh.

Select the mesh with multiple materials and enter edit mode. Select all (Shortcut A, press it a couple of times till everything is selected). Separate (Shortcut P) and select By material. Exit edit mode.
Now the mesh splitted into as many parts as materials where used by the mesh.

2.Name the mesh
As explained previously the name of the mesh will determine how the material is constructed in XPS. So its up to us to select an appropriate Render Group. For example the bikini part, named WGT_body.001 we will rename it to 24_WGT-bikini_0.8You can make items optional in XPS by adding a plus sign " +" (visible by default) or a minus sign " -" (hidden by default) at the begenning of the name.
For example, to make the glasses an optional item rename the frame mesh to 24_+frame_1.0 and the lense mesh to 24_+lens_1.0 then in XPS you can show or hide this items from
Options-->Dispay accessories-->Optional Items (hotkey a)

Some times you will want to group multiple item in a same group, in our example lets create a glasses group that will contain the frame and the lense. All you need to do is rename the meshes to 24_+glasses.frame_1.0 and 24_+ glasses. lens_1.0. With this you will see a single option that will hide or show both meshes.

Note
In XPS 11.0 you have the new RG 40 and 41 which only required Diffuse, Bumpmap, Specular maps. And the Normal map coordinate system (swizzle coordinates) for 40/41 is RGB X+Y+Z+. But in XPS 11.1 the Normal map coordinate system for 40/41 is back to RGB X+Y-Z+.
For XPS previous to version 11.0 you don't have RG 40/41. The most similar RG are 24/25, so were are gonna use RG 24 for the purposes of this tutorial.
As described in the previously mentioned tables, the render group 24 has 4 textures in this precise order: Diffuse, Lightmap, Bumpmap and Specular, doesn't manage alpha channel and as specular highlight.

For this example our blender material as the Diffuse, Normal and Specular maps but we are missing the lightmap. In this case we can create a solid white texture. Remember you can't use a pure white color R255,G255,B255 so use R254,G254,B254 instead.

For this example our blender material as the Diffuse, Normal and Specular maps but we are missing the lightmap. In this case we can create a solid white texture. Remember you can't use a pure white color R255,G255,B255 so use R254,G254,B254 instead.
If you are missing a Normal map, you can use a solid texture with the color R128,G128,B255.
Remeber use a power of 2 for the dimension of the textures, something like 512x512 or 1024x1024.
Now we have to sort the textures, the order is given by the render group. In this case from top to bottom Diffuse, Lightmap, Bumpmap and Specular. You see we have an extra texture in this material at the end of our list, XPS will ignore this texture as it is not requiered by the render broup. You can leave it there (remember to include the texture file or XPS while create a empty file) or remove it.

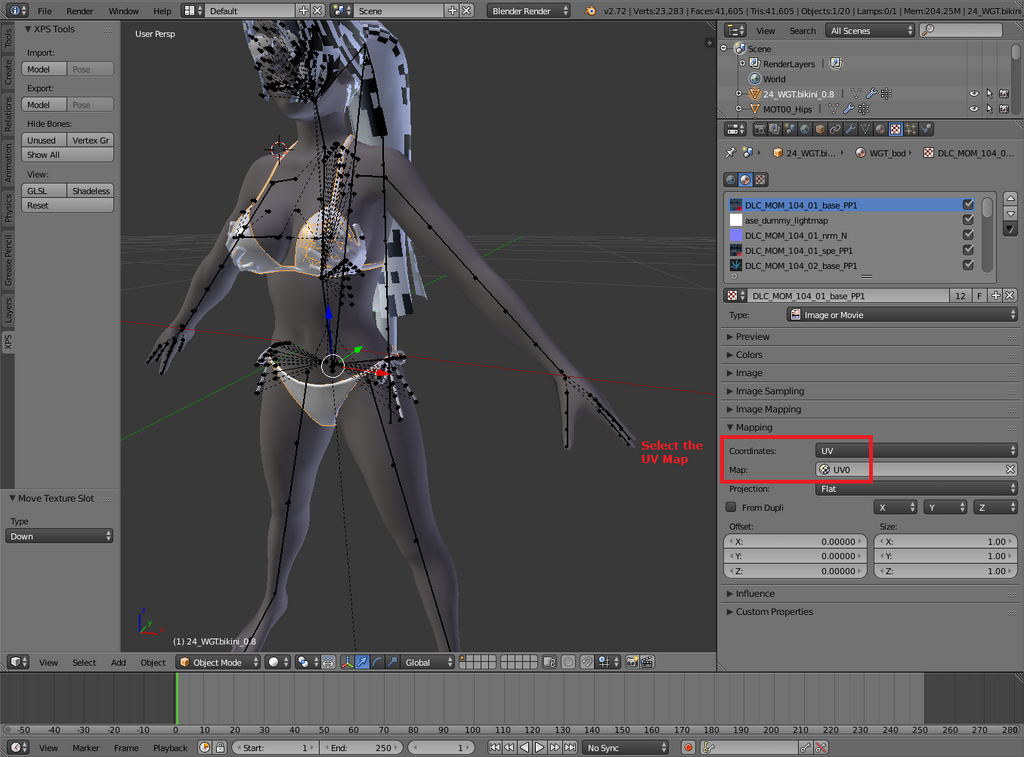
You can choose a different UV map for the lighmap and the specular map if you want.

If you don't specify the UV Map to use with a texture, the addon will export the one set as the active render one.

You can have subsurface modifiers or other modifiers, but the addon will export the original geometry.
Finaly exporting

We are ready to export the model.
Select everything you want to export (only meshes and one armature can be exported).
Go to the XPS toolshelf and click the export model button.
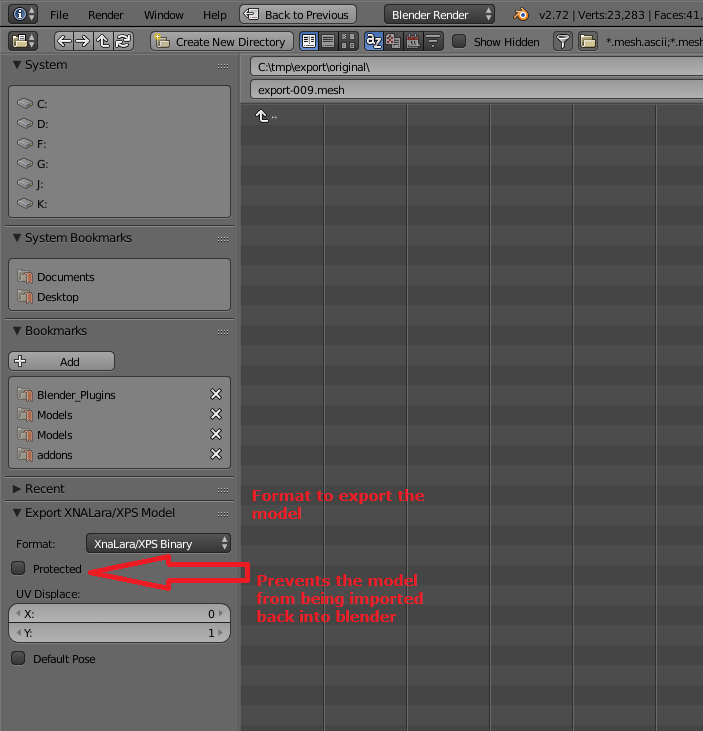
Choose the format to export (*.ascii / *.mesh / *.xps)
If you choose a binary format (*.mesh / *.xps) you can protect the model. This means that the addon will not be able to import this model back into Blender but will work normally in XPS.

You are done. Load Your model into XPS, enjoy you master piece and don't forget to share!!
转载于:https://www.cnblogs.com/mimime/p/6075541.html
最后
以上就是土豪鸡最近收集整理的关于Blender to XPS(blender 2.7x Internal materials)的全部内容,更多相关Blender内容请搜索靠谱客的其他文章。
本图文内容来源于网友提供,作为学习参考使用,或来自网络收集整理,版权属于原作者所有。


![IVR-2 [Voice XML规范详细描述1]](https://www.shuijiaxian.com/files_image/reation/bcimg14.png)


发表评论 取消回复