一、总体思路
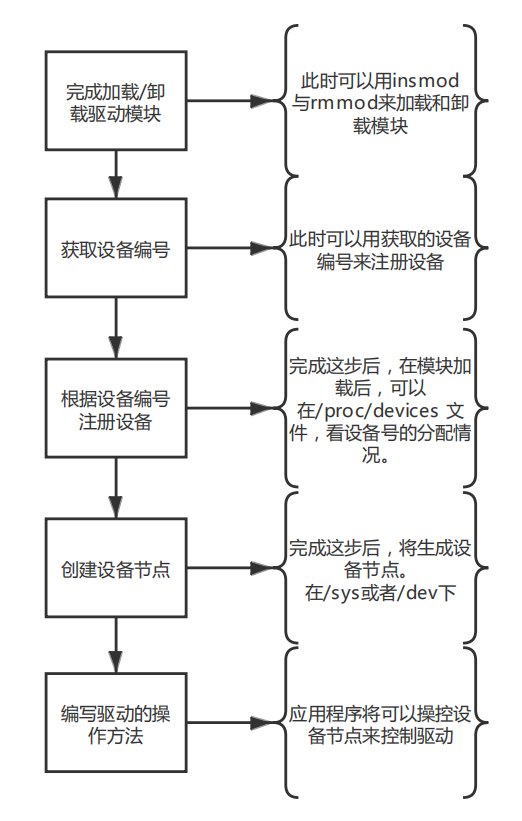
简述

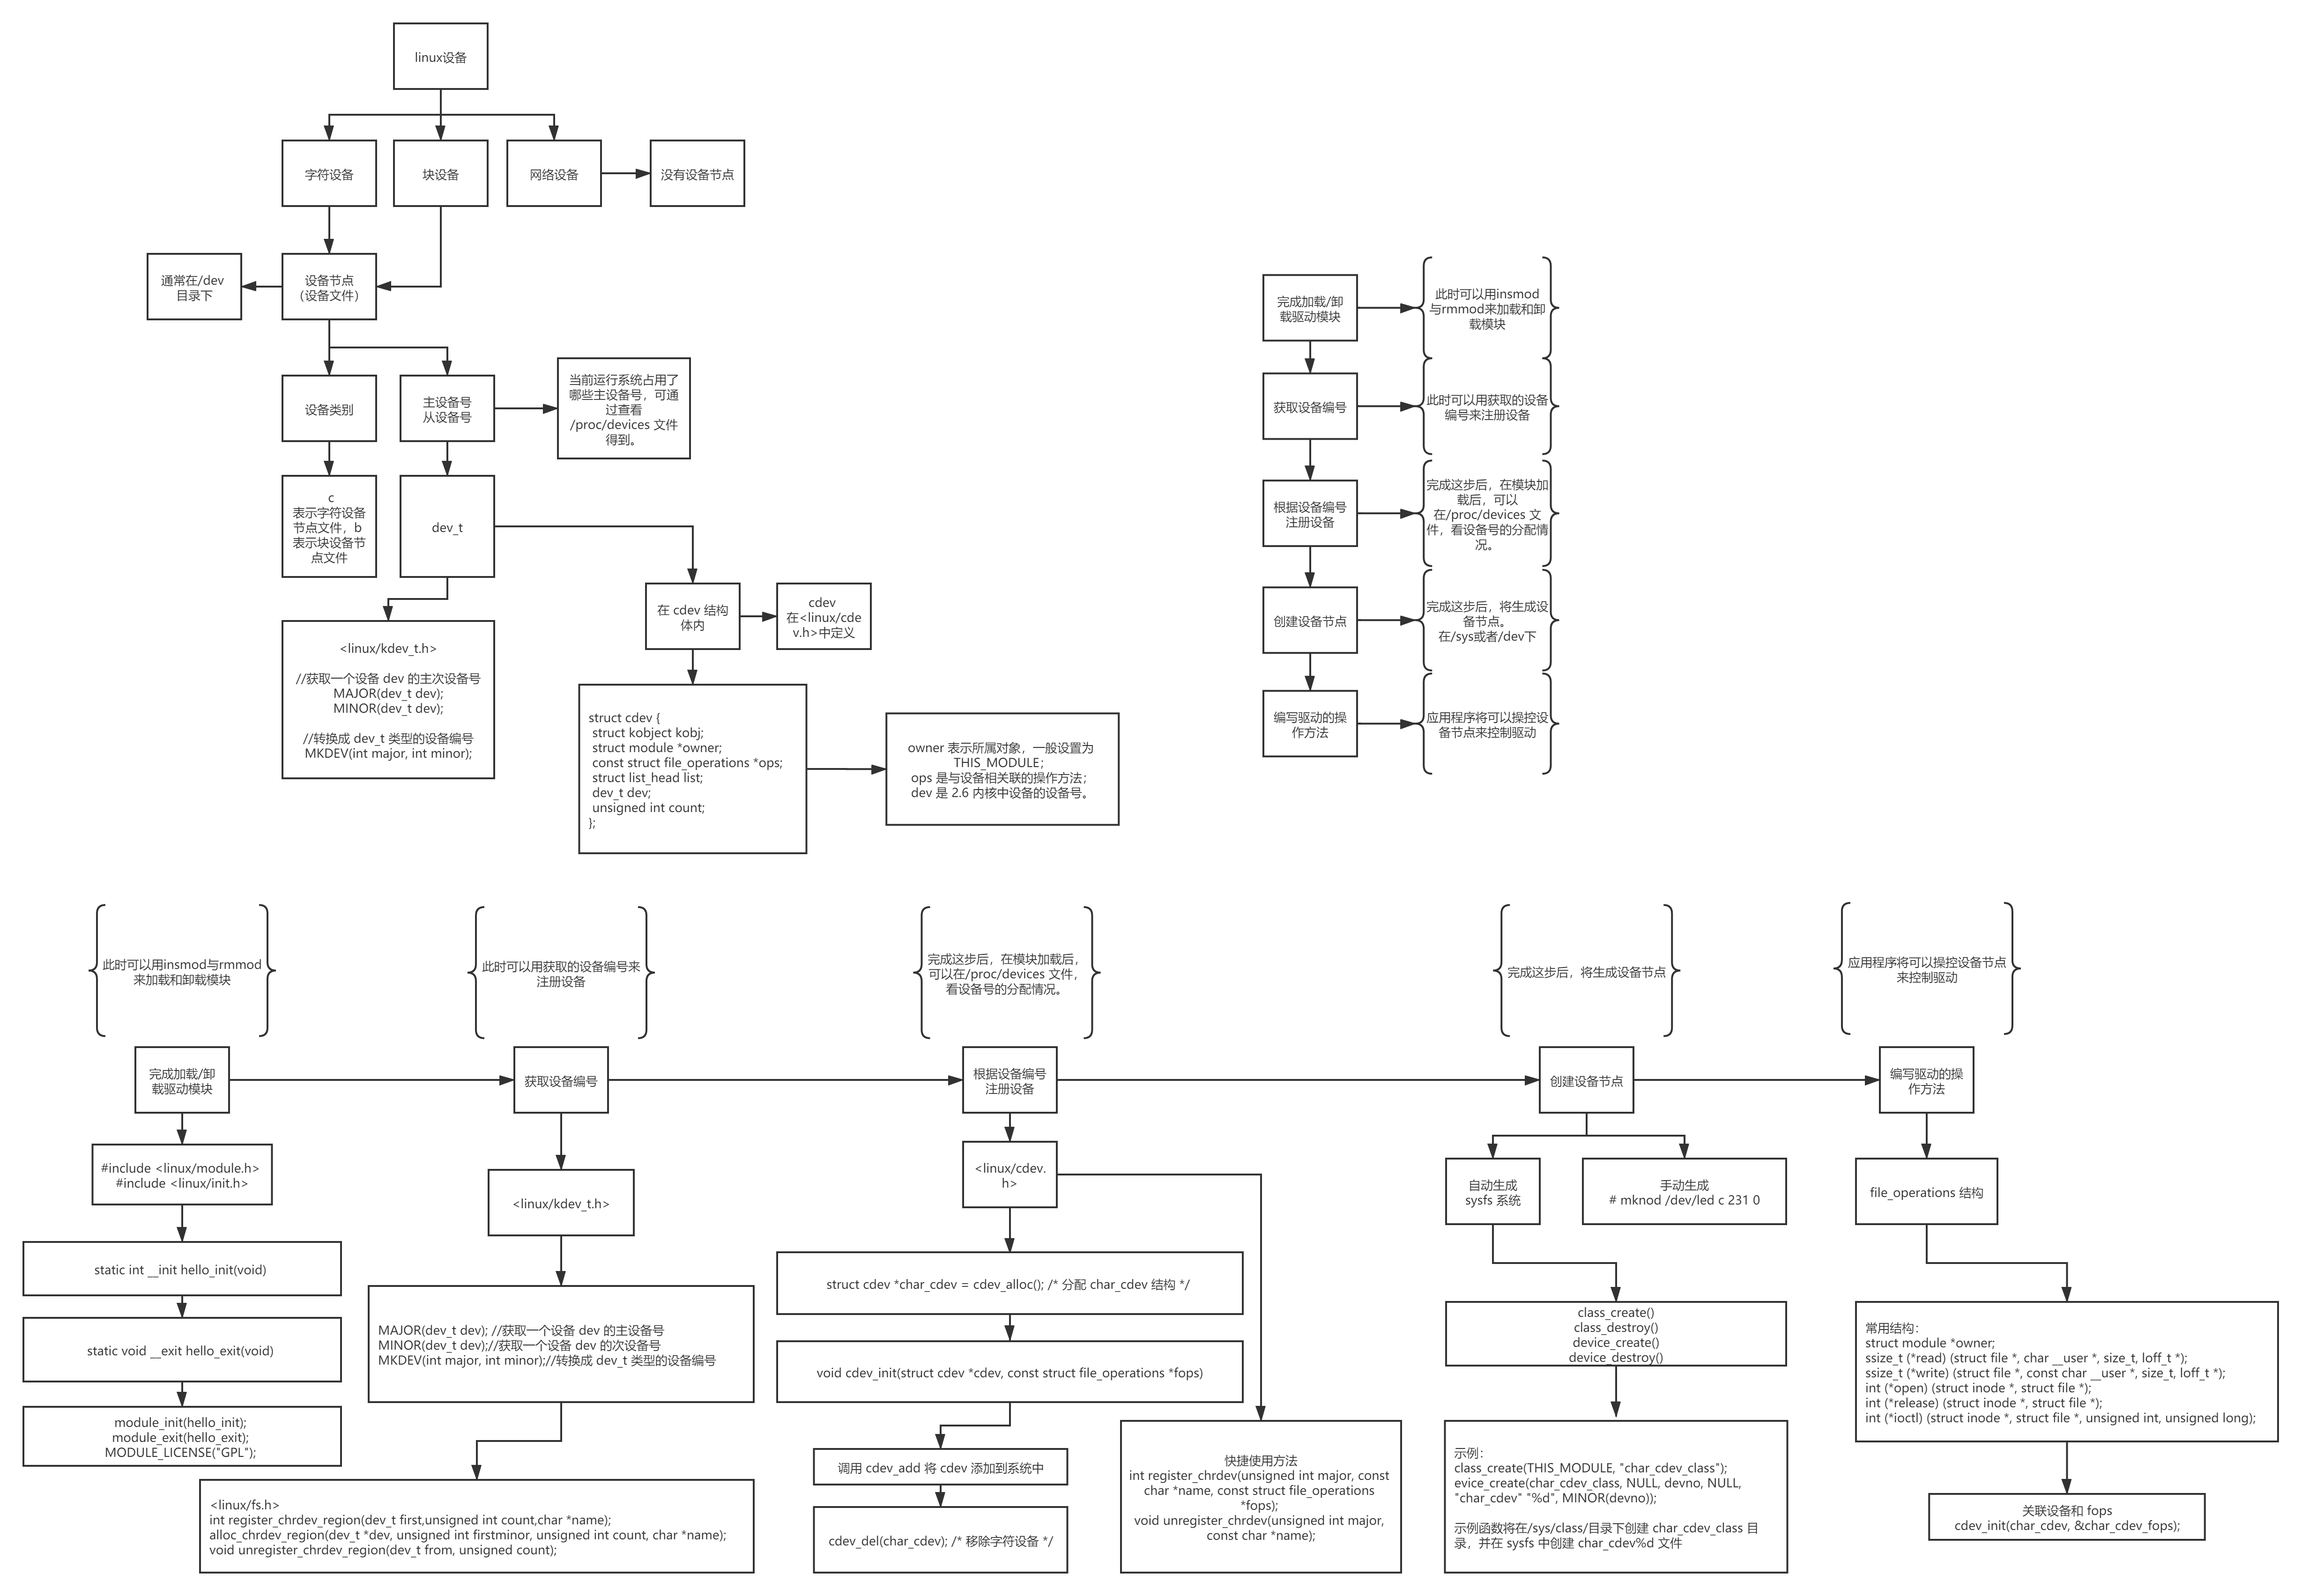
流程图笔记
PS :高清可放大查看

二、完成 关于 加载与卸载模块的函数
(一)包含
#include <linux/module.h>
#include <linux/init.h>
(二)函数示例
static int __init hello_init(void)
{
printk("Hello, I'm ready!n");
return 0;
}
static void __exit hello_exit(void)
{
printk("I'll be leaving, bye!n");
}
(三)其他
module_init(hello_init);
module_exit(hello_exit);
MODULE_LICENSE("GPL");
(四)模块加载时加入参数传递
1.包含
#include <linux/module.h>
2.加入内容
static int num = 5;
module_param(num, int, S_IRUGO);
三、获取设备编号
(一)描述
在建立一个设备节点之前,驱动程序首先应当为这个设备获得一个可用的设备号,注销
设备需要释放所占用的设备号。
(二)包含
<linux/kdev_t.h>
(三)函数
MAJOR(dev_t dev); //获取一个设备 dev 的主设备号
MINOR(dev_t dev);//获取一个设备 dev 的次设备号
MKDEV(int major, int minor);//转换成 dev_t 类型的设备编号
(四)静态获取主设备号
这个函数可以向系统注册 1 个或者多个主设备号,first 是起始编号,count 是主设备号
的数量,name 则是设备名称。注册成功返回 0,否则返回错误码。
int register_chrdev_region(dev_t first,unsigned int count,char *name); //在<linux/fs.h>中
(五)动态获取主设备号
dev 用于保存已 经获得的编号范围的第一个值,firstminor 是第一个次设备号,通常是 0,count 是获得的编号数量,name 是设备名称。
alloc_chrdev_region(dev_t *dev, unsigned int firstminor, unsigned int count, char *name); //在<linux/fs.h>中
1.示例
ret = alloc_chrdev_region(&devno, minor, 1, "char_cdev"); /* 从系统获取主设备号 */
major = MAJOR(devno); /* 保存获得的主设备号 */
(六)释放设备号
void unregister_chrdev_region(dev_t from, unsigned count);
四、设备的注册和注销
(一)cdev 数据结构
1.包含
<linux/cdev.h>
2.内容
驱动代码中不用声明这个结构体。
struct cdev {
struct kobject  kobj;
struct module *owner;
const struct file_operations *ops;
struct list_head list;
dev_t dev;
unsigned int count;
};
3.解释
owner 表示所属对象,一般设置为 THIS_MODULE;
ops 是与设备相关联的操作方法;
dev 是 2.6 内核中设备的设备号。
(二)cdev使用方法
使用 cdev 大体步骤是先分配 cdev 结构,然后初始化,最后往系统添加,如果不再需要,
可以从系统中删除。
(三)分配 cdev 结构
struct cdev *char_cdev = cdev_alloc(); /* 分配 char_cdev 结构 */
(四)初始化 cdev 结构
void cdev_init(struct cdev *cdev, const struct file_operations *fops)
const struct file_operations *fops 需要填 file_operations 的地址
struct file_operations char_fops;
cdev_init(char_cdev, &char_fops);
(五)注册 cdev
1.需设置 cdev 的 owner 成员
char_cdev->owner = THIS_MODULE;
2.调用 cdev_add 将 cdev 添加到系统中
if (cdev_add(char_cdev, devno, 1) != 0) {  //devno是dev_t 类型的设备编号
/* 增加 char_cdev 到系统中 */
printk(KERN_ERR "add cdev error!n");
goto error1;
}
3.必须检查 cdev_add 的返回值,因为 cdev_add 不一定保证成功,添加成功返回 0,失败返回错误码。
(六)删除 cdev
cdev_del(char_cdev); /* 移除字符设备 */
(七)快捷使用方法
int register_chrdev(unsigned int major, const char *name, const struct file_operations *fops);
void unregister_chrdev(unsigned int major, const char *name);
五、设备驱动的操作方法
(一)关联设备和 fops
之前初始化cdev的适合,已经将驱动和 fops关联了。
void cdev_init(struct cdev *cdev, const struct file_operations *fops)
cdev_init(char_cdev, &char_cdev_fops); //初始化 char_cdev 结构
(二)完善fops 的定义
file_operations 成员很多,下面只列了常用的一些。
struct file_operations char_cdev_fops = {
.owner = THIS_MODULE,
.read = char_cdev_read,
.write = char_cdev_write,
.open = char_cdev_open,
.release = char_cdev_release,
.ioctl = char_cdev_ioctl
};
(三)完善fops的函数
static int char_cdev_open(struct inode *inode, struct file *file )
{
	try_module_get(THIS_MODULE);
	printk(KERN_INFO DEVICE_NAME " opened!n");
	return 0;
}

static int char_cdev_release(struct inode *inode, struct file *file )
{
	printk(KERN_INFO DEVICE_NAME " closed!n");
	module_put(THIS_MODULE);
	return 0;
}

static ssize_t char_cdev_read(struct file *file, char *buf,size_t count, loff_t *f_pos)
{
	printk(KERN_INFO DEVICE_NAME " read method!n");
	return count;
}

static ssize_t char_cdev_write(struct file *file, const char *buf, size_t count, loff_t *f_pos)
{
	printk(KERN_INFO DEVICE_NAME " write method!n");
	return count;
}

static int char_cdev_ioctl(struct inode *inode, struct file *file, unsigned int cmd, unsigned long arg)
{
	printk(KERN_INFO DEVICE_NAME " ioctl method!n");
	return 0;
}
六、设备节点的创建
(一)驱动的入口和出口
以上驱动完成后,并不会产生设备文件。但是可以查看/proc/devices 文件,看设备号的分配情况。
我们可以根据/proc/devices 文件中驱动的主设备号,来手动创建设备文件,或者我们也可以修改驱动代码,让加载驱动模块的时候,自动创建设备文件。
(二)手动创建设备文件
根据主设备号手动创建
#mknod /dev/led c 231 0
(三)自动创建/卸载 设备文件( sysfs系统)
udev 根据 sysfs 系统提供的设备信息实现对/dev 目录下设备节点的
动态管理,包括设备节点的创建、删除等。
1.函数
#include <linux/device.h>

class_create()
class_destroy()
device_create()
device_destroy()
2.创建示例
#include <linux/device.h>
static struct class *char_cdev_class;
char_cdev_class = class_create(THIS_MODULE, "char_cdev_class");

if (IS_ERR(char_cdev_class))
{
	printk(KERN_INFO "create class errorn");
	return -1;
}

evice_create(char_cdev_class, NULL, devno, NULL, "char_cdev" "%d", MINOR(devno));
示例函数将在/sys/class/目录下创建 char_cdev_class 目录,并在 sysfs 中创建 char_cdev%d 文件夹,
udev 根据 sysfs 目录中的内容,在/dev 目录下创建相应的设备节点
3.卸载示例
	device_destroy(char_cdev_class, dev);
	class_destroy(char_cdev_class);
最后
以上就是俏皮早晨最近收集整理的关于Linux 驱动编写入门五步走一、总体思路二、完成 关于 加载与卸载模块的函数三、获取设备编号四、设备的注册和注销五、设备驱动的操作方法六、设备节点的创建的全部内容,更多相关Linux内容请搜索靠谱客的其他文章。


发表评论 取消回复