文章目录
- 前言
- 一、bug修改
- 二、文章标签功能实现
- 1、添加实体类
- 2、添加业务接口
- 3、添加业务接口实现类
- 4、数据库查询接口实现
- 5、编写数据库xml
- 6、编写接口层
- 三、Postman测试
- 四、总结
前言
本章将继续进行博客功能的开发,慢慢的我们做了好几个功能模块的开发,其实流程都差不多,只是有些业务逻辑不同而已。前面有网友测试的通知公告的有bug存在,我们先改一下Bug,没有bug就不叫写程序,发现bug修改bug才能进步。
一、bug修改
1、NoticeController.java接口层
我偷懒复制的分类接口那边的代码,有的类名没有进行修改,我们在开发中要规范写方法名。
一个是公告列表的地址list没有加上"/",另一个是类名不规范,现在修改如下:
package com.blog.personalblog.controller;

import com.blog.personalblog.config.page.PageRequest;
import com.blog.personalblog.config.page.PageResult;
import com.blog.personalblog.entity.Category;
import com.blog.personalblog.entity.Notice;
import com.blog.personalblog.service.NoticeService;
import com.blog.personalblog.util.JsonResult;
import com.blog.personalblog.util.PageUtil;
import com.github.pagehelper.PageInfo;
import io.swagger.annotations.Api;
import io.swagger.annotations.ApiOperation;
import org.springframework.beans.factory.annotation.Autowired;
import org.springframework.web.bind.annotation.*;

import javax.validation.Valid;
import java.util.List;

/**
 * 公告管理接口
 *
 * @author: SuperMan
 * @create: 2021-11-23
 */
@Api(tags = "公告管理")
@RestController
@RequestMapping("/notice")
public class NoticeController {

    @Autowired
    NoticeService noticeService;

    /**
     * 分页查询列表
     * @param pageRequest
     * @return
     */
    @ApiOperation(value = "公告列表")
    @PostMapping("/list")
    public JsonResult<Object> listPage(@RequestBody @Valid PageRequest pageRequest) {
        List<Notice> noticeList = noticeService.getNoticePage(pageRequest);
        PageInfo pageInfo = new PageInfo(noticeList);
        PageResult pageResult = PageUtil.getPageResult(pageRequest, pageInfo);
        return JsonResult.success(pageResult);
    }

    /**
     * 添加公告
     * @return
     */
    @ApiOperation(value = "添加公告")
    @PostMapping("/create")
    public JsonResult<Object> noticeCreate(@RequestBody @Valid Notice notice) {
        int isStatus = noticeService.saveNotice(notice);
        if (isStatus == 0) {
            return JsonResult.error("添加公告失败");
        }
        return JsonResult.success();
    }

    /**
     * 修改公告
     * @return
     */
    @ApiOperation(value = "修改公告")
    @PostMapping("/update")
    public JsonResult<Object> noticeUpdate(@RequestBody @Valid Notice notice) {
        int isStatus = noticeService.updateNotice(notice);
        if (isStatus == 0) {
            return JsonResult.error("修改公告失败");
        }
        return JsonResult.success();
    }

    /**
     * 删除
     * @return
     */
    @ApiOperation(value = "删除公告")
    @PostMapping("/delete/{id}")
    public JsonResult<Object> noticeDelete(@PathVariable(value = "id") int id) {
        noticeService.deleteNotice(id);
        return JsonResult.success();
    }

}
2、sql语句修改
我们打开NoticeMapper.xml配置文件,然后找到添加公告的sql语句,将keyProperty="categoryId"修改为keyProperty="noticeId" 等具体下面我已经标出来了。
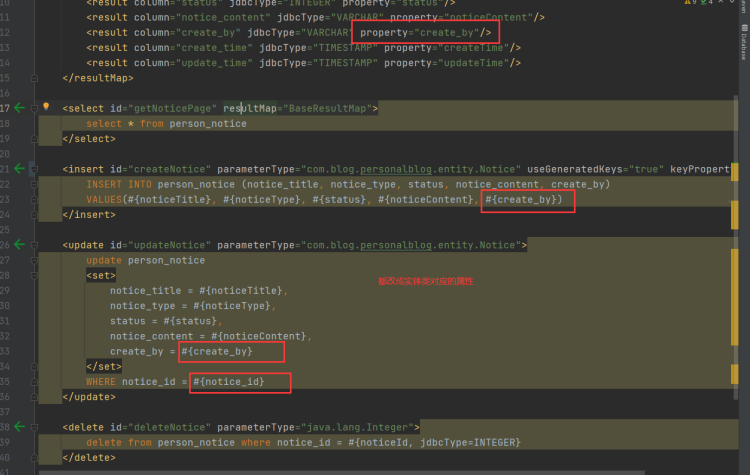
   <?xml version="1.0" encoding="UTF-8" ?>
<!DOCTYPE mapper
        PUBLIC "-//mybatis.org//DTD Mapper 3.0//EN"
        "http://mybatis.org/dtd/mybatis-3-mapper.dtd">
<mapper namespace="com.blog.personalblog.mapper.NoticeMapper">
    <resultMap id="BaseResultMap" type="com.blog.personalblog.entity.Notice">
        <result column="notice_id" jdbcType="INTEGER" property="noticeId"/>
        <result column="notice_title" jdbcType="VARCHAR" property="noticeTitle"/>
        <result column="notice_type" jdbcType="INTEGER" property="noticeType"/>
        <result column="status" jdbcType="INTEGER" property="status"/>
        <result column="notice_content" jdbcType="VARCHAR" property="noticeContent"/>
        <result column="create_by" jdbcType="VARCHAR" property="createBy"/>
        <result column="create_time" jdbcType="TIMESTAMP" property="createTime"/>
        <result column="update_time" jdbcType="TIMESTAMP" property="updateTime"/>
    </resultMap>

    <select id="getNoticePage" resultMap="BaseResultMap">
        select * from person_notice
    </select>

    <insert id="createNotice" parameterType="com.blog.personalblog.entity.Notice" useGeneratedKeys="true" keyProperty="noticeId">
        INSERT INTO person_notice (notice_title, notice_type, status, notice_content, create_by)
        VALUES(#{noticeTitle}, #{noticeType}, #{status}, #{noticeContent}, #{createBy})
    </insert>

    <update id="updateNotice" parameterType="com.blog.personalblog.entity.Notice">
        update person_notice
        <set>
            notice_title = #{noticeTitle},
            notice_type = #{noticeType},
            status = #{status},
            notice_content = #{noticeContent},
            create_by = #{createBy}
        </set>
        WHERE notice_id = #{noticeId}
    </update>

    <delete id="deleteNotice" parameterType="java.lang.Integer">
        delete from person_notice where notice_id = #{noticeId, jdbcType=INTEGER}
    </delete>


</mapper>
3、实体类:Notice.java中的创建者属性也要修改。
    /**
     * 创建者
     */
    private String createBy;
二、文章标签功能实现
好啦,以上的bug修改完成,下面我们进行标签功能的开发,前面有读者问有没有批量插入,标签会有的,一篇文章可能会有多个标签,所以我们要多添加批量插入和批量删除的方法,另外还要过滤以下要插入的标签是否和数据库有重复,有重复数据库就不再添加了,保证数据表的标签唯一。
1、添加实体类
和以前一样,根据数据库进行设计对象,标签比较简单点,就一个内容。
新建一个实体类:Tag.java
package com.blog.personalblog.entity;

import lombok.Data;

import java.time.LocalDateTime;

/**
 * 标签
 *
 * @author: SuperMan
 * @create: 2021-11-28
 */
@Data
public class Tag {

    /**
     * 主键id
     */
    private Integer id;

    /**
     * 标签名称
     */
    private String tagName;

    /**
     * 创建时间
     */
    private LocalDateTime createTime;

    /**
     * 更新时间
     */
    private LocalDateTime updateTime;

}
2、添加业务接口
新建一个接口:TagService.java
可以看到接口中比以前的基本功能多了两个接口,批量删除和批量添加,我们重点讲一下这两个方法,在以后的开发中会经常使用到。
package com.blog.personalblog.service;

import com.blog.personalblog.config.page.PageRequest;
import com.blog.personalblog.entity.Tag;

import java.util.List;

/**
 * @author: SuperMan
 * @create: 2021-11-28
 */
public interface TagService {

    /**
     * 获取所有的标签(分页)
     * @return
     */
    List<Tag> getTagPage(PageRequest pageRequest);

    /**
     * 新建标签
     * @param tag
     * @return
     */
    int saveTag(Tag tag);

    /**
     * 修改标签
     * @param tag
     * @return
     */
    int updateTag(Tag tag);

    /**
     * 删除标签
     * @param tagId
     */
    void deleteTag(Integer tagId);

    /**
     * 批量添加
     * @param tags
     * @return
     */
    boolean batchAddTag(String tags) throws Exception;

    /**
     * 批量删除标签
     * @param ids
     * @return
     */
    boolean batchDelTag(String ids);

    /**
     * 根据标签查找
     * @param tagName
     * @return
     */
    Tag findByTagName(String tagName);

}
3、添加业务接口实现类
实现类:TagServiceImpl.java
和以前不一样的是多了batchAddTag和batchDelTag两个方法,具体的每一步我都添加了注释,大家应该可以看明白。
批量插入: 前端传来的是字符串格式的标签,我们约定好以英文逗号把标签隔开,然后我们传参将字符串获取到,然后进行拆分字符串转成数组的格式,大家学基础的时候肯定知道学习了数组,数据以下标0开始的,我们可以遍历数组。
for(类型 变量 : 数组){

}
这种for循环要学会使用,非常的方便,具体可以去百度查找用法。
然后我们再定义一个List集合来存放我们每一个对象,我们每次遍历的时候都要去表中查找是否有添加的标签,没有的话则存入List集合中,有的话则不存。然后再限制下批量添加标签的个数,都通过则进行数据的插入。
 @Override
    public boolean batchAddTag(String tags) throws Exception {
        //将字符串转成数组
        String[] split = tags.split(",");
        List<Tag> tagList = new ArrayList<>();
        //循环数据,放入List集合中
        for (String str : split) {
            //过滤:判断数据库中是否有存在的标签,没有就添加,有就不添加
            if (findByTagName(str) == null) {
                Tag tag = new Tag();
                tag.setTagName(str);
                tagList.add(tag);
            }
        }
        //我们限制下添加的数量,一次最多添加10个标签
        if (tagList == null || tagList.size() == 0 || tagList.size() > 10){
            throw new Exception ("标签已存在或超过添加标签的限制!");
        }
        boolean isStatus = tagMapper.batchAddTag(tagList);
        return isStatus;
    }
批量删除: 所谓的批量删除就是前端传来多个数据的id,我们根据id去表中把数据删除,和普通的删除的区别就是多个id删除数据罢了。首先接收到id,和批量添加一样,对id进行解析,然后存到新new的对象中,把所有的对象都存到List集合中进行统一删除。
@Override
    public boolean batchDelTag(String ids){
        //将id字符串转成数组
        String[] split = ids.split(",");
        List<Tag> idList = new ArrayList<>();
        for (String id : split) {
            Tag tag = new Tag();
            tag.setId(Integer.valueOf(id));
            idList.add(tag);
        }
        boolean isStatus = tagMapper.deleteBatch(idList);
        return isStatus;
    }
完整代码如下:
package com.blog.personalblog.service.Impl;

import com.blog.personalblog.config.page.PageRequest;
import com.blog.personalblog.entity.Tag;
import com.blog.personalblog.mapper.TagMapper;
import com.blog.personalblog.service.TagService;
import com.github.pagehelper.PageHelper;
import org.springframework.beans.factory.annotation.Autowired;
import org.springframework.stereotype.Service;

import java.util.ArrayList;
import java.util.List;

/**
 * @author: SuperMan
 * @create: 2021-11-28
 */
@Service
public class TagServiceImpl implements TagService {

    @Autowired
    TagMapper tagMapper;

    @Override
    public List<Tag> getTagPage(PageRequest pageRequest) {
        int pageNum = pageRequest.getPageNum();
        int pageSize = pageRequest.getPageSize();
        PageHelper.startPage(pageNum,pageSize);
        List<Tag> tagList = tagMapper.getTagPage();
        return tagList;
    }

    @Override
    public int saveTag(Tag tag) {
        return tagMapper.createTag(tag);
    }

    @Override
    public int updateTag(Tag tag) {
        return tagMapper.updateTag(tag);
    }

    @Override
    public void deleteTag(Integer tagId) {
        tagMapper.deleteTag(tagId);
    }

    @Override
    public boolean batchAddTag(String tags) throws Exception {
        //将字符串转成数组
        String[] split = tags.split(",");
        List<Tag> tagList = new ArrayList<>();
        //循环数据,放入List集合中
        for (String str : split) {
            //过滤:判断数据库中是否有存在的标签,没有就添加,有就不添加
            if (findByTagName(str) == null) {
                Tag tag = new Tag();
                tag.setTagName(str);
                tagList.add(tag);
            }
        }
        //我们限制下添加的数量,一次最多添加10个标签
        if (tagList == null || tagList.size() == 0 || tagList.size() > 10){
            throw new Exception ("标签已存在或超过添加标签的限制!");
        }
        boolean isStatus = tagMapper.batchAddTag(tagList);
        return isStatus;
    }

    @Override
    public boolean batchDelTag(String ids){
        //将id字符串转成数组
        String[] split = ids.split(",");
        List<Tag> idList = new ArrayList<>();
        for (String id : split) {
            Tag tag = new Tag();
            tag.setId(Integer.valueOf(id));
            idList.add(tag);
        }
        boolean isStatus = tagMapper.deleteBatch(idList);
        return isStatus;
    }

    @Override
    public Tag findByTagName(String tagName) {
        Tag tag = new Tag();
        tag.setTagName(tagName);
        Tag byTagName = tagMapper.getByTagName(tag);
        return byTagName;
    }

}
4、数据库查询接口实现
新建一个Mapper接口:TagMapper.java
package com.blog.personalblog.mapper;

import com.blog.personalblog.entity.Tag;
import org.springframework.stereotype.Repository;

import java.util.List;

/**
 * @author: SuperMan
 * @create: 2021-11-28
 */
@Repository
public interface TagMapper {
    /**
     * 创建
     * @param tag
     * @return
     */
    int createTag(Tag tag);

    /**
     * 修改
     * @param tag
     * @return
     */
    int updateTag(Tag tag);

    /**
     * 分类列表(分页)
     * @return
     */
    List<Tag> getTagPage();

    /**
     * 删除
     * @param id
     */
    void deleteTag(Integer id);

    /**
     * 批量添加标签
     * @param strings
     * @return
     */
    boolean batchAddTag(List<Tag> strings);

    /**
     * 批量删除标签
     * @param ids
     */
    boolean deleteBatch(List<Tag> ids);

    /**
     * 根据标签查找该对象
     * @param tag
     * @return
     */
    Tag getByTagName(Tag tag);
}
5、编写数据库xml
在xml中批量添加和删除用到了个知识点foreach的用法。
foreach的主要用在构建in条件中,它可以在SQL语句中进行迭代一个集合。foreach元素的属性主要有 item,index,collection,open,separator,close。
item表示集合中每一个元素进行迭代时的别名,
index指 定一个名字,用于表示在迭代过程中,每次迭代到的位置,
open表示该语句以什么开始,
separator表示在每次进行迭代之间以什么符号作为分隔 符,
close表示以什么结束。
其中我们使用的collection属性是最重要的,这个要看你传参的类型是什么才能给它赋什么样的值。我们都把参数转成了List进行添加和删除的,所以我们这里要使用list作为属性值。
<foreach collection="list" item="item" index="index" separator="," >
            (#{item.tagName})
</foreach>
1、如果传入的是单参数且参数类型是一个List的时候,collection属性值为list
2、如果传入的是单参数且参数类型是一个array数组的时候,collection的属性值为array
3、如果传入的参数是多个的时候,我们就需要把它们封装成一个Map了,当然单参数也可以封装成map。
完整代码如下:
<?xml version="1.0" encoding="UTF-8" ?>
<!DOCTYPE mapper
        PUBLIC "-//mybatis.org//DTD Mapper 3.0//EN"
        "http://mybatis.org/dtd/mybatis-3-mapper.dtd">
<mapper namespace="com.blog.personalblog.mapper.TagMapper">
    <resultMap id="BaseResultMap" type="com.blog.personalblog.entity.Tag">
        <result column="id" jdbcType="INTEGER" property="id"/>
        <result column="tag_name" jdbcType="VARCHAR" property="tagName"/>
        <result column="create_time" jdbcType="TIMESTAMP" property="createTime"/>
        <result column="update_time" jdbcType="TIMESTAMP" property="updateTime"/>
    </resultMap>

    <select id="getTagPage" resultMap="BaseResultMap">
        select * from person_tag
    </select>

    <insert id="createTag" parameterType="com.blog.personalblog.entity.Tag" useGeneratedKeys="true" keyProperty="id">
        INSERT INTO person_tag (tag_name)
        VALUES(#{tagName})
    </insert>

    <update id="updateTag" parameterType="com.blog.personalblog.entity.Tag">
        update person_tag
        <set>
            tag_name = #{tagName}
        </set>
        WHERE id = #{id}
    </update>

    <delete id="deleteTag" parameterType="java.lang.Integer">
        delete from person_tag where id = #{id, jdbcType=INTEGER}
    </delete>

    <insert id="batchAddTag" parameterType="java.util.List">
        INSERT INTO person_tag (tag_name)
        VALUES
        <foreach collection="list" item="item" index="index" separator="," >
            (#{item.tagName})
        </foreach>
    </insert>

    <delete id="deleteBatch" parameterType="java.util.List">
        delete from person_tag where id in
        <foreach collection="list" item="item" open="(" close=")" separator="," >
            (#{item.id})
        </foreach>
    </delete>

    <select id="getByTagName" resultType="com.blog.personalblog.entity.Tag">
        SELECT * FROM person_tag WHERE tag_name = #{tagName}
    </select>

</mapper>
6、编写接口层
编写controller层类:TagController.java
package com.blog.personalblog.controller;
import com.blog.personalblog.config.page.PageRequest;
import com.blog.personalblog.config.page.PageResult;
import com.blog.personalblog.entity.Tag;
import com.blog.personalblog.service.TagService;
import com.blog.personalblog.util.JsonResult;
import com.blog.personalblog.util.PageUtil;
import com.github.pagehelper.PageInfo;
import io.swagger.annotations.Api;
import io.swagger.annotations.ApiOperation;
import org.springframework.beans.factory.annotation.Autowired;
import org.springframework.web.bind.annotation.*;
import javax.validation.Valid;
import java.util.List;
/**
* @author: SuperMan
* @create: 2021-11-28
*/
@Api(tags = "标签管理")
@RestController
@RequestMapping("/tag")
public class TagController {
@Autowired
TagService tagService;
/**
* 分页查询列表
* @param pageRequest
* @return
*/
@ApiOperation(value = "标签列表")
@PostMapping("list")
public JsonResult<Object> listPage(@RequestBody @Valid PageRequest pageRequest) {
List<Tag> tagList = tagService.getTagPage(pageRequest);
PageInfo pageInfo = new PageInfo(tagList);
PageResult pageResult = PageUtil.getPageResult(pageRequest, pageInfo);
return JsonResult.success(pageResult);
}
/**
* 添加标签
* @return
*/
@ApiOperation(value = "添加标签")
@PostMapping("/create")
public JsonResult<Object> tagCreate(@RequestBody @Valid Tag tag) {
int isStatus = tagService.saveTag(tag);
if (isStatus == 0) {
return JsonResult.error("添加公告失败");
}
return JsonResult.success();
}
/**
* 批量添加标签,最多添加10个
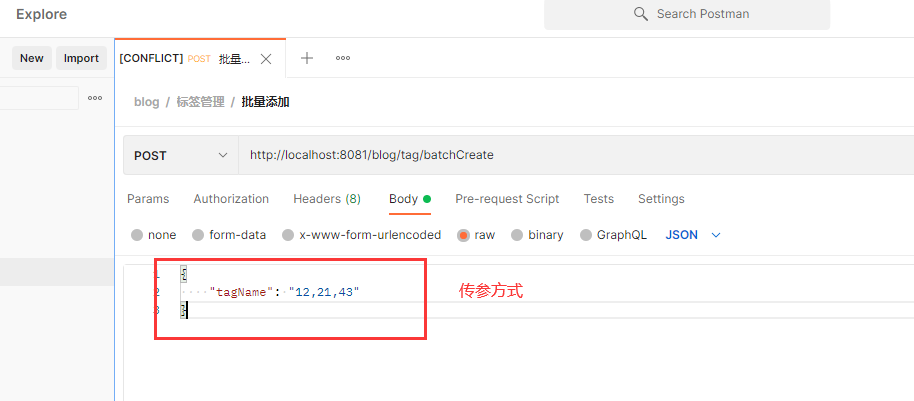
* @param tags 以字符串的方式,以英文逗号隔开。例如:Java,C语言,Python
*
* @return
*/
@ApiOperation(value = "批量添加标签")
@PostMapping("/batchCreate")
public JsonResult<Object> batchCreate(@RequestBody @Valid Tag tags) {
try {
boolean isStatus = tagService.batchAddTag(tags.getTagName());
if (!isStatus) {
return JsonResult.error("批量插入失败!");
}
}catch (Exception e) {
return JsonResult.error(e.getMessage());
}
return JsonResult.success();
}
/**
* 批量删除标签
* @param ids
* @return
*/
@ApiOperation(value = "批量添加标签")
@DeleteMapping("/batchDelete")
public JsonResult<Object> batchDelete(@RequestBody @Valid String ids) {
boolean isDelTag = tagService.batchDelTag(ids);
if (!isDelTag) {
return JsonResult.error("批量删除标签失败");
}
return JsonResult.success();
}
/**
* 修改标签
* @return
*/
@ApiOperation(value = "修改标签")
@PutMapping("/update")
public JsonResult<Object> tagUpdate(@RequestBody @Valid Tag tag) {
int isStatus = tagService.updateTag(tag);
if (isStatus == 0) {
return JsonResult.error("修改标签失败");
}
return JsonResult.success();
}
/**
* 删除
* @return
*/
@ApiOperation(value = "删除标签")
@DeleteMapping("/delete/{id}")
public JsonResult<Object> tagDelete(@PathVariable(value = "id") int id) {
tagService.deleteTag(id);
return JsonResult.success();
}
}
三、Postman测试
这里我只测一个批量添加的接口,其他的还是老规矩大家自己测测,有bug评论区见!
请求返回成功!
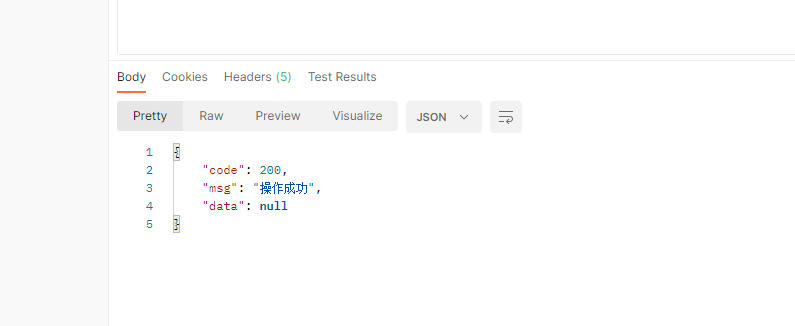
再测的时候,大家要测一下如果数据库中有了数据,再添加同样的数据是否重复插入了,如果没有则过滤成功了。
四、总结
好啦!本章的标签开发也结束了,重点是批量删除和添加的功能,其实也没那么难写代码,只要思路对,顺着写就可以了。下面我们就要开发博客的功能了,这个才是重点,里面会整合很多的东西,希望大家好好练习基础。
接口多测一测,Swagger文档别忘了维护和代码的提交等。
博客代码地址:https://gitee.com/xyhwh/personal_blog
上一篇:Spring Boot + vue-element 开发个人博客项目实战教程(十二、通知公告功能实现)
下一篇:Spring Boot + vue-element 开发个人博客项目实战教程(十四、文章功能实现(上))
最后
以上就是甜美柜子最近收集整理的关于Spring Boot + vue-element 开发个人博客项目实战教程(十三、文章标签功能实现)前言一、bug修改二、文章标签功能实现三、Postman测试四、总结的全部内容,更多相关Spring内容请搜索靠谱客的其他文章。


发表评论 取消回复