In this article, I am going to explain the step by step installation process of MySQL database server 8.0.19. MySQL is open-source, cross-platform relational database management server developed by Swedish company “MySQL AB” and later acquired by Oracle corporation. MySQL is offered as an open-source MySQL community server edition and enterprise server edition. In this article, I am going to install the MySQL Community server edition.
在本文中,我将逐步介绍MySQL数据库服务器8.0.19的安装过程。 MySQL是由瑞典“ MySQL AB”公司开发,后来被Oracle公司收购的开源,跨平台关系数据库管理服务器。 MySQL提供为开源MySQL社区服务器版和企业服务器版。 在本文中,我将安装MySQL Community服务器版。
下载并安装MySQL数据库服务器 (Download and install MySQL database server)
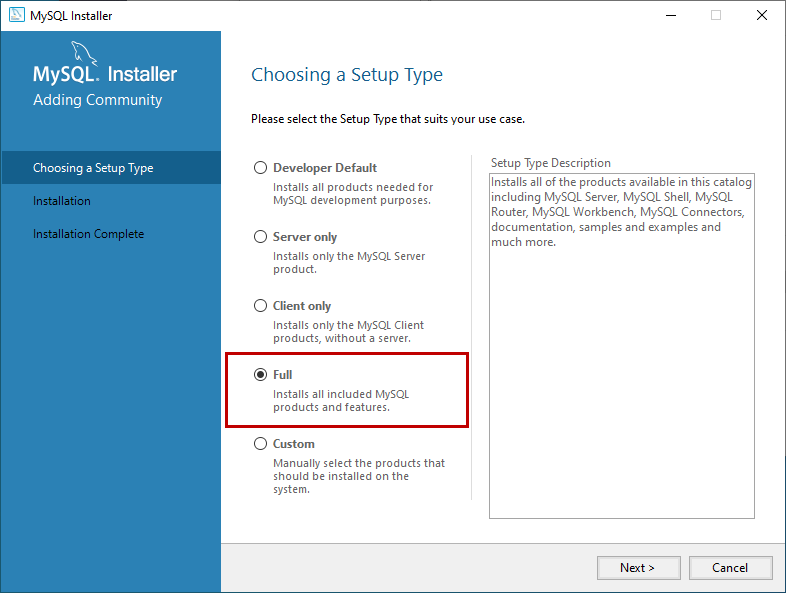
You can download the MySQL community server from this location. Once the installer has been downloaded, double-click the setup file to start the installation process. On the Choosing a Setup Type page, you can see four installation options.
您可以从该位置下载MySQL社区服务器。 下载安装程序后,双击安装文件以开始安装过程。 在“ 选择安装类型”页面上,您可以看到四个安装选项。
- Developer default: If you want to create a development machine, you can use this option. It installs the components which are required for application development, e.g., MySQL Server, MySQL Shell, MySQL connectors, MySQL 开发人员默认值:如果要创建开发计算机,则可以使用此选项。 它安装了应用程序开发所需的组件,例如,MySQL服务器,MySQL Shell,MySQL连接器,MySQL
- Server Only: If you want to create a standalone database server with specific components, you can use this option 仅服务器:如果要创建具有特定组件的独立数据库服务器,则可以使用此选项
- Full: If you want to install MySQL Server with its all components, then you can use this option 完整:如果要安装包含所有组件MySQL Server,则可以使用此选项
- Custom: If your requirements are limited to the few components, you can use this option 自定义:如果您的要求仅限于少数几个组件,则可以使用此选项
We are going to install MySQL Server with all components; hence, choose “Full” and click on Next.
我们将安装所有组件MySQL Server。 因此,选择“ Full ”,然后单击Next 。
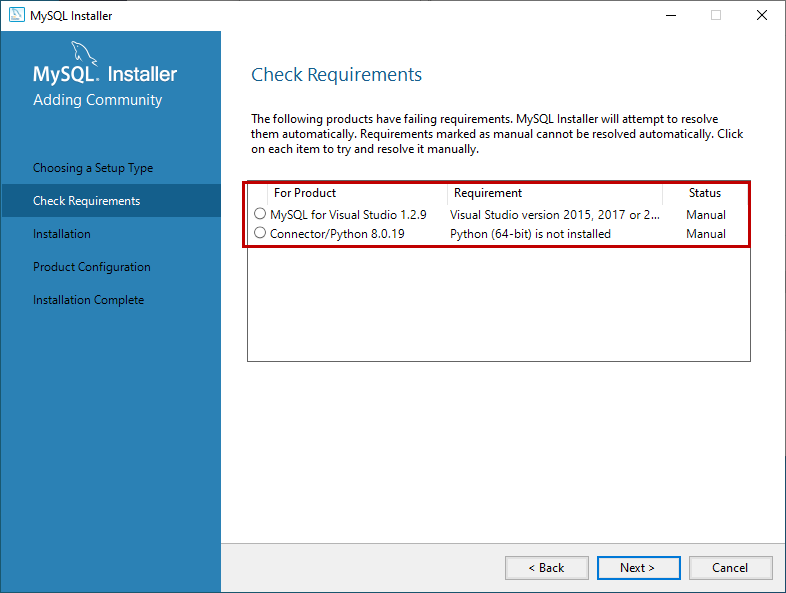
Before installation begins, the installer checks all the prerequisites that are required to install all the components of the MySQL database server. If any software prerequisites are missing, then you can see the details of failing requirements on the “Check Requirements” screen. It shows the name of the product, required component/software, and its status. As you can see, to install the MySQL database server for visual studio, we must install visual studio 2015 or above. Similarly, to install Python connector, we must install python on the work station. Click on Next.
在开始安装之前,安装程序将检查安装MySQL数据库服务器的所有组件所需的所有先决条件。 如果缺少任何软件先决条件,则可以在“检查要求”屏幕上查看失败要求的详细信息。 它显示产品名称,所需的组件/软件及其状态。 如您所见,要为Visual Studio安装MySQL数据库服务器,我们必须安装Visual Studio 2015或更高版本。 同样,要安装Python连接器,我们必须在工作站上安装python。 点击下一步 。
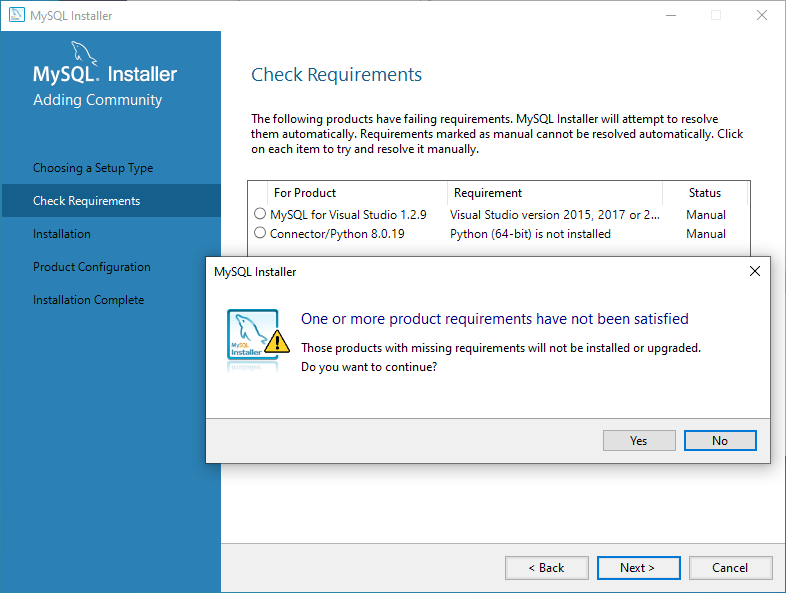
An installer gives us a warning. We can continue our installation without installing the visual studio and python. Click on Yes.
安装程序会向我们发出警告。 我们可以继续安装而无需安装Visual Studio和python。 点击是 。
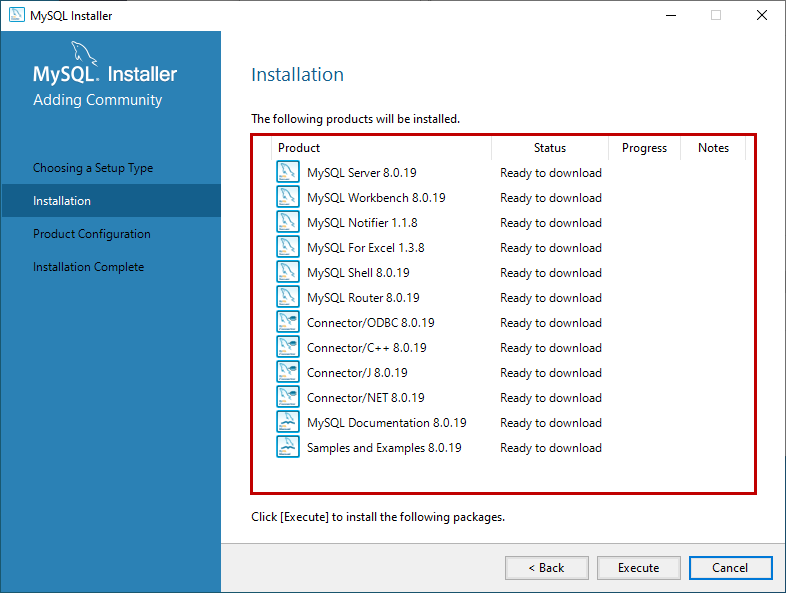
On the Installation screen, you can see the list of the MySQL products/software that are going to be installed on my workstation. Review the list and click on Execute.
在“安装”屏幕上,您可以看到要在我的工作站上安装MySQL产品/软件的列表。 查看列表,然后单击执行 。
The installer downloads all the products/software. After that, it installs all the products.
安装程序将下载所有产品/软件。 之后,它将安装所有产品。
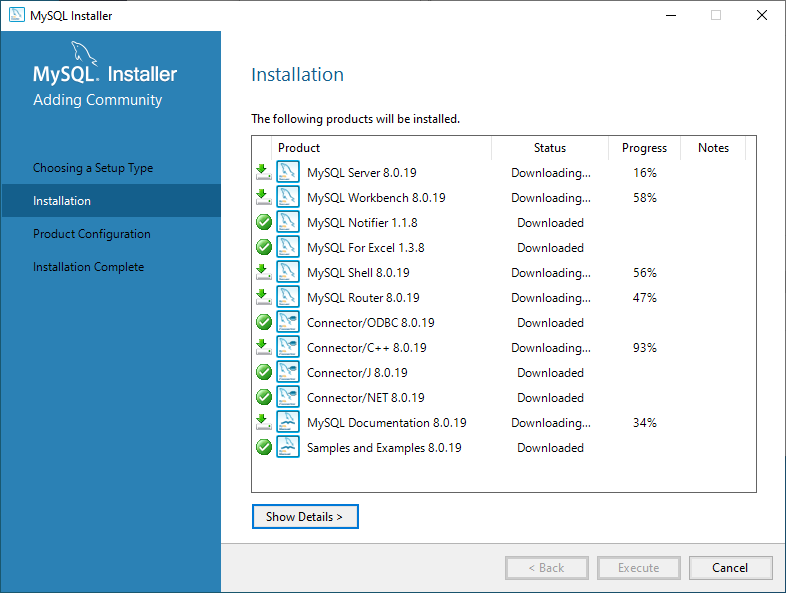
Wait for a few mins. Once the installation process completes, we are ready to configure the MySQL database server and other components. Click on Next.
等待几分钟。 安装过程完成后,我们准备配置MySQL数据库服务器和其他组件。 点击下一步 。
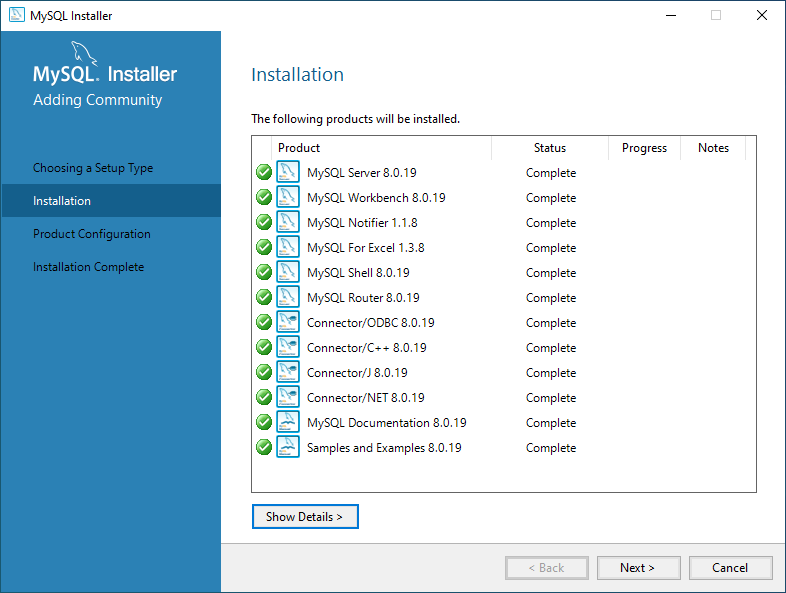
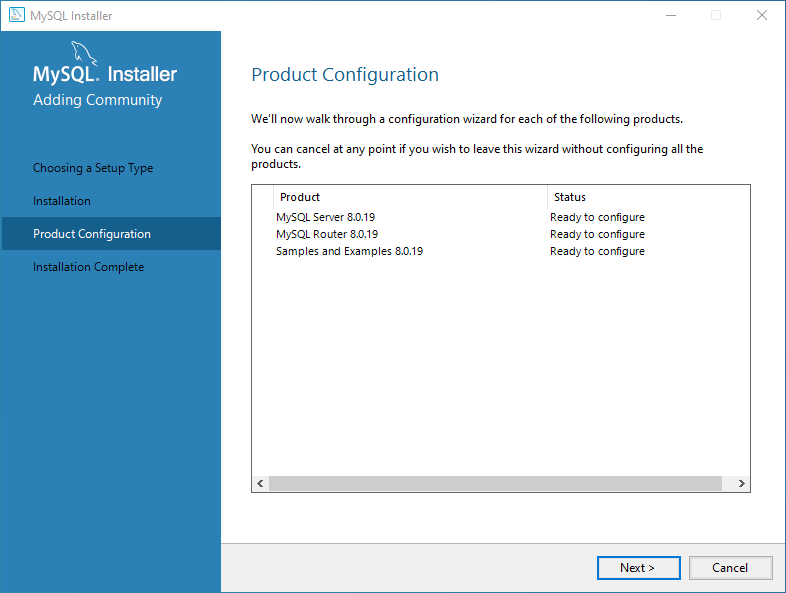
On the Product configuration screen, you can see the list of the products that need to be configured. First, let us configure the MySQL Server. Click on Next.
在“产品配置”屏幕上,您可以看到需要配置的产品列表。 首先,让我们配置MySQL服务器。 点击下一步 。
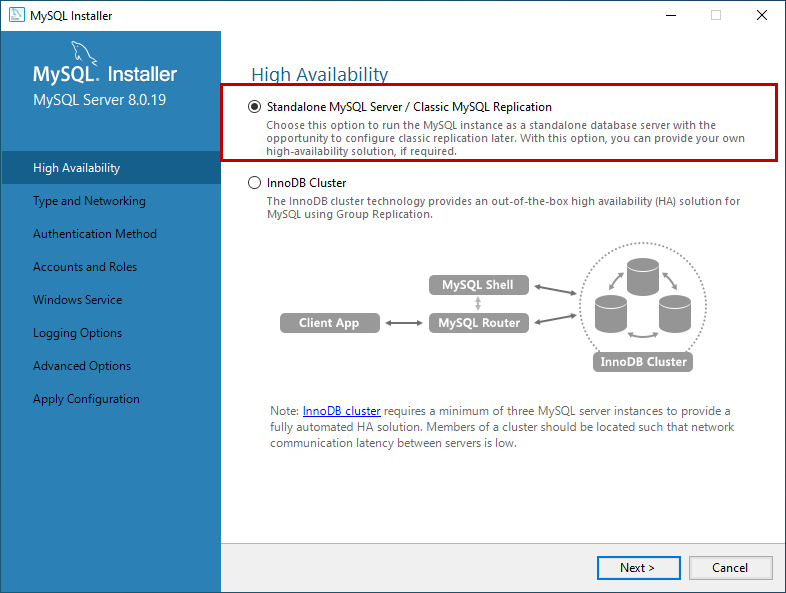
On the High availability screen, we can choose to install the InnoDB cluster or Standalone MySQL Server. InnoDB cluster is the High availability solution of MySQL. It uses group replication. I will explain more about it in my future series of articles. We are going to perform a standalone installation of MySQL Server hence choose “Standalone MySQL Server / Classic MySQL Replication”.
在“高可用性”屏幕上,我们可以选择安装InnoDB集群或独立MySQL服务器 。 InnoDB集群是MySQL的高可用性解决方案。 它使用组复制。 我将在以后的系列文章中对此进行详细说明。 我们将执行MySQL Server的独立安装,因此选择“ Standalone MySQL Server / Classic MySQL Replication ”。
On Type and Networking screen, we can configure the following:
在“ 类型和网络”屏幕上,我们可以配置以下内容:
The type of MySQL configuration.
MySQL配置的类型。
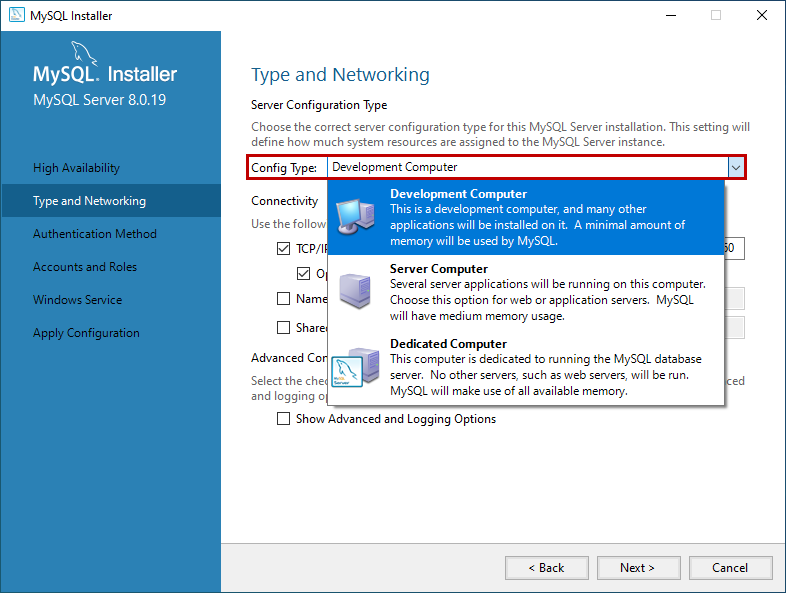
The type of MySQL configuration is a predefined set of configuration parameter that determines how much resources should be allocated to the MySQL Services. You have three configuration options:
MySQL配置的类型是一组预定义的配置参数,该参数确定应为MySQL服务分配多少资源。 您有三个配置选项:
- Development Computer: This configuration uses a minimal amount of the resources to MySQL Service 开发计算机:此配置使用最少MySQL服务资源
- Server Computer: This configuration uses a minimal amount of resources. This option is suitable when we are installing database servers and web servers on the same machine. The configuration allocates an average amount of resources to MySQL Service 服务器计算机:此配置使用最少的资源。 当我们在同一台计算机上安装数据库服务器和Web服务器时,此选项适用。 配置为MySQL服务分配平均资源量
- Dedicated Computer: This option is used when we have created a dedicated MySQL Server. The configuration allocates a high amount of resources to MySQL Service 专用计算机:当我们创建了专用MySQL服务器时,将使用此选项。 该配置为MySQL服务分配了大量资源
We would configure the server with minimal resources hence select “Development computer” from the Config Type drop-down box.
我们将使用最少的资源配置服务器,因此从“配置类型”下拉框中选择“开发计算机”。
Network Connectivity
网络连接
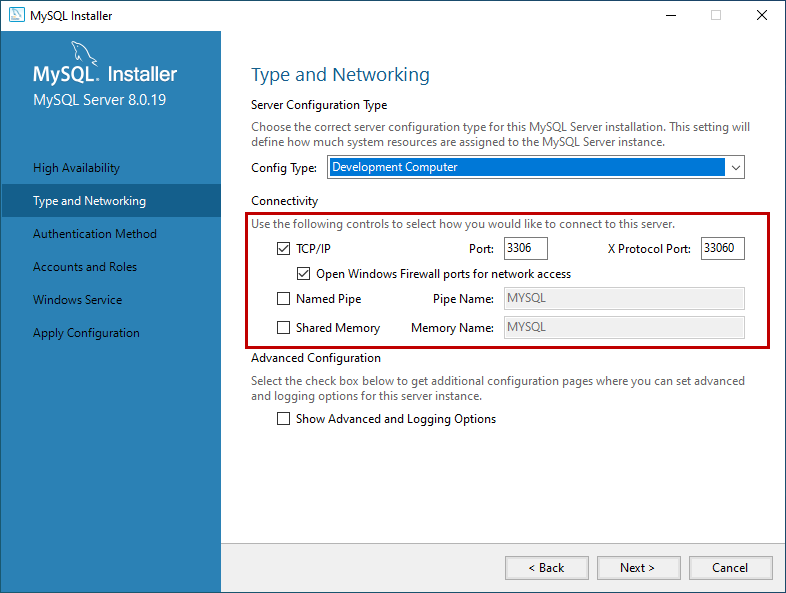
In this section, we can control how clients can connect to MySQL databases. We can use TCP/IP protocol or Named Pipe or Shared Memory. If you want to configure Named Pipe / Shared Memory, we must provide the Pipe Name and Memory Name. You can also specify the default port to connect to the database server. You can also choose to allow the port number specified in Port textbox in the firewall. See the following image:
在本节中,我们可以控制客户端如何连接到MySQL数据库。 我们可以使用TCP / IP协议或命名管道或共享内存。 如果要配置命名管道/共享内存,我们必须提供管道名称和内存名称。 您还可以指定默认端口以连接到数据库服务器。 您也可以选择允许在防火墙的“端口”文本框中指定的端口号。 见下图:
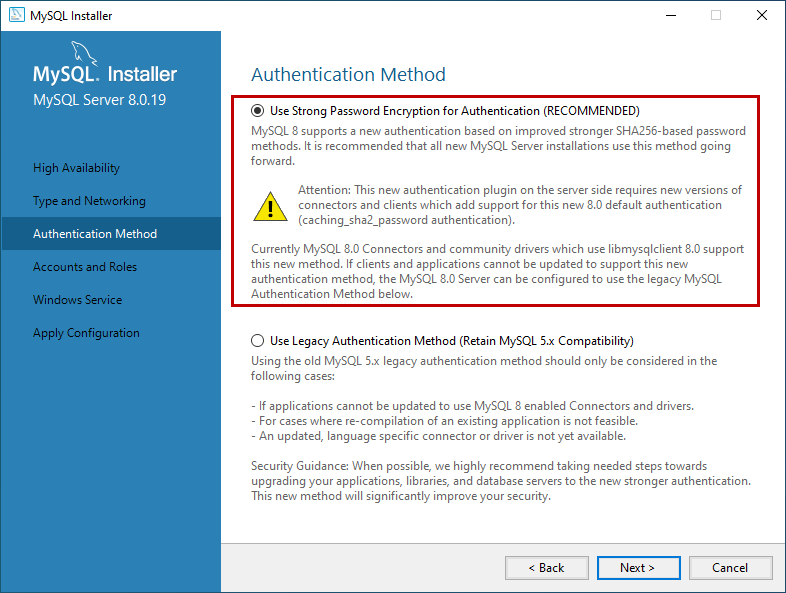
In MySQL 8.0 version, we can use SHA256 based strong passwords. On the Authentication Method screen, choose the option to use the Legacy authentication method or Strong password for authentication. Note: If you are using Strong Password Encryption for Authentication, then make sure that all the connectors must be updated to the latest version. We are going to use Strong password Encryption for Authentication.
在MySQL 8.0版本中,我们可以使用基于SHA256的强密码。 在“ 身份验证方法”屏幕上,选择选项以使用“旧式”身份验证方法或“强密码”进行身份验证。 注意:如果您使用强密码加密进行身份验证,请确保必须将所有连接器都更新为最新版本。 我们将使用强密码加密进行身份验证 。
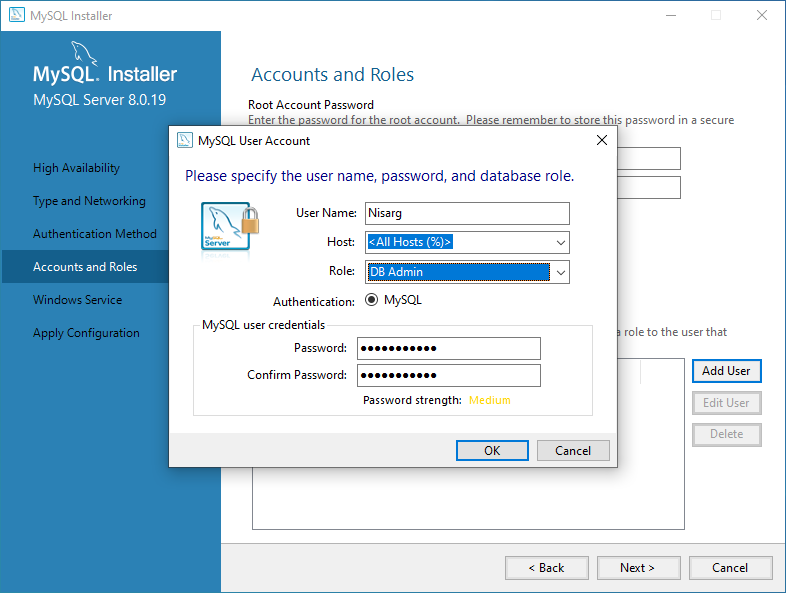
On Accounts and Roles screen, you can specify the MySQL root account password. MySQL Root account is a default sysadmin account, and it must be disabled.
在“ 帐户和角色”屏幕上,可以指定MySQL根帐户密码。 MySQL根帐户是默认的sysadmin帐户,必须将其禁用。
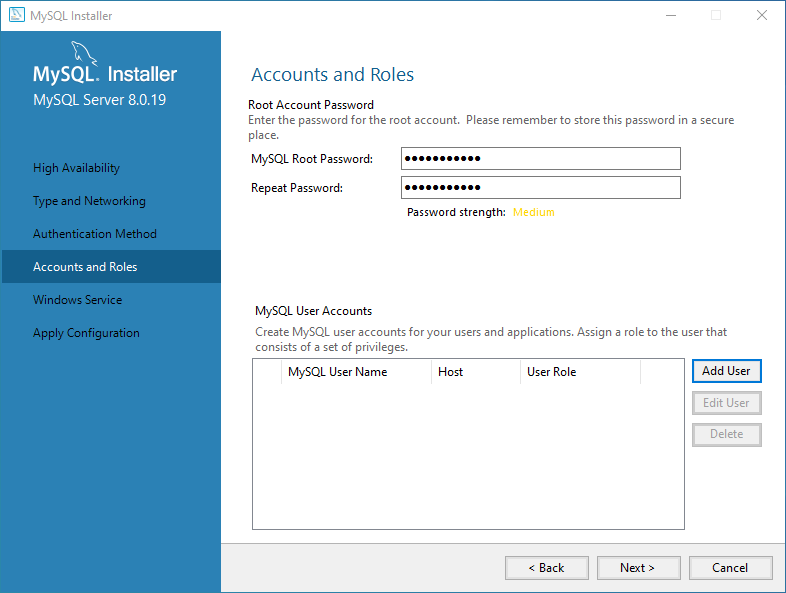
You can also create other users to do that click on Add user. On MySQL User account dialog box, provide a username, hostname, Role of the User, type of authentication, and password. Once the user is created, click on Next. See the following image:
您还可以创建其他用户来执行此操作,请单击添加用户。 在“ MySQL用户帐户”对话框上,提供用户名,主机名,用户角色,身份验证类型和密码。 创建用户后,单击“ 下一步” 。 见下图:
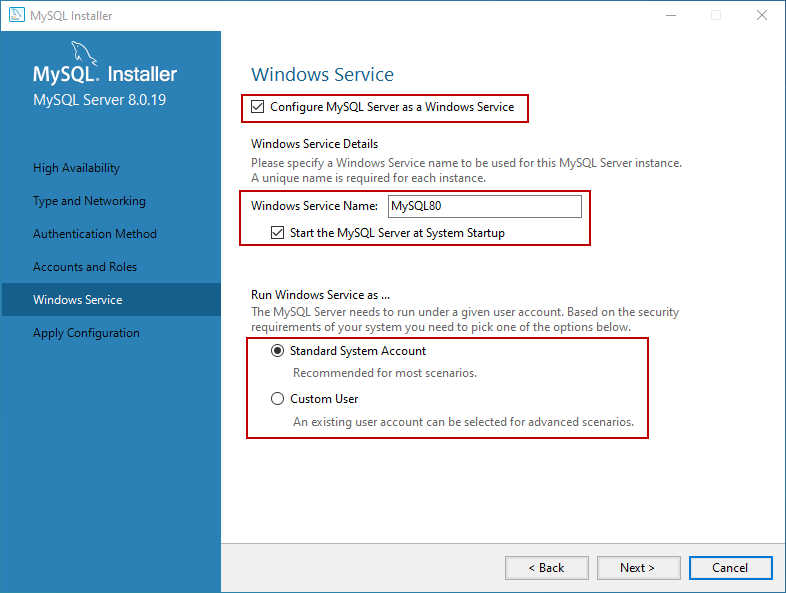
On the Windows Service screen, you can configure the MySQL server to run as a windows service. You can provide the desired name and configure it to auto-start the service when the system reboots. Moreover, you can provide the credentials under which the MySQL Service will run. You can choose the standard system account or provide a specific user. See the following image:
在“ Windows服务”屏幕上,可以将MySQL服务器配置为作为Windows服务运行。 您可以提供所需的名称,并将其配置为在系统重新引导时自动启动服务。 此外,您可以提供运行MySQL Service的凭据。 您可以选择标准系统帐户或提供特定用户。 见下图:
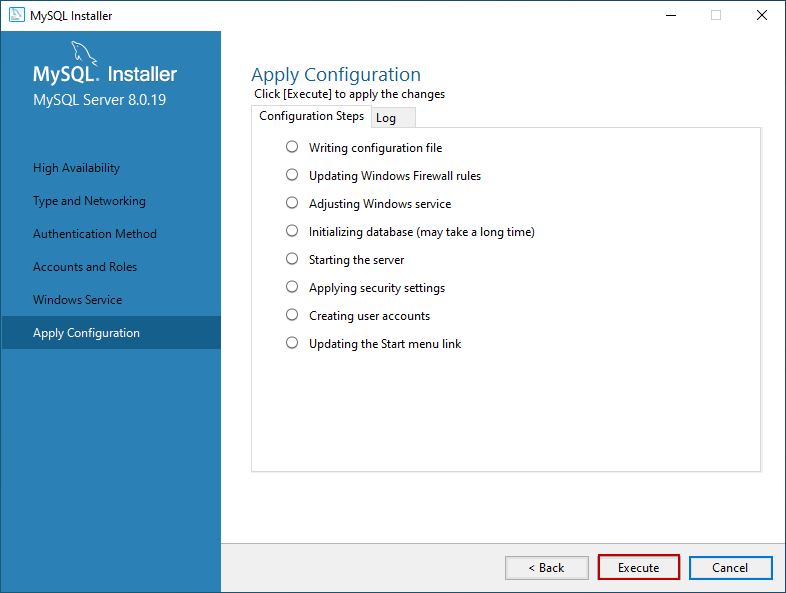
On the Apply Configuration screen, you can see the list of confirmation steps. Once all the configuration settings are verified, click on Execute.
在“ 应用配置”屏幕上,您可以看到确认步骤列表。 验证所有配置设置后,点击Execute 。
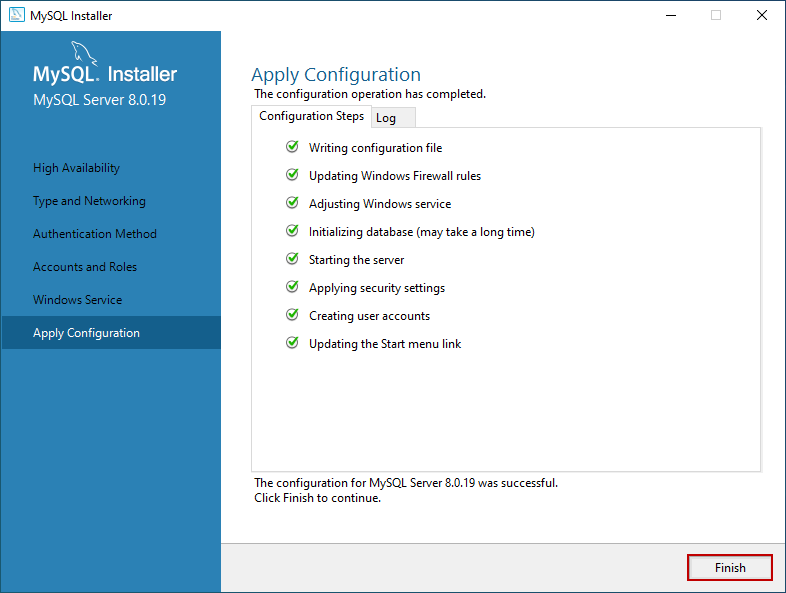
The MySQL installation process starts. You can view the installation process in the “Log” tab. Once installation completes successfully, click on “Finish” to close the installer.
MySQL安装过程开始。 您可以在“日志”选项卡中查看安装过程。 安装成功完成后,单击“ 完成 ”以关闭安装程序。
安装样本数据库 (Install the sample database)
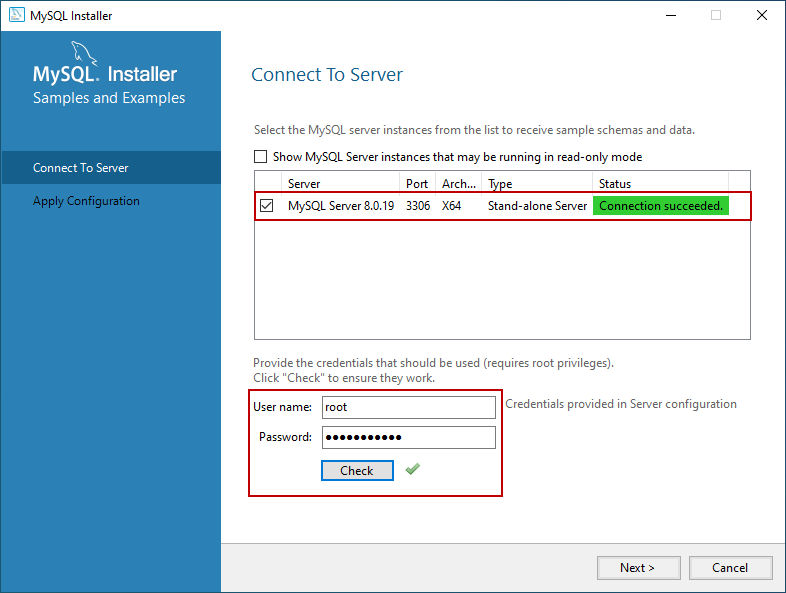
If you have chosen to install all the components of MySQL Server (Full Setup Type), MySQL installer moves to Sample and Example screen. On this screen, provide username and password of the user that has root/sysadmin privileges and click on Check. If the connection establishes successfully, click on next. See the following image:
如果您选择安装MySQL Server的所有组件(完整安装类型),则MySQL安装程序将移至Sample and Example屏幕。 在此屏幕上,提供具有root / sysadmin特权的用户的用户名和密码,然后单击“检查”。 如果连接成功建立,请单击下一步。 见下图:
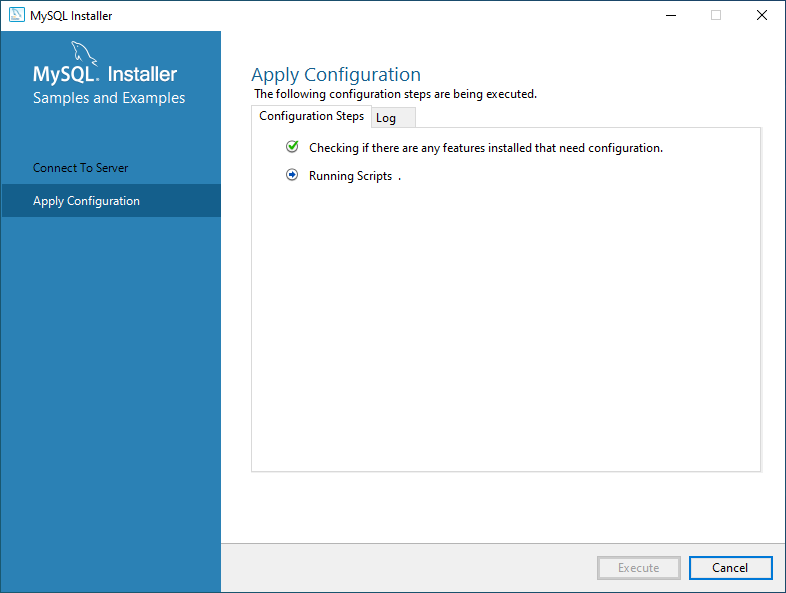
On the Apply Configuration Screen, click on Execute to start the installation of the Sample database. See the following:
在“ 应用配置”屏幕上 ,单击“ 执行”以开始安装示例数据库。 请参阅以下内容:
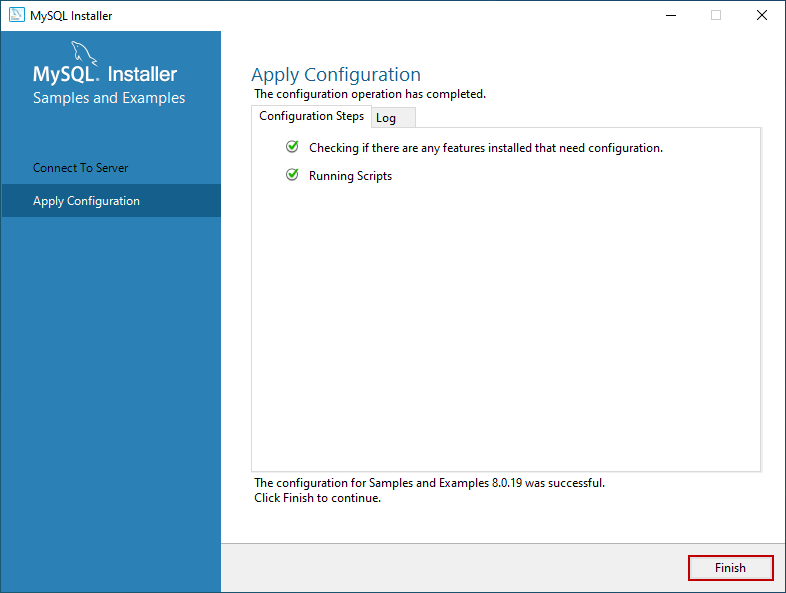
Once the sample database has been installed, click on the Finish button.
安装示例数据库后,单击“ 完成”按钮。
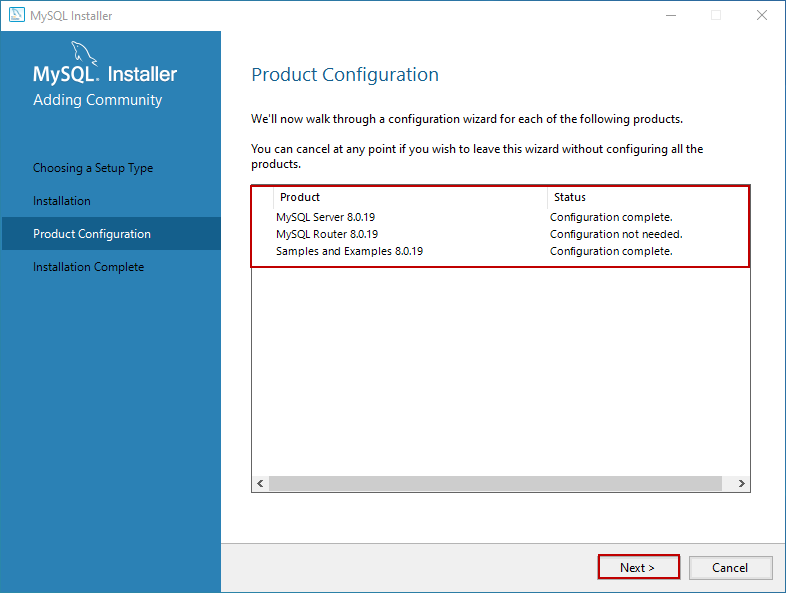
The installer continues to the Product Configuration screen. On this screen, you can see that the installation of the MySQL Server 8.0.19 and Sample and Example 8.0.19 has been completed successfully. See the following image:
安装程序将继续进入“ 产品配置”屏幕。 在此屏幕上,您可以看到MySQL Server 8.0.19和Sample and Example 8.0.19的安装已成功完成。 见下图:
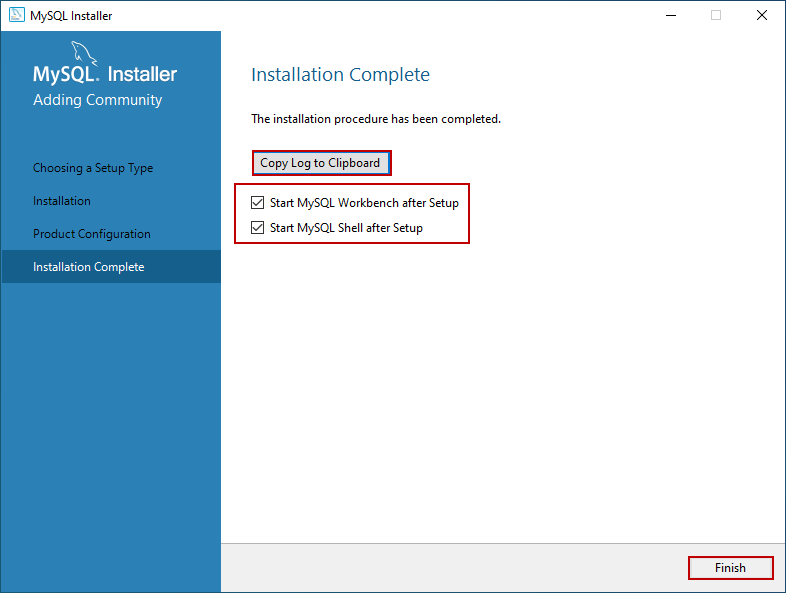
Once the installation completes, you can copy the installation logs on the clipboard to review it later. Moreover, if you want to start exploring MySQL straight away, then you can select “Start MySQL workbench after Setup” and “Start MySQL Shell after Setup” and click on Finish. See the following image:
安装完成后,您可以将安装日志复制到剪贴板上以供以后查看。 此外,如果您想立即开始探索MySQL,则可以选择“ 安装后启动MySQL工作台 ”和“ 安装后启动MySQL Shell ”,然后单击“ 完成” 。 见下图:
连接到MySQL服务器 (Connect to MySQL Server)
Once the installation completes, let us connect to the server and execute the first MySQL Query. Open MySQL workbench. Just like SQL Server management studio, MySQL workbench is the development tool which is used to querying the database and create database objects.
安装完成后,让我们连接到服务器并执行第一个MySQL查询。 打开MySQL工作台。 就像SQL Server Management Studio一样,MySQL Workbench是用于查询数据库和创建数据库对象的开发工具。
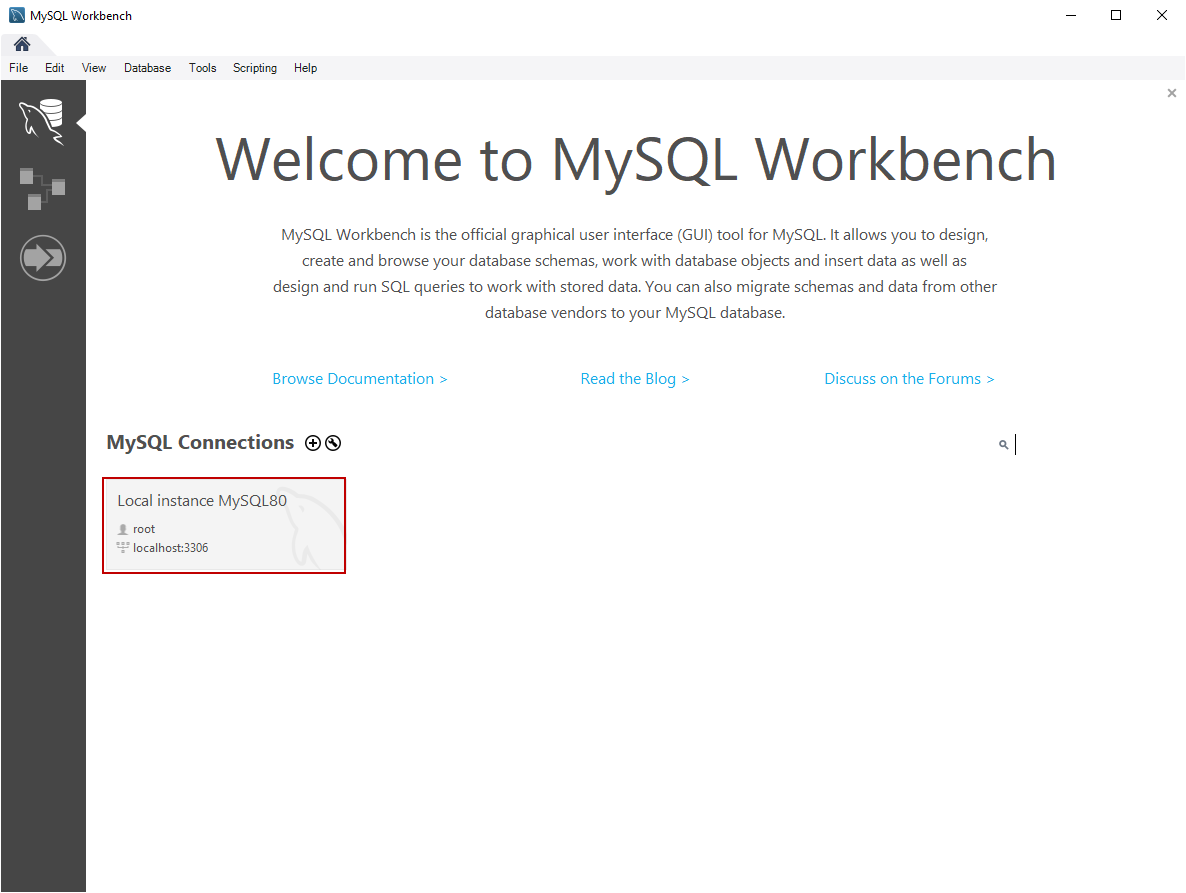
On MySQL workbench welcome screen, you can see the list of MySQL connections. We have not configured multiple connections; hence you can see “Local instance MySQL80.” Click on it to open the new query editor window.
在MySQL工作台欢迎屏幕上,您可以看到MySQL连接列表。 我们尚未配置多个连接; 因此,您可以看到“ 本地实例MySQL80。 ”单击它以打开新的查询编辑器窗口。
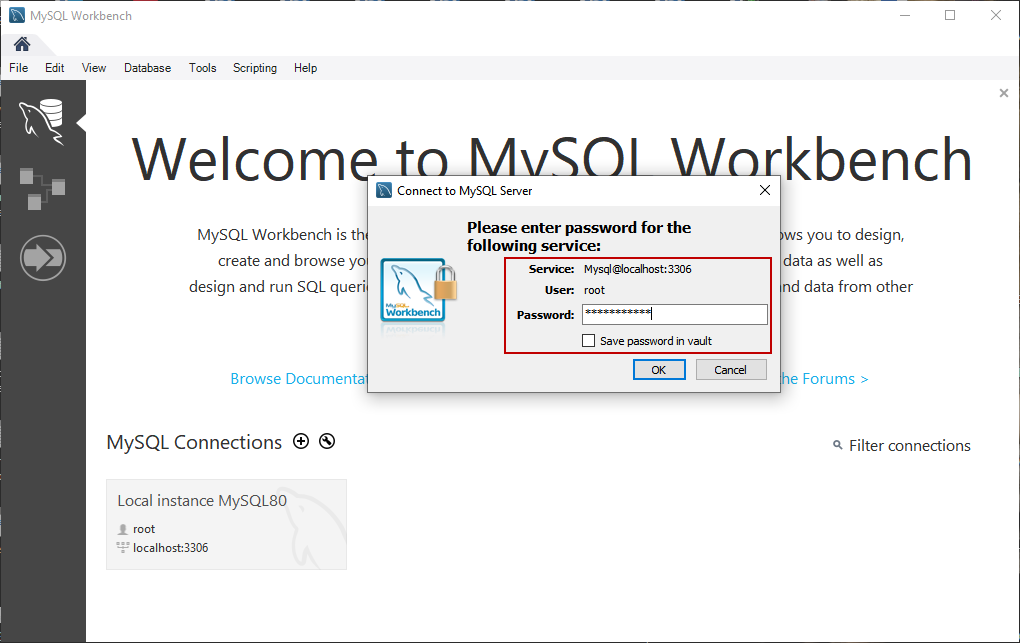
When you click on the connection, you must enter the credentials to connect the database server. Enter the password and click on OK.
单击连接时,必须输入凭据才能连接数据库服务器。 输入密码,然后单击确定。
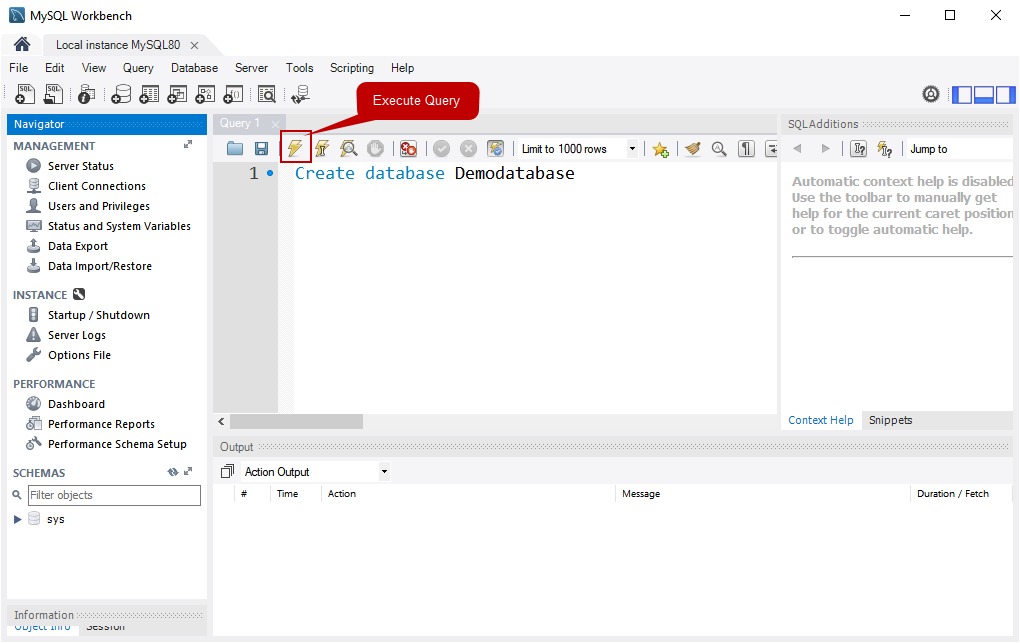
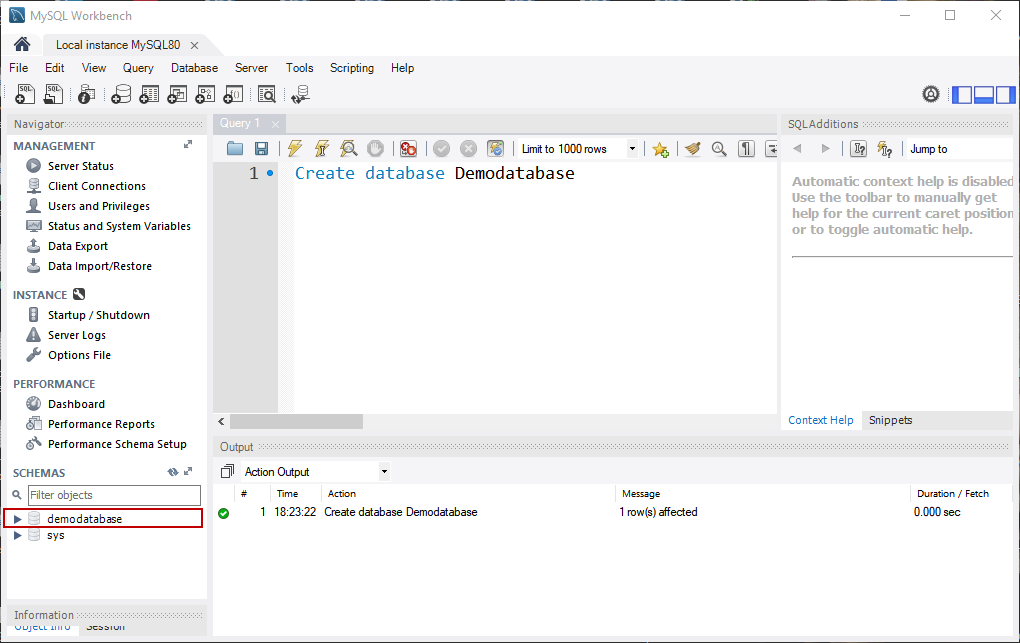
First, let’s create a simple database on MySQL Server. Write the following query in the query editor window and click on execute. See the following image:
首先,让我们在MySQL Server上创建一个简单的数据库。 在查询编辑器窗口中编写以下查询,然后单击执行。 见下图:
Create database Demodatabase
Once the query executes successfully, you can see the new database in the “SCHEMAS” pan. See the following image:
查询成功执行后,您可以在“ SCHEMAS”窗格中看到新数据库。 见下图:
摘要 (Summary)
In this article, we learned the step by step installation process of the MySQL Database server 8.0.19 on Windows 10. If you have any questions, feel free to ask in the comments section below.
在本文中,我们了解到 Windows 10上MySQL数据库服务器8.0.19的分步安装过程。如有任何疑问,请随时在下面的评论部分中提问。
翻译自: https://www.sqlshack.com/how-to-install-mysql-database-server-8-0-19-on-windows-10/
最后
以上就是醉熏裙子最近收集整理的关于如何在Windows 10上安装MySQL数据库服务器8.0.19的全部内容,更多相关如何在Windows内容请搜索靠谱客的其他文章。


发表评论 取消回复