今天接到了一个开发蓝牙小程序的需求, 所以就研究了一下小程序开发蓝牙的功能, 现做以下笔记备忘
(链接:https://pan.baidu.com/s/1Hw84CnMVcFFojJSfjtk0Ww 提取码:qjhp)
首先, 购买一个测试硬件(HC-08), 做为一个蓝牙设备
在小程序开发工具中编辑代码, 和 测试的硬件进行互通
看一看小程序代码的编写 微信小程序的开发文档
bluetooch.wxml
<button bindtap="openBluetoochAdapter">初始化蓝牙设备</button>

<view>所选服务的特征值列表</view>
<view class="character-wrapper">
  <view class="character-list" wx:for="{{characteristicsList}}" wx:key="index" bindtap="sendmessage" data-index="{{index}}">
    <view class="uuiduuid">蓝牙特征uuid:{{item.uuid}}</view>
    <view class="porpers">
      read:{{item.properties.read?'是':'否'}} ---
      write:{{item.properties.write?'是':'否'}} ---
      notify:{{item.properties.notify?'是':'否'}} ---
      indicate:{{item.properties.indicate?'是':'否'}}
    </view>
  </view>
</view>


<view>你选择的设备有如下服务</view>
<view class="service-wrapper">
  <view class="servicelist" wx:for="{{currentDeviceServiceList}}" wx:key="index" bindtap="selectService" data-index="{{index}}">
    <view class="uuid">uuid:{{item.uuid}}</view>
    <view class="isPrimary">主服务:{{item.isPrimary?"是":"否"}}</view>
  </view>
</view>


<view>查找到的蓝牙设备的列表如下</view>
<view class="deviceslist">
  <view class="device" wx:for="{{devices}}" wx:key="index" bindtap="selectDevice" data-index="{{index}}">
    <view class="name">名称:{{item.name}}</view>
    <view class="deviceid">deviceId:{{item.deviceId}}</view>
    <view class="rssi">信号强度:{{item.RSSI}}</view>
  </view>
</view>
bluetooch.css
/* mybluetooch/mybluetooch.wxss */
.deviceslist{
  width:100%;
}

.device{
  width:100%;
  display: flex;
  flex-flow: row nowrap;
  justify-content: space-between;
  align-items: center;
  margin-top:10rpx;
  background:#eee;
}

.service-wrapper{
  width:100%;
}

.servicelist{
  display: flex;
  flex-flow: row nowrap;
  justify-content: space-between;
  align-items: center;
  background:pink;
}
上面界面的操作流程是, 点击 “初始化蓝牙设备” 在 “蓝牙设备列表中”就可以显示所查找到的蓝牙设备。 点击其中的一个 设备, 就可以在 “你选择的设备有如下服务” 列表中 找到服务的列表, 点击其中的一个服务, 就可以得到该服务的特征值。 然后就是收发数据了
bluetooch.js
// mybluetooch/mybluetooch.js
Page({

  /**
   * 页面的初始数据
   */
  data: {
    devices:[],     //所有的设备列表
    selectindex:"",   //所选的设备的index
    userSelectdevice:{},  //用户选定的设备信息
    currentDeviceServiceList:[],  //所选设备的服务列表
    selectServiceindex:"",  //所选服务的index
    userSelectService:{},   //用户所选的服务信息
    characteristicsList:[],  //所选服务的特征值列表
    characteristicsSelectIndex:'',  //所选服务特征值的index
    selectCharacteristic:{} //所选特征值信息
  },

  //初始化蓝牙设备
  openBluetoochAdapter(){
    let that = this;
    wx.openBluetoothAdapter({
      success(res){
        console.log("蓝牙初始化完毕");
        //开始搜索蓝牙设备
         wx.startBluetoothDevicesDiscovery({
           allowDuplicatesKey: false,
           success(res){
            console.log("开始蓝牙搜索");
            console.log(res);
           }
         });
         //注册蓝牙监听的事件(当搜索到新的设备的时候的事件)
         wx.onBluetoothDeviceFound((result) => {
            let devices = result.devices;
            console.log(that.ab2hex(devices[0].advertisData));
          // 得到现有的所有蓝牙的设备
          wx.getBluetoothDevices({
            success: (result1) => {
              that.setData({
                devices:result1.devices
              })
            },
          })
         });
      },
      fail(){
        wx.showToast({
          title: '初始化失败,请重试',
        })
      }
    })
  },

  selectDevice(e){
    let that = this;
    //关闭蓝牙搜索
    wx.stopBluetoothDevicesDiscovery({
      success (res) {
        console.log(res,"关闭蓝牙搜索");
        let index = e.currentTarget.dataset.index;
        that.setData({selectindex:index})
        //开始连接蓝牙设备
        let userSelectdevice = that.data.devices[index];
        that.setData({userSelectdevice});
        wx.createBLEConnection({
          deviceId: that.data.userSelectdevice.deviceId,
          success(res1){
            wx.getBLEDeviceServices({
              deviceId: that.data.userSelectdevice.deviceId,
              success:(res2)=>{
                that.setData({currentDeviceServiceList:res2.services});
              }
            })
          }
        })
      }
    })
  },

  selectService(e){
    console.log(e);
    let index = e.currentTarget.dataset.index;
    //所选的服务
    this.setData({
      userSelectService:this.data.currentDeviceServiceList[index]
    });

    //得到所选服务的特征值
    wx.getBLEDeviceCharacteristics({
      deviceId: this.data.userSelectdevice.deviceId,
      serviceId: this.data.userSelectService.uuid,
      success:(res)=>{
        this.setData({
          characteristicsList:res.characteristics
        })
      }
    })
    console.log(e.currentTarget.dataset.index);
  },

  buf2string(buffer) {
    var arr = Array.prototype.map.call(new Uint8Array(buffer), x => x)
    return arr.map((char, i) => {
      return String.fromCharCode(char);
    }).join('');
  },


  sendmessage(e){
    let that = this;
    let index = e.currentTarget.dataset.index;
    this.setData({
      characteristicsSelectIndex:index,
      selectCharacteristic:this.data.characteristicsList[index]
    });

    wx.notifyBLECharacteristicValueChange({
      characteristicId: that.data.selectCharacteristic.uuid,
      deviceId: that.data.userSelectdevice.deviceId,
      serviceId: that.data.userSelectService.uuid,
      state: true,
    })


    let sendtext = "huanghaha";
    let buff;
    buff =  this.string2buf(sendtext);
    let sendpackage = this.getSendPackage(buff)
    for(let i=0;i<sendpackage.length;i++){
      wx.writeBLECharacteristicValue({
        characteristicId: that.data.selectCharacteristic.uuid,
        deviceId: that.data.userSelectdevice.deviceId,
        serviceId: that.data.userSelectService.uuid,
        value: sendpackage[i],
        success(res){
          console.log(res);
        },
        fail(err){
          console.log(err)
        }
      })
    }


  },


  getSendPackage:function(buff){
    const packageArray = []
    for(let i = 0; i<buff.byteLength;i+=20){
      if(i<buff.byteLength){
        packageArray.push(buff.slice(i,i+20))
      }else{
        packageArray.push(i,buff.byteLength)
        break
      }
    }
    return packageArray
  },


  string2buf: function (str) {
    // 首先将字符串转为16进制
    let val = ""
    for (let i = 0; i < str.length; i++) {
      if (val === '') {
        val = str.charCodeAt(i).toString(16)
      } else {
        val += ',' + str.charCodeAt(i).toString(16)
      }
    }
    return new Uint8Array(val.match(/[da-f]{2}/gi).map(function (h) {
      return parseInt(h, 16)
    })).buffer
  },


// ArrayBuffer转16进度字符串示例
  ab2hex(buffer) {
    var hexArr = Array.prototype.map.call(
      new Uint8Array(buffer),
      function(bit) {
        return ('00' + bit.toString(16)).slice(-2)
      }
    )
    return hexArr.join('');
  },


  /**
   * 生命周期函数--监听页面加载
   */
  onLoad: function (options) {

  },

  /**
   * 生命周期函数--监听页面初次渲染完成
   */
  onReady: function () {
    console.log(123);
    let that = this;
    wx.onBLECharacteristicValueChange(function(result){
      console.log(123123);
      const receiverText = that.buf2string(result.value);
          console.log("返回值"+ receiverText);
      // wx.readBLECharacteristicValue({
      //   characteristicId: result.characteristicId,
      //   deviceId: result.deviceId,
      //   serviceId: result.serviceId,
      //   success(res){

      //   }
      // })
    })
  },

  /**
   * 生命周期函数--监听页面显示
   */
  onShow: function () {

  },

  /**
   * 生命周期函数--监听页面隐藏
   */
  onHide: function () {

  },

  /**
   * 生命周期函数--监听页面卸载
   */
  onUnload: function () {

  },

  /**
   * 页面相关事件处理函数--监听用户下拉动作
   */
  onPullDownRefresh: function () {

  },

  /**
   * 页面上拉触底事件的处理函数
   */
  onReachBottom: function () {

  },

  /**
   * 用户点击右上角分享
   */
  onShareAppMessage: function () {

  }
})
上面的代码是有注释的, 要注意的是 wx.getBluetoothDevices是在wx.onBluetoothDeviceFound 事件中的,分析一下就是, 当蓝牙第搜索到一个设备是, 就是调用 wx.onBluetoothDeviceFound 事件, 而事件中又有 wx.getBluetoothDevices , 也就是说每找到一个新的设备, 就把蓝牙发现的所有设备获取 一次,(不是增量的添加),所以代码中, 当我们选择好了蓝牙设备的时候就 把 wx.stopBluetoothDevicesDiscovery 停止对新设备的搜索
在上面的 sendmessage方法中, 我调用了 wx.notifyBLECharacteristicValueChange 方法, 这个方法看似和 sendmessage 没有关系, 但其实这行代码是为了接收蓝牙设备发过来的信息才有的。
文档中说 wx.onBLECharacteristicValueChange 必须要在 wx.notifyBLECharacteristicValueChange 调用之后才可以接收到数据, 大至的意思就是 wx.notifyBLECharacteristicValueChange 好像就是订阅了一个消息一样, 而wx.onBLECharacteristicValueChange 就是你必须在订阅之后才可以收到消息
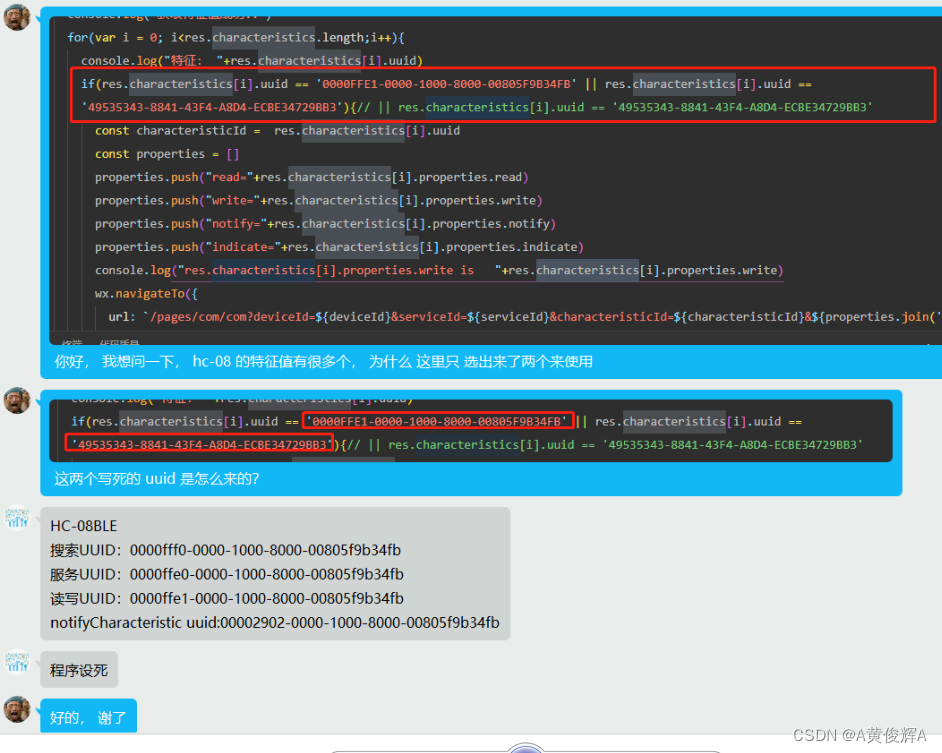
其中有些参数是要和硬件开发者约定好的

以上是我开发的时候的问题, 对方给的解答可以看出, 服务uuid 是硬件上写死的,要和实际硬件工程师沟通好才可以
最后
以上就是爱撒娇外套最近收集整理的关于小程序开发蓝牙模块笔记的全部内容,更多相关小程序开发蓝牙模块笔记内容请搜索靠谱客的其他文章。


发表评论 取消回复