一、Haproxy简介
在大型系统设计中用代理在负载均衡是最常见的一种方式,而相对靠谱的解决方案中Nginx、HAProxy、LVS、F5在各大场中用得比较普遍,各有各的优势和使用场景,本次讲解的主角是HAProxy。
HAProxy 提供高可用性、负载均衡以及基于 TCP 和 HTTP 应用的代理,支持虚拟主机,它是免费、快速并且可靠的一种解决方案。HAProxy 特别适用于那些负载特大的 web 站点, 这些站点通常又需要会话保持或七层处理。HAProxy 运行在当前的硬件上,完全可以支持数以万计的并发连接。并且它的运行模式使得它可以很简单安全的整 合进您当前的架构中, 同时可以保护你的 web 服务器不被暴露到网络上。
HAProxy支持双机热备、虚拟主机、基于TCP和HTTP应用代理等功能。其配置简单,而且拥有很好的对服务器节点的健康检查功能(相当于keepalived健康检查),当其代理的后端服务器出现故障时,Haproxy会自动的将该故障服务器摘除,当服务器的故障恢复后Haproxy还会自动将RS服务器加入集群。
二、haproxy部署
实验环境:rhel6.5 selinux and iptables disabled
实验主机:
| hostname | IP | role |
|---|---|---|
| server5 | 172.25.20.5 | haproxy |
| server2 | 172.25.20.2 | web1 |
| server1 | 172.25.20.3 | web2 |
软件下载:http://haproxy.1wt.eu/
[root@server5 ~]# ls
anaconda-ks.cfg  haproxy-1.4.23.tar.gz  install.log  install.log.syslog
[root@server5 ~]# yum install gcc rpm-build kernel-devel -y
[root@server5 ~]# rpmbuild -tb haproxy-1.4.23.tar.gz
[root@server5 ~]# rpm -ivh /root/rpmbuild/RPMS/x86_64/haproxy-1.4.23-1.x86_64.rpm
[root@server5 ~]# vim /etc/haproxy/haproxy.cfg


# this config needs haproxy-1.1.28 or haproxy-1.2.1

global
        log 127.0.0.1   local0
        #log 127.0.0.1  local1 notice
        #log loghost    local0 info
        maxconn 65535
        chroot /usr/share/haproxy
        uid 99
        gid 99
        daemon
        #debug
        #quiet

defaults
        log     global
        mode    http
        option  httplog
        option  dontlognull
        retries 3
        redispatch
        maxconn 65535
        contimeout      5000
        clitimeout      50000
        srvtimeout      50000
        stats uri       /status

listen  www.myexample.com *:80
        #cookie SERVERID rewrite
        balance roundrobin
        server  web1 172.25.20.2:80 cookie app1inst1 check inter 2000 rise 2 fall 5
        server  web2 172.25.20.3:80 cookie app1inst1 check inter 2000 rise 2 fall 5

listen  appli2-insert 0.0.0.0:10002
        option  httpchk
        balance roundrobin
        cookie  SERVERID insert indirect nocache
        server  inst1 192.168.114.56:80 cookie server01 check inter 2000 fall 3
        server  inst2 192.168.114.56:81 cookie server02 check inter 2000 fall 3

[root@server5 ~]# mkdir /usr/share/haproxy
[root@server5 ~]# /etc/init.d/haproxy start
配置文件解析
global                  #全局设置
    log 127.0.0.1 local0    #指定日志设备,所有日志都记录在本机,通过local0输出
    #log 127.0.0.1 local1 notice
    log loghost local0 info #指定日志类型,还有 err warning debug
    maxconn 65535 #并发最大连接数量
    chroot /usr/share/haproxy #jail 目录
    uid 99 #用户
    gid 99 #组
    daemon #后台运行
    #debug
    #quiet
defaults         #默认设置
    log  global
    mode http #默认使用 http 的 7 层模式 tcp: 4 层
    option httplog #http 日志格式
    option dontlognull #禁用空链接日志
    retries 3 #重试 3 次失败认为服务器不可用
    option redispatch #当 client 连接到挂掉的机器时,重新分配到健康的主机
    maxconn 65535
    contimeout 5000
    #连接超时
    clitimeout 50000 #客户端超时
    srvtimeout 50000 #服务器端超时
    stats uri
    #haproxy 监控页面
    /status
listen www.myexample.com *:80   #监听的实例名称,地址和端口
balance roundrobin      #负载均衡算法
 server  web1 172.25.20.2:80 cookie app1inst1 check inter 2000 rise 2 fall 5
 server  web1 172.25.20.3:80 cookie app1inst1 check inter 2000 rise 2 fall 5

#cookie app1inst1:表示 serverid 为 app1inst1
#check inter 2000:检测心跳频率
#rise 2:表示 2 次正确认为服务器可用
#fall 5:表示 5 次失败认为服务器不可用
三、测试访问
[root@foundation20 ~]# for i in {1..10} ; do curl www.myexample.com ; done
<h1> httpd from server 33333333</h1>
<h1> httpd from server 22222222</h1>
<h1> httpd from server 33333333</h1>
<h1> httpd from server 22222222</h1>
<h1> httpd from server 33333333</h1>
<h1> httpd from server 22222222</h1>
<h1> httpd from server 33333333</h1>
<h1> httpd from server 22222222</h1>
<h1> httpd from server 33333333</h1>
<h1> httpd from server 22222222</h1>- 访问 www.myexample.com 测试负载

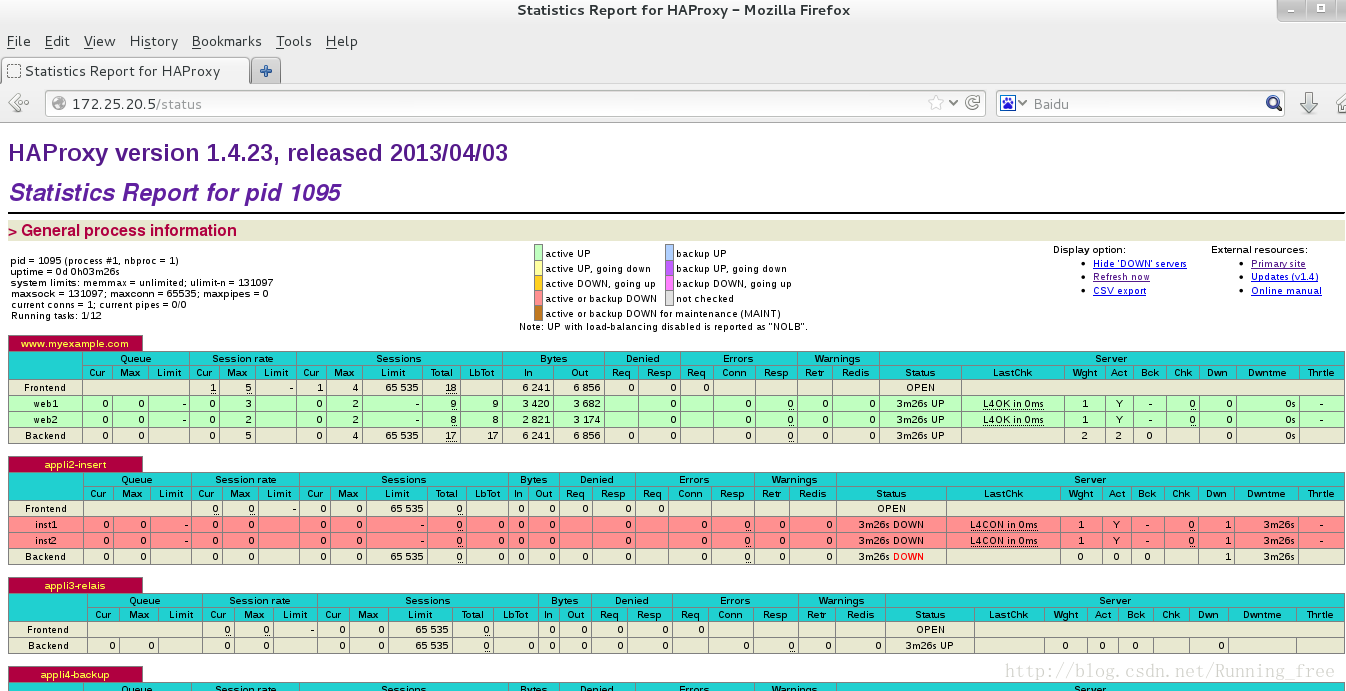
- 访问监控界面 http://172.25.20.5/status
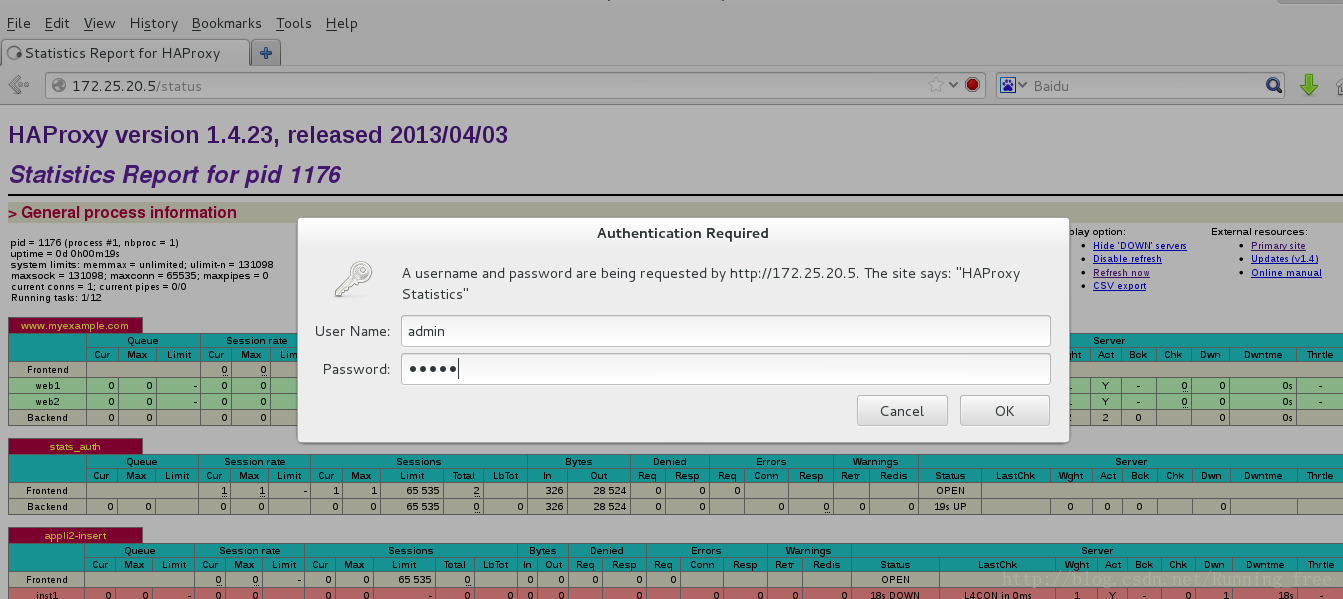
四、监控页面添加认证
[root@server5 ~]# vim /etc/haproxy/haproxy.cfg
listen stats_auth 172.25.20.5:80
    stats enable
    stats uri /status
    stats auth admin:admin
    stats refresh 5s
[root@server5 ~]# /etc/init.d/haproxy restart

stats uri /status #监控页面地址
stats auth admin:admin #管理帐号和密码
stats refresh 5s #刷新频率
五、heartbeat+Haproxy多VIP负载均衡高可用
5.1 环境:
我们还需要一台主机 来实现 Haproxy + heartbeat
实验主机:
| hostname | IP | role | 说明 |
|---|---|---|---|
| server5 | eth0 : 172.25.20.5 eth1 : 172.25.254.5 | haproxy + heartbeat | VIP:172.25.20.100 |
| server2 | eth0 : 172.25.20.2 | web1 | |
| server1 | eth0 : 172.25.20.3 | web2 | |
| server6 | eth0 : 172.25.20.6 eth1 : 172.25.254.5 | haproxy + heartbeat | VIP:172.25.20.200 |
这里heartbeat服务将产生两个VIP,server5上默认启动VIP 172.25.20.100,而server6 上默认启动VIP 172.25.20.200,当某一台发生故障时,另一台将接管故障服务器的VIP。Haproxy两个服务器的配置相同,都将绑定172.25.20.100和172.25.20.200两个IP地址,从而达到高可用的目的。
注意:大家应该注意到,如果将两个VIP都绑定到同一台服务器上,然后让heartbeat控制haproxy服务,也可以达到上面的目的,但是这样的话,无论何时必定有一台主机获得两个VIP,且提供代理服务,而另外一个主机可能什么服务都没有,完全处于备用状态,为了充分利用服务器资源,所以不采用这种方式,而采用两个VIP的模式
5.2配置heartbeat
以下为server5 上的配置,server6上参照配置即可,配置完全一样
[root@server5 ~]# ls
anaconda-ks.cfg              haproxy-1.4.23.tar.gz             heartbeat-libs-3.0.4-2.el6.x86_64.rpm  install.log.syslog
haproxy-1.4.23-1.x86_64.rpm  heartbeat-3.0.4-2.el6.x86_64.rpm  install.log                            rpmbuild
[root@server5 ~]# yum install -y heartbeat-*
[root@server5 ~]# cd /usr/share/doc/heartbeat-3.0.4/
[root@server5 ~]# cp ha.cf authkeys haresources /etc/ha.d/
[root@server5 ~]# cd /etc/ha.d/
[root@server5 ~]# vim haresources
[root@server5 ha.d]# tail -n 2 haresources
server5 IPaddr::172.25.254.5/24/eth0
server6 IPaddr::172.25.254.6/24/eth0
[root@server5 ha.d]# vim ha.cf

logfacility     local0
logfacility     local0
deadtime 30
warntime 10
initdead 60
udpport 694
bcast   eth0            # Linux
auto_failback on
node    server5
node    server6
ping 172.25.20.250

[root@server5 ha.d]# vim authkeys

auth 1
1 crc

[root@server5 ha.d]# chmod 600 authkeys

[root@server5 ha.d]# scp haresources authkeys ha.cf server6:/etc/ha.d/

[root@server5 ha.d]# /etc/init.d/heartbeat start

##要确保VIP成功绑定
[root@server5 ha.d]# ip addr
[root@server5 ha.d]# ip addr | grep 254
      inet 172.25.254.5/24 scope global eth0
[root@server6 ha.d]# ip addr | grep 254
    inet 172.25.254.6/24 scope global eth0



5.3 配置 haproxy
server5 我们刚才已经配置过了,server6的配置和server5一样,两台服务器都在上面的基础上作以下改动
[root@server5 ha.d]# vim /etc/haproxy/haproxy.cfg

# this config needs haproxy-1.1.28 or haproxy-1.2.1

global
        log 127.0.0.1   local0
        #log 127.0.0.1  local1 notice
        #log loghost    local0 info
        maxconn 65535
        chroot /usr/share/haproxy
        uid 99
        gid 99
        daemon
        #debug
        #quiet

defaults
        log     global
        mode    http
        option  httplog
        option  dontlognull
        retries 3
        option redispatch
        #redispatch
        maxconn 65535
        contimeout      5000
        clitimeout      50000
        srvtimeout      50000
        stats uri       /status

listen  haproxy_stats
        bind   *:8000
        mode   http
        option httplog
        maxconn 20
        stats enable
        stats refresh 30s
        stats uri /haproxy_status
        stats auth admin:admin
        stats hide-version
listen websites_01
        bind  172.25.254.5:80
        option   forwardfor
        #option  httpchk GET /info.txt
        #option  httpchk HEAD /check.html HTTP/1.0
        timeout  server  15s
        timeout  connect 30s
        server  web1  172.25.20.2:80 check port 80 inter 2000 fall 3
        server  web2  172.25.20.3:80 check port 80 inter 2000 fall 3
listen websites_02
        bind  172.25.254.6:80
        option   forwardfor
        #option  httpchk GET /info.txt
        #option  httpchk HEAD /check.html HTTP/1.0
        timeout  server  15s
        timeout  connect 30s
        server  web1  172.25.20.2:80 check port 80 inter 2000 fall 3

#listen www.myexample.com *:80
#       #cookie SERVERID rewrite
#       balance roundrobin
#       server  web1 172.25.20.2:80 cookie app1inst1 check inter 2000 rise 2 fall 5
#       server  web2 172.25.20.3:80 cookie app1inst1 check inter 2000 rise 2 fall 5

#listen stats_auth 172.25.20.5:80
#       stats enable
#       stats uri /status
#       stats auth admin:admin
#       stats refresh 5s


[root@server5 ha.d]# scp /etc/haproxy/haproxy.cfg server6:/etc/haproxy/
5.4启动haproxy服务
经过以上的配置,server 5 上 haproxy是无法启动的,因为无法绑定VIP 172.25.254.5,所以启动不成功。同样的,在server 6 上也因为无法绑定VIP 172.25.254.6而无法启动
解决方法是在/etc/sysctl.conf中添加如下配置
[root@server5 ha.d]# echo "net.ipv4.ip_nonlocal_bind = 1" >>/etc/sysctl.conf
[root@server5 ha.d]# tail -2 /etc/sysctl.conf

kernel.shmall = 4294967296
net.ipv4.ip_nonlocal_bind = 1

[root@server5 ha.d]# sysctl -p

net.ipv4.ip_forward = 0
net.ipv4.conf.default.rp_filter = 1
net.ipv4.conf.default.accept_source_route = 0
kernel.sysrq = 0
kernel.core_uses_pid = 1
net.ipv4.tcp_syncookies = 1
error: "net.bridge.bridge-nf-call-ip6tables" is an unknown key
error: "net.bridge.bridge-nf-call-iptables" is an unknown key
error: "net.bridge.bridge-nf-call-arptables" is an unknown key
kernel.msgmnb = 65536
kernel.msgmax = 65536
kernel.shmmax = 68719476736
kernel.shmall = 4294967296
net.ipv4.ip_nonlocal_bind = 1
然后再启动haproxy 服务
[root@server5 ha.d]# service haproxy start
同样的,在server6上也这样解决
5.5测试heartbeat+Haproxy多VIP负载均衡高可用
通过vip 172.25.254.5和172.25.254.6均可获得服务,外部可以作个dns解析,这就很好的弥补了heartbeat 中备机闲置的缺陷
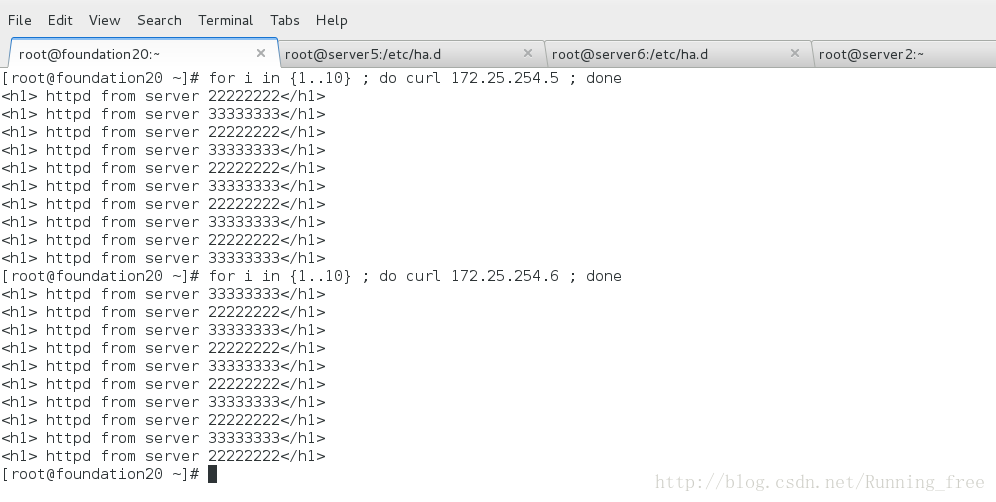
1.停掉server5 的heartbeat,server6提供服务
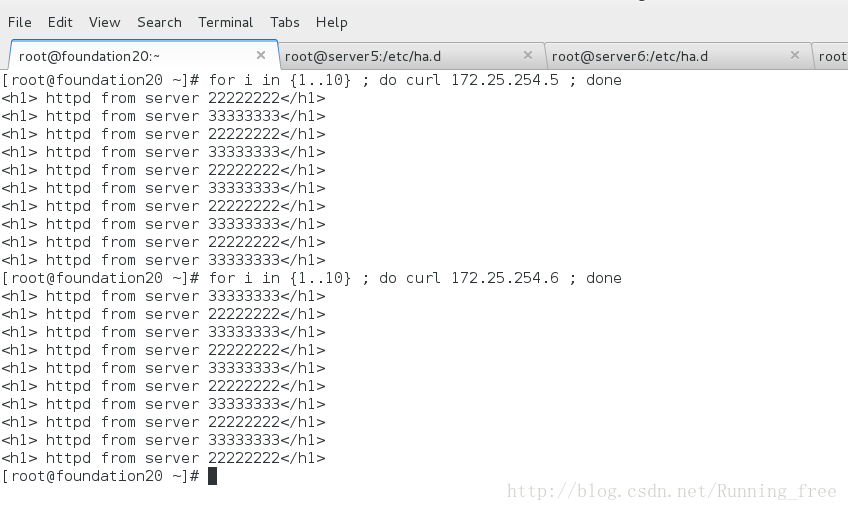


VIP1和VIP2都被server6接管
2.再开启server5 的heartbeat,
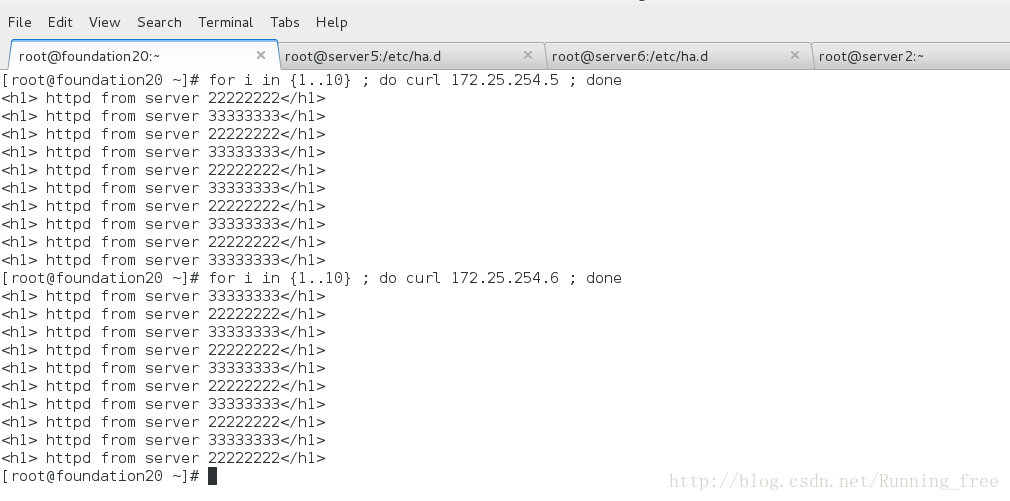
因为开启了回切,VIP1 又被server5接管

VIP1 被server5接管后,server6上只有VIP2,这样就由dns的解析优化了一台服务器闲置的问题

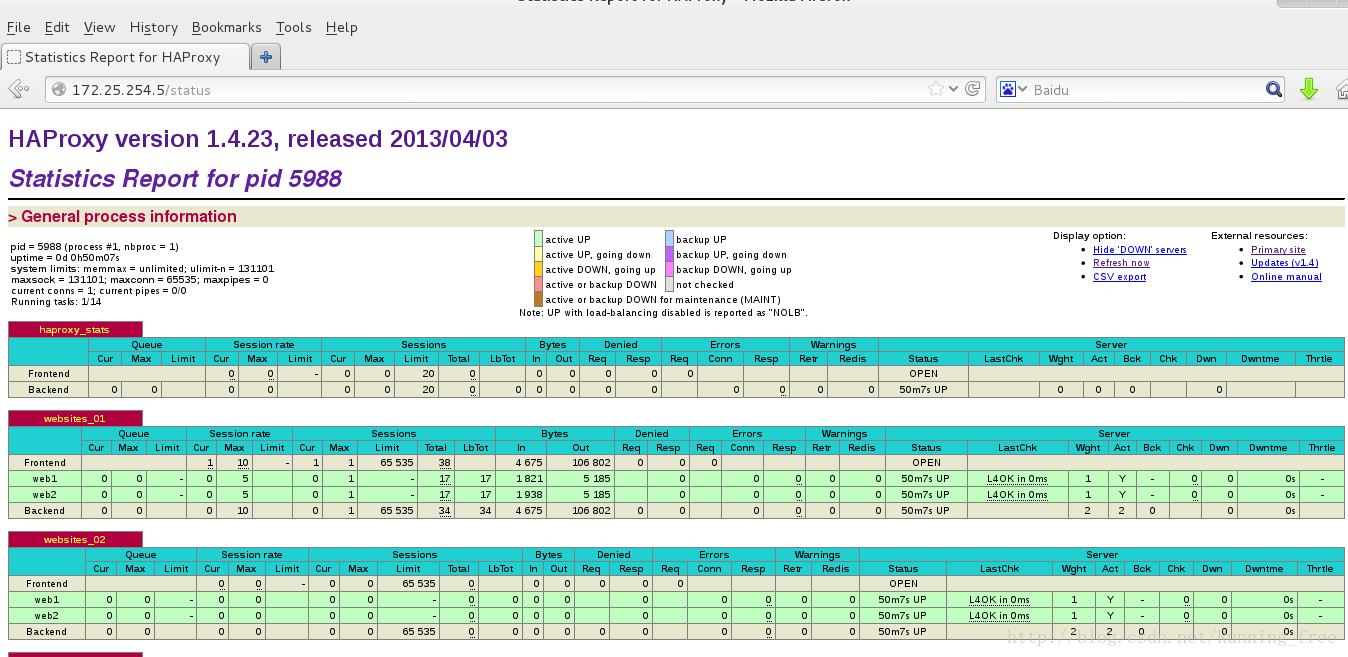
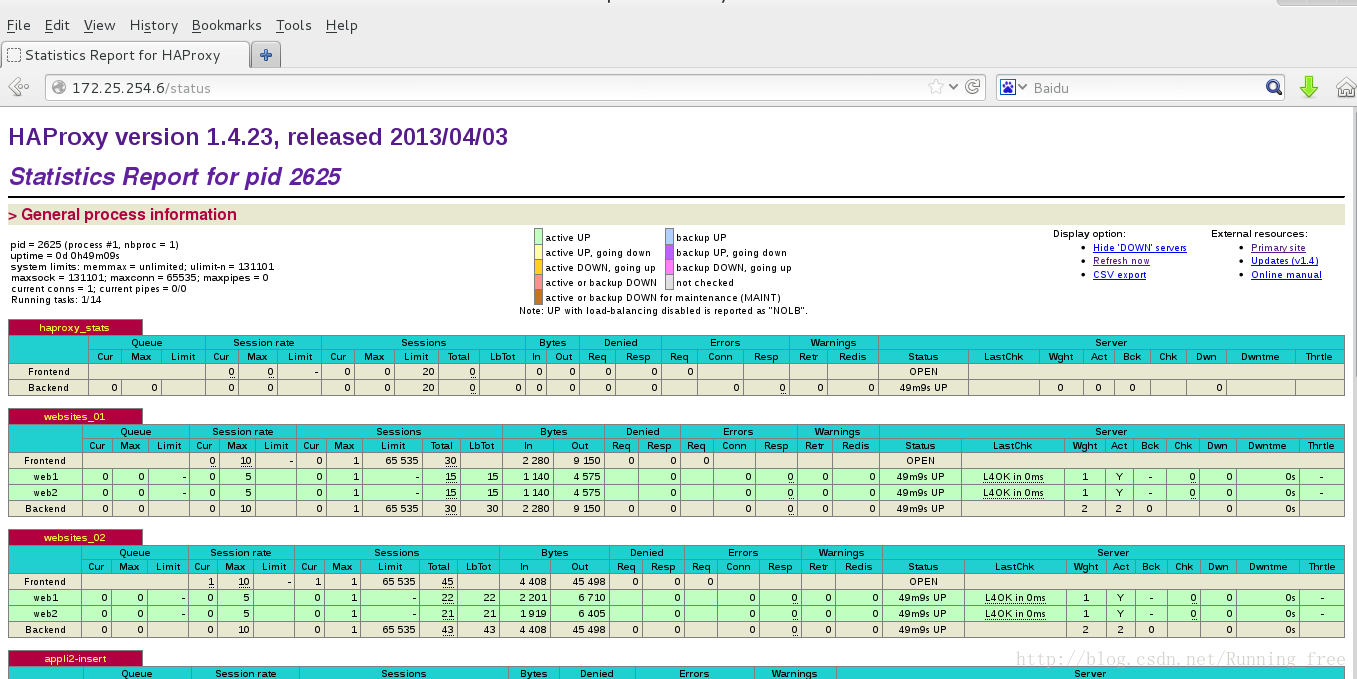
访问监控界面
http://172.25.254.5/status
http://172.25.254.6/status
最后
以上就是哭泣嚓茶最近收集整理的关于heartbeat+Haproxy多VIP负载均衡高可用的全部内容,更多相关heartbeat+Haproxy多VIP负载均衡高可用内容请搜索靠谱客的其他文章。


发表评论 取消回复