1)实验平台:正点原子Linux开发板
2)摘自《正点原子I.MX6U嵌入式Linux驱动开发指南》
关注官方微信号公众号,获取更多资料:正点原子

文件bsp_lcd.c里面一共有10个函数,第一个函数是lcd_init,这个是LCD初始化函数,此函数先调用LCD的IO初始化函数、时钟初始化函数、复位函数等,然后会按照我们前面讲解的步骤初始化eLCDIF相关的寄存器,最后使能eLCDIF。第二个函数是lcdgpio_init,这个是LCD的IO初始化函数。第三个函数lcdclk_init是LCD的时钟初始化函数。第四个函数lcd_reset和第五个函数lcd_noreset分别为复位LCD的停止LCD复位函数。第六个函数lcd_enable是eLCDIF使能函数,用于使能eLCDIF。第七个和第八个是画点和读点函数,分别为lcd_drawpoint和lcd_readpoint,通过这两个函数就可以在LCD的指定像素点上显示指定的颜色,或者读取指定像素点的颜色。第九个函数lcd_clear是清屏函数,使用指定的颜色清除整个屏幕。最后一个函数lcd_fill是填充函数,使用此函数的时候需要指定矩形的起始坐标、终止坐标和填充颜色,这样就可以填充出一个矩形区域。
在bsp_lcdapi.h中输入如下所示内容:
示例代码24.3.3 bsp_lcdapi.h文件代码
1 #ifndef BSP_LCDAPI_H
2 #define BSP_LCDAPI_H
3/***************************************************************
4 Copyright © zuozhongkai Co., Ltd. 1998-2019. All rights reserved.
5文件名 : bsp_lcdapi.h
6作者 : 左忠凯
7版本 : V1.0
8描述 : LCD显示API函数。
9其他 : 无
10论坛 : www.openedv.com
11日志 : 初版V1.0 2019/3/18 左忠凯创建
12 ***************************************************************/
13 #include "imx6ul.h"
14 #include "bsp_lcd.h"
15
16/* 函数声明 */
17void lcd_drawline(unsignedshort x1,unsignedshort y1,unsigned
short x2,unsignedshort y2);
18void lcd_draw_rectangle(unsignedshort x1,unsignedshort y1,
unsignedshort x2,unsignedshort y2);
19void lcd_draw_circle(unsignedshort x0,unsignedshort y0,
unsignedchar r);
20void lcd_showchar(unsignedshort x,unsignedshort y,
unsignedchar num,unsignedchar size,
unsignedchar mode);
21unsignedint lcd_pow(unsignedchar m,unsignedchar n);
22void lcd_shownum(unsignedshort x,unsignedshort y,
unsignedint num,unsignedchar len,
unsignedchar size);
23void lcd_showxnum(unsignedshort x,unsignedshort y,
unsignedint num,unsignedchar len,
unsignedchar size,unsignedchar mode);
24void lcd_show_string(unsignedshort x,unsignedshort y,
unsignedshort width,unsignedshort height,
unsignedchar size, char*p);
25 #endif
文件bsp_lcdapi.h内容很简单,就是函数声明。在bsp_lcdapi.c中输入如下内容:
示例代码24.3.4 bsp_lcdapi.c文件代码
/***************************************************************
Copyright © zuozhongkai Co., Ltd. 1998-2019. All rights reserved.
文件名 : bsp_lcdapi.c
作者 : 左忠凯
版本 : V1.0
描述 : LCD API函数文件。
其他 : 无
论坛 : www.openedv.com
日志 : 初版V1.0 2019/3/18 左忠凯创建
***************************************************************/
1 #include "bsp_lcdapi.h"
2 #include "font.h"
3
4/*
5 * @description : 画线函数
6 * @param - x1 : 线起始点坐标X轴
7 * @param - y1 : 线起始点坐标Y轴
8 * @param - x2 : 线终止点坐标X轴
9 * @param - y2 : 线终止点坐标Y轴
10 * @return : 无
11 */
12void lcd_drawline(unsignedshort x1,unsignedshort y1,
unsignedshort x2,unsignedshort y2)
13{
14 u16 t;
15int xerr =0, yerr =0, delta_x, delta_y, distance;
16int incx, incy, uRow, uCol;
17 delta_x = x2 - x1; /* 计算坐标增量 */
18 delta_y = y2 - y1;
19 uRow = x1;
20 uCol = y1;
21if(delta_x >0) incx =1; /* 设置单步方向 */
22elseif(delta_x==0) incx =0;/* 垂直线 */
23else
24{
25 incx =-1;
26 delta_x =-delta_x;
27}
28
29if(delta_y>0) incy=1;
30elseif(delta_y ==0) incy=0; /* 水平线 */
31else
32{
33 incy =-1;
34 delta_y =-delta_y;
35}
36if( delta_x > delta_y) distance = delta_x;/*选取基本增量坐标轴 */
37else distance = delta_y;
38for(t =0; t <= distance+1; t++) /* 画线输出 */
39{
40 lcd_drawpoint(uRow, uCol, tftlcd_dev.forecolor);/* 画点 */
41 xerr += delta_x ;
42 yerr += delta_y ;
43if(xerr > distance)
44{
45 xerr -= distance;
46 uRow += incx;
47}
48if(yerr > distance)
49{
50 yerr -= distance;
51 uCol += incy;
52}
53}
54}
55
56/*
57 * @description : 画矩形函数
58 * @param - x1 : 矩形坐上角坐标X轴
59 * @param - y1 : 矩形坐上角坐标Y轴
60 * @param - x2 : 矩形右下角坐标X轴
61 * @param - y2 : 矩形右下角坐标Y轴
62 * @return : 无
63 */
64void lcd_draw_rectangle(unsignedshort x1,unsignedshort y1,
unsignedshort x2,unsignedshort y2)
65{
66 lcd_drawline(x1, y1, x2, y1);
67 lcd_drawline(x1, y1, x1, y2);
68 lcd_drawline(x1, y2, x2, y2);
69 lcd_drawline(x2, y1, x2, y2);
70}
71
72/*
73 * @description : 在指定位置画一个指定大小的圆
74 * @param - x0 : 圆心坐标X轴
75 * @param - y0 : 圆心坐标Y轴
76 * @param - y2 : 圆形半径
77 * @return : 无
78 */
79void lcd_draw_circle(unsignedshort x0,unsignedshort y0,
unsignedchar r)
80{
81int mx = x0, my = y0;
82int x =0, y = r;
83
84int d =1- r;
85while(y > x)/* y>x即第一象限的第1区八分圆 */
86{
87 lcd_drawpoint(x + mx, y + my, tftlcd_dev.forecolor);
88 lcd_drawpoint(y + mx, x + my, tftlcd_dev.forecolor);
89 lcd_drawpoint(-x + mx, y + my, tftlcd_dev.forecolor);
90 lcd_drawpoint(-y + mx, x + my, tftlcd_dev.forecolor);
91
92 lcd_drawpoint(-x + mx,-y + my, tftlcd_dev.forecolor);
93 lcd_drawpoint(-y + mx,-x + my, tftlcd_dev.forecolor);
94 lcd_drawpoint(x + mx,-y + my, tftlcd_dev.forecolor);
95 lcd_drawpoint(y + mx,-x + my, tftlcd_dev.forecolor);
96if( d <0)
97{
98 d = d +2* x +3;
99}
100else
101{
102 d= d +2*(x - y)+5;
103 y--;
104}
105 x++;
106}
107}
108
109/*
110 * @description : 在指定位置显示一个字符
111 * @param - x : 起始坐标X轴
112 * @param - y : 起始坐标Y轴
113 * @param - num : 显示字符
114 * @param – size : 字体大小, 可选12/16/24/32
115 * @param – mode : 叠加方式(1)还是非叠加方式(0)
116 * @return : 无
117 */
118void lcd_showchar(unsignedshort x,unsignedshort y,
119unsignedchar num,unsignedchar size,
120unsignedchar mode)
121{
122unsignedchar temp, t1, t;
123unsignedshort y0 = y;
/* 得到字体一个字符对应点阵集所占的字节数 */
124unsignedchar csize =(size /8+((size %8)?1:0))*
(size /2);
125 num = num -' ';/* 得到偏移后的值(ASCII字库是从空格开始取模,
所以-' '就是对应字符的字库) */
126for(t =0; t < csize; t++)
127{
128if(size ==12) temp = asc2_1206[num][t];/* 调用1206字体 */
129elseif(size ==16)temp = asc2_1608[num][t];/* 调用1608字体 */
130elseif(size ==24)temp = asc2_2412[num][t];/* 调用2412字体 */
131elseif(size ==32)temp = asc2_3216[num][t];/* 调用3216字体 */
132elsereturn;/* 没有的字库 */
133for(t1 =0; t1 <8; t1++)
134{
135if(temp &0x80)lcd_drawpoint(x, y, tftlcd_dev.forecolor);
136elseif(mode==0)lcd_drawpoint(x, y,
tftlcd_dev.backcolor);
137 temp <<=1;
138 y++;
139if(y >= tftlcd_dev.height)return;/* 超区域了 */
140if((y - y0)== size)
141{
142 y = y0;
143 x++;
144if(x >= tftlcd_dev.width)return;/* 超区域了 */
145break;
146}
147}
148}
149}
150
151/*
152 * @description : 计算m的n次方
153 * @param - m : 要计算的值
154 * @param - n : n次方
155 * @return : m^n次方.
156 */
157unsignedint lcd_pow(unsignedchar m,unsignedchar n)
158{
159unsignedint result =1;
160while(n--) result *= m;
161return result;
162}
163
164/*
165 * @description : 显示指定的数字,高位为0的话不显示
166 * @param - x : 起始坐标点X轴。
167 * @param - y : 起始坐标点Y轴。
168 * @param - num : 数值(0~999999999)。
169 * @param - len : 数字位数。
170 * @param – size : 字体大小
171 * @return : 无
172 */
173void lcd_shownum(unsignedshort x,
174unsignedshort y,
175unsignedint num,
176unsignedchar len,
177unsignedchar size)
178{
179unsignedchar t, temp;
180unsignedchar enshow =0;
181for(t =0; t < len; t++)
182{
183 temp =(num / lcd_pow(10, len - t -1))%10;
184if(enshow ==0&& t len -1))
185{
186if(temp ==0)
187{
188 lcd_showchar(x +(size /2)* t, y,' ', size,0);
189continue;
190}else enshow =1;
191}
192 lcd_showchar(x +(size /2)* t, y, temp +'0', size,0);
193}
194}
195
196/*
197 * @description : 显示指定的数字,高位为0,还是显示
198 * @param - x : 起始坐标点X轴。
199 * @param - y : 起始坐标点Y轴。
200 * @param - num : 数值(0~999999999)。
201 * @param - len : 数字位数。
202 * @param - size : 字体大小
203 * @param - mode : [7]:0,不填充;1,填充0.
204 * [6:1]:保留
205 * [0]:0,非叠加显示;1,叠加显示.
206 * @return : 无
207 */
208void lcd_showxnum(unsignedshort x,unsignedshort y,
209unsignedint num,unsignedchar len,
210unsignedchar size,unsignedchar mode)
211{
212unsignedchar t, temp;
213unsignedchar enshow =0;
214for(t =0; t < len; t++)
215{
216 temp =(num / lcd_pow(10, len - t-1))%10;
217if(enshow ==0&& t len -1))
218{
219if(temp ==0)
220{
221if(mode &0X80) lcd_showchar(x +(size /2)* t, y,
'0', size, mode &0X01);
222else lcd_showchar(x +(size /2)* t, y ,' ', size,
mode &0X01);
223continue;
224}else enshow=1;
225
226}
227 lcd_showchar( x +(size /2)* t, y, temp +'0', size ,
mode &0X01);
228}
229}
230
231/*
232 * @description : 显示一串字符串
233 * @param - x : 起始坐标点X轴。
234 * @param - y : 起始坐标点Y轴。
235 * @param - width : 字符串显示区域长度
236 * @param - height : 字符串显示区域高度
237 * @param - size : 字体大小
238 * @param - p : 要显示的字符串首地址
239 * @return : 无
240 */
241void lcd_show_string(unsignedshort x,unsignedshort y,
242unsignedshort width,unsignedshort height,
243unsignedchar size,char*p)
244{
245unsignedchar x0 = x;
246 width += x;
247 height += y;
248while((*p <='~')&&(*p >=' '))/* 判断是不是非法字符! */
249{
250if(x >= width){x = x0; y += size;}
251if(y >= height)break; /* 退出 */
252 lcd_showchar(x, y,*p , size,0);
253 x += size /2;
254 p++;
255}
256}
文件bsp_lcdapi.h里面都是一些LCD的API操作函数,比如画线、画矩形、画圆、显示数字、显示字符和字符串等函数。这些函数都是从STM32例程里面移植过来的,如果学习过ALIENTEK的STM32教程的话就会很熟悉,都是一些纯软件的东西。
lcd_showchar函数是字符显示函数,要理解这个函数就得先了解一下字符(ASCII字符集)在LCD上的显示原理。要显示字符,我们先要有字符的点阵数据,ASCII常用的字符集总共有95个,从空格符开始,分别为:!"#$%&'()*+,-0123456789:;<=>?@ABCDEFGHIJKLMNOPQR
STUVWXYZ[]^_`abcdefghijklmnopqrstuvwxyz{|}~.
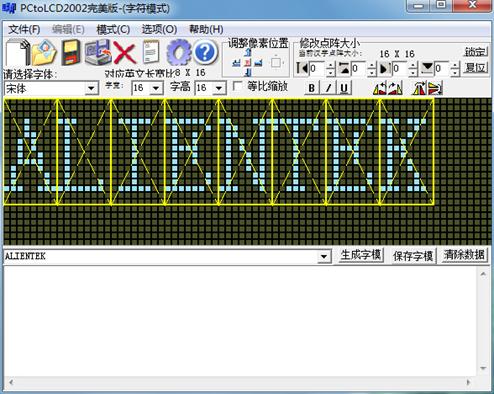
我们先要得到这个字符集的点阵数据,这里我们介绍一个款很好的字符提取软件:PCtoLCD2002完美版。该软件可以提供各种字符,包括汉字(字体和大小都可以自己设置)阵提取,且取模方式可以设置好几种,常用的取模方式,该软件都支持。该软件还支持图形模式,也就是用户可以自己定义图片的大小,然后画图,根据所画的图形再生成点阵数据,这功能在制作图标或图片的时候很有用。
该软件的界面如图24.3.1所示:

图24.3.1 PCtoLCD2002软件界面
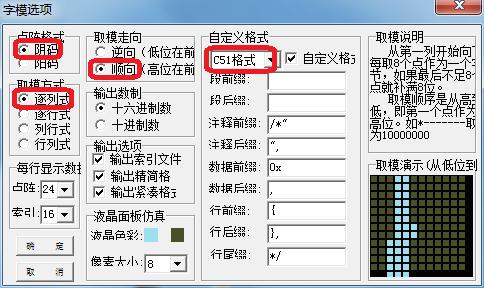
然后我们点击字模选项按钮进入字模选项设置界面。设置界面中点阵格式和取模方式等参数配置如图24.3.2所示:

图24.3.2 设置取模方式
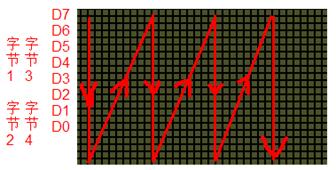
上图设置的取模方式,在右上角的取模说明里面有,即:从第一列开始向下每取8个点作为一个字节,如果最后不足8个点就补满8位。取模顺序是从高到低,即第一个点作为最高位。如*-------取为10000000。其实就是按如图24.3.3所示的这种方式:

图24.3.3 取模方式图解
从上到下,从左到右,高位在前。我们按这样的取模方式,然后把ASCII字符集按12*6大小、16*8、24*12和32*16大小取模出来(对应汉字大小为12*12、16*16、24*24和32*32,字符的只有汉字的一半大!)。将取出的点阵数组保存在font.h里面,每个12*6的字符占用12个字节,每个16*8的字符占用16个字节,每个24*12的字符占用36个字节,每个32*16的字符占用64个字节。font.h中的字符集点阵数据数组asc2_1206、asc2_1608、asc2_2412和asc2_3216就对应着这四个大小字符集,具体见font.h部分代码(该部分我们不再这里列出来了,请大家参考光盘里面的代码)。
最后在main.c中输入如下所示内容:
示例代码24.3.5main.c文件代码
/**************************************************************
Copyright © zuozhongkai Co., Ltd. 1998-2019. All rights reserved.
文件名 : mian.c
作者 : 左忠凯
版本 : V1.0
描述 : I.MX6U开发板裸机实验16 LCD液晶屏实验
其他 : 本实验学习如何在I.MX6U上驱动RGB LCD液晶屏幕,I.MX6U有个
ELCDIF接口,通过此接口可以连接一个RGB LCD液晶屏。
论坛 : www.openedv.com
日志 : 初版V1.0 2019/1/15 左忠凯创建
**************************************************************/
1 #include "bsp_clk.h"
2 #include "bsp_delay.h"
3 #include "bsp_led.h"
4 #include "bsp_beep.h"
5 #include "bsp_key.h"
6 #include "bsp_int.h"
7 #include "bsp_uart.h"
8 #include "stdio.h"
9 #include "bsp_lcd.h"
10 #include "bsp_lcdapi.h"
11
12
13/* 背景颜色数组 */
14unsignedint backcolor[10]={
15 LCD_BLUE, LCD_GREEN, LCD_RED, LCD_CYAN, LCD_YELLOW,
16 LCD_LIGHTBLUE, LCD_DARKBLUE, LCD_WHITE, LCD_BLACK, LCD_ORANGE
17
18};
19
20/*
21 * @description : main函数
22 * @param : 无
23 * @return : 无
24 */
25int main(void)
26{
27 unsignedchar index =0;
28 unsignedchar state = OFF;
29
30 int_init(); /* 初始化中断(一定要最先调用!) */
31 imx6u_clkinit(); /* 初始化系统时钟 */
32 delay_init(); /* 初始化延时 */
33 clk_enable(); /* 使能所有的时钟 */
34 led_init(); /* 初始化led */
35 beep_init(); /* 初始化beep */
36 uart_init(); /* 初始化串口,波特率115200 */
37 lcd_init(); /* 初始化LCD */
38
39 tftlcd_dev.forecolor = LCD_RED;
40 lcd_show_string(10,10,400,32,32,(char*)"ALPHA-IMX6UL
ELCD TEST");
41 lcd_draw_rectangle(10,52,1014,290); /* 绘制矩形框 */
42 lcd_drawline(10,52,1014,290); /* 绘制线条 */
43 lcd_drawline(10,290,1014,52); /* 绘制线条 */
44 lcd_draw_Circle(512,171,119); /* 绘制圆形 */
45
46 while(1)
47 {
48 index++;
49 if(index ==10) index =0;
50 lcd_fill(0,300,1023,599, backcolor[index]);
51 lcd_show_string(800,10,240,32,32,(char*)"INDEX=");
52 lcd_shownum(896,10, index,2,32);/* 显示数字,叠加显示 */
53
54 state =!state;
55 led_switch(LED0,state);
56 delayms(1000); /* 延时一秒 */
57 }
58 return0;
59}
第37行调用函数lcd_init初始化LCD。
第39行设置前景色,也就是画笔颜色为红色。
第40~44行都是调用bsp_lcdapi.c中的API函数在LCD上绘制各种图形和显示字符串。
第46行的while循环中每隔1S中就调用函数lcd_fill填充指定的区域,并且显示index值。
main函数很简单,重点就是初始化LCD,然后调用LCD的API函数进行一些常用的操作,比如画线、画矩形、显示字符串和数字等等。
24.4 编译下载验证
24.4.1 编写Makefile和链接脚本
修改Makefile中的TARGET为lcd,然后在在INCDIRS和SRCDIRS中加入“bsp/lcd”,修改后的Makefile如下:
示例代码19.4.1 Makefile代码
1 CROSS_COMPILE ?= arm-linux-gnueabihf-
2 TARGET ?=lcd
3
4/* 省略掉其它代码...... */
5
6 INCDIRS := imx6ul
7 stdio/include
8 bsp/clk
9 bsp/led
10 bsp/delay
11 bsp/beep
12 bsp/gpio
13 bsp/key
14 bsp/exit
15 bsp/int
16 bsp/epittimer
17 bsp/keyfilter
18 bsp/uart
19 bsp/lcd
20
21 SRCDIRS := project
22 stdio/lib
23 bsp/clk
24 bsp/led
25 bsp/delay
26 bsp/beep
27 bsp/gpio
28 bsp/key
29 bsp/exit
30 bsp/int
31 bsp/epittimer
32 bsp/keyfilter
33 bsp/uart
34 bsp/lcd
35
36/* 省略掉其它代码...... */
37
38 clean:
39 rm -rf $(TARGET).elf $(TARGET).dis $(TARGET).bin $(COBJS)$(SOBJS)
第2行修改变量TARGET为“lcd”,也就是目标名称为“lcd”。
第19行在变量INCDIRS中添加RGB LCD驱动头文件(.h)路径。
第34行在变量SRCDIRS中添加RGB LCD驱动驱动文件(.c)路径。
链接脚本保持不变。
24.4.2编译下载
使用Make命令编译代码,编译成功以后使用软件imxdownload将编译完成的lcd.bin文件下载到SD卡中,命令如下:
chmod 777 imxdownload //给予imxdownload可执行权限,一次即可
./imxdownload lcd.bin /dev/sdd //烧写到SD卡中
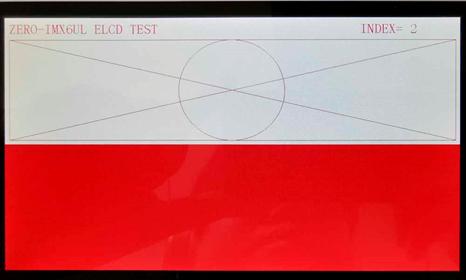
烧写成功以后将SD卡插到开发板的SD卡槽中,然后复位开发板。程序开始运行,LED0每隔1S闪烁依次,屏幕下半部分会每1S刷新依次,并且在屏幕的右上角显示索引值,LCD屏幕显示如图24.4.3所示

最后
以上就是甜蜜皮卡丘最近收集整理的关于韦东山 IMX6ULL和正点原子_「正点原子Linux连载」 第二十四章RGBLCD显示实验(二)...的全部内容,更多相关韦东山内容请搜索靠谱客的其他文章。


发表评论 取消回复