一、基本框架分析
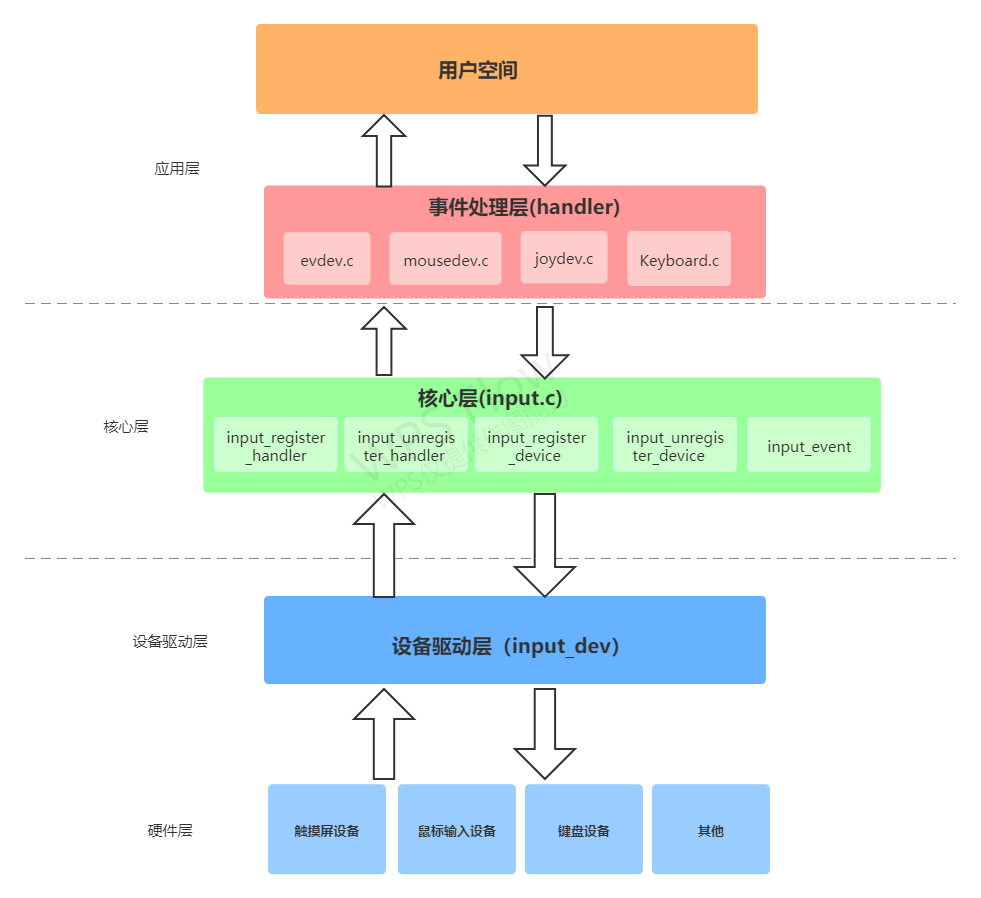
输入子系统主要由三部分构成: 核心层(input.c)、事件处理层(evdev.c, joydev.c, mousedev.c 等等)、设备驱动层(具体硬件设备相关的驱动,比如按键驱动,触摸屏驱动等等 )

一个输入事件从产生到应用捕获的流程是: 产生事件(鼠标移动,触摸点击,按键等) -> 设备驱动捕获事件(通过硬件中断响应) , 上报事件(input_evnet) -> 事件处理层获取到事件, 上报用户 -> 用户获取事件进行逻辑处理。
事件处理层和设备层通过中间核心层接口进行注册和匹配,一个设备驱动可以匹配到多个事件处理层,产生的事件会上报到匹配到的事件处理层。
1、核心层 - input.c
这一层是linux内核实现的的一些通用的接口,可以向事件处理层和设备驱动层提供一些公用函数
- input_register_handler /input_unregister_handler -> 向事件处理层提供注册/释放一个hander的接口
- input_register_device /input_unregister_device -> 向设备驱动层提供注册/释放设备的接口(设备驱动程序会用到这两个接口来注册input设备)
- input_register_handle/input_unregister_handle -> 设备和事件匹配成功后会注册一个handle,通过这个handle来绑定上面的handler和device
- input_event -> 上报一个输入事件,由device驱动层调用上报到应用端去处理(设备驱动程序会调用该接口来上报事件,比如按键,鼠标等等)
以上就是input 子系统常用的接口,更多接口可阅读源码(driverinputinput.c)
2、事件处理层 - input_handler
这一层一般也是内核自己写好几个典型的事件处理驱动,比如 evdev.c, joydev.c,mousedev.c,keyboard.c. 调用 input_register_handler 来注册一个handler,注册handler的时候会去查找有没有匹配的device, 如果匹配成功, handler.connect 函数就会被调用。系统实现的这些事件处理驱动就够用了,不需要自己再去添加。input_handler的结构如下:
struct input_handler {

	void *private;

	void (*event)(struct input_handle *handle, unsigned int type, unsigned int code, int value);
	void (*events)(struct input_handle *handle,
		       const struct input_value *vals, unsigned int count);
	bool (*filter)(struct input_handle *handle, unsigned int type, unsigned int code, int value);
	bool (*match)(struct input_handler *handler, struct input_dev *dev);
	int (*connect)(struct input_handler *handler, struct input_dev *dev, const struct input_device_id *id);
	void (*disconnect)(struct input_handle *handle);
	void (*start)(struct input_handle *handle);

	bool legacy_minors;
	int minor;
	const char *name;

	const struct input_device_id *id_table;

	struct list_head	h_list;
	struct list_head	node;
};
3、设备驱动层 - input_device
这一层就是具体的驱动程序,这一层就是需要我们自己来实现的。我们先分配一个input_dev结构指针,然后可以调用input_register_device 函数来注册一个input_device,同时在注册的时候也会去扫描有没有匹配的handler, 如果有匹配的,handler.connect 就会被调用。注册一个input device的具体步骤如下:
- 分配一个input_dev -- input_allocate_device
- 初始化input_dev成员变量
- 做一些硬件相关的操作,比如中断申请等
- 注册一个input_dev -- input_register_device
4、input_dev、input_handler 以及 input_handle之间的关系
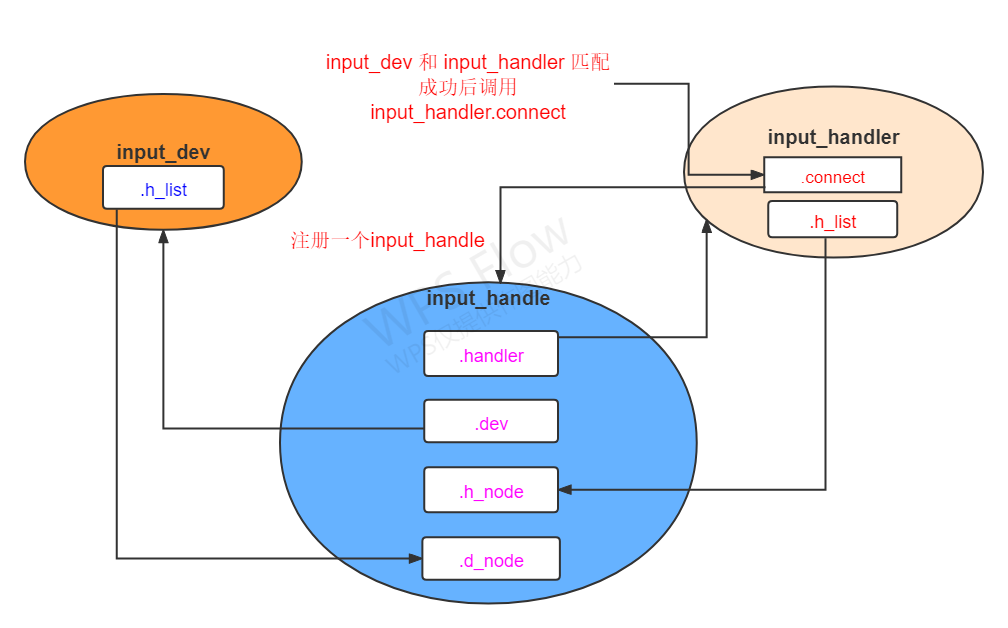
依赖关系图如下:

注册input_handler的时候会去扫描input_dev_list 链表中有没有匹配的input_dev。同时在注册input_dev的时候也会去扫描input_handler_list 链表查找是否有与之匹配的input_handler 。如果input_device 和 input_handler有匹配成功的,input_handler ->connect函数就会调用。
connect 函数里面会为input_device 分配一个minor(次设备号),并且注册一个handle,将input_dev 和 input_handler 地址分别赋值给 handle.dev 和 handle.handler,通过一个handle将input_dev和input_handler 绑定起来。
input_register_handle 调用时,将handle->d_node 添加到 input_dev->h_list, 将handle->h_node 添加到input_handler->h_list中,这样在input_dev中就能通过input_dev->h_list 找到input_handle, 然后根据input_handle->handler成员找到对应的事件处理层。同理也可以通过input_handler ->h_list 找到input_handle, 然后再通过input_handle->dev 成员找到对应的input_dev。至此input_dev和input_handler就能通过一个input_handle 一一对应起来。设备和事件处理层就连同通了,事件处理层上面的就是用户层。input_register_handle源码如下:
/**
 * input_register_handle - register a new input handle
 * @handle: handle to register
 *
 * This function puts a new input handle onto device's
 * and handler's lists so that events can flow through
 * it once it is opened using input_open_device().
 *
 * This function is supposed to be called from handler's
 * connect() method.
 */
int input_register_handle(struct input_handle *handle)
{
	struct input_handler *handler = handle->handler;
	struct input_dev *dev = handle->dev;
	int error;

	/*
	 * We take dev->mutex here to prevent race with
	 * input_release_device().
	 */
	error = mutex_lock_interruptible(&dev->mutex);
	if (error)
		return error;

	/*
	 * Filters go to the head of the list, normal handlers
	 * to the tail.
	 */
	if (handler->filter)
		list_add_rcu(&handle->d_node, &dev->h_list);
	else
		list_add_tail_rcu(&handle->d_node, &dev->h_list);

	mutex_unlock(&dev->mutex);

	/*
	 * Since we are supposed to be called from ->connect()
	 * which is mutually exclusive with ->disconnect()
	 * we can't be racing with input_unregister_handle()
	 * and so separate lock is not needed here.
	 */
	list_add_tail_rcu(&handle->h_node, &handler->h_list);

	if (handler->start)
		handler->start(handle);

	return 0;
}
二、 基于input子系统实现的按键驱动实例
这个实例是基于 imx6ull 开发板, Linux4.9.80 内核实现的, 代码如下:
#include <linux/device.h>
#include <linux/input.h>
#include <linux/interrupt.h>
#include <linux/module.h>
#include <linux/timer.h>

#include <linux/poll.h>
#include <linux/fs.h>
#include <linux/errno.h>
#include <linux/miscdevice.h>
#include <linux/kernel.h>
#include <linux/major.h>
#include <linux/mutex.h>
#include <linux/proc_fs.h>
#include <linux/seq_file.h>
#include <linux/stat.h>
#include <linux/init.h>
#include <linux/device.h>
#include <linux/tty.h>
#include <linux/kmod.h>
#include <linux/gfp.h>
#include <linux/platform_device.h>
#include <linux/of_gpio.h>
#include <linux/of_irq.h>
#include <linux/interrupt.h>
#include <linux/irq.h>
#include <linux/slab.h>
#include <linux/fcntl.h>
#include <asm/current.h>
#include <asm/io.h>


static struct input_dev *input_key_dev;

struct input_gpio_key{
	int m_gpio;   //引脚号
	struct gpio_desc * m_gpiod;
	int m_irq;
	int m_flag;
	int m_code;
	struct timer_list m_timer;
} ;

static struct input_gpio_key * input_keys_gpio;

static irqreturn_t input_key_irq(int irq, void *dev_id)
{
     struct input_gpio_key * key_desc = (struct input_gpio_key *)dev_id;
	 printk(KERN_INFO "irq:key_desc->m_code=%dn", key_desc->m_code);
     mod_timer(&key_desc->m_timer, jiffies+HZ/100);
     return IRQ_RETVAL(IRQ_HANDLED);
}


void  input_key_timer_fn(unsigned long  arg)
{
	int val;
	struct input_gpio_key * key_desc = (struct input_gpio_key *)arg;
	val = gpiod_get_value(key_desc->m_gpiod);

	/* 上报按键值 0: 按下 1: 抬起     */
	input_report_key(input_key_dev, key_desc->m_code, val);
    input_sync(input_key_dev);

}

static int input_key_probe(struct platform_device *pdev)
{
	int retval = 0;
	int  err, i;
	int count;
	enum of_gpio_flags flags;
	struct device_node * node = pdev->dev.of_node;
	count = of_gpio_count(node); 						//获取设备节点下 gpios属性有几个gpio
	if(!count){
		retval = -1;
		goto exit_entry;
	}
	input_keys_gpio = kmalloc(sizeof(struct input_gpio_key) * count, GFP_KERNEL);
	if(!input_keys_gpio){
		retval = -1;
		goto exit_entry;
	}
	for(i = 0; i < count; i++){
		input_keys_gpio[i].m_gpio = of_get_gpio_flags(node, i, &flags);
		input_keys_gpio[i].m_gpiod = gpio_to_desc(input_keys_gpio[i].m_gpio); //根据gpio引脚转换成gpio desc
		input_keys_gpio[i].m_irq = gpiod_to_irq(input_keys_gpio[i].m_gpiod);  //获取gpio中断号
		input_keys_gpio[i].m_flag = flags & OF_GPIO_ACTIVE_LOW;       //只获取低电平触发中断的标志
		input_keys_gpio[i].m_code = KEY_1+i;  //user key1,2
		setup_timer(&input_keys_gpio[i].m_timer, input_key_timer_fn, (unsigned long)&input_keys_gpio[i]);
		add_timer(&input_keys_gpio[i].m_timer);
	}

	//申请中断
	for(i = 0; i < count; i++){
		err = request_irq(input_keys_gpio[i].m_irq, input_key_irq, IRQF_TRIGGER_RISING | IRQF_TRIGGER_FALLING, "input_gpio_key", &input_keys_gpio[i]);
	}

	input_key_dev = input_allocate_device(); //分配一个 input_dev 结构体
	if(input_key_dev == NULL){
		printk(KERN_ERR "input_allocate_device filed");
		retval = -1;
		goto exit_entry;
	}
	input_key_dev->name = "input_key_dev";

	//设置支持的输入事件类型
	set_bit(EV_KEY, input_key_dev->evbit);
	//set_bit(EV_LED, input_key_dev->evbit);

	//设置key支持的事件码(支持哪些按键)
	set_bit(KEY_1, input_key_dev->keybit);
	set_bit(KEY_2, input_key_dev->keybit);


	//注册一个输入设备
	retval = input_register_device(input_key_dev);

exit_entry:
	return retval;
}

static int input_key_remove(struct platform_device *pdev)
{
	int retval = 0;
	int count, i;

	count = of_gpio_count(pdev->dev.of_node);
	for(i = 0 ; i < count; i++){
		free_irq(input_keys_gpio[i].m_irq, &input_keys_gpio[i]);
		del_timer(&input_keys_gpio[i].m_timer);
	}
	kfree(input_keys_gpio);

	if(input_key_dev != NULL){
		input_unregister_device(input_key_dev);
		input_free_device(input_key_dev);
		input_key_dev = NULL;
	}

	return retval;
}


static const struct of_device_id	input_key_table[] = {
	{.compatible = "100ask,gpio_key"},
	{ },
};


static struct platform_driver input_key_driver = {
	.probe		= input_key_probe,
	.remove		= input_key_remove,
	.driver		= {
		.name	= "InputKey",    //会根据这个名字去匹配device
		.of_match_table = input_key_table,
	},
};

static int __init input_key_init(void)
{
	platform_driver_register(&input_key_driver);  //注册platfrom 驱动
	return 0;
}


static void __exit input_key_exit(void)
{
	platform_driver_unregister(&input_key_driver);
}


module_init(input_key_init);
module_exit(input_key_exit);
MODULE_LICENSE("GPL");
最后
以上就是鲤鱼嚓茶最近收集整理的关于Linux Input 子系统一、基本框架分析二、 基于input子系统实现的按键驱动实例的全部内容,更多相关Linux内容请搜索靠谱客的其他文章。


发表评论 取消回复