目录
1、Operations
1.1、file operation
1.2、tty operations
1.3、tty_ldisc_ops
1.4、uart_ops
2、Open 流程
3、Write 流程
3.1、tty_write
3.2、n_tty_write
3.3、uart_write
3.4、start_tx
4、Read 流程
4.1、tty_read
4.2、n_tty_read
4.3、数据来自中断
在上一章节中,从芯片对接 Kernel 的角度上来描述了我们需要设计和实现的结构以及调用的接口,这些毕竟是最底层的内容,Linux Kernel 中,串口驱动的代码,将它们注册进了 tty 核心层,本文从应用的角度上来说明 tty 层是如何起到上面对应应用程序,下面对接到实际的串口驱动的。内容涉及到 tty core 层以及 tty 线路规程部分。
在 Linux UART 驱动 Part-1 (底层对接)小节中,我们知道了一下几点,先来回顾一下:
1、芯片厂家需要实现的内容:
A、uart_drvier 结构(一个)
B、uart_port 结构(多个)
C、uart_ops 对串口的操作集(可能一个,可能多个)
2、芯片厂家需要调用的接口:
A、uart_register_driver (一次调用)
B、uart_add_one_port (多次调用)
调用的结果是,配置好了针对芯片的寄存器级的操作集,完成了 uart_driver 对 tty 层的注册;
咱们使用 UART ,但是注册到了 tty 层,因为 tty 不光只有 UART,还有其他的设备,UART 只是 tty 里面的一种;
在注册到 tty 层的时候,注册了字符设备,字符设备的名字就是我们在最底层实现的 uart_driver 中的 dev_name,最后生成的设备节点在 /dev/xxxx,比如:
#define S3C24XX_SERIAL_NAME	"ttySAC"

static struct uart_driver s3c24xx_uart_drv = {
	.owner		= THIS_MODULE,
	.driver_name	= "s3c2410_serial",
	.nr		= CONFIG_SERIAL_SAMSUNG_UARTS,
	.cons		= S3C24XX_SERIAL_CONSOLE,
	.dev_name	= S3C24XX_SERIAL_NAME,
	.major		= S3C24XX_SERIAL_MAJOR,
	.minor		= S3C24XX_SERIAL_MINOR,
};
辣么,设备节点就是 /dev/ttySACn,这里的 n 因为是注册了不止一个,所以后面带来序号;
OK,既然找到了设备节点,那么应用层便可以通过打开设备节点,并对串口做一些配置、读写的操作;这里用户空间的任何 open、write、read 等操作,直接对应到了 tty 层的注册到字符设备的这些 file_operation;整个调用流程的 operation 比较多,这里我们先整理一下,以便清晰的向前进!
1、Operations
1.1、file operation
在 Linux UART 驱动 Part-1 (底层对接)小节中,我们知道了,在底层注册 uart_driver 实例到串口核心层的时候呢,会触及到这样一个流程:
uart_register_driver
|----> tty_register_driver
|----> register_chrdev_region (dev, driver->num, driver->name);
|----> cdev_init (&driver->cdev, &tty_fops);
|----> cdev_add (&driver->cdev, dev, driver->num);
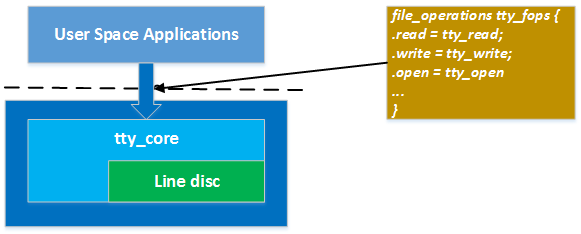
这里,注册的字符设备的操作集为:tty_fops 是一个标准的 file_operations
static const struct file_operations tty_fops = {
    .llseek     = no_llseek,
    .read       = tty_read,
    .write      = tty_write,
    .poll       = tty_poll,
    .unlocked_ioctl = tty_ioctl,
    .compat_ioctl   = tty_compat_ioctl,
    .open       = tty_open,
    .release    = tty_release,
    .fasync     = tty_fasync,
};
所以,用户空间的任何操作,首先对接到的是这个地方,也就是文件 tty_io.c 中的这个操作集!
1.2、tty operations
第二个登场的是 tty_operations,在 Linux UART 驱动 Part-1 (底层对接)小节中,在 serial_core.c 中,分析 uart_register_driver 的时候有:
uart_register_driver
|----> tty_set_operations(normal, &uart_ops);
void tty_set_operations(struct tty_driver *driver,
            const struct tty_operations *op)
{
    driver->ops = op;
};
EXPORT_SYMBOL(tty_set_operations);
这里有一个名为 uart_ops 的 tty_operations:
static const struct tty_operations uart_ops = {
    .open       = uart_open,
    .close      = uart_close,
    .write      = uart_write,
    .put_char   = uart_put_char,
    .flush_chars    = uart_flush_chars,
    .write_room = uart_write_room,
    .chars_in_buffer= uart_chars_in_buffer,
    .flush_buffer   = uart_flush_buffer,
    .ioctl      = uart_ioctl,
    .throttle   = uart_throttle,
    .unthrottle = uart_unthrottle,
    .send_xchar = uart_send_xchar,
    .set_termios    = uart_set_termios,
    .set_ldisc  = uart_set_ldisc,
    .stop       = uart_stop,
    .start      = uart_start,
    .hangup     = uart_hangup,
    .break_ctl  = uart_break_ctl,
    .wait_until_sent= uart_wait_until_sent,
#ifdef CONFIG_PROC_FS
    .proc_fops  = &uart_proc_fops,
#endif
    .tiocmget   = uart_tiocmget,
    .tiocmset   = uart_tiocmset,
    .get_icount = uart_get_icount,
#ifdef CONFIG_CONSOLE_POLL
    .poll_init  = uart_poll_init,
    .poll_get_char  = uart_poll_get_char,
    .poll_put_char  = uart_poll_put_char,
#endif
};
为什么第二个讲这个 operation 呢,因为从应用层调用 open,会走到 1.1 中描述的 tty_fops 然后进而走到这里,打个比如,应用层对设备节点 "/dev/ttySAC0" 设备节点调用 open 的时候,触发的流程如下:
open("/dev/ttySAC0")
|----> tty_fops->tty_open()
static int tty_open(struct inode *inode, struct file *filp)
{
    struct tty_struct *tty = NULL;
    int noctty, retval;
    struct tty_driver *driver;
    int index;
    dev_t device = inode->i_rdev;
    unsigned saved_flags = filp->f_flags;

    nonseekable_open(inode, filp);
..............
    driver = get_tty_driver(device, &index);
..............
    if (tty->ops->open)
        retval = tty->ops->open(tty, filp);
    else
        retval = -ENODEV;
    filp->f_flags = saved_flags;
..............
}
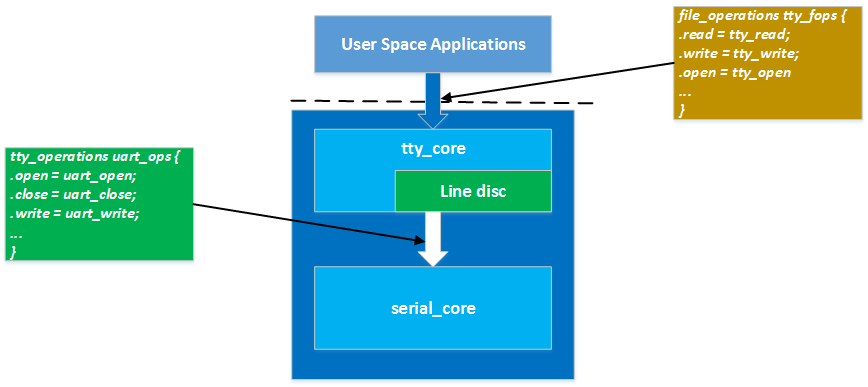
这里调用的 tty->ops->open(tty, filp); 其实就是调用到了 struct tty_operations uart_ops 中的 uart_open
这里调用的 tty_struct 的 ops,其实是在 tty_open 的时候,进行 tty_driver ops 到 tty_struct ops 的赋值,在 tty_open 的时候:
static int tty_open(struct inode *inode, struct file *filp)
{
.............
    if (tty) {
        retval = tty_reopen(tty);
        if (retval)
            tty = ERR_PTR(retval);
    } else
        tty = tty_init_dev(driver, index, 0);
..............

    if (tty->ops->open)
        retval = tty->ops->open(tty, filp);
    else
        retval = -ENODEV;
    filp->f_flags = saved_flags;
..............
}
走到 tty_init_dev 调用:
struct tty_struct *tty_init_dev(struct tty_driver *driver, int idx,
                                int first_ok)
{
    struct tty_struct *tty;
    int retval;

.............
    if (!try_module_get(driver->owner))
        return ERR_PTR(-ENODEV);

    tty = alloc_tty_struct();
    if (!tty) {
        retval = -ENOMEM;
        goto err_module_put;
    }
    initialize_tty_struct(tty, driver, idx);

    retval = tty_driver_install_tty(driver, tty);
    if (retval < 0)
        goto err_deinit_tty;

    retval = tty_ldisc_setup(tty, tty->link);
    if (retval)
        goto err_release_tty;
    return tty;
.............
    return ERR_PTR(retval);
}
分别调用了
alloc_tty_struct 分配 tty_struct
initialize_tty_struct 初始化 tty_struct:
void initialize_tty_struct(struct tty_struct *tty,
        struct tty_driver *driver, int idx)
{
    memset(tty, 0, sizeof(struct tty_struct));
    kref_init(&tty->kref);
    tty->magic = TTY_MAGIC;
    tty_ldisc_init(tty);
    tty->session = NULL;
............
    tty->driver = driver;
    tty->ops = driver->ops;
    tty->index = idx;
    tty_line_name(driver, idx, tty->name);
    tty->dev = tty_get_device(tty);
}
这里完成了 driver->ops 到这个 tty_struct ops 的赋值;
接着调用了 tty_ldisc_setup(/drivers/tty/tty_ldisc.c) :
int tty_ldisc_setup(struct tty_struct *tty, struct tty_struct *o_tty)
{
	struct tty_ldisc *ld = tty->ldisc;
	int retval;

	retval = tty_ldisc_open(tty, ld);
	if (retval)
		return retval;

	if (o_tty) {
		retval = tty_ldisc_open(o_tty, o_tty->ldisc);
		if (retval) {
			tty_ldisc_close(tty, ld);
			return retval;
		}
		tty_ldisc_enable(o_tty);
	}
	tty_ldisc_enable(tty);
	return 0;
}
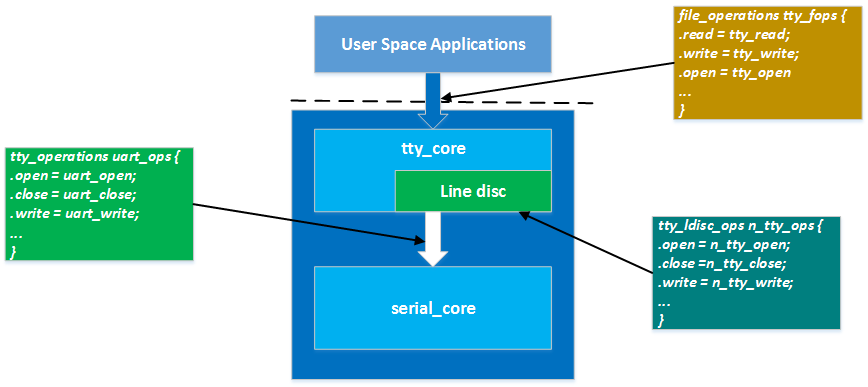
这里调用到了线路规程的 open:
static int tty_ldisc_open(struct tty_struct *tty, struct tty_ldisc *ld)
{
	WARN_ON(test_and_set_bit(TTY_LDISC_OPEN, &tty->flags));
	if (ld->ops->open) {
		int ret;
                /* BTM here locks versus a hangup event */
		WARN_ON(!tty_locked());
		ret = ld->ops->open(tty);
		if (ret)
			clear_bit(TTY_LDISC_OPEN, &tty->flags);
		return ret;
	}
	return 0;
}
1.3、tty_ldisc_ops
上面的这个 ld->ops_open,其实就是调用到了:
static struct tty_ldisc_ops n_tty_ops = {
	.magic           = TTY_LDISC_MAGIC,
	.name            = "n_tty",
	.open            = n_tty_open,
	.close           = n_tty_close,
	.flush_buffer    = n_tty_flush_buffer,
	.read            = n_tty_read,
	.write           = n_tty_write,
	.ioctl           = n_tty_ioctl,
	.set_termios     = n_tty_set_termios,
	.poll            = n_tty_poll,
	.receive_buf     = n_tty_receive_buf,
	.write_wakeup    = n_tty_write_wakeup,
	.receive_buf2	 = n_tty_receive_buf2,
};
中的 n_tty_open 中,N_TTY 这个,在 printk 的 console_init 中,默认进行 n_tty_init(); 调用,默认的初始化了 N_TTY 线路规程
void __init n_tty_init(void)
{
	tty_register_ldisc(N_TTY, &n_tty_ops);
}
1.4、uart_ops
接着看 open 调用,在上面看到了:
tty->ops->open(tty, filp); 其实就是调用到了 struct tty_operations uart_ops 中的 uart_open 了
那么我们来看看 uart_open 的实现:
static int uart_open(struct tty_struct *tty, struct file *filp)
{
    struct uart_driver *drv = (struct uart_driver *)tty->driver->driver_state;
    struct uart_state *state;
    struct tty_port *port;
    int retval, line = tty->index;

    state = uart_get(drv, line);
    if (IS_ERR(state)) {
        retval = PTR_ERR(state);
        goto fail;
    }
    port = &state->port;

    tty->driver_data = state;
    state->uart_port->state = state;
    tty->low_latency = (state->uart_port->flags & UPF_LOW_LATENCY) ? 1 : 0;
    tty->alt_speed = 0;
    tty_port_tty_set(port, tty);

..............
    /*
     * Make sure the device is in D0 state.
     */
    if (port->count == 1)
        uart_change_pm(state, 0);

    retval = uart_startup(tty, state, 0);

    /*
     * If we succeeded, wait until the port is ready.
     */
    mutex_unlock(&port->mutex);
    if (retval == 0)
        retval = tty_port_block_til_ready(port, tty, filp);

fail:
    return retval;
}
调用到 uart_startup:
static int uart_startup(struct tty_struct *tty, struct uart_state *state, int init_hw)
{
    struct uart_port *uport = state->uart_port;
    struct tty_port *port = &state->port;
    unsigned long page;
    int retval = 0;

.........
    if (!state->xmit.buf) {
        /* This is protected by the per port mutex */
        page = get_zeroed_page(GFP_KERNEL);
        if (!page)
            return -ENOMEM;

        state->xmit.buf = (unsigned char *) page;
        uart_circ_clear(&state->xmit);
    }

    retval = uport->ops->startup(uport);
.........
    if (retval && capable(CAP_SYS_ADMIN))
        retval = 0;

    return retval;
}
调用到 uport->ops->startup,也就是对接到最底层的 uart_ops 结构的 startup 调用:
struct uart_ops {
	unsigned int	(*tx_empty)(struct uart_port *);
	void		(*set_mctrl)(struct uart_port *, unsigned int mctrl);
	unsigned int	(*get_mctrl)(struct uart_port *);
	void		(*stop_tx)(struct uart_port *);
	void		(*start_tx)(struct uart_port *);
	void		(*throttle)(struct uart_port *);
	void		(*unthrottle)(struct uart_port *);
	void		(*send_xchar)(struct uart_port *, char ch);
	void		(*stop_rx)(struct uart_port *);
	void		(*enable_ms)(struct uart_port *);
	void		(*break_ctl)(struct uart_port *, int ctl);
	int		(*startup)(struct uart_port *);
	void		(*shutdown)(struct uart_port *);
	void		(*flush_buffer)(struct uart_port *);
	void		(*set_termios)(struct uart_port *, struct ktermios *new,
				       struct ktermios *old);
..................
};
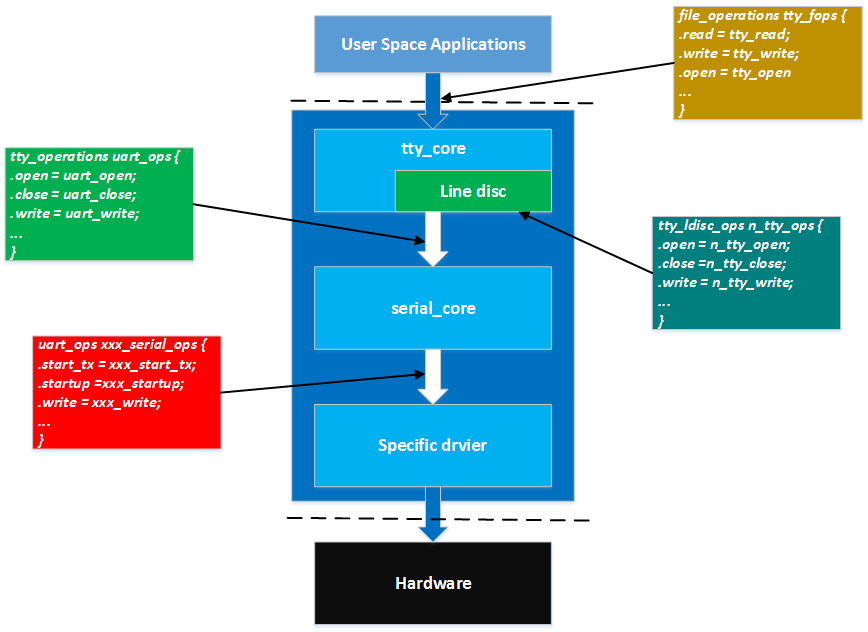
到这里,一个基本的脉络就有点眉目了:
2、Open 流程
在第 1 小结以及分析了一些关于 open 一个串口设备节点的大致流程,从最上层的 open,到 tty core 层的 tty_open,再到 uart_open,n_tty_open,以及最终调用到挂接芯片相关的 startup 函数。这里不在多说,请看上面的流程分析;
3、Write 流程
3.1、tty_write
用户空间打开串口,要往串口写数据,那么就会走到这个 write 流程,当然,还是先对接到了字符设备的 write 的调用,也就是 tty_write:
static ssize_t tty_write(struct file *file, const char __user *buf,
                        size_t count, loff_t *ppos)
{
    struct inode *inode = file->f_path.dentry->d_inode;
    struct tty_struct *tty = file_tty(file);
    struct tty_ldisc *ld;
    ssize_t ret;

    if (tty_paranoia_check(tty, inode, "tty_write"))
        return -EIO;
    if (!tty || !tty->ops->write ||
        (test_bit(TTY_IO_ERROR, &tty->flags)))
            return -EIO;
    /* Short term debug to catch buggy drivers */
    if (tty->ops->write_room == NULL)
        printk(KERN_ERR "tty driver %s lacks a write_room method.n",
            tty->driver->name);
    ld = tty_ldisc_ref_wait(tty);
    if (!ld->ops->write)
        ret = -EIO;
    else
        ret = do_tty_write(ld->ops->write, tty, file, buf, count);
    tty_ldisc_deref(ld);
    return ret;
}tty_write:调用到了 do_tty_write:并且传入的参数是 ld->ops->write,看懂了吧,这个是线路规程 ld 的 ops 那个 write:
do_tty_write(ld->ops->write, tty, file, buf, count);
第一个参数是线路规程的 write,也就是 ld 为 N_TTY 规程的 write,我们来看看 do_tty_write:
static inline ssize_t do_tty_write(
    ssize_t (*write)(struct tty_struct *, struct file *, const unsigned char *, size_t),
    struct tty_struct *tty,
    struct file *file,
    const char __user *buf,
    size_t count)
{
    ssize_t ret, written = 0;
    unsigned int chunk;

    ret = tty_write_lock(tty, file->f_flags & O_NDELAY);
    if (ret < 0)
        return ret;

    chunk = 2048;
    if (test_bit(TTY_NO_WRITE_SPLIT, &tty->flags))
        chunk = 65536;
    if (count < chunk)
        chunk = count;

    /* write_buf/write_cnt is protected by the atomic_write_lock mutex */
    if (tty->write_cnt < chunk) {
        unsigned char *buf_chunk;

        if (chunk < 1024)
            chunk = 1024;

        buf_chunk = kmalloc(chunk, GFP_KERNEL);
        if (!buf_chunk) {
            ret = -ENOMEM;
            goto out;
        }
        kfree(tty->write_buf);
        tty->write_cnt = chunk;
        tty->write_buf = buf_chunk;
    }

    /* Do the write .. */
    for (;;) {
        size_t size = count;
        if (size > chunk)
            size = chunk;
        ret = -EFAULT;
        if (copy_from_user(tty->write_buf, buf, size))
            break;
        ret = write(tty, file, tty->write_buf, size);
        if (ret <= 0)
            break;
        written += ret;
        buf += ret;
        count -= ret;
        if (!count)
            break;
        ret = -ERESTARTSYS;
        if (signal_pending(current))
            break;
        cond_resched();
    }
    if (written) {
        struct inode *inode = file->f_path.dentry->d_inode;
        tty_update_time(&inode->i_mtime);
        ret = written;
    }
out:
    tty_write_unlock(tty);
    return ret;
}
do_tty_write 做了几个事情:
1、首先计算出一个叫做 chunk 的值,这个值用于限制每次最大从用户空间 copy 多少数据到内核空间
2、调用 copy_from_user 循环拷贝用户的 buffer 数据到内裤空间的 tty->write_buf
3、调用 write(ld->ops_write)将数据传递到下一层,也就是线路规程
4、信号处理
5、让出 CPU,下次被调度的时候,继续执行,判断用户需要传输的数据是否传输完毕,未完成,则继续走 2~5 的流程
那么接下来我们要看到 N_TTY 线路规程的 wirte 函数了!
线路规程的 write 是:
struct tty_ldisc_ops tty_ldisc_N_TTY = {
    .magic           = TTY_LDISC_MAGIC,
    .name            = "n_tty",
....
    .write           = n_tty_write,
....
};
3.2、n_tty_write
n_tty_write:的实现如下所示:
static ssize_t n_tty_write(struct tty_struct *tty, struct file *file,
               const unsigned char *buf, size_t nr)
{
    const unsigned char *b = buf;
    DECLARE_WAITQUEUE(wait, current);
    int c;
    ssize_t retval = 0;

    /* Job control check -- must be done at start (POSIX.1 7.1.1.4). */
    if (L_TOSTOP(tty) && file->f_op->write != redirected_tty_write) {
        retval = tty_check_change(tty);
        if (retval)
            return retval;
    }

    /* Write out any echoed characters that are still pending */
    process_echoes(tty);

    add_wait_queue(&tty->write_wait, &wait);
    while (1) {
        set_current_state(TASK_INTERRUPTIBLE);
        if (signal_pending(current)) {
            retval = -ERESTARTSYS;
            break;
        }
        if (tty_hung_up_p(file) || (tty->link && !tty->link->count)) {
            retval = -EIO;
            break;
        }
        if (O_OPOST(tty) && !(test_bit(TTY_HW_COOK_OUT, &tty->flags))) {
            while (nr > 0) {
                ssize_t num = process_output_block(tty, b, nr);
                if (num < 0) {
                    if (num == -EAGAIN)
                        break;
                    retval = num;
                    goto break_out;
                }
                b += num;
                nr -= num;
                if (nr == 0)
                    break;
                c = *b;
                if (process_output(c, tty) < 0)
                    break;
                b++; nr--;
            }
            if (tty->ops->flush_chars)
                tty->ops->flush_chars(tty);
        } else {
            while (nr > 0) {
                c = tty->ops->write(tty, b, nr);
                if (c < 0) {
                    retval = c;
                    goto break_out;
                }
                if (!c)
                    break;
                b += c;
                nr -= c;
            }
        }
        if (!nr)
            break;
        if (file->f_flags & O_NONBLOCK) {
            retval = -EAGAIN;
            break;
        }
        schedule();
    }
break_out:
    __set_current_state(TASK_RUNNING);
    remove_wait_queue(&tty->write_wait, &wait);
    if (b - buf != nr && tty->fasync)
        set_bit(TTY_DO_WRITE_WAKEUP, &tty->flags);
    return (b - buf) ? b - buf : retval;
}
在 n_tty_write 中:
1、定义了等待队列,并且设置了当前进程为 TASK_INTERRUPTIBLE 类型(可打断),可以等待被调度;
2、调用 tty->ops->write(tty, b, nr); 进行循环写入
3、调用 schedule(); 允许 CPU 调度其他进程
tty->ops->write(tty, b, nr); 其实是调用到了 tty core 层的 uart_write
3.3、uart_write
uart_write 的实现为:
static int uart_write(struct tty_struct *tty,
                    const unsigned char *buf, int count)
{
    struct uart_state *state = tty->driver_data;
    struct uart_port *port;
    struct circ_buf *circ;
    unsigned long flags;
    int c, ret = 0;

    /*
     * This means you called this function _after_ the port was
     * closed.  No cookie for you.
     */
    if (!state) {
        WARN_ON(1);
        return -EL3HLT;
    }

    port = state->uart_port;
    circ = &state->xmit;

    if (!circ->buf)
        return 0;

    spin_lock_irqsave(&port->lock, flags);
    while (1) {
        c = CIRC_SPACE_TO_END(circ->head, circ->tail, UART_XMIT_SIZE);
        if (count < c)
            c = count;
        if (c <= 0)
            break;
        memcpy(circ->buf + circ->head, buf, c);
        circ->head = (circ->head + c) & (UART_XMIT_SIZE - 1);
        buf += c;
        count -= c;
        ret += c;
    }
    spin_unlock_irqrestore(&port->lock, flags);

    uart_start(tty);
    return ret;
}
在 uart_write 中:
1、首先获取到了这个对应串口的 uart_state 结构
2、获取 state->xmit 的环形 buffer
3、Check 当前环形 buffer 的剩余量 c,并确定将数据 copy 到 state->xmit 的环形 buffer 中
4、调用 uart_start 启动发送
这里说明一下这个 state->xmit 的环形 buffer,在 open 串口设备节点的时候调用到 serial_core.c 中的 uart_startup:
static int uart_startup(struct tty_struct *tty, struct uart_state *state, int init_hw)
{
    struct uart_port *uport = state->uart_port;
    struct tty_port *port = &state->port;
    unsigned long page;
    int retval = 0;
....
    /*
     * Initialise and allocate the transmit and temporary
     * buffer.
     */
    if (!state->xmit.buf) {
        /* This is protected by the per port mutex */
        page = get_zeroed_page(GFP_KERNEL);
        if (!page)
            return -ENOMEM;

        state->xmit.buf = (unsigned char *) page;
        uart_circ_clear(&state->xmit);
    }
....
}
为这个 uart state 的 xmit 环形 buffer 通过 get_zeroed_page 的方式,分配了一个 page 也就是 4K 的环形 buffer,并清零了这个 buffer,这个就是环形 buffer 的初始化地方!
我们接着看 write 流程:下面就是调用到了 serial_core.c 的 uart_start:
static void uart_start(struct tty_struct *tty)
{
    struct uart_state *state = tty->driver_data;
    struct uart_port *port = state->uart_port;
    unsigned long flags;

    spin_lock_irqsave(&port->lock, flags);
    __uart_start(tty);
    spin_unlock_irqrestore(&port->lock, flags);
}
进一步调用到了 __uart_start:
static void __uart_start(struct tty_struct *tty)
{
    struct uart_state *state = tty->driver_data;
    struct uart_port *port = state->uart_port;

    if (!uart_circ_empty(&state->xmit) && state->xmit.buf &&
        !tty->stopped && !tty->hw_stopped)
        port->ops->start_tx(port);
}
如果环形 buffer 不为空,那么调用到了 port->ops->start_tx,也就是最后一层,需要芯片厂家实现的对接硬件的那一层 ops 的 start_tx
3.4、start_tx
这个 start_tx 其实就是最下面了,芯片对接那一层次,比如:
static struct uart_ops s3c24xx_serial_ops = {
	.pm		= s3c24xx_serial_pm,
....
	.start_tx	= s3c24xx_serial_start_tx,
....

};
对应到实际的函数:
static void s3c24xx_serial_start_tx(struct uart_port *port)
{
	struct s3c24xx_uart_port *ourport = to_ourport(port);
	struct circ_buf *xmit = &port->state->xmit;

	if (!tx_enabled(port)) {
		if (port->flags & UPF_CONS_FLOW)
			s3c24xx_serial_rx_disable(port);

		tx_enabled(port) = 1;
		if (!ourport->dma || !ourport->dma->tx_chan)
			s3c24xx_serial_start_tx_pio(ourport);
	}

	if (ourport->dma && ourport->dma->tx_chan) {
		if (!uart_circ_empty(xmit) && !ourport->tx_in_progress)
			s3c24xx_serial_start_next_tx(ourport);
	}
}
这里和实际的硬件关联了,不多说了,后面有机会实际的分析一款芯片的整个流程;
整个过程如下:
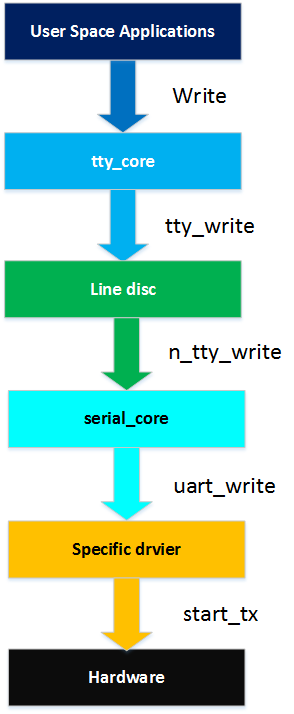
数据的流程为:
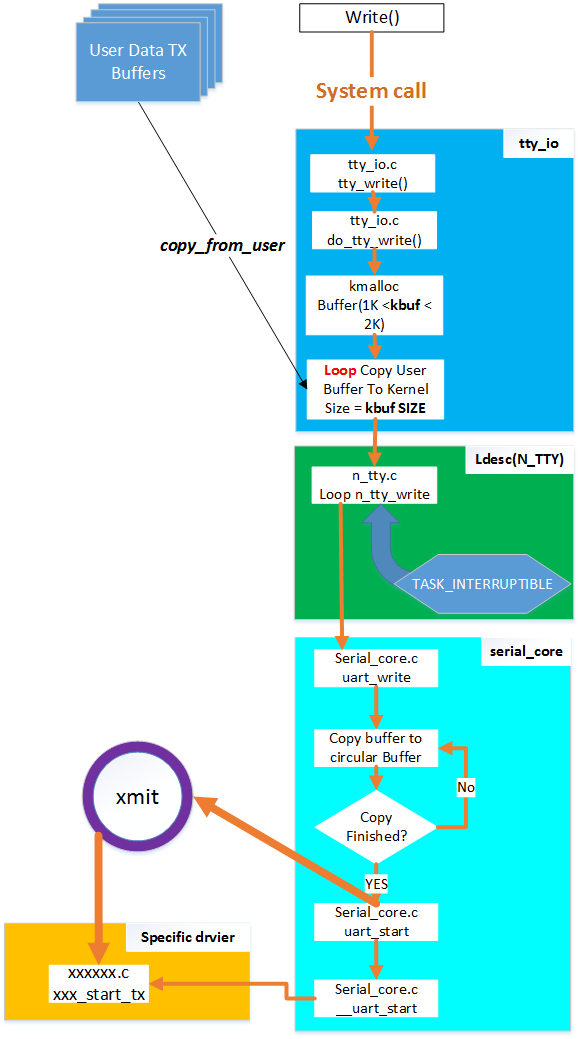
所以,其实整个 tty-uart 的数据发送流程,是将数据仍到了串口对应的 state->xmit 环形 buffer 中去,底下对接的地方,取出环形 buffer 的数据,在通过操作寄存器,将这些数据通过硬件发送出去!
4、Read 流程
4.1、tty_read
当然,读也是先走到了 tty_io.c 中的 tty_read 函数调用,我们直接上菜:
static ssize_t tty_read(struct file *file, char __user *buf, size_t count,
            loff_t *ppos)
{
    int i;
    struct inode *inode = file->f_path.dentry->d_inode;
    struct tty_struct *tty = file_tty(file);
    struct tty_ldisc *ld;

    if (tty_paranoia_check(tty, inode, "tty_read"))
        return -EIO;
    if (!tty || (test_bit(TTY_IO_ERROR, &tty->flags)))
        return -EIO;

    /* We want to wait for the line discipline to sort out in this
       situation */
    ld = tty_ldisc_ref_wait(tty);
    if (ld->ops->read)
        i = (ld->ops->read)(tty, file, buf, count);
    else
        i = -EIO;
    tty_ldisc_deref(ld);

    if (i > 0)
        tty_update_time(&inode->i_atime);

    return i;
}
直接调用了线路规程的 ld->ops->read:
4.2、n_tty_read
n_tty_read 函数的实现较多,因为要处理的情况比较复杂,这里看个大概:
static ssize_t n_tty_read(struct tty_struct *tty, struct file *file,
             unsigned char __user *buf, size_t nr)
{
    unsigned char __user *b = buf;
    DECLARE_WAITQUEUE(wait, current);
    int c;
    int minimum, time;
    ssize_t retval = 0;
    ssize_t size;
    long timeout;
    unsigned long flags;
    int packet;

do_it_again:
....
    minimum = time = 0;
    timeout = MAX_SCHEDULE_TIMEOUT;
    if (!tty->icanon) {
        time = (HZ / 10) * TIME_CHAR(tty);
        minimum = MIN_CHAR(tty);
        if (minimum) {
            if (time)
                tty->minimum_to_wake = 1;
            else if (!waitqueue_active(&tty->read_wait) ||
                 (tty->minimum_to_wake > minimum))
                tty->minimum_to_wake = minimum;
        } else {
            timeout = 0;
            if (time) {
                timeout = time;
                time = 0;
            }
            tty->minimum_to_wake = minimum = 1;
        }
    }
....
    add_wait_queue(&tty->read_wait, &wait);
    while (nr) {
        /* First test for status change. */
        if (packet && tty->link->ctrl_status) {
            unsigned char cs;
            if (b != buf)
                break;
            spin_lock_irqsave(&tty->link->ctrl_lock, flags);
            cs = tty->link->ctrl_status;
            tty->link->ctrl_status = 0;
            spin_unlock_irqrestore(&tty->link->ctrl_lock, flags);
            if (tty_put_user(tty, cs, b++)) {
                retval = -EFAULT;
                b--;
                break;
            }
            nr--;
            break;
        }
....
        set_current_state(TASK_INTERRUPTIBLE);
....
        if (!input_available_p(tty, 0)) {
....
            n_tty_set_room(tty);
            timeout = schedule_timeout(timeout);
            BUG_ON(!tty->read_buf);
            continue;
        }
        __set_current_state(TASK_RUNNING);

        /* Deal with packet mode. */
        if (packet && b == buf) {
            if (tty_put_user(tty, TIOCPKT_DATA, b++)) {
                retval = -EFAULT;
                b--;
                break;
            }
            nr--;
        }

        if (tty->icanon && !L_EXTPROC(tty)) {
            /* N.B. avoid overrun if nr == 0 */
            while (nr && tty->read_cnt) {
                int eol;

....
                c = tty->read_buf[tty->read_tail];
                spin_lock_irqsave(&tty->read_lock, flags);
                tty->read_tail = ((tty->read_tail+1) &
                          (N_TTY_BUF_SIZE-1));
                tty->read_cnt--;
                if (eol) {
                    /* this test should be redundant:
                     * we shouldn't be reading data if
                     * canon_data is 0
                     */
                    if (--tty->canon_data < 0)
                        tty->canon_data = 0;
                }
                spin_unlock_irqrestore(&tty->read_lock, flags);

                if (!eol || (c != __DISABLED_CHAR)) {
                    if (tty_put_user(tty, c, b++)) {
                        retval = -EFAULT;
                        b--;
                        break;
                    }
                    nr--;
                }
                if (eol) {
                    tty_audit_push(tty);
                    break;
                }
            }
            if (retval)
                break;
        } else {
            int uncopied;
            /* The copy function takes the read lock and handles
               locking internally for this case */
            uncopied = copy_from_read_buf(tty, &b, &nr);
            uncopied += copy_from_read_buf(tty, &b, &nr);
            if (uncopied) {
                retval = -EFAULT;
                break;
            }
        }
....
        if (b - buf >= minimum)
            break;
        if (time)
            timeout = time;
    }
    mutex_unlock(&tty->atomic_read_lock);
    remove_wait_queue(&tty->read_wait, &wait);

    if (!waitqueue_active(&tty->read_wait))
        tty->minimum_to_wake = minimum;

    __set_current_state(TASK_RUNNING);
    size = b - buf;
    if (size) {
        retval = size;
        if (nr)
            clear_bit(TTY_PUSH, &tty->flags);
    } else if (test_and_clear_bit(TTY_PUSH, &tty->flags))
         goto do_it_again;

    n_tty_set_room(tty);
    return retval;
}
内容很多,大致的内容是:
1、Check 有没有可用的数据,没有的话,设置成为 TASK_INTERRUPTIBLE,并进入睡眠 schedule_timeout
2、有数据的话,调用 copy_from_read_buf 把数据通过 copy_to_user 给用户空间
static int copy_from_read_buf(struct tty_struct *tty,
                      unsigned char __user **b,
                      size_t *nr)

{
    int retval;
    size_t n;
    unsigned long flags;

    retval = 0;
    spin_lock_irqsave(&tty->read_lock, flags);
    n = min(tty->read_cnt, N_TTY_BUF_SIZE - tty->read_tail);
    n = min(*nr, n);
    spin_unlock_irqrestore(&tty->read_lock, flags);
    if (n) {
        retval = copy_to_user(*b, &tty->read_buf[tty->read_tail], n);
        n -= retval;
        tty_audit_add_data(tty, &tty->read_buf[tty->read_tail], n);
        spin_lock_irqsave(&tty->read_lock, flags);
        tty->read_tail = (tty->read_tail + n) & (N_TTY_BUF_SIZE-1);
        tty->read_cnt -= n;
        /* Turn single EOF into zero-length read */
        if (L_EXTPROC(tty) && tty->icanon && n == 1) {
            if (!tty->read_cnt && (*b)[n-1] == EOF_CHAR(tty))
                n--;
        }
        spin_unlock_irqrestore(&tty->read_lock, flags);
        *b += n;
        *nr -= n;
    }
    return retval;
}
代码追到这里,线索就断了,所以需要跟踪一下这个 tty->read_buf 这个里面的数据哪里来的。
4.3、数据来自中断
数据显然是从硬件来的,咱们需要知道数据是怎么传到了tty->read_buf 这个地方!
在芯片级对接层,在 UART 接收数据之前,一般的,如果是中断的方式,那么需要首先通过 irq_request 来申请中断,并且挂接中断服务程序,这个操作一般是在串口 open,也就是在底层调用 startup 的时候,比如:
static int s3c24xx_serial_startup(struct uart_port *port)
{
	struct s3c24xx_uart_port *ourport = to_ourport(port);
	int ret;
....
	ret = request_irq(ourport->rx_irq, s3c24xx_serial_rx_chars, 0,
			  s3c24xx_serial_portname(port), ourport);
	if (ret != 0) {
		dev_err(port->dev, "cannot get irq %dn", ourport->rx_irq);
		return ret;
	}
....
}
所以,RX 中断服务程序是 s3c24xx_serial_rx_chars 函数,当有数据接收到后,触发这个函数:
static irqreturn_t s3c24xx_serial_rx_chars(int irq, void *dev_id)
{
	struct s3c24xx_uart_port *ourport = dev_id;

	if (ourport->dma && ourport->dma->rx_chan)
		return s3c24xx_serial_rx_chars_dma(dev_id);
	return s3c24xx_serial_rx_chars_pio(dev_id);
}
假设没用 DMA,则走到 s3c24xx_serial_rx_chars_pio :
static irqreturn_t s3c24xx_serial_rx_chars_pio(void *dev_id)
{
	struct s3c24xx_uart_port *ourport = dev_id;
	struct uart_port *port = &ourport->port;
	unsigned long flags;

	spin_lock_irqsave(&port->lock, flags);
	s3c24xx_serial_rx_drain_fifo(ourport);
	spin_unlock_irqrestore(&port->lock, flags);

	return IRQ_HANDLED;
}
进而调用到了 s3c24xx_serial_rx_drain_fifo 函数:
static void s3c24xx_serial_rx_drain_fifo(struct s3c24xx_uart_port *ourport)
{
	struct uart_port *port = &ourport->port;
	unsigned int ufcon, ch, flag, ufstat, uerstat;
	unsigned int fifocnt = 0;
	int max_count = port->fifosize;

	while (max_count-- > 0) {
		/*
		 * Receive all characters known to be in FIFO
		 * before reading FIFO level again
		 */
		if (fifocnt == 0) {
			ufstat = rd_regl(port, S3C2410_UFSTAT);
			fifocnt = s3c24xx_serial_rx_fifocnt(ourport, ufstat);
			if (fifocnt == 0)
				break;
		}
		fifocnt--;

		uerstat = rd_regl(port, S3C2410_UERSTAT);
		ch = rd_regb(port, S3C2410_URXH);

		if (port->flags & UPF_CONS_FLOW) {
			int txe = s3c24xx_serial_txempty_nofifo(port);

			if (rx_enabled(port)) {
				if (!txe) {
					rx_enabled(port) = 0;
					continue;
				}
			} else {
				if (txe) {
					ufcon = rd_regl(port, S3C2410_UFCON);
					ufcon |= S3C2410_UFCON_RESETRX;
					wr_regl(port, S3C2410_UFCON, ufcon);
					rx_enabled(port) = 1;
					return;
				}
				continue;
			}
		}

		/* insert the character into the buffer */

		flag = TTY_NORMAL;
		port->icount.rx++;

		if (unlikely(uerstat & S3C2410_UERSTAT_ANY)) {
			dbg("rxerr: port ch=0x%02x, rxs=0x%08xn",
			    ch, uerstat);

			/* check for break */
			if (uerstat & S3C2410_UERSTAT_BREAK) {
				dbg("break!n");
				port->icount.brk++;
				if (uart_handle_break(port))
					continue; /* Ignore character */
			}

			if (uerstat & S3C2410_UERSTAT_FRAME)
				port->icount.frame++;
			if (uerstat & S3C2410_UERSTAT_OVERRUN)
				port->icount.overrun++;

			uerstat &= port->read_status_mask;

			if (uerstat & S3C2410_UERSTAT_BREAK)
				flag = TTY_BREAK;
			else if (uerstat & S3C2410_UERSTAT_PARITY)
				flag = TTY_PARITY;
			else if (uerstat & (S3C2410_UERSTAT_FRAME |
					    S3C2410_UERSTAT_OVERRUN))
				flag = TTY_FRAME;
		}

		if (uart_handle_sysrq_char(port, ch))
			continue; /* Ignore character */

		uart_insert_char(port, uerstat, S3C2410_UERSTAT_OVERRUN,
				 ch, flag);
	}

	tty_flip_buffer_push(&port->state->port);
}
和寄存器交互部分,暂时不管,看最后的两个调用:
uart_insert_char(port, uerstat, S3C2410_UERSTAT_OVERRUN, ch, flag);
这个,便是将数据往上面报的接口:
在 serial_core.c 中:
void uart_insert_char(struct uart_port *port, unsigned int status,
		 unsigned int overrun, unsigned int ch, unsigned int flag)
{
	struct tty_port *tport = &port->state->port;

	if ((status & port->ignore_status_mask & ~overrun) == 0)
		if (tty_insert_flip_char(tport, ch, flag) == 0)
			++port->icount.buf_overrun;

	/*
	 * Overrun is special.  Since it's reported immediately,
	 * it doesn't affect the current character.
	 */
	if (status & ~port->ignore_status_mask & overrun)
		if (tty_insert_flip_char(tport, 0, TTY_OVERRUN) == 0)
			++port->icount.buf_overrun;
}
EXPORT_SYMBOL_GPL(uart_insert_char);
关键函数是 tty_insert_flip_char:
static inline int tty_insert_flip_char(struct tty_port *port,
					unsigned char ch, char flag)
{
	struct tty_buffer *tb = port->buf.tail;
	int change;

	change = (tb->flags & TTYB_NORMAL) && (flag != TTY_NORMAL);
	if (!change && tb->used < tb->size) {
		if (~tb->flags & TTYB_NORMAL)
			*flag_buf_ptr(tb, tb->used) = flag;
		*char_buf_ptr(tb, tb->used++) = ch;
		return 1;
	}
	return __tty_insert_flip_char(port, ch, flag);
}
调用到 __tty_insert_flip_char:
int __tty_insert_flip_char(struct tty_port *port, unsigned char ch, char flag)
{
	struct tty_buffer *tb;
	int flags = (flag == TTY_NORMAL) ? TTYB_NORMAL : 0;

	if (!__tty_buffer_request_room(port, 1, flags))
		return 0;

	tb = port->buf.tail;
	if (~tb->flags & TTYB_NORMAL)
		*flag_buf_ptr(tb, tb->used) = flag;
	*char_buf_ptr(tb, tb->used++) = ch;

	return 1;
}
EXPORT_SYMBOL(__tty_insert_flip_char);
将 ch 放到了 tty_port->buf.tail
接着回到那个中断服务程序的最后一行:tty_flip_buffer_push(&port->state->port);
void tty_flip_buffer_push(struct tty_port *port)
{
	tty_schedule_flip(port);
}
EXPORT_SYMBOL(tty_flip_buffer_push);
走到了 tty_schedule_flip:
/**
 *	tty_schedule_flip	-	push characters to ldisc
 *	@port: tty port to push from
 *
 *	Takes any pending buffers and transfers their ownership to the
 *	ldisc side of the queue. It then schedules those characters for
 *	processing by the line discipline.
 */

void tty_schedule_flip(struct tty_port *port)
{
	struct tty_bufhead *buf = &port->buf;

	/* paired w/ acquire in flush_to_ldisc(); ensures
	 * flush_to_ldisc() sees buffer data.
	 */
	smp_store_release(&buf->tail->commit, buf->tail->used);
	queue_work(system_unbound_wq, &buf->work);
}
EXPORT_SYMBOL(tty_schedule_flip);
在 tty_buffer_init 的时候呢:
void tty_buffer_init(struct tty_port *port)
{
	struct tty_bufhead *buf = &port->buf;

	mutex_init(&buf->lock);
	tty_buffer_reset(&buf->sentinel, 0);
	buf->head = &buf->sentinel;
	buf->tail = &buf->sentinel;
	init_llist_head(&buf->free);
	atomic_set(&buf->mem_used, 0);
	atomic_set(&buf->priority, 0);
	INIT_WORK(&buf->work, flush_to_ldisc);
	buf->mem_limit = TTYB_DEFAULT_MEM_LIMIT;
}
倒数第二行看到没,这个 buf->work 最终是执行了 flush_to_ldisc!
接着看 flush_to_ldisc:
static void flush_to_ldisc(struct work_struct *work)
{
    char_buf = head->char_buf_ptr + head->read;
    flag_buf = head->flag_buf_ptr + head->read;
    head->read += count;
    spin_unlock_irqrestore(&tty->buf.lock, flags);
    disc->ops->receive_buf(tty, char_buf,flag_buf, count);
}
所以走到了线路规程的 receive_buf 调用也就是 n_tty_receive_buf:
static void n_tty_receive_buf(struct tty_struct *tty, const unsigned char *cp,char *fp, int count)
{

	if (tty->real_raw) {
		spin_lock_irqsave(&tty->read_lock, cpuflags);
		i = min(N_TTY_BUF_SIZE - tty->read_cnt,
			N_TTY_BUF_SIZE - tty->read_head);
		i = min(count, i);
		memcpy(tty->read_buf + tty->read_head, cp, i); /* COPY 数据到tty->read_buf中*/
		tty->read_head = (tty->read_head + i) & (N_TTY_BUF_SIZE-1);
		tty->read_cnt += i;
		cp += i;
		count -= i;

		i = min(N_TTY_BUF_SIZE - tty->read_cnt,
			N_TTY_BUF_SIZE - tty->read_head);
		i = min(count, i);
		memcpy(tty->read_buf + tty->read_head, cp, i);
		tty->read_head = (tty->read_head + i) & (N_TTY_BUF_SIZE-1);
		tty->read_cnt += i;
		spin_unlock_irqrestore(&tty->read_lock, cpuflags);
	}
}
这里将数据通过 memcpy 放入了 tty->read_buf 中,所以分析到这里,基本的 read 流程就串起来了
最后
以上就是欣慰钥匙最近收集整理的关于Linux UART 驱动 Part-2 (tty 层流程)1、Operations2、Open 流程3、Write 流程4、Read 流程的全部内容,更多相关Linux内容请搜索靠谱客的其他文章。


发表评论 取消回复