请一定要看代码中的解释,一定要理解深度学习的原理,一定要理解pytorch的实现方法。
一些简介:MNIST、经典的手写数字图片,Fashion-MNIST是MNIST的更新版,意在取代MNIST。从0-9共10个类别。
整体上我并没有用程序设计模块化的写法,直接一溜烟下来的。
整个程序的流程:
1.得到MNIST图片训练材料作为training set、
2.transform图片使得其更好投喂进pytorch网络。
3.进行3轮训练。
4.用training set作为test set,进行accuracy的测试。
另外我写了两个函数为显示更清楚
import torch
from torch import nn
from torch.nn import functional as F
from torch import optim

import torchvision# this is used for vision task for pytorch
from matplotlib import pyplot as plt

#set print line width.
torch.set_printoptions(linewidth=120)

#to show loss picture
def plot_curve(data):
    fig=plt.figure()
    plt.plot(range(len(data)),data,color='blue')
    plt.legend(['loss_value'],loc='upper right')
    plt.xlabel('step')
    plt.ylabel('value')
    plt.show()

#designed to show picture meterial
def plot_image(img,label,name):
    #create a figure
    fig=plt.figure()
    #set subplot figure
    for i in range(6):
        plt.subplot(2,3,i+1)
        plt.tight_layout()
        plt.imshow(img[i][0]*0.3081+0.1307,cmap='gray',interpolation='none')
        plt.title("{}:{}".format(name,label[i].item()))
        #add xticks and yticks
        plt.xticks([])
        plt.yticks([])
    #show the whole picture
    plt.show()

#designed to transform y into one hot vector
def one_hot(lable,depth=10):
    out=torch.zeros(lable.size(0),depth)
    idx=torch.LongTensor(lable).view(-1,1)
    out.scatter_(dim=1,index=idx,value=1)
    return out

#batch size if the total data number every batch.
batch_size=512
#e.g:   we have 100 pieces of data totally,
# and we are to do three batches,
# and we get batch size pieces of data per batch.


#ETL process. Extract data, Transform data and Load data.

#extract and transform
training_set=torchvision.datasets.MNIST('mnist_data',train=True,download=True,
                                transform=torchvision.transforms.Compose([
                                    torchvision.transforms.ToTensor(),
                                    torchvision.transforms.Normalize(
                                        (0.1307,),(0.3081,))
                                ]))
test_set=torchvision.datasets.MNIST('mnist_data/',train=False,download=True,
                               transform=torchvision.transforms.Compose([
                                   torchvision.transforms.ToTensor(),
                                   torchvision.transforms.Normalize(
                                       (0.1307,),(0.3081,)
                                   )
                               ]))
#len(training_set), you can get the number of training_set
#train_set.train_labels, you can get lable set of data
#train_set.train_labels.bincount(), you can get number of data of each class.
#note: if numbera of each label are equal, we call it balanced, otherwise it's unbalanced.

#images,labels=next(iter(train_loader))   they are a batch, many many images and lebels.

#batch_size the data number extracted from the whole dataset.
#load training set.
train_loader=torch.utils.data.DataLoader(training_set,batch_size=batch_size,shuffle=True)
#load test set.
test_loader=torch.utils.data.DataLoader(test_set,batch_size=batch_size,shuffle=False)

#just sample a little bit for a look
x,y=next(iter(train_loader))
#x is images, y is result
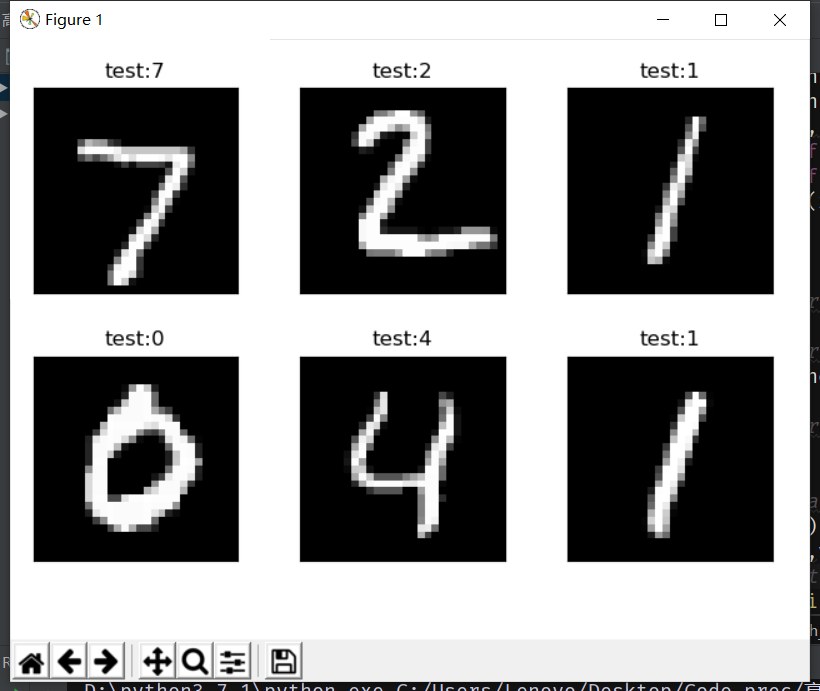
plot_image(x,y,'image_sample')

#define neural network
class Net(nn.Module):
    def __init__(self):
        super(Net,self).__init__()
        #define three layers,
        # fc stands for fully connected layer. conv is for convolution layer(nn.Con2d()
        self.fc1=nn.Linear(28*28,256)
        self.fc2 = nn.Linear(256, 64)
        self.fc3 = nn.Linear(64, 10)
    def forward(self, x):
        x=F.relu(self.fc1(x))
        x=F.relu(self.fc2(x))
        x = self.fc3(x)
        return x


#define neuron network used for predicting
net =Net()
#define optimizer for forward prop and backward prop
optimizer=optim.SGD(net.parameters(),lr=0.01,momentum=0.9)

#this list is to store loss in each epoch
train_loss=[]

#start training. 3 batches, 512 per batch
for epoch in range(3):
    for batch_idx,(x,y) in enumerate(train_loader):
        # transformation: [b,1,28,28]====> [b,feature]
        x=x.view(x.size(0),28*28)
        out=net(x)
        y_onehot=one_hot(y)
        loss=F.mse_loss(out,y_onehot)

        optimizer.zero_grad()
        loss.backward()
        optimizer.step()

        #record loss
        train_loss.append(loss.item())
#print loss curve
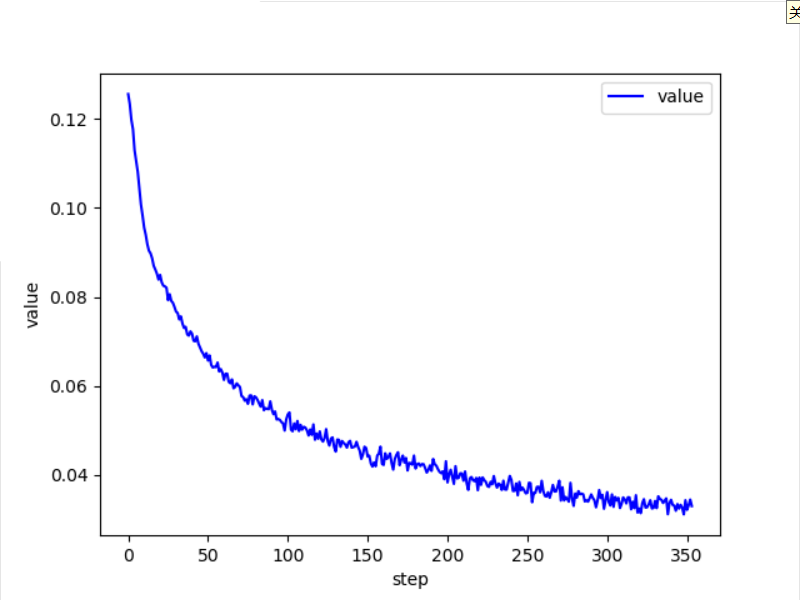
plot_curve(train_loss)


#test model
total_correct=0
for x,y in test_loader:
    x=x.view(x.size(0),28*28)
    out=net(x)
    predict=out.argmax(dim=1)
    correct=predict.eq(y).sum().float().item()
    total_correct+=correct


total_data=len(test_loader.dataset)
accuracy=total_correct/total_data
print('test accuracy:{}'.format(accuracy))

#do practical predict

x,y=next(iter(test_loader))
out=net(x.view(x.size(0),28*28))
predict=out.argmax(dim=1)
plot_image(x,predict,'test')
我是在cpu上运行的,相对来说慢一些。
一些运行结果:
这是看一下加载的训练图片和label

这是一个epoch的loss曲线,看上去还行

控制台会显示出用了test_set的accuracy。
最后
以上就是包容星月最近收集整理的关于pytorch深度学习 3层全连接层,使用MNIST,图片训练、识别、测试全过程示例的全部内容,更多相关pytorch深度学习内容请搜索靠谱客的其他文章。
本图文内容来源于网友提供,作为学习参考使用,或来自网络收集整理,版权属于原作者所有。


发表评论 取消回复