参考文章:SpringBoot整合JDBC和使用Druid数据源
SpringBoot多数据源使用impala连接
SpringBoot整合Mybatis连接Impala入门案例详解
springboot中使用jdbc+impala+Kerberos+数据源查询hive
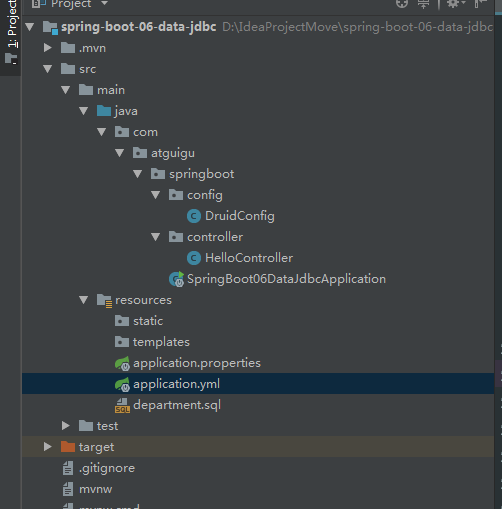
目录结构

src
├───main
│   ├───java
│   │   └───com
│   │       └───template
│   │           ├───common      # 公共部分
│   │           ├───config      # 配置、数据源
│   │           ├───domain      # DO、DTO、VO
│   │           ├───repository  # 数据库访问层
│   │           ├───service     # 逻辑层
│   │           │   └───impl    # 逻辑具体实现
│   │           ├───util        # 工具类
│   │           └───web         # api 接口
│   └───resources
│       ├───static              # 静态资源文件
│       │   └───js              # 页面依赖的javascript 文件
│       └───templates           # 页面模板文件
└───test
    └───java
        └───com
            └───template
                ├───config
                └───repository
Pom.xml
	<dependencies>
		<dependency>
			<groupId>org.springframework.boot</groupId>
			<artifactId>spring-boot-starter-jdbc</artifactId>
		</dependency>
		<dependency>
			<groupId>mysql</groupId>
			<artifactId>mysql-connector-java</artifactId>
			<scope>runtime</scope>
		</dependency>

		<!--引入druid数据源-->
		<!-- https://mvnrepository.com/artifact/com.alibaba/druid -->
		<dependency>
			<groupId>com.alibaba</groupId>
			<artifactId>druid</artifactId>
			<version>1.1.8</version>
		</dependency>

		<dependency>
			<groupId>org.springframework.boot</groupId>
			<artifactId>spring-boot-starter-web</artifactId>
		</dependency>


		<dependency>
			<groupId>org.springframework.boot</groupId>
			<artifactId>spring-boot-starter-test</artifactId>
			<scope>test</scope>
		</dependency>
	</dependencies>
application.yml
spring:
  datasource:
    username: root
    password: 123456
    url: jdbc:mysql://localhost:3306/SpringData01
    driver-class-name: com.mysql.jdbc.Driver
    type: com.alibaba.druid.pool.DruidDataSource

    initialSize: 5
    minIdle: 5
    maxActive: 20
    maxWait: 60000
    timeBetweenEvictionRunsMillis: 60000
    minEvictableIdleTimeMillis: 300000
    validationQuery: SELECT 1 FROM DUAL
    testWhileIdle: true
    testOnBorrow: false
    testOnReturn: false
    poolPreparedStatements: true
#   配置监控统计拦截的filters,去掉后监控界面sql无法统计,'wall'用于防火墙
    filters: stat,wall,log4j
    maxPoolPreparedStatementPerConnectionSize: 20
    useGlobalDataSourceStat: true
    connectionProperties: druid.stat.mergeSql=true;druid.stat.slowSqlMillis=500
    schema:
      - classpath:department.sql

# impala多数据源配置参考
---
# developer enviroment
spring:
  profiles: dev
  datasource:
    impala:
      driver-class-name: com.cloudera.impala.jdbc41.Driver
      jdbc-url: jdbc:impala://xx:21050/default

---
# developer enviroment
spring:
  profiles: test
  datasource:
    impala:
      driver-class-name: com.cloudera.impala.jdbc41.Driver
      jdbc-url: jdbc:impala://xx:21050/default

---
# developer enviroment
spring:
  profiles: prod
  datasource:
    impala:
      driver-class-name: com.cloudera.impala.jdbc41.Driver
      jdbc-url: jdbc:impala://xx:21050/default
注意:每次运行SpringBoot主程序的时候会加载一遍sql文件,并且清空表的数据,所以运行一次之后记得注释!
创建配置类
package com.atguigu.springboot.config;

import com.alibaba.druid.pool.DruidDataSource;
import com.alibaba.druid.support.http.StatViewServlet;
import com.alibaba.druid.support.http.WebStatFilter;
import org.springframework.boot.context.properties.ConfigurationProperties;
import org.springframework.boot.web.servlet.FilterRegistrationBean;
import org.springframework.boot.web.servlet.ServletRegistrationBean;
import org.springframework.context.annotation.Bean;
import org.springframework.context.annotation.Configuration;

import javax.sql.DataSource;
import java.util.Arrays;
import java.util.HashMap;
import java.util.Map;

@Configuration
public class DruidConfig {

    @ConfigurationProperties(prefix = "spring.datasource")
    @Bean
    public DataSource druid(){
       return  new DruidDataSource();
    }

    //配置Druid的监控
    //1、配置一个管理后台的Servlet
    @Bean
    public ServletRegistrationBean statViewServlet(){
        ServletRegistrationBean bean = new ServletRegistrationBean(new StatViewServlet(), "/druid/*");
        Map<String,String> initParams = new HashMap<>();

        initParams.put("loginUsername","admin");
        initParams.put("loginPassword","123456");
        initParams.put("allow","");//默认就是允许所有访问
        initParams.put("deny","192.168.15.21");

        bean.setInitParameters(initParams);
        return bean;
    }


    //2、配置一个web监控的filter
    @Bean
    public FilterRegistrationBean webStatFilter(){
        FilterRegistrationBean bean = new FilterRegistrationBean();
        bean.setFilter(new WebStatFilter());

        Map<String,String> initParams = new HashMap<>();
        initParams.put("exclusions","*.js,*.css,/druid/*");

        bean.setInitParameters(initParams);

        bean.setUrlPatterns(Arrays.asList("/*"));

        return  bean;
    }
}
controller类
package com.atguigu.springboot.controller;

import org.springframework.beans.factory.annotation.Autowired;
import org.springframework.jdbc.core.JdbcTemplate;
import org.springframework.stereotype.Controller;
import org.springframework.web.bind.annotation.GetMapping;
import org.springframework.web.bind.annotation.ResponseBody;

import java.util.List;
import java.util.Map;

@Controller
public class HelloController {

    @Autowired
    JdbcTemplate jdbcTemplate;


    @ResponseBody
    @GetMapping("/query")
    public Map<String,Object> map(){
        List<Map<String, Object>> list = jdbcTemplate.queryForList("select * FROM department");
        return list.get(0);
    }
}
最后
以上就是大气春天最近收集整理的关于impala之springBoot整合jdbc和Druid数据源的全部内容,更多相关impala之springBoot整合jdbc和Druid数据源内容请搜索靠谱客的其他文章。
本图文内容来源于网友提供,作为学习参考使用,或来自网络收集整理,版权属于原作者所有。


发表评论 取消回复