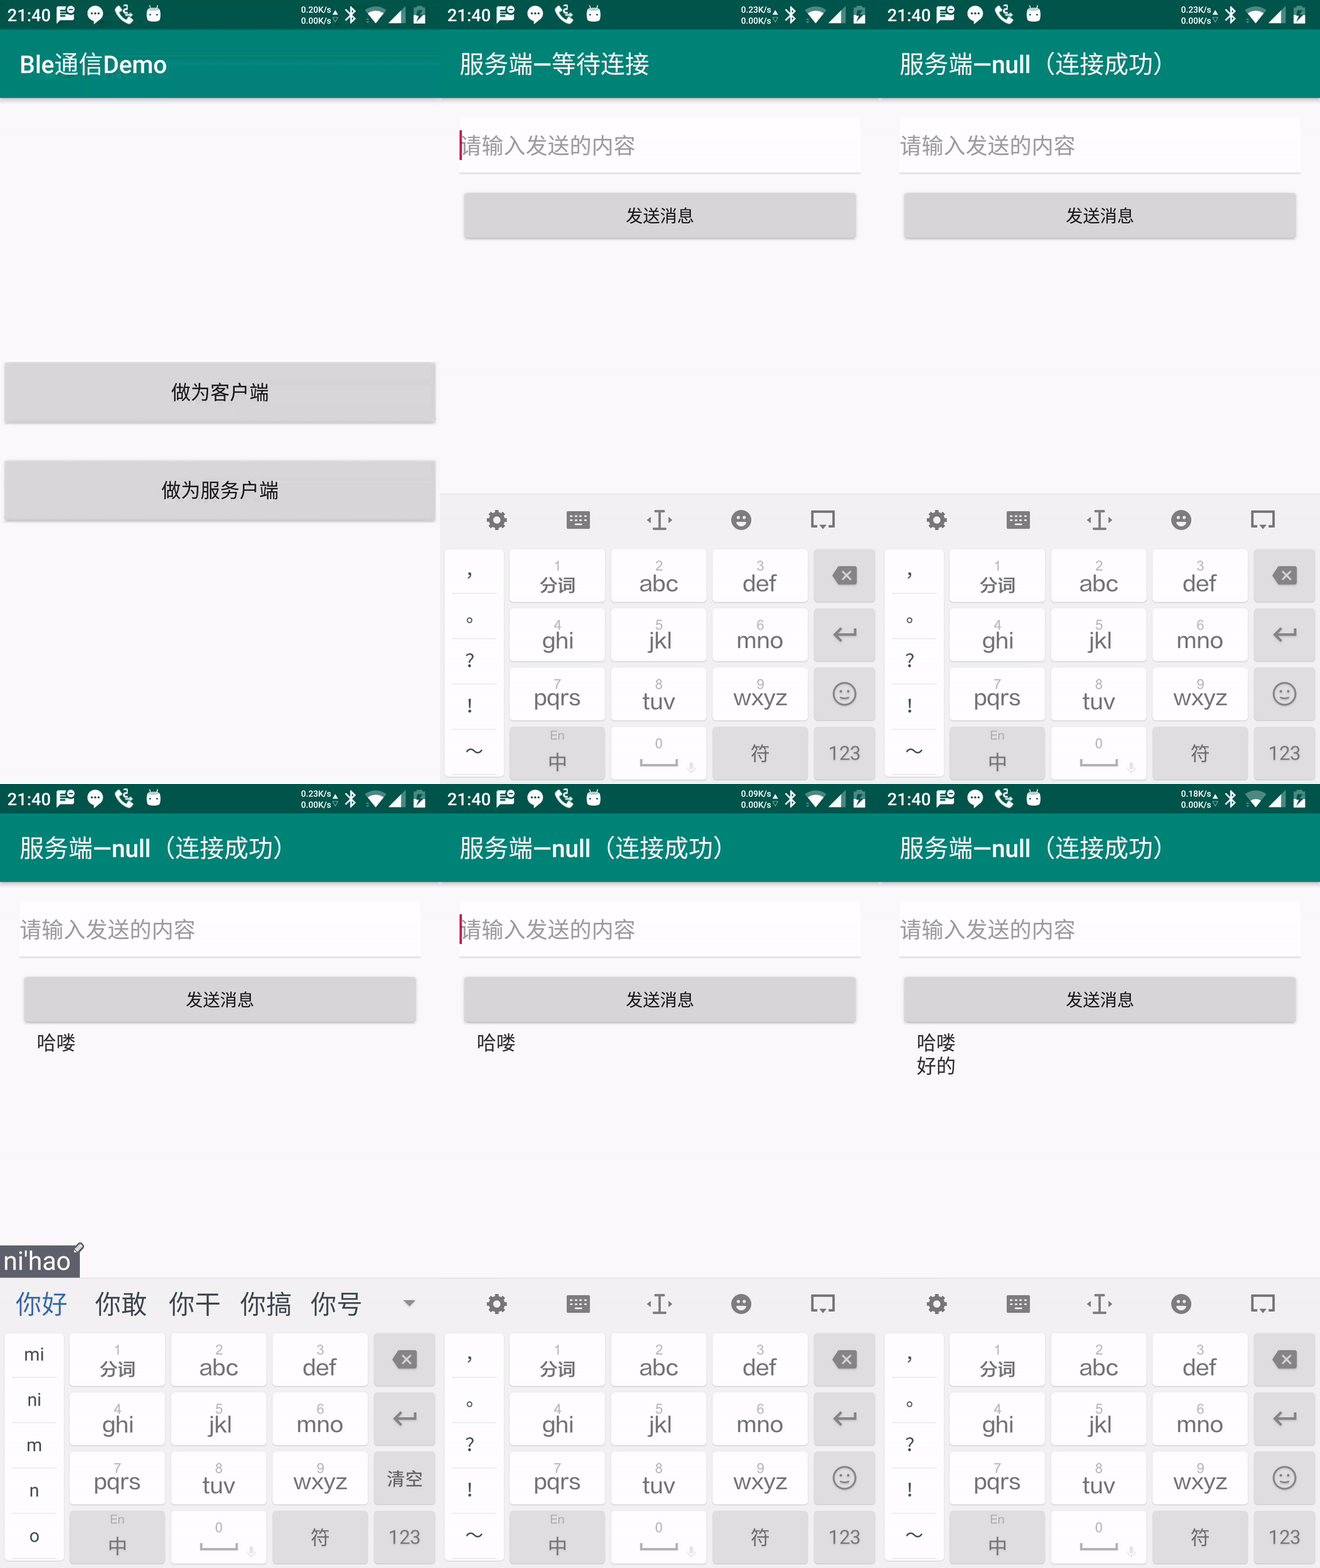
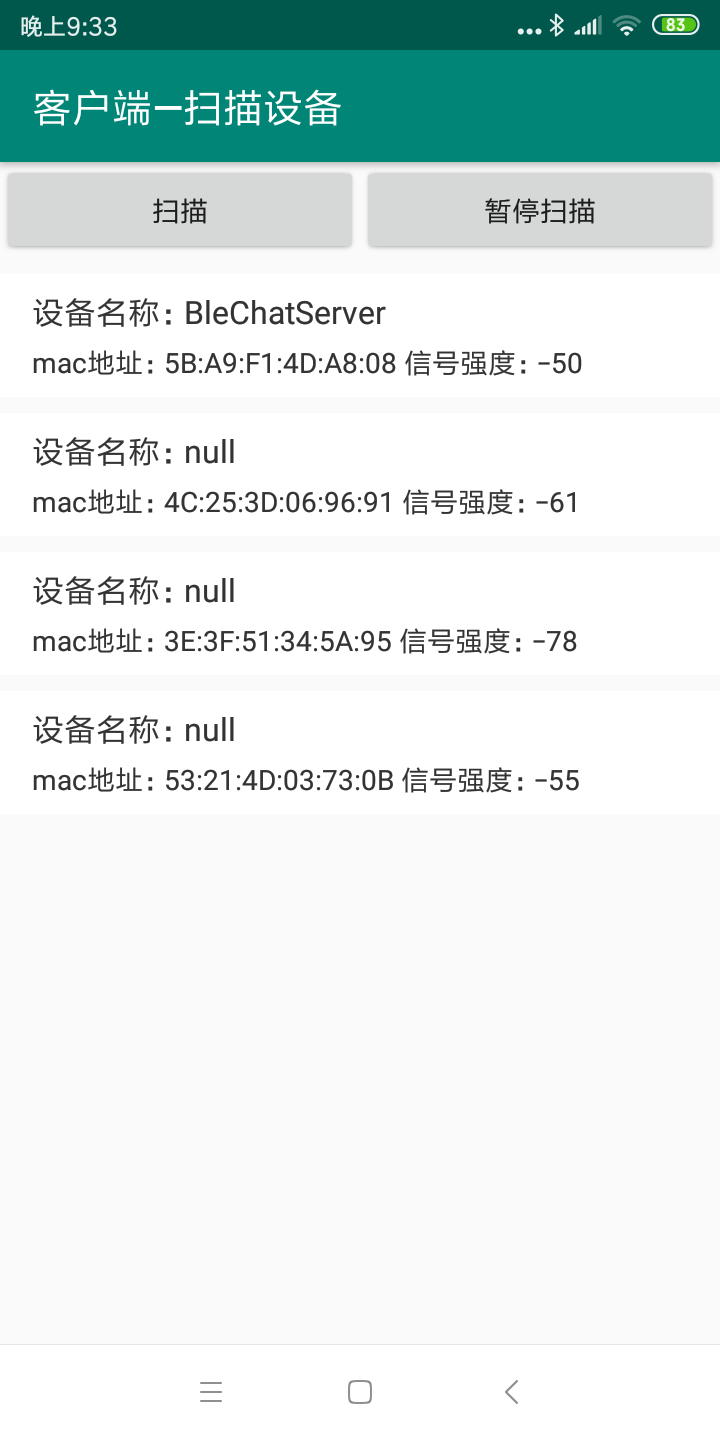
这篇文章主要说的是通过BLE(Bluetooth Low Energy)蓝牙来实现一个聊天的效果;通常我们使用这个BLE都是手机去连接一些智能设备或者智能硬件然后进行通讯,也就是手机充当客户端,智能设备充当服务端;很少有用到通过BLE让两个手机进行通讯,手机既可以充当客户端也可以充当服务端
一、话不多说,先看效果图


BLE最低支持Android4.3(API=18),如果还要充当服务端那么最低支持Android5.0(API=21)
二、需要添加权限,运行在Android6.0以上还需要动态申请ACCESS_FINE_LOCATION权限才可以获取到周边的蓝牙设备
<uses-permission android:name="android.permission.BLUETOOTH" />
<uses-permission android:name="android.permission.BLUETOOTH_ADMIN" />
<!--  android M 以上版本获取周边蓝牙设备必须定位权限  -->
<uses-permission android:name="android.permission.ACCESS_COARSE_LOCATION" />
<uses-permission android:name="android.permission.ACCESS_FINE_LOCATION" />
<uses-feature
    android:name="android.hardware.bluetooth_le"
    android:required="true" />
三、初始化蓝牙,打开蓝牙
BluetoothManager bluetoothManager = (BluetoothManager) context.getSystemService(Context.BLUETOOTH_SERVICE);
BluetoothAdapter bluetoothAdapter = bluetoothManager.getAdapter();
- 打开蓝牙
	/**
     * 打开蓝牙
     */
    public boolean enableBluetooth() {
        if (bluetoothAdapter == null) return false;
        if (!bluetoothAdapter.isEnabled()) {
            return bluetoothAdapter.enable();
        } else {
            return true;
        }
    }
四、先创建我们的BLE服务端,等待客户端连接;可以设置我们的蓝牙名字BleChatServer
//开启BLE蓝牙服务
startAdvertising("BleChatServer");
- 调用开启服务代码
/**
 * 创建Ble服务端,接收连接
 */
public void startAdvertising(String name) {
    //BLE广告设置
    AdvertiseSettings settings = new AdvertiseSettings.Builder()
            .setConnectable(true)
            .setTimeout(0)
            .setTxPowerLevel(AdvertiseSettings.ADVERTISE_TX_POWER_HIGH)
            .setAdvertiseMode(AdvertiseSettings.ADVERTISE_MODE_LOW_LATENCY)
            .build();
    AdvertiseData advertiseData = new AdvertiseData.Builder()
            .setIncludeDeviceName(true)
            .setIncludeTxPowerLevel(true)
            .build();
    bluetoothAdapter.setName(name);
    //开启服务
    BluetoothLeAdvertiser bluetoothLeAdvertiser = bluetoothAdapter.getBluetoothLeAdvertiser();
    bluetoothLeAdvertiser.startAdvertising(settings, advertiseData, advertiseCallback);
}
- BLE服务开启成功的回调,之后我们需要暴露我们用来交互的服务UUID同时服务UUID下包括一个读和写的特征值
/**
 * Ble服务监听
 */
private AdvertiseCallback advertiseCallback = new AdvertiseCallback() {
    @Override
    public void onStartSuccess(AdvertiseSettings settingsInEffect) {
        super.onStartSuccess(settingsInEffect);
        Log.e(TAG, "服务开启成功 " + settingsInEffect.toString());
        addService();
    }
};
- 添加服务UUID
//服务uuid
public static UUID UUID_SERVER = UUID.fromString("0000fff2-0000-1000-8000-00805f9b34fb");
//读的特征值¸
public static UUID UUID_CHAR_READ = UUID.fromString("0000ffe3-0000-1000-8000-00805f9b34fb");
//写的特征值
public static UUID UUID_CHAR_WRITE = UUID.fromString("0000ffe4-0000-1000-8000-00805f9b34fb");


/**
 * 添加读写服务UUID,特征值等
 */
private void addService() {
    BluetoothGattService gattService = new BluetoothGattService(UUID_SERVER, BluetoothGattService.SERVICE_TYPE_PRIMARY);
    //只读的特征值
   BluetoothGattCharacteristic characteristicRead = new BluetoothGattCharacteristic(UUID_CHAR_READ,
            BluetoothGattCharacteristic.PROPERTY_READ | BluetoothGattCharacteristic.PROPERTY_NOTIFY,
            BluetoothGattCharacteristic.PERMISSION_READ);
    //只写的特征值
    BluetoothGattCharacteristic characteristicWrite = new BluetoothGattCharacteristic(UUID_CHAR_WRITE,
            BluetoothGattCharacteristic.PROPERTY_WRITE | BluetoothGattCharacteristic.PROPERTY_READ
                    | BluetoothGattCharacteristic.PROPERTY_NOTIFY,
            BluetoothGattCharacteristic.PERMISSION_WRITE | BluetoothGattCharacteristic.PERMISSION_READ);
    //将特征值添加至服务里
    gattService.addCharacteristic(characteristicRead);
    gattService.addCharacteristic(characteristicWrite);
    //监听客户端的连接
   BluetoothGattServer bluetoothGattServer = bluetoothManager.openGattServer(this, gattServerCallback);
   //添加服务
    bluetoothGattServer.addService(gattService);
}
gattServerCallback客户端连接上来的回调
private BluetoothGattServerCallback gattServerCallback = new BluetoothGattServerCallback() {
    @Override
    public void onConnectionStateChange(BluetoothDevice device, int status, int newState) {
        super.onConnectionStateChange(device, status, newState);
        ServerActivity.this.device = device;
        String state = "";
        if (newState == BluetoothProfile.STATE_CONNECTED) {
            state = "连接成功";
        } else if (newState == BluetoothProfile.STATE_DISCONNECTED) {
            state = "连接断开";
        }
        Log.e(TAG, "onConnectionStateChange device=" + device.toString() + " status=" + status + " newState=" + state);
    }
    @Override
    public void onCharacteristicWriteRequest(BluetoothDevice device, int requestId, BluetoothGattCharacteristic characteristic, boolean preparedWrite, boolean responseNeeded, int offset, byte[] value) {
        super.onCharacteristicWriteRequest(device, requestId, characteristic, preparedWrite, responseNeeded, offset, value);
        String data = new String(value);
        Log.e(TAG, "收到了客户端发过来的数据 " + data);
        //告诉客户端发送成功
        bluetoothGattServer.sendResponse(device, requestId, BluetoothGatt.GATT_SUCCESS, offset, characteristic.getValue());
    }
};
五、这里得提一下服务UUID和特征值这个东西
- 一个BLE有多个服务Service,也就是上面new的
BluetoothGattService,客户端可以通过UUID来查找 - 一个Service中有多个特征Characteristic,客户端先通过UUID查找到服务在通过UUID来查找特征值
六、到这里BLE的服务端就已经实现了,客户端扫描就可以发现开启的这个服务了

七、服务端的创建已经说完了,接下来就是客户端的扫描与连接了
- 首先也是需要打开蓝牙,参考第
二、三步;在Android M以上还需要动态申请定位权限才能获取到周边蓝牙设备
/**
 * 扫描设备
 */
public void startScan() {
    if (bluetoothAdapter == null) return;
    if (Build.VERSION.SDK_INT >= Build.VERSION_CODES.LOLLIPOP) {
        BluetoothLeScanner scanner = bluetoothAdapter.getBluetoothLeScanner();
        if (scanner != null) {
            scanner.startScan(scanCallback);
        }
    } else {
        bluetoothAdapter.startLeScan(leScanCallback);
    }
}
//扫描的监听回调
@RequiresApi(api = Build.VERSION_CODES.LOLLIPOP)
private ScanCallback scanCallback = new ScanCallback() {
    @Override
    public void onScanResult(int callbackType, ScanResult result) {
        super.onScanResult(callbackType, result);
        BluetoothDevice device = result.getDevice();
        //device就是周边的设备了
    }
};
private BluetoothAdapter.LeScanCallback leScanCallback = new BluetoothAdapter.LeScanCallback() {
    @Override
    public void onLeScan(BluetoothDevice device, int rssi, byte[] scanRecord) {
         //device就是周边的设备了
    }
};
八、与服务端建立连接,收发数据
//device就是我们扫描回调内拿到的设备(BleChatServer)
BluetoothGatt bluetoothGatt = device.getDevice().connectGatt(this, false, bluetoothGattCallback);
- 连接状态的回调
private BluetoothGattCallback bluetoothGattCallback = new BluetoothGattCallback() {
    @Override
    public void onConnectionStateChange(BluetoothGatt gatt, int status, int newState) {
        super.onConnectionStateChange(gatt, status, newState);
        if (newState == BluetoothProfile.STATE_CONNECTED) {
            Log.e(TAG, "onConnectionStateChange 连接成功");
            //查找服务
            gatt.discoverServices();
        } else if (newState == BluetoothProfile.STATE_CONNECTING) {
            Log.e(TAG, "onConnectionStateChange 连接中......");
        } else if (newState == BluetoothProfile.STATE_DISCONNECTED) {
            Log.e(TAG, "onConnectionStateChange 连接断开");
        } else if (newState == BluetoothProfile.STATE_DISCONNECTING) {
            Log.e(TAG, "onConnectionStateChange 连接断开中......");
        }
    }
    @Override
    public void onServicesDiscovered(BluetoothGatt gatt, int status) {
        super.onServicesDiscovered(gatt, status);
        //设置读特征值的监听,接收服务端发送的数据
        BluetoothGattService service = bluetoothGatt.getService(UUID_SERVER);
        BluetoothGattCharacteristic characteristic = service.getCharacteristic(UUID_CHAR_READ);
        boolean b = bluetoothGatt.setCharacteristicNotification(characteristic, true);
        Log.e(TAG, "onServicesDiscovered 设置通知 " + b);
    }
    @Override
    public void onCharacteristicChanged(BluetoothGatt gatt, BluetoothGattCharacteristic characteristic) {
        super.onCharacteristicChanged(gatt, characteristic);
        String data = new String(characteristic.getValue());
        Log.e(TAG, "onCharacteristicChanged 接收到了数据 " + data);
    }
};
- 这里的
UUID_SERVER、UUID_CHAR_READ就是我们在服务端设置的 - 在发现服务回调这里,我们需要对我们在服务端设置的
读特征值进行通知设置;这样当服务端写入了数据,就会回调我们的onCharacteristicChanged()拿到数据
客户端发送数据给服务端,也就是往我们服务端定义的写特征值写入数据
/**
 * 发送数据
 *
 * @param msg
 */
public void sendData(String msg) {
    //找到服务
    BluetoothGattService service = bluetoothGatt.getService(UUID_SERVER);
    //拿到写的特征值
    BluetoothGattCharacteristic characteristic = service.getCharacteristic(UUID_CHAR_WRITE);
    bluetoothGatt.setCharacteristicNotification(characteristic, true);
    characteristic.setValue(msg.getBytes());
    bluetoothGatt.writeCharacteristic(characteristic);
    Log.e(TAG, "sendData 发送数据成功");
}
到这里一个蓝牙聊天的案例就完成了Demo下载地址
最后
以上就是花痴黑裤最近收集整理的关于Android通过蓝牙(BLE低功耗蓝牙)实现设备间通讯 | 客户端 | 服务端的全部内容,更多相关Android通过蓝牙(BLE低功耗蓝牙)实现设备间通讯内容请搜索靠谱客的其他文章。
本图文内容来源于网友提供,作为学习参考使用,或来自网络收集整理,版权属于原作者所有。


![python控制蓝牙音响_[ESP32+MicroPython]智能音响控制](https://www.shuijiaxian.com/files_image/reation/bcimg13.png)


发表评论 取消回复