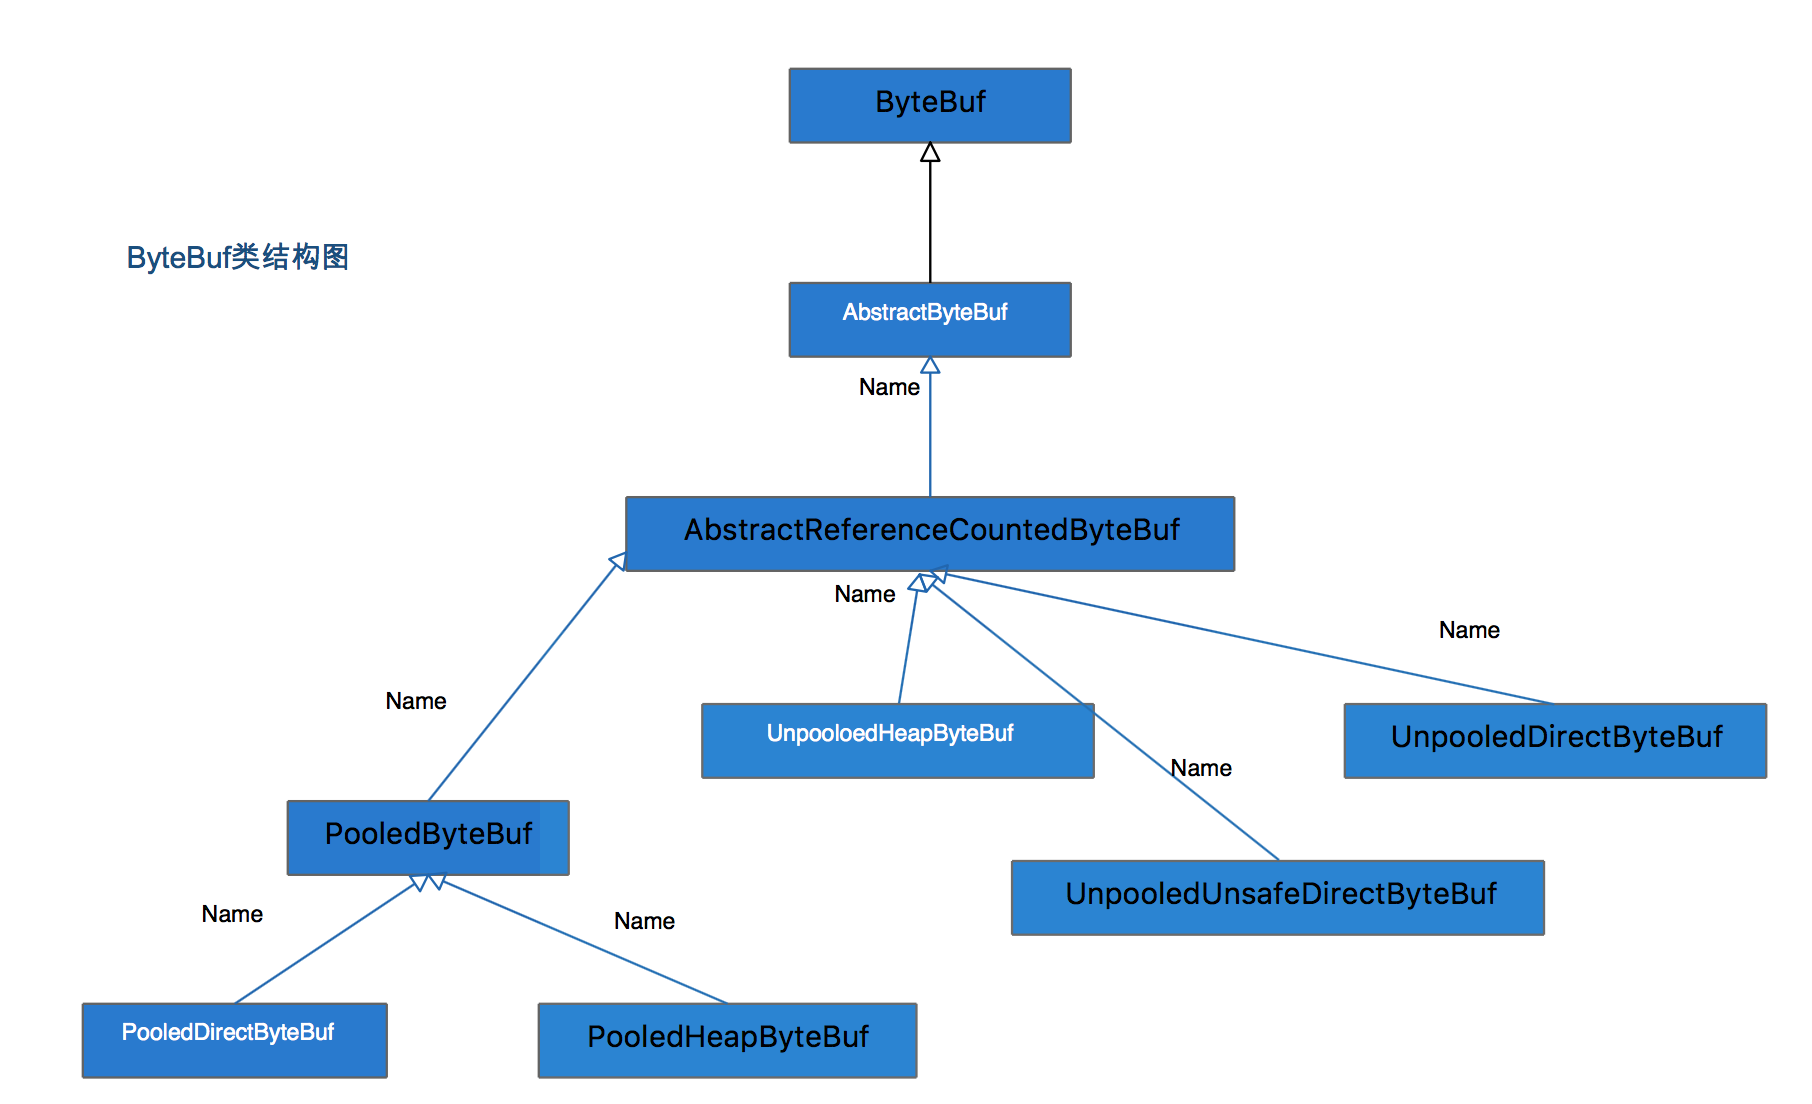
ByteBuf在Netty占据着中重要的位置,上篇《Netty——ByteBuf功能之说》讲了ByteBuf的工作原理和重要功能介绍。这篇从源码的角度来看ByteBuf。首先,来看一下主要的类继承结构图:

我们从两个角度看下上图:
从内容分配角度上分为:1,堆内存(HeapByteBuf)字节缓冲区,特点是内存的分配和回收速度快,可被JVM自动回收;缺点是如果进行Socket的I/O读写,需要额外做一次内存复制,将堆内存对应的缓冲区复制到内核Channel中,性能会有一定程度的下降。2,直接内存(DirectByteBuf)字节缓冲区:在堆外进行内存分配,相比于堆内存分配和回收速度会慢一些,但是将它写入或者从Socket Channel中读取会很快。经验表明:ByteBuf的最佳实践是在I/O通信线程的读写缓冲区使用DirectByteBuf,后端业务消息处理使用HeapByteBuf。
从内存回收角度看分为:1,对象池的ByteBuf和普通的ByteBuf。主要区别就是对象池的ByteBuf维护了一个内存池,可以循环利用创建的ByteBuf,提高内存的使用率,降低由于高负载导致的频繁GC。
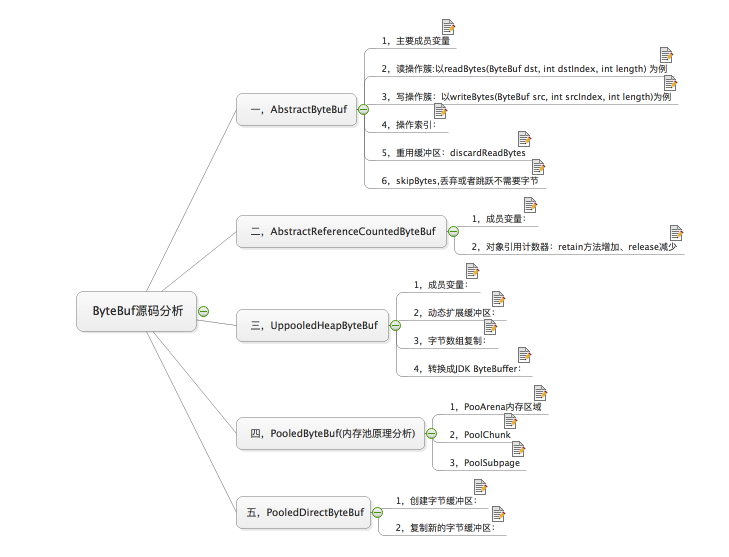
好,下边,我来看下各个类的源码分析,由于我这里用思维导图进行的源码分析总结,将涉及到源码的部分放到了注释中,就不一一展示了,这里先看下总结的导图吧:

这里看下第一个吧,其它可以自己跟着思维导图查看,或者下载思维导图——ByteBuf源码之析。AbstractByteBuf继承自ByteBuf,一些公共属性和功能会体现这个类中,源码分析:
一,主要成员变量:

说明:1,读索引、写索引、mark、最大容量等公共属性;
           2,leakDetector  为static,用于检测对象的是否泄漏;
           3,将缓存区实现放到子类实现,让子类决定是基于堆内存还是直接内存。
static final ResourceLeakDetector<ByteBuf> leakDetector = new ResourceLeakDetector<ByteBuf>(ByteBuf.class);

int readerIndex;
int writerIndex;
private int markedReaderIndex;
private int markedWriterIndex;

private int maxCapacity;

/**************************************************/


二,读操作簇:以readBytes(ByteBuf dst, int dstIndex, int length) 为例

1,方法:
@Override
public ByteBuf readBytes(ByteBuf dst, int dstIndex, int length) {
    checkReadableBytes(length);
    getBytes(readerIndex, dst, dstIndex, length);
    readerIndex += length;
    return this;
}

2,对缓冲区可用空间的校验:
/**
 * Throws an {@link IndexOutOfBoundsException} if the current
 * {@linkplain #readableBytes() readable bytes} of this buffer is less
 * than the specified value.
 */
protected final void checkReadableBytes(int minimumReadableBytes) {
    ensureAccessible();
    if (minimumReadableBytes < 0) {
        throw new IllegalArgumentException("minimumReadableBytes: " + minimumReadableBytes + " (expected: >= 0)");
    }
    if (readerIndex > writerIndex - minimumReadableBytes) {
        throw new IndexOutOfBoundsException(String.format(
                "readerIndex(%d) + length(%d) exceeds writerIndex(%d): %s",
                readerIndex, minimumReadableBytes, writerIndex, this));
    }
}

3,校验通过后,调用getBytes方法,从当前读索引开始,复制length个字节到目标byte数组中。由子类实现,不同子类实现细节不同。
4,读索引增加

/**************************************************/


三,写操作簇:以writeBytes(ByteBuf src, int srcIndex, int length)为例

1,方法:
@Override
public ByteBuf writeBytes(ByteBuf src, int srcIndex, int length) {
    ensureAccessible();
    ensureWritable(length);
    setBytes(writerIndex, src, srcIndex, length);
    writerIndex += length;
    return this;
}
1.1,写入字节数组的长度校验:
@Override
public ByteBuf ensureWritable(int minWritableBytes) {
    if (minWritableBytes < 0) {
        throw new IllegalArgumentException(String.format(
                "minWritableBytes: %d (expected: >= 0)", minWritableBytes));
    }

    if (minWritableBytes <= writableBytes()) {
        return this;
    }

    if (minWritableBytes > maxCapacity - writerIndex) {
        throw new IndexOutOfBoundsException(String.format(
                "writerIndex(%d) + minWritableBytes(%d) exceeds maxCapacity(%d): %s",
                writerIndex, minWritableBytes, maxCapacity, this));
    }

    // Normalize the current capacity to the power of 2.
    int newCapacity = alloc().calculateNewCapacity(writerIndex + minWritableBytes, maxCapacity);

    // Adjust to the new capacity.
    capacity(newCapacity);
    return this;
}

1.1.1,如果当前写入数组长度大于可写字节数,则通过自身的动态扩展进行满足写需求。扩容方式:首先设置门限阈值threshold 4MB,如果=threshold直接返回,如果<threshold则以64进行倍增;如果>threshold则每次采用4MB扩张。
@Override
public int calculateNewCapacity(int minNewCapacity, int maxCapacity) {
    if (minNewCapacity < 0) {
        throw new IllegalArgumentException("minNewCapacity: " + minNewCapacity + " (expectd: 0+)");
    }
    if (minNewCapacity > maxCapacity) {
        throw new IllegalArgumentException(String.format(
                "minNewCapacity: %d (expected: not greater than maxCapacity(%d)",
                minNewCapacity, maxCapacity));
    }
    final int threshold = 1048576 * 4; // 4 MiB page

    if (minNewCapacity == threshold) {
        return threshold;
    }

    // If over threshold, do not double but just increase by threshold.
    if (minNewCapacity > threshold) {
        int newCapacity = minNewCapacity / threshold * threshold;
        if (newCapacity > maxCapacity - threshold) {
            newCapacity = maxCapacity;
        } else {
            newCapacity += threshold;
        }
        return newCapacity;
    }

    // Not over threshold. Double up to 4 MiB, starting from 64.
    int newCapacity = 64;
    while (newCapacity < minNewCapacity) {
        newCapacity <<= 1;
    }

    return Math.min(newCapacity, maxCapacity);
}

/**************************************************/


四,操作索引:

1,与索引相关主要涉及读写索引、mark、rest等,比较简单,看设置读索引方法:
@Override
public ByteBuf readerIndex(int readerIndex) {
    if (readerIndex < 0 || readerIndex > writerIndex) {
        throw new IndexOutOfBoundsException(String.format(
                "readerIndex: %d (expected: 0 <= readerIndex <= writerIndex(%d))", readerIndex, writerIndex));
    }
    this.readerIndex = readerIndex;
    return this;
}

/**************************************************/


五,重用缓冲区:discardReadBytes

1,discardReadBytes方法:
@Override
public ByteBuf discardReadBytes() {
    ensureAccessible();
    if (readerIndex == 0) {
        return this;
    }

    if (readerIndex != writerIndex) {
        setBytes(0, this, readerIndex, writerIndex - readerIndex);
        writerIndex -= readerIndex;
        adjustMarkers(readerIndex);
        readerIndex = 0;
    } else {
        adjustMarkers(readerIndex);
        writerIndex = readerIndex = 0;
    }
    return this;
}
1.1,adjustMarkers(readerIndex)方法设置markedReaderIndex和markedWriteIndex:
protected final void adjustMarkers(int decrement) {
    int markedReaderIndex = this.markedReaderIndex;
    if (markedReaderIndex <= decrement) {
        this.markedReaderIndex = 0;
        int markedWriterIndex = this.markedWriterIndex;
        if (markedWriterIndex <= decrement) {
            this.markedWriterIndex = 0;
        } else {
            this.markedWriterIndex = markedWriterIndex - decrement;
        }
    } else {
        this.markedReaderIndex = markedReaderIndex - decrement;
        markedWriterIndex -= decrement;
    }
}

/**************************************************/


六,skipBytes,丢弃或者跳跃不需要字节

1,看方法源码:
@Override
public ByteBuf skipBytes(int length) {
    checkReadableBytes(length);
    readerIndex += length;
    return this;
}
下边我们在来简单看下ButyBuf的几个重要的辅助类,其实都非常简单,为了更容易扩展,为了提供更多的基本功能,都是非常实用的,我们来看下简单说明:

好,这样我么Netty的ByteBuf相关内容就学习完了,需要思考的是,作者对此的设计思路,实现方式,编码风格等,剩下就是我们多用多做多思考,来更进一步的理解了。接下来,Netty其它重要类源码的学习思考。。。欢迎大家多交流。
PS:思维导图下载地址:ByteBuf源码分析。也可以到我的资源中进行下载。
最后
以上就是眼睛大唇彩最近收集整理的关于Netty(九)——ByteBuf源码之析的全部内容,更多相关Netty(九)——ByteBuf源码之析内容请搜索靠谱客的其他文章。


发表评论 取消回复