需求:
同一位置不同时间拍20张照片或多或少有些偏移,需要矫正。
解决思路:
原理就不介绍了,就是简单的图片配准(找关键点、关键点匹配、筛选关键点、计算变换矩阵、变换)
参考:
网上搜了下大致有两种思路,试过效果都不错:
-
一、利用ORB/SURF提取特征点、查找单应性矩阵、对图片变换
stackoverflow上一个回答(ORB)
https://stackoverflow.com/questions/6418742/how-to-register-an-image-manually-image-registration
OpenCV的图像配准融合(SURF)
https://blog.csdn.net/qq_27737701/article/details/82289607
Opencv官网对这一块的介绍
https://docs.opencv.org/3.4.2/db/d61/group__reg.html -
二、Image Alignment (ECC) in OpenCV
这个介绍的比较详细了
https://www.learnopencv.com/image-alignment-ecc-in-opencv-c-python/
使用:
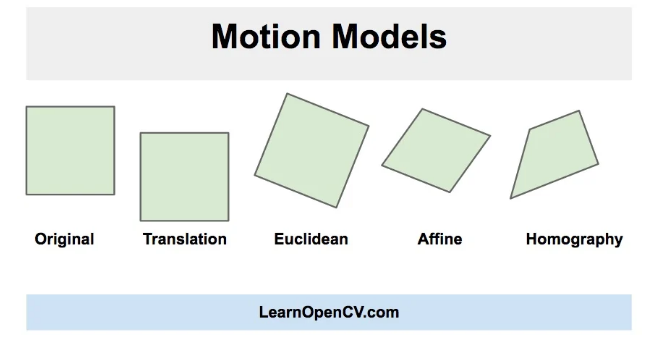
opencv配准对其时候有四种方式:平移、欧几里得、仿射、单应。变换矩阵详细介绍
具体使用哪一种看自己需求:比如我只希望进行图片的平移和旋转,不希望造成图片的畸变,所以我用Euclidean。
代码:
就是摘自上边的链接利用ORB/SURF提取特征点、查找单应性矩阵、对图片变换、Image Alignment (ECC) in OpenCV 细微的改动了下。
利用ORB/SURF提取特征点、查找单应性矩阵、对图片变换
#include <opencv2/opencv.hpp>
#include "opencv2/xfeatures2d.hpp"
#include "opencv2/features2d.hpp"

using namespace std;
using namespace cv;
using namespace cv::xfeatures2d;

const int MAX_FEATURES = 500;
const float GOOD_MATCH_PERCENT = 0.15f;


void alignImages(Mat &im1, Mat &im2, Mat &im1Reg, Mat &h)

{


  Mat im1Gray, im2Gray;
  cvtColor(im1, im1Gray, CV_BGR2GRAY);
  cvtColor(im2, im2Gray, CV_BGR2GRAY);

  // Variables to store keypoints and descriptors
  std::vector<KeyPoint> keypoints1, keypoints2;
  Mat descriptors1, descriptors2;

  // Detect ORB features and compute descriptors.
  Ptr<Feature2D> orb = ORB::create(MAX_FEATURES);
  orb->detectAndCompute(im1Gray, Mat(), keypoints1, descriptors1);
  orb->detectAndCompute(im2Gray, Mat(), keypoints2, descriptors2);

  // Match features.
  std::vector<DMatch> matches;
  Ptr<DescriptorMatcher> matcher = DescriptorMatcher::create("BruteForce-Hamming");
  matcher->match(descriptors1, descriptors2, matches, Mat());

  // Sort matches by score
  std::sort(matches.begin(), matches.end());

  // Remove not so good matches
  const int numGoodMatches = matches.size() * GOOD_MATCH_PERCENT;
  matches.erase(matches.begin()+numGoodMatches, matches.end());


  // Draw top matches
  Mat imMatches;
  drawMatches(im1, keypoints1, im2, keypoints2, matches, imMatches);
  imwrite("matches.jpg", imMatches);


  // Extract location of good matches
  std::vector<Point2f> points1, points2;

  for( size_t i = 0; i < matches.size(); i++ )
  {
    points1.push_back( keypoints1[ matches[i].queryIdx ].pt );
    points2.push_back( keypoints2[ matches[i].trainIdx ].pt );
  }

  // Find homography
  h = findHomography( points1, points2, RANSAC );

  // Use homography to warp image
  warpPerspective(im1, im1Reg, h, im2.size());

}


int main(int argc, char **argv)
{
  // Read reference image
  string refFilename("form.jpg");
  cout << "Reading reference image : " << refFilename << endl;
  Mat imReference = imread(refFilename);


  // Read image to be aligned
  string imFilename("scanned-form.jpg");
  cout << "Reading image to align : " << imFilename << endl;
  Mat im = imread(imFilename);


  // Registered image will be resotred in imReg.
  // The estimated homography will be stored in h.
  Mat imReg, h;

  // Align images
  cout << "Aligning images ..." << endl;
  alignImages(im, imReference, imReg, h);

  // Write aligned image to disk.
  string outFilename("aligned.jpg");
  cout << "Saving aligned image : " << outFilename << endl;
  imwrite(outFilename, imReg);

  // Print estimated homography
  cout << "Estimated homography : n" << h << endl;

}
Image Alignment (ECC) in OpenCV
int main(int, char **) {
    // 【1】图像对齐(配准)
    // 读取图像
    Mat im1 = imread("/home/yx/Desktop/11/_0.png");
    Mat im2 = imread("/home/yx/Desktop/11/_18.png");
    // 将图像转换为灰度;
    Mat im1_gray, im2_gray;
    cvtColor(im1, im1_gray, CV_BGR2GRAY);
    cvtColor(im2, im2_gray, CV_BGR2GRAY);
    // 定义运动模型
    const int warp_mode = MOTION_EUCLIDEAN;
    // MOTION_TRANSLATION  平移
    // MOTION_EUCLIDEAN 欧几里得
    // MOTION_AFFINE 仿射
    // MOTION_HOMOGRAPHY 单应性
    // 根据运动模型设置2x3或3x3变形矩阵。
    Mat warp_matrix;
    // 初始化矩阵以进行标识
    if ( warp_mode == MOTION_HOMOGRAPHY ) {
        warp_matrix = Mat::eye(3, 3, CV_32F);
    } else {
        warp_matrix = Mat::eye(2, 3, CV_32F);
    }
    // 指定迭代次数。
    int number_of_iterations = 50;
    // 指定两次迭代之间相关系数增量的阈值
    double termination_eps = 1e-10;
    // 定义终止条件
    TermCriteria criteria (TermCriteria::COUNT +
                           TermCriteria::EPS,
                           number_of_iterations,
                           termination_eps);
    //运行ECC算法。结果存储在warp_matrix中。
    findTransformECC(
        im1_gray,
        im2_gray,
        warp_matrix,
        warp_mode,
        criteria
    );
    // 存放变形的图像。
    Mat im2_aligned;
    warpAffine(im2, im2_aligned, warp_matrix, im1.size(), INTER_LINEAR + WARP_INVERSE_MAP);
    // 显示最终结果
    imshow("Image 2", im2);
    imshow("Image 2 Aligned", im2_aligned);
    //【2】图像平滑 (高斯滤波)
    qint32 kernel_length = 3;
    GaussianBlur(im2_aligned, im2_aligned, Size(kernel_length, kernel_length), 0, 0);
    imshow("Image 2 Aligned GaussianBlur", im2_aligned);
    //【3】图像去血管
    waitKey(0);
}
最后
以上就是谦让镜子最近收集整理的关于利用opencv实现图片的配准/对齐的全部内容,更多相关利用opencv实现图片内容请搜索靠谱客的其他文章。


发表评论 取消回复