图像卷积是我们对图像进行处理时最常用的方法,如去噪、滤波、边缘提取等都要用的卷积函数。OpenCV中提供了不同方法的卷积函数,包括Sobel算子、Laplace算子、Canny边缘检测算子等等,除了这些自带的函数,OpenCV库中还提供一种可以自定义卷积核的函数,可由用户自己根据需要定义合适的卷积核。
先学习下OpenCV中自带的卷积函数
Sobel算子
OpenCV中Sobel算子被封装在
CV_EXPORTS_W void Sobel( InputArray src, OutputArray dst, int ddepth,
                         int dx, int dy, int ksize=3,
                         double scale=1, double delta=0,
                         int borderType=BORDER_DEFAULT );
这个函数里面,其中:src表示输入原图像;dst表示输出目标图像;ddepth表示用来度量每一个像素中每一个通道的精度,但它本身与图像的通道数无关!depth数值越大,精度越高。在Opencv中,Mat.depth()得到的是一个0~6的数字,分别代表不同的位数,对应关系如下:
enum{CV_8U=0,CV_8S=1,CV_16U=2,CV_16S=3,CV_32S=4,CV_32F=5,CV_64F=6},ddepth 由于Sobel运算时可能会出现比较大的值,因此取值方式有以下几种:
- 若 ddepth = CV_8U, 取 ddepth = -1 或 CV_16S 或 CV_32F 或 CV_64F
- 若 ddepth = CV_16U, 或 CV_16S, 取 ddepth = -1 或 CV_32F 或 CV_64F
- 若 ddepth = CV_32F, 取 ddepth = -1 或 CV_32F 或 CV_64F
- 若 ddepth = CV_64F, 取 ddepth = -1 或 CV_64F
- 若 ddepth = -1, 代表输出图像与输入图像相同的深度。
dx表示对X方向进行求导的差分阶数;dy表示对Y方向进行求导的差分阶数;
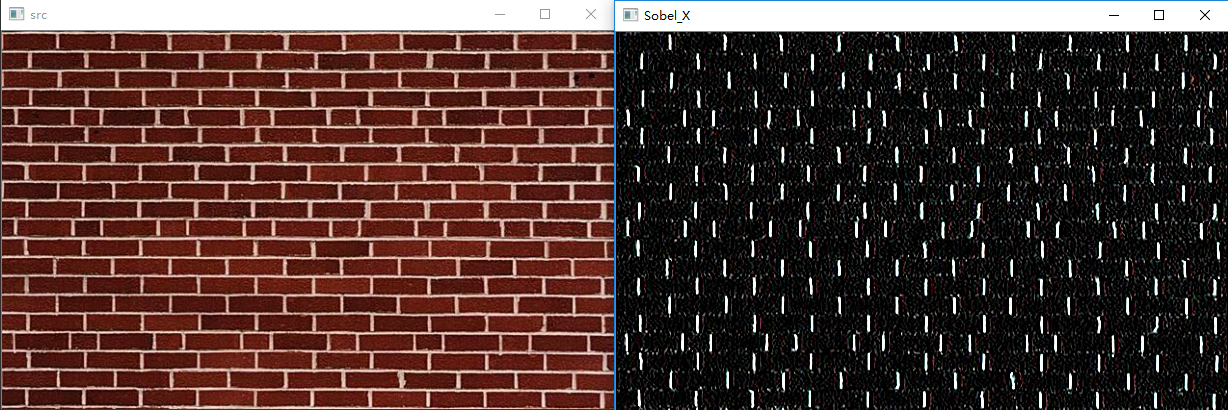
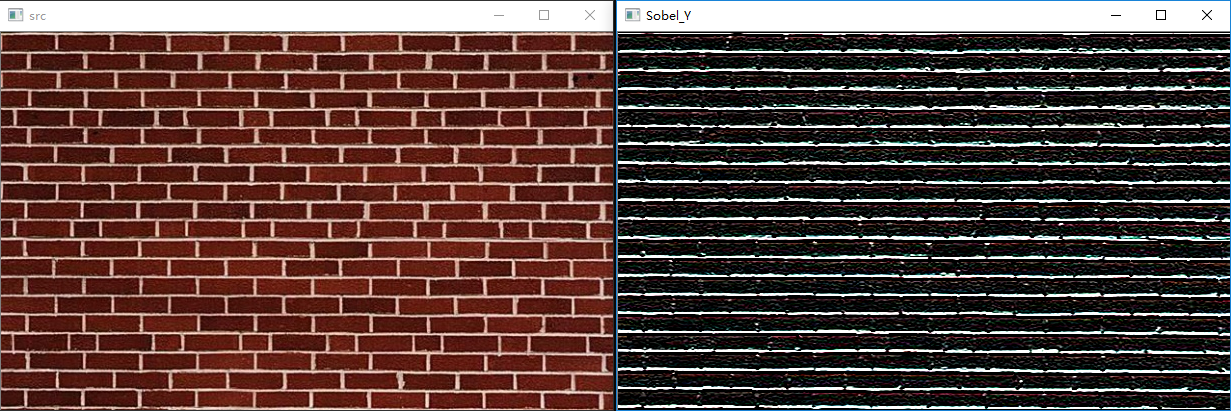
其中, dx=1,dy=0,表示计算X方向的导数,检测出的是垂直方向上的边缘;dx=0,dy=1,表示计算Y方向的导数,检测出的是水平方向上的边缘。
ksize 表示卷积核的大小,只能为奇数 1、3、5、7 等,特殊情况:当ksize <= 0 时,采用的模板为3 * 3 的Scharr内核。
当ksize=3时,Sobel内核可能产生比较明显的误差,此时,可以使用 Scharr 函数,该函数仅作用于大小为3的内核。具有跟sobel一样的速度,但结果更精确,其内核为:
( Gx ) [ − 3 0 + 3 − 10 0 + 10 − 3 0 + 3 ] left[ begin{matrix} -3 & 0 & +3 \ -10 & 0 & +10 \ -3 & 0 & +3 end{matrix} right] tag{ Gx } ⎣⎡−3−10−3000+3+10+3⎦⎤( Gx )
( Gy )
[
−
3
−
10
−
3
0
0
0
+
3
+
10
+
3
]
left[ begin{matrix} -3 & -10 & -3 \ 0 & 0 & 0 \ +3 & +10 & +3 end{matrix} right] tag{ Gy }
⎣⎡−30+3−100+10−30+3⎦⎤( Gy )
其调用格式为:
/// 求 X方向梯度
Sobel(src_gray,grad_x,ddepth, 1, 0, CV_SCHARR, scale, delta, BORDER_DEFAULT );
/// 求 Y方向梯度
Sobel(src_gray,grad_y,ddepth, 0, 1, CV_SCHARR, scale, delta, BORDER_DEFAULT );
double scale:默认1。
double delta:默认0。
int borderType:默认值为BORDER_DEFAULT。
调用 Sobel 实现图像效果如下:
对 X 方向求导
对 Y 方向求导
Laplace算子
Laplace算子也是一种边缘检测算子,与Sobel算子不同的地方为它是二阶微分求导,Sobel为一阶微分,如下图所示:
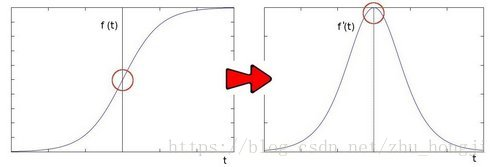
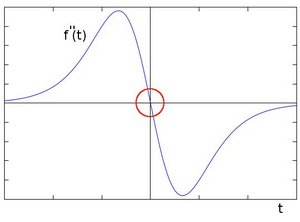
经过二阶微分求导后会出现正峰值点与负峰值点,中间有过零点,这一特性使得Laplace在处理边缘变化平缓的场合也能很好地将边缘检测出来。
OpenCV中Laplace算子被封装在
CV_EXPORTS_W void Laplacian( InputArray src, OutputArray dst, int ddepth,
                             int ksize=1, double scale=1, double delta=0,
                             int borderType=BORDER_DEFAULT );
这个函数中,其中:
src表示输入原图像;
dst表示输出目标图像;
ddepth表示图像深度,若 ddepth = -1, 代表输出图像与输入图像相同的深度(若输入图像为CV_8UC1格式,如灰度图等,此处必须设置成CV_16UC1格式,因为进行Laplace卷积运算时可能出现>8 bits(255)也可能出现 <0 的情况,此处转换为16位得到完整的Laplace变换后的值,再通过convertScaleAbs(InputArray src, OutputArray dst,double alpha=1, double beta=0)函数将16位图像转换为8位图像);
ksize 表示卷积核的大小,只能为奇数 1、3、5、7 等,特殊情况:ksize=1 时,采用的模板为3 * 1 或 1 * 3;
double scale:默认1;
double delta:默认0;
int borderType:默认值为BORDER_DEFAULT;
调用 Laplacian 实现图像效果如下:
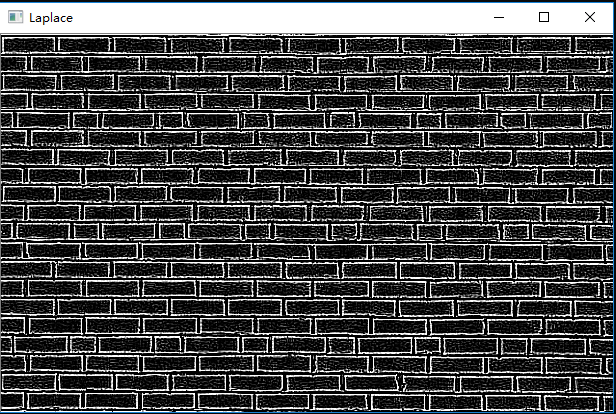
可以看出,比起Sobel算子来说,Laplace算子对X方向与Y方向的边缘信息都能够比较好的提取出来。
通过自己构造卷积核实现卷积滤波
OpenCV中还提供了一种更加自由的卷积操作函数:
CV_EXPORTS_W void filter2D( InputArray src, OutputArray dst, int ddepth, InputArray kernel,
 Point anchor=Point(-1,-1), double delta=0, int borderType=BORDER_DEFAULT );
其中:
src 表示输入图像;
dst 表示输出图像;
ddepth 表示图像深度;
kernel 表示卷积核,为单通道浮点矩阵, 如果想要应用不同的核于不同的通道,需要先用 split() 函数分解图像到单个色彩通道上,然后单独处理;
anchor 为核的锚点,表示一个被滤波的点在核内的位置(其中(-1,-1)点表示核的中心点);
delta 表示在储存目标图像前可选的添加到像素的值,默认值为0;
borderType 表示像素向外逼近的方法,默认值是BORDER_DEFAULT,即对全部边界进行计算。
Sobel卷积核
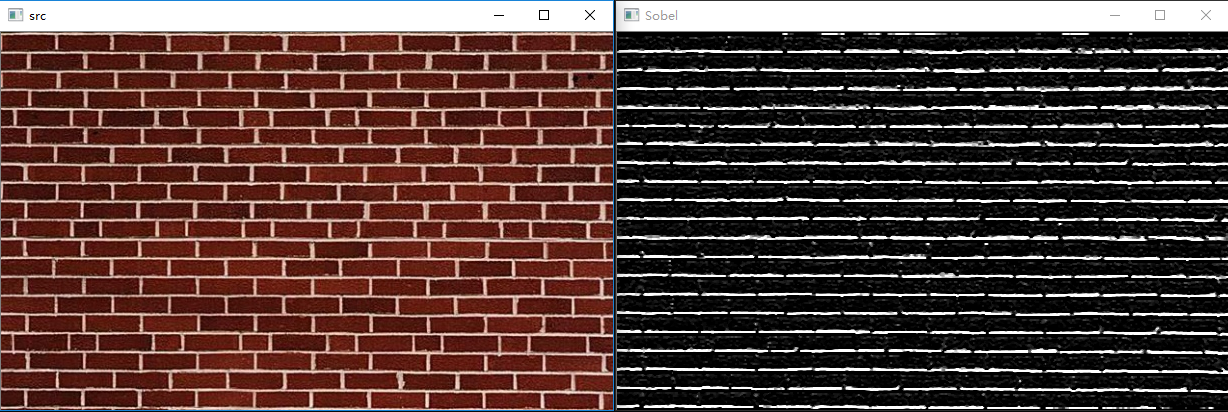
同样的,我们使用 sobel 算子来实现滤波操作,这次我们自己构造几个不同的卷积核来对同一幅图像进行 sobel 滤波看看会有什么效果,第一种如下:
( Gx )
水
平
S
o
b
e
l
[
−
1
0
1
−
2
0
2
−
1
0
1
]
水平Sobel left[ begin{matrix} -1 & 0 & 1 \ -2 & 0 & 2 \ -1 & 0 & 1 end{matrix} right] tag{ Gx }
水平Sobel⎣⎡−1−2−1000121⎦⎤( Gx )
测试效果图:

( Gy )
垂
直
S
o
b
e
l
[
−
1
−
2
−
1
0
0
0
1
2
1
]
垂直Sobel left[ begin{matrix} -1 & -2 & -1 \ 0 & 0 & 0 \ 1 & 2 & 1 end{matrix} right] tag{ Gy }
垂直Sobel⎣⎡−101−202−101⎦⎤( Gy )
测试效果图:
( Gx )
水
平
S
c
h
a
r
r
[
−
3
0
+
3
−
10
0
+
10
−
3
0
+
3
]
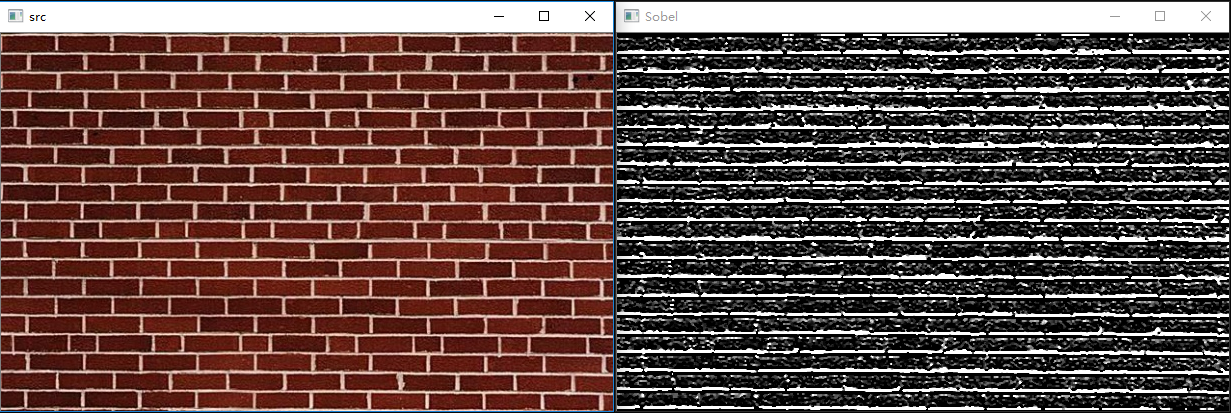
水平 Scharr left[ begin{matrix} -3 & 0 & +3 \ -10 & 0 & +10 \ -3 & 0 & +3 end{matrix} right] tag{ Gx }
水平Scharr⎣⎡−3−10−3000+3+10+3⎦⎤( Gx )
测试效果图:

( Gy )
垂
直
S
c
h
a
r
r
[
−
3
−
10
−
3
0
0
0
+
3
+
10
+
3
]
垂直 Scharr left[ begin{matrix} -3 & -10 & -3 \ 0 & 0 & 0 \ +3 & +10 & +3 end{matrix} right] tag{ Gy }
垂直Scharr⎣⎡−30+3−100+10−30+3⎦⎤( Gy )
测试效果图:
Laplace 卷积核
(1)
L
a
p
l
a
c
e
[
−
1
−
1
−
1
−
1
8
−
1
−
1
−
1
−
1
]
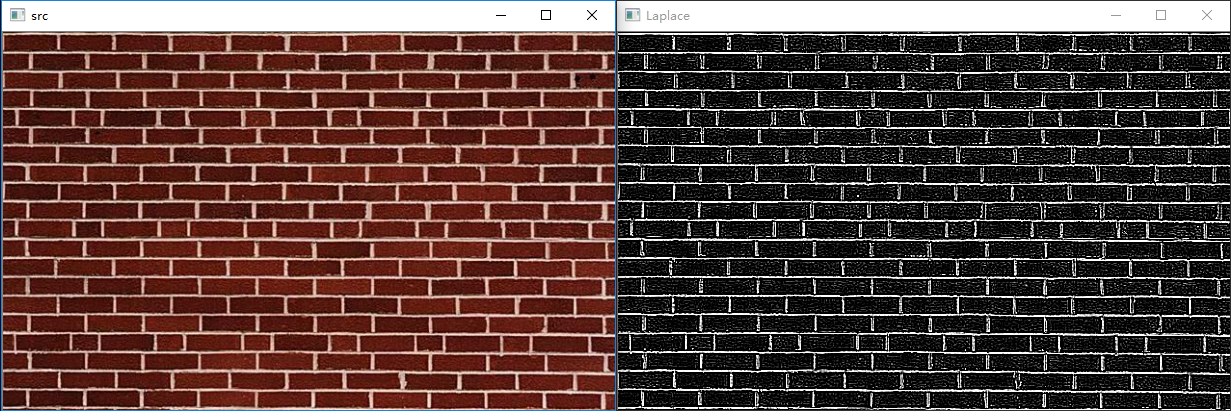
Laplace left[ begin{matrix} -1 & -1 & -1 \ -1 & 8 & -1 \ -1 & -1 & -1 end{matrix} right] tag{1}
Laplace⎣⎡−1−1−1−18−1−1−1−1⎦⎤(1)
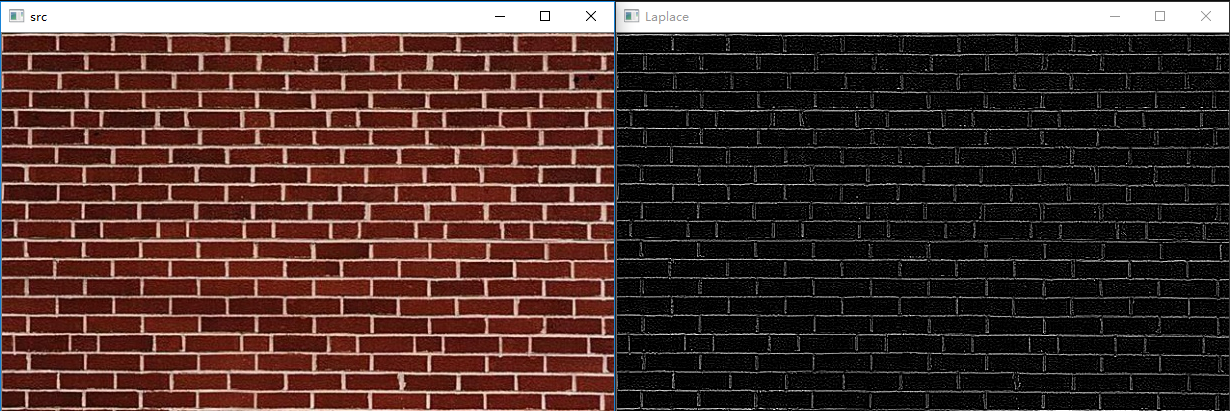
测试效果图:
(2)
L
a
p
l
a
c
e
[
0
−
1
0
−
1
4
−
1
0
−
1
0
]
Laplace left[ begin{matrix} 0 & -1 & 0 \ -1 & 4 & -1 \ 0 & -1 & 0 end{matrix} right] tag{2}
Laplace⎣⎡0−10−14−10−10⎦⎤(2)
测试效果图:
倾斜方向卷积核
[
−
1
0
0
0
1
0
0
0
0
]
left[ begin{matrix} -1 & 0 & 0 \ 0 & 1 & 0 \ 0 & 0 & 0 end{matrix} right]
⎣⎡−100010000⎦⎤
测试效果图:

很多时候我们需要对特殊方向的边缘进行检测,但是OpenCV中只封装了水平、垂直或者是全方向的边缘检测,实际项目中有时我们需要对不同方向进行边缘检测,通过filter2D()这个函数结合自己构建的不同的卷积核我们可以很方便的实现不同方向的边缘检测,可以是水平(X轴)方向的,垂直(Y方向),甚至是倾斜(如“/” 或 “”)方向的边缘检测。
实现代码
// Convolution_Laplace.cpp : 定义控制台应用程序的入口点。
//

#include "stdafx.h"
#include "highgui.h"
#include "cv.h"

using namespace std;
using namespace cv;

void ConvolutionFunction_kernel(Mat InputImage)  //自己构造卷积核函数
{
	Mat OutSobelImage, OutLaplaceImage;
	Mat Kernel_Scharr = (Mat_<char>(3, 3) << -3, 0, 3 ,
									        -10, 0, 10,
									         -3, 0, 3 );
	Mat Kernel_Sobel = (Mat_<char>(3, 3) << -1, 0, 1,
											-2, 0, 2,
											-1, 0, 1);
	Mat Kernel_Laplace = (Mat_<char>(3, 3) << -1, -1, -1,
		                                      -1,  8, -1,
		                                      -1, -1, -1);

	filter2D(InputImage, OutSobelImage, CV_16UC1, Kernel_Sobel);
	filter2D(InputImage, OutLaplaceImage, CV_16UC1, Kernel_Laplace);
	convertScaleAbs(OutSobelImage, OutSobelImage);
	convertScaleAbs(OutLaplaceImage, OutLaplaceImage);
	namedWindow("Laplace", CV_WINDOW_AUTOSIZE);
	namedWindow("Sobel", CV_WINDOW_AUTOSIZE);
	imshow("Laplace", OutLaplaceImage);
	imshow("Sobel", OutSobelImage);
}

void ConvolutionFunction_OpenCV(Mat InputImage)  //调用OpenCV库中的卷积函数
{
	Mat OutSobelImage, OutLaplaceImage;
	Sobel(InputImage, OutSobelImage, CV_16UC1, 1, 0, 3);
	//Scharr(InputImage, OutSobelImage, CV_16UC1, 1, 0);
	Laplacian(InputImage, OutLaplaceImage, CV_16UC1, 3);
	convertScaleAbs(OutSobelImage, OutSobelImage);
	convertScaleAbs(OutLaplaceImage, OutLaplaceImage);
	namedWindow("Laplace", CV_WINDOW_AUTOSIZE);
	namedWindow("Sobel", CV_WINDOW_AUTOSIZE);
	imshow("Laplace", OutLaplaceImage);
	imshow("Sobel", OutSobelImage);
}

int _tmain(int argc, _TCHAR* argv[])
{
	Mat InputImage,GrayImage;
	InputImage = imread("walls.jpg", CV_LOAD_IMAGE_COLOR);
	cvtColor(InputImage, GrayImage, CV_BGR2GRAY);
	//ConvolutionFunction_OpenCV(GrayImage);
	ConvolutionFunction_kernel(GrayImage);
	namedWindow("src", CV_WINDOW_AUTOSIZE);
	imshow("src", InputImage);

	while (true)
	{
		if (waitKey(10)==27)
		{
			break;
		}
	}
	destroyAllWindows();
	return 0;
}
最后
以上就是秀丽网络最近收集整理的关于OpenCV学习笔记(七)图像卷积的全部内容,更多相关OpenCV学习笔记(七)图像卷积内容请搜索靠谱客的其他文章。


发表评论 取消回复