文章目录
- 1. 前言
- 2. 实现
- 2.1 定义Room相关的结构
- 1.2 定义Repository
- 1.3 定义ViewModel
- 1.4 定义RecyclerView
- 1.5 定义Activity
1. 前言
实现内容:
- 使用
Room框架来完成数据库的CRUD操作; - 对于查询到的数据库数据,使用
LiveData进行封装,使得每次数据库中数据更新后都可以自动渲染到RecyclerView控件;
2. 实现
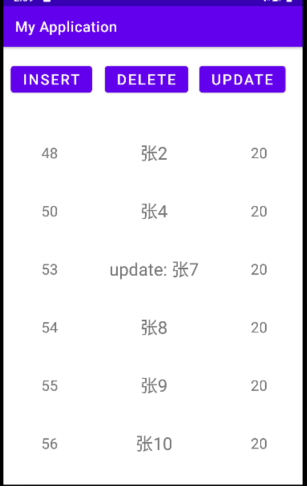
最后效果:

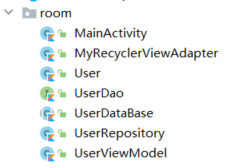
文件结构:

2.1 定义Room相关的结构
User表:
@Entity(tableName = "User")
class User {

    @PrimaryKey(autoGenerate = true)
    @ColumnInfo(name = "userId", typeAffinity = ColumnInfo.INTEGER)
    var id = 0

    @ColumnInfo(name = "userName", typeAffinity = ColumnInfo.TEXT)
    var name = ""

    @ColumnInfo(name = "userAge", typeAffinity = ColumnInfo.INTEGER)
    var age = 10

    // 可以让创建的时候忽略这个属性
    @Ignore
    var date = "2022年4月20日20:59:20"
}
使用@Entity注解标识表,使用tableName可以定制表名。@ColumnInfo来指定字段,typeAffinity用于指定该字段在数据库中的类型。最后的@Ignore标签可以用来忽略不需要加入到表中的数据。

同样可以在应用目录下找到这个数据库文件。不妨使用SQLiteStudio打开这个数据库文件:

可以看见确实@Ignore标签修饰的字段没有生成。
其实和SQLite差不多,只是做了一层封装。使得使用起来更简洁。
然后就是定义对应的接口操作层,有点类似于SpringBoot中常写的Service层:
@Dao  // 这个注解仅用作标识
interface UserDao {

    @Insert(onConflict = OnConflictStrategy.REPLACE)
    fun insertUser(user: User): Unit

    @Delete
    fun deleteUser(user: User): Unit

    @Query("select * from User")
    fun getAllUser(): LiveData<List<User>>

    @Query("select * from User where userId = :userId")
    fun getUserById(userId: Int): User

    @Update(onConflict = OnConflictStrategy.REPLACE)
    fun updateUser(user: User)
}
上面值得注意的是其中一个方法,即:
@Query("select * from User")
fun getAllUser(): LiveData<List<User>>
在返回的数据List<User>可以直接使用LiveData来进行包起来。最后是获取数据库实例的类,这个类定义为单例,所有的数据库中表相关的Dao层不需要实现,声明为抽象方法,具体的实现由Room自动实现,所以这个类也需要声明为abstract:
@Database(entities = arrayOf(User::class), version = 1, exportSchema = false)
abstract class UserDataBase : RoomDatabase() {
    // 定义的抽象方法,由Room自动实现,我们不需要实现
    abstract fun userDao(): UserDao


    companion object {
        // 单例模式
        private var mInstance: UserDataBase? = null
        private const val DATABASE_NAME = "User.db"

        @JvmStatic
        fun getInstance(context: Context): UserDataBase? {
            if (mInstance == null) {
                synchronized(UserDataBase::class.java) {
                    if (mInstance == null) {
                        mInstance = createInstance(context)
                    }
                }
            }
            return mInstance
        }

        private fun createInstance(context: Context): UserDataBase {
            mInstance = Room.databaseBuilder(
                context.applicationContext,
                UserDataBase::class.java,
                DATABASE_NAME
            ).build()
            return mInstance as UserDataBase
        }
    }
}
1.2 定义Repository
然后定义一层Repository,类似于SpringBoot中的Controller层。添加这一层主要是因为在Room要求数据操作不能在UI线程中,需要在子线程中进行操作。且在这个类中完成获取数据库的实例对象,然后再次封装CRUD方法,可以在自定义ViewModel的类中更加简洁。
/**
 * @author 梦否 on 2022/4/20
 * @blog https://mengfou.blog.csdn.net/
 */
class UserRepository(var context: Context) {

    private var userDao: UserDao? = null

    init {
        // 获取到数据库操作的Dao层接口
        userDao = UserDataBase.getInstance(context)?.userDao()
    }

    // Android-Room要求数据操作不能在UI线程中,需要在子线程中进行操作
    fun insertUser(user: User) {
        GlobalScope.launch {
            userDao?.insertUser(user)
        }
    }

    fun deleteUserById(id: Int) {
        val user = User().apply {
            this.id = id
        }
        GlobalScope.launch {
            userDao?.deleteUser(user)
        }
    }

    fun updateUser(user:User){
        GlobalScope.launch {
            userDao?.updateUser(user)
        }
    }

    fun getAllUsers(): LiveData<List<User>>? {
        return userDao?.getAllUser()
    }
}
1.3 定义ViewModel
最后在ViewModel中共只需要完成获取所有数据即可。因为返回的是LiveData所以我们可以设置监听:
class UserViewModel() : ViewModel() {

    var repository: UserRepository? = null
    var context: Context? = null

    fun getUsers(): LiveData<List<User>>? {
        val allUsers = repository?.getAllUsers()
        return allUsers
    }
}
1.4 定义RecyclerView
在布局文件中,因为需要使用RecyclerView来渲染数据,所以这里首先定义一个适配器类,且在这个控件需要完成数据库中数据发生改变后就自动渲染。所以这里使用dataBinding来定义布局文件:
<layout xmlns:android="http://schemas.android.com/apk/res/android"
    xmlns:app="http://schemas.android.com/apk/res-auto"
    xmlns:tools="http://schemas.android.com/tools">

    <data>
        <variable
            name="user"
            type="com.weizu.myapplication.room.User" />
    </data>

    <androidx.constraintlayout.widget.ConstraintLayout
        android:layout_width="match_parent"
        android:layout_height="80dp">

        <TextView
            android:id="@+id/item_recyclerview_id"
            android:layout_width="wrap_content"
            android:layout_height="wrap_content"
            android:text="@{ String.valueOf(user.id) }"
            android:textSize="20sp"
            app:layout_constraintBottom_toBottomOf="parent"
            app:layout_constraintEnd_toStartOf="@+id/guideline2"
            app:layout_constraintStart_toStartOf="parent"
            app:layout_constraintTop_toTopOf="parent" />

        <androidx.constraintlayout.widget.Guideline
            android:id="@+id/guideline2"
            android:layout_width="wrap_content"
            android:layout_height="wrap_content"
            android:orientation="vertical"
            app:layout_constraintGuide_percent="0.3" />

        <androidx.constraintlayout.widget.Guideline
            android:id="@+id/guideline3"
            android:layout_width="wrap_content"
            android:layout_height="wrap_content"
            android:orientation="vertical"
            app:layout_constraintGuide_percent="0.7080292" />

        <TextView
            android:id="@+id/room_recyclerview_name"
            android:layout_width="wrap_content"
            android:layout_height="wrap_content"
            android:text="@{ user.name }"
            android:textSize="24sp"
            app:layout_constraintBottom_toBottomOf="parent"
            app:layout_constraintEnd_toEndOf="parent"
            app:layout_constraintStart_toStartOf="parent"
            app:layout_constraintTop_toTopOf="parent" />

        <TextView
            android:id="@+id/room_recyclerview_age"
            android:layout_width="wrap_content"
            android:layout_height="wrap_content"
            android:text="@{ String.valueOf(user.age) }"
            android:textSize="20sp"
            app:layout_constraintBottom_toBottomOf="parent"
            app:layout_constraintEnd_toEndOf="parent"
            app:layout_constraintStart_toStartOf="@+id/guideline3"
            app:layout_constraintTop_toTopOf="parent" />
    </androidx.constraintlayout.widget.ConstraintLayout>
</layout>
然后定义对应的适配器:
class MyRecyclerViewAdapter(val context: Context, var datas: List<User>) :
    RecyclerView.Adapter<MyRecyclerViewAdapter.MyViewHolder>() {

    fun setData(datas: List<User>) {
        this.datas = datas
    }

    override fun onCreateViewHolder(parent: ViewGroup, viewType: Int): MyViewHolder {
        val binding = DataBindingUtil.inflate<RoomRecyclerviewItemBinding>(
            LayoutInflater.from(context),
            R.layout.room_recyclerview_item,
            parent,
            false
        )
        val myViewHolder = MyViewHolder(binding.root).apply {
            this.binding = binding
        }
        return myViewHolder
    }

    override fun onBindViewHolder(holder: MyViewHolder, position: Int) {
        datas.apply {
            holder.binding?.user = datas.get(position)
        }
    }

    override fun getItemCount(): Int {
        return datas.size
    }

    inner class MyViewHolder(view: View) : RecyclerView.ViewHolder(view) {
        var binding: RoomRecyclerviewItemBinding? = null
    }
}
1.5 定义Activity
最后就是在Activity中进行使用了:
class MainActivity : AppCompatActivity() {

    private val userRepository: UserRepository by lazy {
        val userRepository = UserRepository(this)
        userRepository
    }

    override fun onCreate(savedInstanceState: Bundle?) {
        super.onCreate(savedInstanceState)
        val binding =
            DataBindingUtil.setContentView<ActivityMain2Binding>(
                this,
                R.layout.activity_main2
            )

        val myViewModel = ViewModelProvider(this, ViewModelProvider.NewInstanceFactory())
            .get(UserViewModel::class.java)

        myViewModel.context = this
        myViewModel.repository = userRepository

        val myRecyclerViewAdapter =
            MyRecyclerViewAdapter(this, userRepository.getAllUsers()?.value ?: ArrayList<User>())
        binding.recycleview.layoutManager = LinearLayoutManager(this)
        binding.recycleview.adapter = myRecyclerViewAdapter

        myViewModel.getUsers()?.observe(this) {
            myRecyclerViewAdapter.datas = it
            myRecyclerViewAdapter.notifyDataSetChanged()
            currentDatas = it
        }
    }

    private var count = 1
    private var currentDatas: List<User>? = null

    fun insert(view: View) {
        userRepository.insertUser(User().apply {
            name = "张${ count++ }"
            age = 20
        })
    }
    fun delete(view: View) {
        // 随机删除一个
        currentDatas?.let {
            if(currentDatas!!.isNotEmpty()) {
                val index = (Math.random() * currentDatas!!.size).toInt()
                currentDatas?.get(index)?.id?.let { userRepository.deleteUserById(it) }
            }
        }
    }
    fun update(view: View) {
        currentDatas?.let {
            if(currentDatas!!.isNotEmpty()) {
                // 随机修改一个用户信息
                val index = (Math.random() * currentDatas!!.size).toInt()
                currentDatas?.get(index)?.apply {
                    name = "update: ${ name }"
                    userRepository.updateUser(this)
                }
            }
        }
    }
}
至于主布局文件,比较简单这里不再给出。
最后
以上就是老迟到项链最近收集整理的关于【Android Jetpack】Room+ViewModel+LiveData1. 前言2. 实现的全部内容,更多相关【Android内容请搜索靠谱客的其他文章。


发表评论 取消回复