作为微服务框架,SpringCloud 将各个 业务拆分成 独立运行的模块。那各个模块之间是怎样通信的呢?SpringCloud 提供两种方法:1.Ribbon+RestTemplate 2.openFeign
一、客户端负载均衡:Spring Cloud Ribbon。
Spring Cloud Ribbon是基于HTTP和TCP的客户端负载工具,它是基于Netflix Ribbon实现的。通过Spring Cloud的封装,可以轻松地将面向服务的REST模板请求,自动转换成客户端负载均衡服务调用。
1、 Ribbion+RestTemplate方式
使用IntelliJIdea创建一个消费者工程, New Project ---> 选中Spring Initializr ---> 设置包名/工程名 ---> 勾选Web、Eureka Discovery、Ribbon等 ---> 设置存储路径。
修改配置文件application.properties
#端口
server.port=11000
#注册地址
eureka.client.serviceUrl.defaultZone=http://localhost:8080/eureka/
#服务名称
spring.application.name=ribbon
在入口类添加@EnableEurekaClient,@LoadBalanced,@Bean
package com.springcloud.ribbon;

import org.springframework.boot.SpringApplication;
import org.springframework.boot.autoconfigure.SpringBootApplication;
import org.springframework.cloud.client.loadbalancer.LoadBalanced;
import org.springframework.cloud.netflix.eureka.EnableEurekaClient;
import org.springframework.context.annotation.Bean;
import org.springframework.web.client.RestTemplate;

/**
 * 本例中使用Eureka服务中心所以用@EnableEurekaClient
 * 如果注册中心是zookeeper或其它,建议使用@EnableDiscoveryClient
 **/
@SpringBootApplication
@EnableEurekaClient
public class RibbonApplication {

    public static void main(String[] args) {
        SpringApplication.run(RibbonApplication.class, args);
    }

    //声明RestTemplate并添加@Bean和@LoadBalanced, @LoadBalance表示支持Ribbon的负载均衡。
    @LoadBalanced
    @Bean
    RestTemplate restTemplate() {
        return new RestTemplate();
    }

}
新建service 和controller ,结构如下:
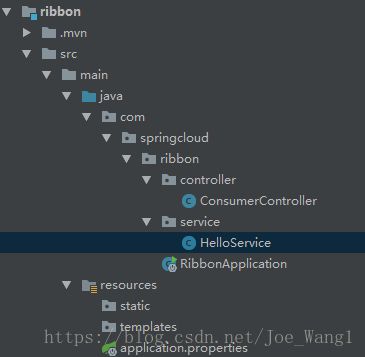
Helloservice:
package com.springcloud.ribbon.service;

import org.springframework.beans.factory.annotation.Autowired;
import org.springframework.stereotype.Service;
import org.springframework.web.client.RestTemplate;

/**
 * Created by joe强 on 2018/9/27 20:01
 */
@Service
public class HelloService {
    @Autowired
    RestTemplate restTemplate;
    public String doSomething(String parm){
        String result;
        result=restTemplate.getForObject("http://server1/ribbon?parm="+parm,String.class);//调用server1客户端 ribbon接口
        System.out.println(result);
        return  result;
    }
}
ConsumerController:
package com.springcloud.ribbon.controller;

import com.springcloud.ribbon.service.HelloService;
import org.springframework.beans.factory.annotation.Autowired;
import org.springframework.web.bind.annotation.RequestMapping;
import org.springframework.web.bind.annotation.RequestMethod;
import org.springframework.web.bind.annotation.RequestParam;
import org.springframework.web.bind.annotation.RestController;

/**
 * Created by joe强 on 2018/9/27 20:15
 */
@RestController
public class ConsumerController {
    @Autowired
    HelloService helloService;

    @RequestMapping(value = "/consumer",method = RequestMethod.GET)
    public String callRemoteService(@RequestParam String parm){
        String str= helloService.doSomething(parm);
        return "你调用了server1的API,结果是"+str;
    }
}
启动 Eureka服务注册中心,server1客户端,Zuul 网关,ribbon服务 。
访问 http://localhost:8080

服务启动之后 调用接口:
便于观察 先用 Zuul 网关 调用server1服务的接口
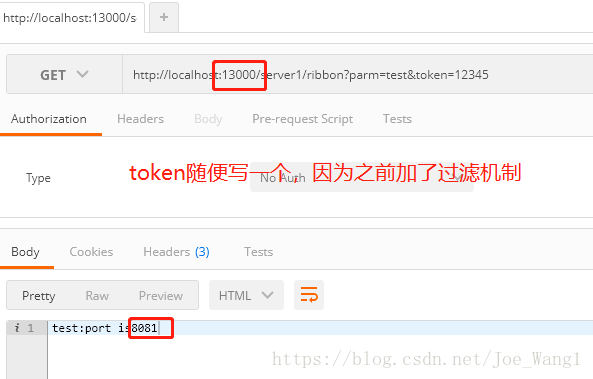
再 用Ribbon 服务 调用 server1 的ribbon 接口
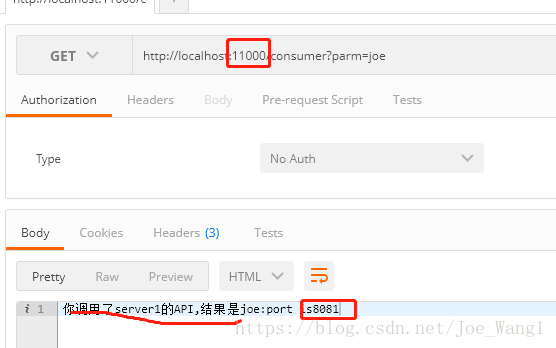
同样返回的是server1 的端口号,说明调用成功!
二、OpenFeign 方式
创建一个Feign服务, 调用service-hello1服务的接口。New Project ---> 选中Spring Initializr ---> 设置包名/工程名 ---> 勾选Web、Eureka Discovery、Feign等 ---> 设置存储路径。
修改配置文件,这里使用的是.properties 而不是yml, 两种都可以,选其中一个
#网关端口
server.port=12000
#服务名称
spring.application.name=Feign
#注册地址
eureka.client.serviceUrl.defaultZone=http://localhost:8080/eureka/
在 入口类中增加注解@EnableEurekaClient @EnableFeignClients
package com.springcloud.feign;

import org.springframework.boot.SpringApplication;
import org.springframework.boot.autoconfigure.SpringBootApplication;
import org.springframework.cloud.netflix.eureka.EnableEurekaClient;
import org.springframework.cloud.openfeign.EnableFeignClients;

@SpringBootApplication
@EnableEurekaClient //表示自己是服务注册中心客户端
@EnableFeignClients //使用Feign调用其他服务接口的客户端
public class FeignApplication {

	public static void main(String[] args) {
		SpringApplication.run(FeignApplication.class, args);
	}
}
新增Service接口和Controller类,包结构如下:
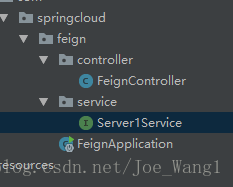
Server1Service:
package com.springcloud.feign.service;

import org.springframework.cloud.openfeign.FeignClient;
import org.springframework.web.bind.annotation.RequestMapping;
import org.springframework.web.bind.annotation.RequestParam;

/**
 * Created by joe强 on 2018/9/27 20:57
 */
@FeignClient(value = "server1")  //微服务server1客户端
public interface Server1Service {
    @RequestMapping(value = "/ribbon") //和需要调用接口的访问url一样
    String callribbonByFegin(@RequestParam(value = "parm")String parm);//调用微服务server1的接口ribbon
}
FeignController:
package com.springcloud.feign.controller;

import com.springcloud.feign.service.Server1Service;
import org.springframework.beans.factory.annotation.Autowired;
import org.springframework.web.bind.annotation.RequestMapping;
import org.springframework.web.bind.annotation.RequestParam;
import org.springframework.web.bind.annotation.RestController;

/**
 * Created by joe强 on 2018/9/27 21:02
 */
@RestController
public class FeignController {
    @Autowired
    Server1Service server1Service; //调用外部服务接口
    @RequestMapping(value = "/hello")
    public String sayHello(@RequestParam(value = "parm")String parm){
        System.out.println("---------"+parm+"---------");
        return server1Service.callribbonByFegin(parm);  //调用server1 服务的ribbon 接口

    }
    @RequestMapping(value = "/first")
    public String doFirst(){
        return "this is server1FeignDemo";
    }

}
启动 Feign服务:

使用Feign 调用 server1 接口:
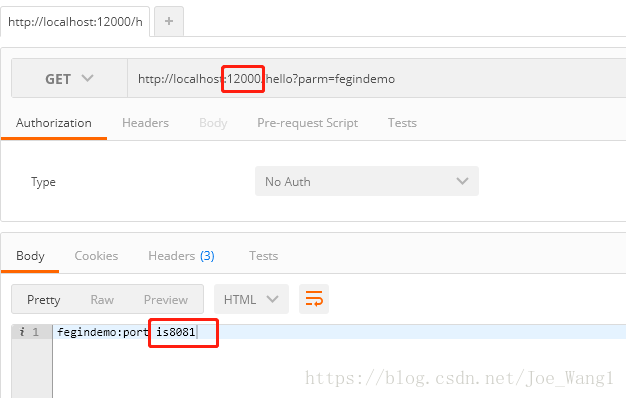
返回端口号8081说明调用成功!
最后
以上就是安静白云最近收集整理的关于Spring Cloud -- 消费者 (Feign、Ribbon 搭建)的全部内容,更多相关Spring内容请搜索靠谱客的其他文章。


发表评论 取消回复