自定义样式
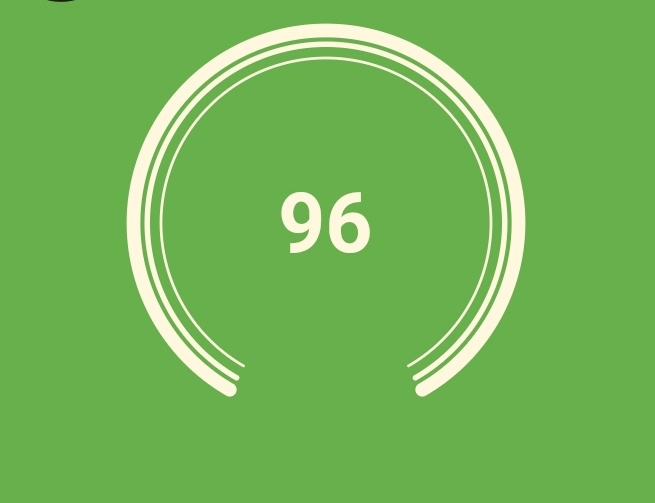
最近Flutter项目新需求中需要实现圆弧样式,如下图所示:

在Flutter自身UI组件中好像也没有直接可用圆弧并带缺口的组件。所以圆弧样式就需要自己自定义绘制了。 在Flutter中同样也有画布功能用于开发者绘制自定义样式。
画布
画布组件CustomPaint,绘制内容通过painter和foregroundPainter。painter绘制在child之前,foregroundPainter绘制在child之后,因此child内容覆盖在painter上层,foregroundPainter内容覆盖在child上层。
CustomPaint(
  painter: CanvasPainter(),
  foregroundPainter: ForegroundPainter(),
  child: Container(
      height: 50,
      decoration: BoxDecoration(
        border: Border.all(color: Colors.black, width: 5),
      ),
      child: Text("我是CustomPaint的child"),
  ),
),
绘制
绘制部分的实现由CustomPainter完成。首先创建一个继承CustomPainter的类对象。
- paint方法通过canvas绘制内容,size获取canvas大小。
- shouldRepaint判断是否需要重绘。
class DemoPainter extends CustomPainter{
  @override
  void paint(Canvas canvas, Size size) {
  }

  @override
  bool shouldRepaint(CustomPainter oldDelegate) {
    return null;
  }
}
圆弧计算
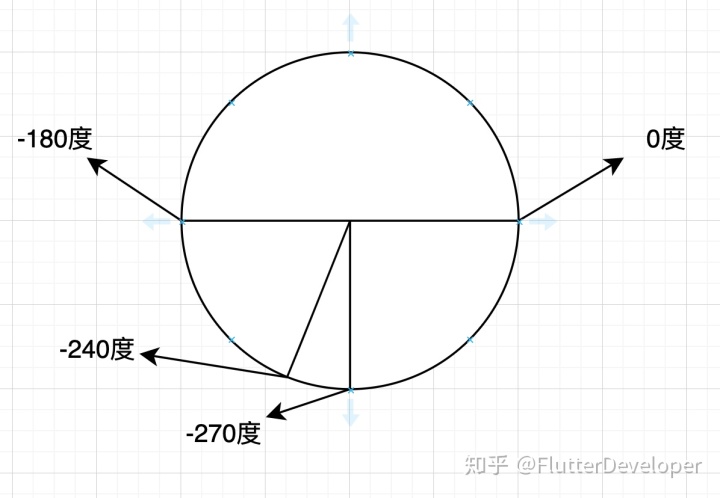
1度 = pi / 180,所以起始度数 = 度数 * pi / 180。
drawArc方法0度位置是在圆点水平位置左侧正方向是顺时针,所以圆弧绘制第一个起始度数参数为-240度(-240 * (pi / 180)),已知0度位置并知道360度位置。-240度位置距离圆点垂直位置下方度数为30,缺口总共度数为60。因此第二个度数参数为 300 * (pi / 180)。
圆弧实现
绘制圆弧使用drawArc方法,设置绘制圆形尺寸(圆心,半径)、起始角度、圆弧角度、是否闭合。
@override
  void paint(Canvas canvas, Size size) {
    Paint paint = Paint();
    paint.style = PaintingStyle.stroke;
    paint.strokeWidth = 5;
    paint.strokeCap = StrokeCap.round;
    paint.color = Colors.white;
    canvas.drawArc(
        Rect.fromCircle(
            center: Offset(size.width / 2, size.height / 2), radius: 70),
        -240 * (pi / 180),
        300 * (pi / 180),
        false,
        paint);
    paint.strokeWidth = 2;
    canvas.drawArc(
        Rect.fromCircle(
            center: Offset(size.width / 2, size.height / 2), radius: 65),
        -240 * (pi / 180),
        300 * (pi / 180),
        false,
        paint);
    paint.strokeWidth = 1;
    canvas.drawArc(
        Rect.fromCircle(
            center: Offset(size.width / 2, size.height / 2), radius: 60),
        -240 * (pi / 180),
        300 * (pi / 180),
        false,
        paint);
  }
另外CustomPainter还有child,可以通过Stack将文本内容通过Text居中显示,当然UI中间文本和按钮当然也可以用画布绘制的方式实现,完整画布代码如下:
DemoPainter(
   painter: CanvasPainter(),
   foregroundPainter: ForegroundPainter(),
   child: Container(
     height: 50,
     decoration: BoxDecoration(
       border: Border.all(color: Colors.black, width: 5),
     ),
     child: Stack(
       children: <Widget>[
         Text("我是CustomPaint的child"),
         Center(
           child: Text(
             "96",
             style: TextStyle(
               color: Colors.white,
               fontSize: 30,
               fontWeight: FontWeight.bold,
             ),
           ),
         )
       ],
     ),
   ),
 ),
最终效果
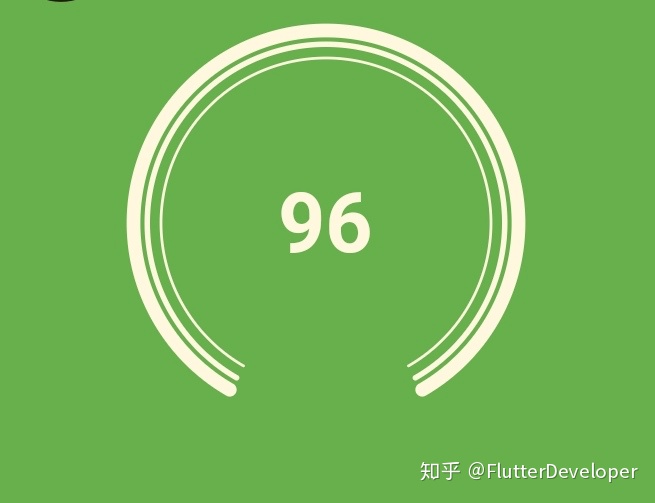
这只是比较简单的画布应用,可以用画布绘制图片、根据数学公式绘制更多图形、文字和其他绚丽自定义样式。Canvas在不管是在前端、客户端都是会有类似的使用场景,而且接触多了之后会发现每个语言上封装的接口和方法都很相似,因为在做Android开发的时候也接触过确实是大同小异,所以画布其他具体功能不再展开。
最后的最后介绍两个优秀的Flutter图表开源库Syncfusion Flutter Charts、Flutter Charting 。你会惊喜的发现通过画布实现图表功能原来可以这么酷炫。
Demo代码地址
参考
- www.codercto.com/a/36364.htm…
- www.youtube.com/watch?v=kp1…
作者:JulyYu
链接:https://juejin.im/post/5d64ab25f265da03e523430c
来源:掘金
最后
以上就是不安草莓最近收集整理的关于canvas画布 带箭头的虚线_Flutter小技巧之画布使用的全部内容,更多相关canvas画布内容请搜索靠谱客的其他文章。


发表评论 取消回复