转载自:https://www.cnblogs.com/fp2952/p/9193959.html
概要
基于上文讲解的spring cloud 授权服务的搭建,本文扩展了spring security 的登陆方式,增加手机验证码登陆、二维码登陆。 主要实现方式为使用自定义filter、 AuthenticationProvider、 AbstractAuthenticationToken 根据不同登陆方式分别处理。 本文相应代码在Github上已更新。
GitHub 地址:https://github.com/fp2952/spring-cloud-base/tree/master/auth-center/auth-center-provider
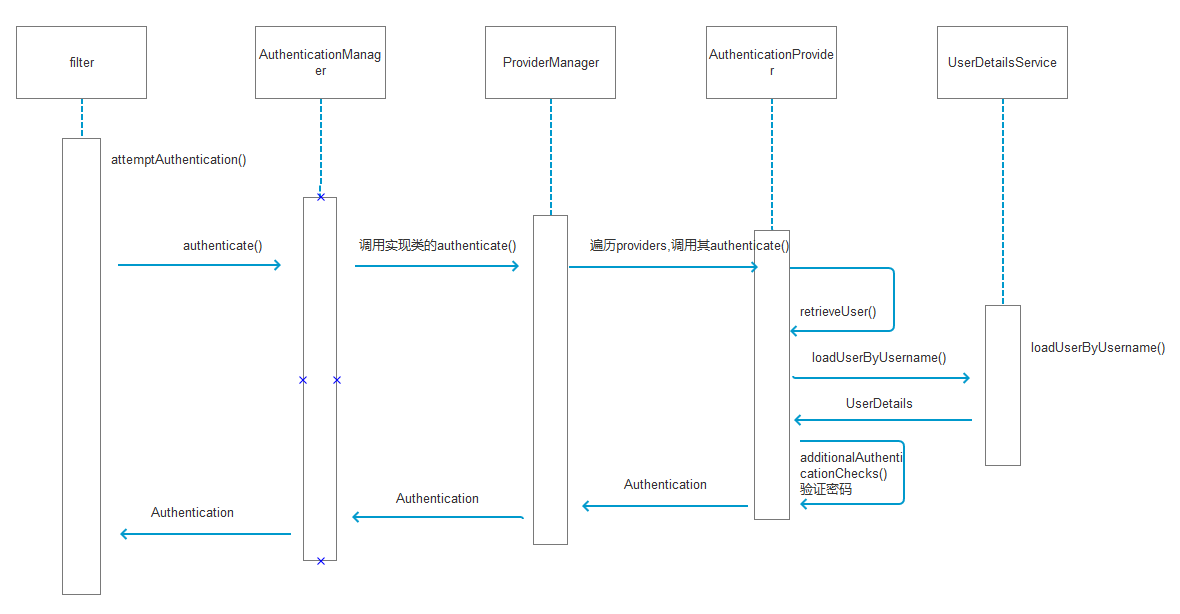
srping security 登陆流程

关于二维码登陆
二维码扫码登陆前提是已在微信端登陆,流程如下:
- 用户点击二维码登陆,调用后台接口生成二维码(带参数key), 返回二维码链接、key到页面
- 页面显示二维码,提示扫码,并通过此key建立websocket
- 用户扫码,获取参数key,点击登陆调用后台并传递key
- 后台根据微信端用户登陆状态拿到userdetail, 并在缓存(redis)中维护 key: userDetail 关联关系
- 后台根据websocket: key通知对于前台页面登陆
- 页面用此key登陆
最后一步用户通过key登陆就是本文的二维码扫码登陆部分,实际过程中注意二维码超时,redis超时等处理
自定义LoginFilter
自定义过滤器,实现AbstractAuthenticationProcessingFilter,在attemptAuthentication方法中根据不同登陆类型获取对于参数、 并生成自定义的 MyAuthenticationToken。
    @Override
    public Authentication attemptAuthentication(HttpServletRequest request, HttpServletResponse response) throws AuthenticationException, IOException, ServletException {
        if (postOnly && !request.getMethod().equals("POST")) {
            throw new AuthenticationServiceException(
                    "Authentication method not supported: " + request.getMethod());
        }

        // 登陆类型:user:用户密码登陆;phone:手机验证码登陆;qr:二维码扫码登陆
        String type = obtainParameter(request, "type");
        String mobile = obtainParameter(request, "mobile");
        MyAuthenticationToken authRequest;
        String principal;
        String credentials;

        // 手机验证码登陆
        if("phone".equals(type)){
            principal = obtainParameter(request, "phone");
            credentials = obtainParameter(request, "verifyCode");
        }
        // 二维码扫码登陆
        else if("qr".equals(type)){
            principal = obtainParameter(request, "qrCode");
            credentials = null;
        }
        // 账号密码登陆
        else {
            principal = obtainParameter(request, "username");
            credentials = obtainParameter(request, "password");
            if(type == null)
                type = "user";
        }
        if (principal == null) {
            principal = "";
        }
        if (credentials == null) {
            credentials = "";
        }
        principal = principal.trim();
        authRequest = new MyAuthenticationToken(
                principal, credentials, type, mobile);
        // Allow subclasses to set the "details" property
        setDetails(request, authRequest);
        return this.getAuthenticationManager().authenticate(authRequest);
    }

    private void setDetails(HttpServletRequest request,
                            AbstractAuthenticationToken authRequest) {
        authRequest.setDetails(authenticationDetailsSource.buildDetails(request));
    }

    private String obtainParameter(HttpServletRequest request, String parameter) {
        return request.getParameter(parameter);
    }
自定义 AbstractAuthenticationToken
继承 AbstractAuthenticationToken,添加属性 type,用于后续判断。
public class MyAuthenticationToken extends AbstractAuthenticationToken {

    private static final long serialVersionUID = 110L;
    private final Object principal;
    private Object credentials;
    private String type;
    private String mobile;

    /**
     * This constructor can be safely used by any code that wishes to create a
     * <code>UsernamePasswordAuthenticationToken</code>, as the {@link
     * #isAuthenticated()} will return <code>false</code>.
     *
     */
    public MyAuthenticationToken(Object principal, Object credentials,String type, String mobile) {
        super(null);
        this.principal = principal;
        this.credentials = credentials;
        this.type = type;
        this.mobile = mobile;
        this.setAuthenticated(false);
    }

    /**
     * This constructor should only be used by <code>AuthenticationManager</code> or <code>AuthenticationProvider</code>
     * implementations that are satisfied with producing a trusted (i.e. {@link #isAuthenticated()} = <code>true</code>)
     * token token.
     *
     * @param principal
     * @param credentials
     * @param authorities
     */
    public MyAuthenticationToken(Object principal, Object credentials,String type, String mobile, Collection<? extends GrantedAuthority> authorities) {
        super(authorities);
        this.principal = principal;
        this.credentials = credentials;
        this.type = type;
        this.mobile = mobile;
        super.setAuthenticated(true);
    }


    @Override
    public Object getCredentials() {
        return this.credentials;
    }

    @Override
    public Object getPrincipal() {
        return this.principal;
    }

    public String getType() {
        return this.type;
    }

    public String getMobile() {
        return this.mobile;
    }

    public void setAuthenticated(boolean isAuthenticated) throws IllegalArgumentException {
        if(isAuthenticated) {
            throw new IllegalArgumentException("Cannot set this token to trusted - use constructor which takes a GrantedAuthority list instead");
        } else {
            super.setAuthenticated(false);
        }
    }

    public void eraseCredentials() {
        super.eraseCredentials();
        this.credentials = null;
    }
}
自定义 AuthenticationProvider
实现 AuthenticationProvider
代码与 AbstractUserDetailsAuthenticationProvider 基本一致,只需修改 authenticate 方法 及 createSuccessAuthentication 方法中的 UsernamePasswordAuthenticationToken 为我们的 token, 改为:
    public Authentication authenticate(Authentication authentication) throws AuthenticationException {
        // 此处修改断言自定义的 MyAuthenticationToken
        Assert.isInstanceOf(MyAuthenticationToken.class, authentication, this.messages.getMessage("MyAbstractUserDetailsAuthenticationProvider.onlySupports", "Only MyAuthenticationToken is supported"));
        // ...
    }

    protected Authentication createSuccessAuthentication(Object principal, Authentication authentication, UserDetails user) {
        MyAuthenticationToken result = new MyAuthenticationToken(principal, authentication.getCredentials(),((MyAuthenticationToken) authentication).getType(),((MyAuthenticationToken) authentication).getMobile(), this.authoritiesMapper.mapAuthorities(user.getAuthorities()));
        result.setDetails(authentication.getDetails());
        return result;
    }
继承provider
继承我们自定义的AuthenticationProvider,编写验证方法additionalAuthenticationChecks及 retrieveUser
    /**
     * 自定义验证
     * @param userDetails
     * @param authentication
     * @throws AuthenticationException
     */
    protected void additionalAuthenticationChecks(UserDetails userDetails, MyAuthenticationToken authentication) throws AuthenticationException {
        Object salt = null;
        if(this.saltSource != null) {
            salt = this.saltSource.getSalt(userDetails);
        }

        if(authentication.getCredentials() == null) {
            this.logger.debug("Authentication failed: no credentials provided");
            throw new BadCredentialsException(this.messages.getMessage("MyAbstractUserDetailsAuthenticationProvider.badCredentials", "Bad credentials"));
        } else {
            String presentedPassword = authentication.getCredentials().toString();

            // 验证开始
            if("phone".equals(authentication.getType())){
                // 手机验证码验证,调用公共服务查询后台验证码缓存: key 为authentication.getPrincipal()的value, 并判断其与验证码是否匹配,
                此处写死为 1000
                if(!"1000".equals(presentedPassword)){
                    this.logger.debug("Authentication failed: verifyCode does not match stored value");
                    throw new BadCredentialsException(this.messages.getMessage("MyAbstractUserDetailsAuthenticationProvider.badCredentials", "Bad verifyCode"));
                }
            }else if(MyLoginAuthenticationFilter.SPRING_SECURITY_RESTFUL_TYPE_QR.equals(authentication.getType())){
                // 二维码只需要根据 qrCode 查询到用户即可,所以此处无需验证
            }
            else {
                // 用户名密码验证
                if(!this.passwordEncoder.isPasswordValid(userDetails.getPassword(), presentedPassword, salt)) {
                    this.logger.debug("Authentication failed: password does not match stored value");
                    throw new BadCredentialsException(this.messages.getMessage("MyAbstractUserDetailsAuthenticationProvider.badCredentials", "Bad credentials"));
                }
            }
        }
    }

    protected final UserDetails retrieveUser(String username, MyAuthenticationToken authentication) throws AuthenticationException {
        UserDetails loadedUser;
        try {
            // 调用loadUserByUsername时加入type前缀
            loadedUser = this.getUserDetailsService().loadUserByUsername(authentication.getType() + ":" + username);
        } catch (UsernameNotFoundException var6) {
            if(authentication.getCredentials() != null) {
                String presentedPassword = authentication.getCredentials().toString();
                this.passwordEncoder.isPasswordValid(this.userNotFoundEncodedPassword, presentedPassword, (Object)null);
            }

            throw var6;
        } catch (Exception var7) {
            throw new InternalAuthenticationServiceException(var7.getMessage(), var7);
        }

        if(loadedUser == null) {
            throw new InternalAuthenticationServiceException("UserDetailsService returned null, which is an interface contract violation");
        } else {
            return loadedUser;
        }
    }
自定义 UserDetailsService
查询用户时根据类型采用不同方式查询: 账号密码根据用户名查询用户; 验证码根据 phone查询用户, 二维码可调用公共服务
    @Override
    public UserDetails loadUserByUsername(String var1) throws UsernameNotFoundException {

        BaseUser baseUser;
        String[] parameter = var1.split(":");
        // 手机验证码调用FeignClient根据电话号码查询用户
        if("phone".equals(parameter[0])){
            ResponseData<BaseUser> baseUserResponseData = baseUserService.getUserByPhone(parameter[1]);
            if(baseUserResponseData.getData() == null || !ResponseCode.SUCCESS.getCode().equals(baseUserResponseData.getCode())){
                logger.error("找不到该用户,手机号码:" + parameter[1]);
                throw new UsernameNotFoundException("找不到该用户,手机号码:" + parameter[1]);
            }
            baseUser = baseUserResponseData.getData();
        } else if("qr".equals(parameter[0])){
            // 扫码登陆根据key从redis查询用户
            baseUser = null;
        } else {
            // 账号密码登陆调用FeignClient根据用户名查询用户
            ResponseData<BaseUser> baseUserResponseData = baseUserService.getUserByUserName(parameter[1]);
            if(baseUserResponseData.getData() == null || !ResponseCode.SUCCESS.getCode().equals(baseUserResponseData.getCode())){
                logger.error("找不到该用户,用户名:" + parameter[1]);
                throw new UsernameNotFoundException("找不到该用户,用户名:" + parameter[1]);
            }
            baseUser = baseUserResponseData.getData();
        }

        // 调用FeignClient查询角色
        ResponseData<List<BaseRole>> baseRoleListResponseData = baseRoleService.getRoleByUserId(baseUser.getId());
        List<BaseRole> roles;
        if(baseRoleListResponseData.getData() == null ||  !ResponseCode.SUCCESS.getCode().equals(baseRoleListResponseData.getCode())){
            logger.error("查询角色失败!");
            roles = new ArrayList<>();
        }else {
            roles = baseRoleListResponseData.getData();
        }

        //调用FeignClient查询菜单
        ResponseData<List<BaseModuleResources>> baseModuleResourceListResponseData = baseModuleResourceService.getMenusByUserId(baseUser.getId());

        // 获取用户权限列表
        List<GrantedAuthority> authorities = convertToAuthorities(baseUser, roles);

        // 存储菜单到redis
        if( ResponseCode.SUCCESS.getCode().equals(baseModuleResourceListResponseData.getCode()) && baseModuleResourceListResponseData.getData() != null){
            resourcesTemplate.delete(baseUser.getId() + "-menu");
            baseModuleResourceListResponseData.getData().forEach(e -> {
                resourcesTemplate.opsForList().leftPush(baseUser.getId() + "-menu", e);
            });
        }

        // 返回带有用户权限信息的User
        org.springframework.security.core.userdetails.User user =  new org.springframework.security.core.userdetails.User(baseUser.getUserName(),
                baseUser.getPassword(), isActive(baseUser.getActive()), true, true, true, authorities);
        return new BaseUserDetail(baseUser, user);
    }
配置WebSecurityConfigurerAdapter
将我们自定义的类配置到spring security 登陆流程中
@Configuration
@Order(ManagementServerProperties.ACCESS_OVERRIDE_ORDER)
public class WebSecurityConfig extends WebSecurityConfigurerAdapter {

    // 自动注入UserDetailsService
    @Autowired
    private BaseUserDetailService baseUserDetailService;

    @Override
    public void configure(HttpSecurity http) throws Exception {
        http    // 自定义过滤器
                .addFilterAt(getMyLoginAuthenticationFilter(), UsernamePasswordAuthenticationFilter.class)
                // 配置登陆页/login并允许访问
                .formLogin().loginPage("/login").permitAll()
                // 登出页
                .and().logout().logoutUrl("/logout").logoutSuccessUrl("/backReferer")
                // 其余所有请求全部需要鉴权认证
                .and().authorizeRequests().anyRequest().authenticated()
                // 由于使用的是JWT,我们这里不需要csrf
                .and().csrf().disable();
    }

    /**
     * 用户验证
     * @param auth
     */
    @Override
    public void configure(AuthenticationManagerBuilder auth) {
        auth.authenticationProvider(myAuthenticationProvider());
    }

    /**
     * 自定义密码验证
     * @return
     */
    @Bean
    public MyAuthenticationProvider myAuthenticationProvider(){
        MyAuthenticationProvider provider = new MyAuthenticationProvider();
        // 设置userDetailsService
        provider.setUserDetailsService(baseUserDetailService);
        // 禁止隐藏用户未找到异常
        provider.setHideUserNotFoundExceptions(false);
        // 使用BCrypt进行密码的hash
        provider.setPasswordEncoder(new BCryptPasswordEncoder(6));
        return provider;
    }

    /**
     * 自定义登陆过滤器
     * @return
     */
    @Bean
    public MyLoginAuthenticationFilter getMyLoginAuthenticationFilter() {
        MyLoginAuthenticationFilter filter = new MyLoginAuthenticationFilter();
        try {
            filter.setAuthenticationManager(this.authenticationManagerBean());
        } catch (Exception e) {
            e.printStackTrace();
        }
        filter.setAuthenticationSuccessHandler(new MyLoginAuthSuccessHandler());
        filter.setAuthenticationFailureHandler(new SimpleUrlAuthenticationFailureHandler("/login?error"));
        return filter;
    }
}
最后
以上就是知性寒风最近收集整理的关于Spring Cloud OAuth2(二) 扩展登陆方式:账户密码登陆、 手机验证码登的全部内容,更多相关Spring内容请搜索靠谱客的其他文章。


发表评论 取消回复