1.hystrix的局部降级逻辑的处理方式
1.1局部服务降级(在服务提供方设置)
一般服务降级放在消费端,即 消费者端 ,但是提供者端一样能使用。
首先提供者,即8001 先从自身找问题,设置自身调用超时的峰值,峰值内正常运行,超出峰值需要有兜底的方法处理,作服务降级fallback
(1)在8001服务提供方引入Hystrix依赖
<!-- hystrix -->
<dependency>
    <groupId>org.springframework.cloud</groupId>
    <artifactId>spring-cloud-starter-netflix-hystrix</artifactId>
</dependency>
(2)对 8001 的service进行配置(对容易超时的方法进行配置) :
@Service
public class PaymentService {

    /**
     * 可以正常访问的方法
     * @param id
     * @return
     */
    public String paymentInfo_Ok(Integer id){
        return "线程池:" + Thread.currentThread().getName() + "  ,paymentInfo_OK,id:" + id;
    }

    /**
     超时访问的方法
     */
    @HystrixCommand(fallbackMethod = "timeoutHandler",commandProperties = {
            //设置峰值,超过 3 秒,就会调用兜底方法,这个时间也可以由feign控制
            @HystrixProperty(name = "execution.isolation.thread.timeoutInMilliseconds",value = "3000")
    })
    public String paymentInfo_Timeout(Integer id){
        int interTime = 5;
        //int i = 10/0;
        try{
            TimeUnit.SECONDS.sleep(interTime);
        }catch (Exception e){
            e.printStackTrace();
        }
        return "线程池:" + Thread.currentThread().getName() + "  ,paymentInfo_Timeout,id:" + id + "耗时" + interTime + "秒钟";
    }
   // 定义服务出现异常之后,兜底的方法
    public String timeoutHandler(Integer id){
        return "服务异常,请重试......";
    }
}
(3)在启动类上开启服务熔断
@SpringBootApplication
@EnableDiscoveryClient
@EnableCircuitBreaker //开启服务熔断
public class HystrixPaymentApplication {

    public static void main(String[] args) {
        SpringApplication.run(HystrixPaymentApplication.class,args);
    }
}
(4)启动8001服务测试:localhost:8001/payment/hystrix/timeout/1
(5)现在我们改动服务方里面的代码(模拟服务出现异常,而不是服务调用超时)
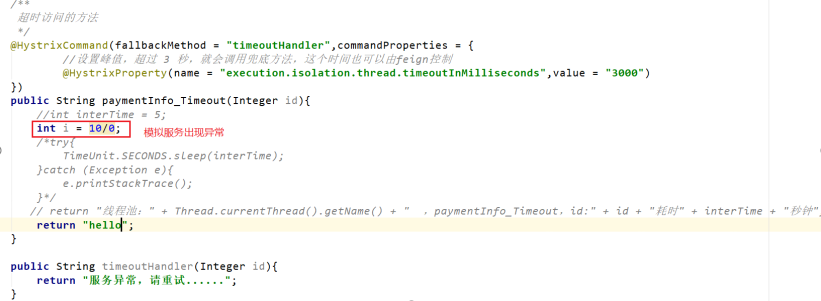
只要是我们服务不可用了(调用超时、内部错误),都可以用降级来处理。
1.2 局部服务降级(在消费方设置)
(1)将服务提供方关于所有服务降级的设置全部去掉
(2)在服务消费方引入hsytrix依赖
<dependency>
    <groupId>org.springframework.cloud</groupId>
    <artifactId>spring-cloud-starter-netflix-hystrix</artifactId>
</dependency>
(3)在启动类上开启服务熔断
@SpringBootApplication
@EnableDiscoveryClient
@EnableFeignClients //开启Feign客户端
@EnableCircuitBreaker//开启熔断器
public class HystrixOrderApplication80 {

    public static void main(String[] args) {
        SpringApplication.run(HystrixOrderApplication80.class,args);
    }
}
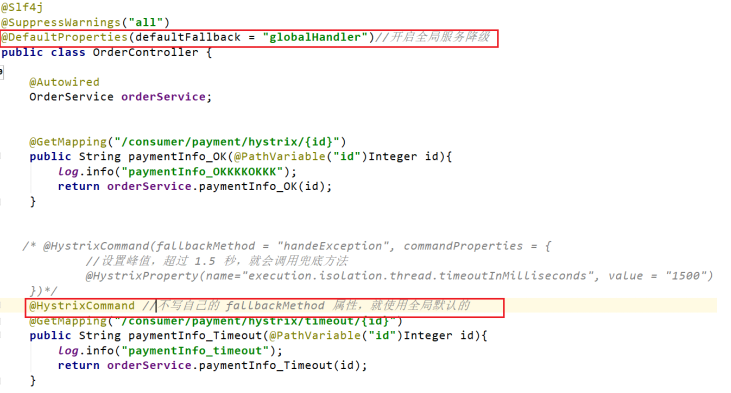
(4)在controller编写降级逻辑
@RestController
@Slf4j
@SuppressWarnings("all")
public class OrderController {
    @Autowired
    OrderService orderService;
    @GetMapping("/consumer/payment/hystrix/{id}")
    public String paymentInfo_OK(@PathVariable("id")Integer id){
        log.info("paymentInfo_OKKKKOKKK");
        return orderService.paymentInfo_OK(id);
    }
    @HystrixCommand(fallbackMethod = "handeException", commandProperties = {
            //设置峰值,超过 1.5 秒,就会调用兜底方法
            @HystrixProperty(name="execution.isolation.thread.timeoutInMilliseconds", value = "1500")
    })
    @GetMapping("/consumer/payment/hystrix/timeout/{id}")
    public String paymentInfo_Timeout(@PathVariable("id")Integer id){
        log.info("paymentInfo_timeout");
        return orderService.paymentInfo_Timeout(id);
    }

    public String handeException(Integer id){
        return "服务调用异常,请稍后再试.....";
    }
}
(5)启动测试:localhost/consumer/payment/hystrix/timeout/1
(6)修改服务提供方代码

2.全局降级处理方式
上面的降级策略,很明显造成了代码的杂乱,提升了耦合度,而且按照这样,每个方法都需要配置一个兜底方法,很繁琐。现在将降级处理方法(兜底方法)做一个全局的配置,设置共有的兜底方法和独享的兜底方法。
全局服务降级处理在服务消费方上面实现
(1)在消费方的controller里面编写全局降级逻辑的方法
// 全局降级处理方法
public String globalHandler(){
    return "这是全局处理降级逻辑的方法.......";
}
(2)使用注解开启全局服务降级逻辑处理
(3)启动测试
3.什么是熔断? 熔断有哪几种状态 断路器的工作原理
3.1熔断器,也叫断路器,其英文单词为:Circuit Breaker。当用户访问某个服务,达到了最大的访问量之后,直接拒绝用户访问。
3.2熔断状态机3个状态:
3.2.1 Closed:关闭状态,所有请求都正常访问。
3.2.2 Open:打开状态,所有请求都会被降级。Hystix会对请求情况计数,当一定时间内失败请求百分比达到阈值,则触发熔断,断路器会完全打开。默认失败比例的阈值是50%,请求次数最少不低于20次。
3.2.3 Half Open:半开状态,open状态不是永久的,打开后会进入休眠时间(默认是5S)。随后断路器会自动进入半开状态。此时会释放部分请求通过,若这些请求都是健康的,则会完全关闭断路器,否则继续保持打开,再次进行休眠计时
实际上服务熔断 和 服务降级 没有任何关系,就像 java 和 javaScript
3.3服务熔断原理(断路器的原理):
统计用户在指定的时间范围(默认10s)之内的请求总数达到指定的数量之后,如果不健康的请求(超时、异常)占总请求数量的百分比(50%)
达到了指定的阈值之后,就会触发熔断。触发熔断,断路器就会打开(open),此时所有请求都不能通过。在5s之后,断路器
会恢复到半开状态(half open),会允许少量请求通过,如果这些请求都是健康的,那么断路器会回到关闭状态(close).如果
这些请求还是失败的请求,断路器还是恢复到打开的状态(open).
4.如何开启熔断?
1.在指定请求方法上,开启熔断
@HystrixCommand(fallbackMethod = “handleCircuitBreaker”,commandProperties = {
@HystrixProperty(name=“circuitBreaker.enabled”, value=“true”), // 是否开启断路器
@HystrixProperty(name=“circuitBreaker.requestVolumeThreshold”, value=“10”), //请求次数
@HystrixProperty(name=“circuitBreaker.sleepWindowInMilliseconds”, value=“10000”), // 时间窗口期
@HystrixProperty(name=“circuitBreaker.errorThresholdPercentage”, value=“60”), // 失败率达到多少后跳闸
//整体意思:10秒内 10次请求,有6次失败,就跳闸
})
public String enableCircuitBreaker(Integer id){
if(id < 0){
throw new RuntimeException();
}
String uuid = UUID.randomUUID().toString();
return “返回的uuid是:” + uuid;
}
2.使用XML的方式进行熔断的配置
hystrix:
command:
default:
circuitBreaker:
enabled: true
requestVolumeThreshold: 10
sleepWindowInMilliseconds: 10000
errorThresholdPercentage: 60
5.什么是网关? gateway 的核心概念
SpringCloud Gateway是springcloud的一个全新项目,基于spring5.0+springboot2.0和project Reactor等技术开发的网关,它指在为微服务架构提供一种简单有效的统一的API路由管理方式。
SpringCloud Gateway作为Spring Cloud生态系统中的网关,目标是代替Zuul,在 springcloud2.0以上版本中,没有对新版本的Zuul2.0以上最新高性能版本进行集成,仍然还是使用Zuul 1.x非Reactor模式的老版本。而为了提升网关的性能,springcloud Gateway是基于webFlux框架实现的,二WebFlux框架底层则使用了高性能的Reactor模式通信框架Netty。
Springcloud Gateway的目标提供唯一的路由方式且基于Filter链的方式提供合格了网关的基本功能,例如:安全,监控/指标,和限流。
6.如何简单使用gateway

(2)引入POM依赖
<dependencies>
    <!--gateway-->
    <dependency>
        <groupId>org.springframework.cloud</groupId>
        <artifactId>spring-cloud-starter-gateway</artifactId>
    </dependency>
    <!--eureka-client gateWay作为网关,也要注册进服务中心-->
    <dependency>
        <groupId>org.springframework.cloud</groupId>
        <artifactId>spring-cloud-starter-netflix-eureka-client</artifactId>
    </dependency>
    <!-- gateway和web不能同时存在,即web相关jar包不能导入 -->
    <dependency>
        <groupId>org.springframework.boot</groupId>
        <artifactId>spring-boot-devtools</artifactId>
        <scope>runtime</scope>
        <optional>true</optional>
    </dependency>
    <dependency>
        <groupId>org.projectlombok</groupId>
        <artifactId>lombok</artifactId>
        <optional>true</optional>
    </dependency>
    <dependency>
        <groupId>org.springframework.boot</groupId>
        <artifactId>spring-boot-starter-test</artifactId>
        <scope>test</scope>
    </dependency>
    <dependency><!-- 引入自己定义的api通用包,可以使用Payment支付Entity -->
        <groupId>com.krisswen.cloud</groupId>
        <artifactId>cloud-api-commons</artifactId>
        <version>${project.version}</version>
    </dependency>
</dependencies>
(3)编写application.yml配置文件
server:
  port: 9527
spring:
  application:
    name: cloud-gateway
  ## GateWay配置
  cloud:
    gateway:
      routes:
      - id: payment_routh  # 路由ID , 没有固定的规则但要求唯一,建议配合服务名
        uri: http://localhost:8001  # 匹配后提供服务的路由地址
        predicates:
        - Path=/payment/**  # 断言,路径相匹配的进行路由

      - id: payment_routh2  # 路由ID , 没有固定的规则但要求唯一,建议配合服务名
        uri: http://localhost:8001  # 匹配后提供服务的路由地址
        predicates:
        - Path=/payment/lb/**  # 断言,路径相匹配的进行路由

# 注册进 eureka Server
eureka:
  client:
    service-url:
      defaultZone: http://eureka7001.com:7001/eureka/,http://eureka7002.com:7002/eureka/
    register-with-eureka: true
    fetch-registry: true
(4)编写启动类
@SpringBootApplication
@EnableEurekaClient
public class GatewayMain9527 {
    public static void main(String[] args) {
        SpringApplication.run(GatewayMain9527.class,args);
    }
}
(5)测试
没有使用网关前:localhost:8001/payment/1
使用网关后:localhost:9527/payment/3
这样子就隐藏了业务微服务端口8001,使用网关服务对微服务进行保护
最后
以上就是俭朴烧鹅最近收集整理的关于SpringCloud小扩展的全部内容,更多相关SpringCloud小扩展内容请搜索靠谱客的其他文章。


发表评论 取消回复