这篇分享开始对SpringMVC进行学习。在讨论之前相信大部分都或多或少使用过SpringMVC,因为这个SpringMVC框架简单易用,代码结构清晰,而且其可拓展性等优势也非常明显,也因此目前来说SpringMVC依旧是许多开发者选择使用的技术框架。
既然SpringMVC这么强大,那就让我们开始了解这个强大的工具吧。
在学习之前,一如既往先提出学习目标,通过本文及关联文章的学习,我们会学习了解以下知识:
(1)SpringMVC的工作流程;
(2)SpringMVC的XML方式搭建应用,包括DispatcherServlet,ContextLoaderListener,视图解析器,消息转换器等配置,关于拦截器,过滤器等常用知识这里暂时不做演示,在源码中关于这两个知识点也会稍微提及不做主线研究;
(3)Servlet3.0的SPI规范;
(4)SpringMVC的零XML(即全Java代码)方式搭建应用,包括DispatcherServlet,ContextLoaderListener,视图解析器,消息转换器等配置;
(5)SpringMVC应用怎么配置和使用内置Tomcat发布应用;
(6)SpringMVC流程源码分析及涉及组件剖析和SpringMVC知识点(父子容器,SpringBoot对SpringMVC拓展的例子等);
(7)结合对源码流程解析和内部组件功能分析,手写一个自己的简易版SpringMVC框架并打包成可工程引用的jar提交到github;
关于SpringMVC的官方文档说明,可以查阅https://docs.spring.io/spring/docs/current/spring-framework-reference/web.html#mvc
一.SpringMVC的工作流程,也就是SpringMVC是怎么接收处理以及响应一个请求?
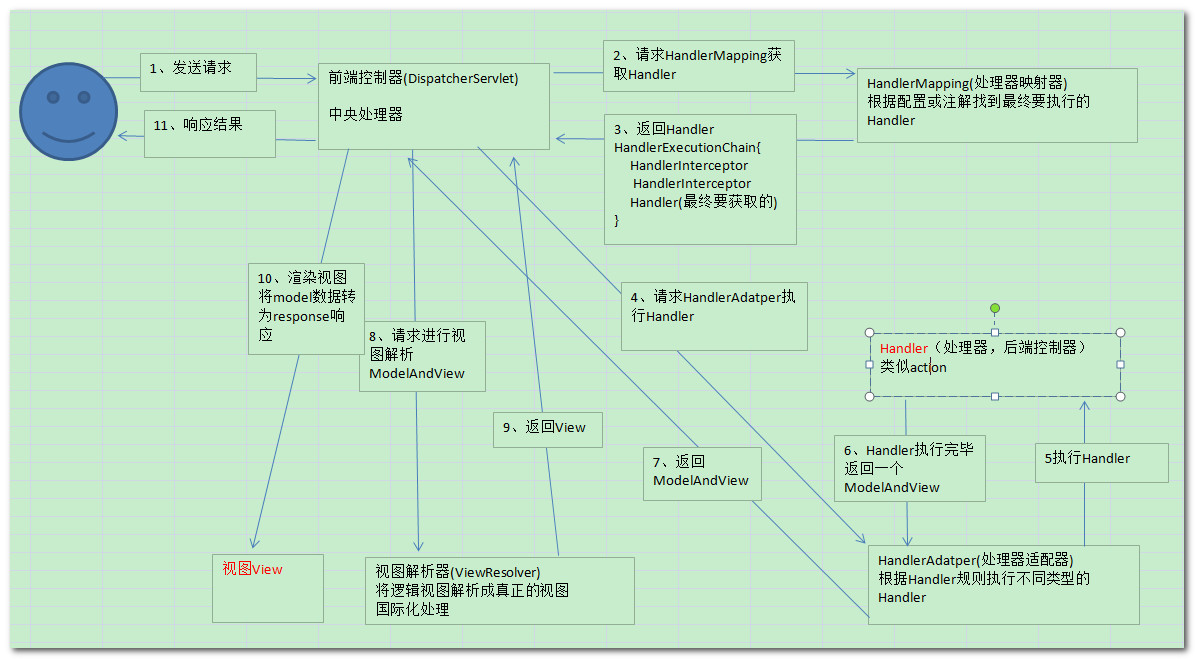
上图就是SpringMVC的工作流程图:
1.首先用户发送http请求到前端控制器DispatchServlet上,
2.前端控制器调用映射处理器HandlerMappings,HandlerMapping根据配置或注解找到具体处理器handler,
3.HandlerMapping将具体handler返回给DispatchServlet,
4.前端控制器拿着handler去请求HandlerAdatpers,找到一个与handler匹配的适配器Adapter,
5.通过适配器传入请求和具体的处理器handler(Controller或Action),执行handler方法处理请求,
6.handler被执行完毕后返回ModelAndView给处理器适配器HandlerAdatper,
7.HandlerAdatper将得到的ModelAndView返回给前端控制器,
8.前端控制器将ModelAndView传给视图解析器ViewResolver,
9.视图解析器对ViewResource进行解析后返回具体的VIew给前端控制器,
10.前端控制器根据View进行渲染视图(将模型数据填充到视图中),
11.把渲染好的视图把过response响应给用户。
以上就是关于SpringMVC从接收一个请求到响应一个请求的工作过程。在这个工作过程中我们可以看到有诸多组件相互配合使用,如DispatchServlet,HandlerMappings,HandlerAdatpers,ModelAndView,ViewResolver,VIew等等。
那么,初步了解了这个工作原理,我们先搭建一个SpringMVC的应用,将SpringMVC必备组件都配置到应用当中。对于SpringMVC的配置有XML和零XML方式。
二.XML的方式进行配置?
对于XML方式,主要有pom.xml,web.xml,applicationContext.xml,spring.xml几个配置文件,其中pom.xml引入所需要的的依赖和内置tomcat7插件;web.xml主要进行servlet相关的配置;applicationContext.xml是全局配置,可配置多个servlet配合监听器一起在web.xml中使用;spring.xml则是Spring容器的配置,如mvc驱动,bean声明等。
pom.xml:主要引入spring-webmvc和javax.servlet-api(3.0版本以上)依赖,fastJson的依赖用于消息转换器使用,tomcat依赖和插件配置则声明一个内置tomcat配置,启动时会按插件配置启动一个tomcat实例并发布这个web应用。
<?xml version="1.0" encoding="UTF-8"?>
<project xmlns="http://maven.apache.org/POM/4.0.0"
         xmlns:xsi="http://www.w3.org/2001/XMLSchema-instance"
         xsi:schemaLocation=
        "http://maven.apache.org/POM/4.0.0 http://maven.apache.org/maven-v4_0_0.xsd">
  <modelVersion>4.0.0</modelVersion>
  <groupId>springmvc</groupId>
  <artifactId>springmvc</artifactId>
  <packaging>jar</packaging>
  <version>1.0-SNAPSHOT</version>

  <dependencies>
    <!--springMVC依赖-->
    <dependency>
      <groupId>org.springframework</groupId>
      <artifactId>spring-webmvc</artifactId>
      <version>5.0.8.RELEASE</version>
    </dependency>
    <!--servlet依赖,注意要3.0以上才支持SPI规范-->
    <dependency>
      <groupId>javax.servlet</groupId>
      <artifactId>javax.servlet-api</artifactId>
      <version>3.0.1</version>
      <scope>provided</scope>
    </dependency>
    <dependency>
      <groupId>org.apache.tomcat.maven</groupId>
      <artifactId>tomcat7-maven-plugin</artifactId>
      <version>2.2</version>
      <scope>provided</scope>
    </dependency>
    <dependency>
      <groupId>com.alibaba</groupId>
      <artifactId>fastjson</artifactId>
      <version>1.2.31</version>
    </dependency>
    <dependency>
      <groupId>com.fasterxml.jackson.core</groupId>
      <artifactId>jackson-databind</artifactId>
      <version>2.9.1</version>
    </dependency>
  </dependencies>

  <!-- Tomcat7插件,在工程运行配置命令 tomcat7:run  -->
  <build>
    <plugins>
      <!-- 编译插件 -->
      <plugin>
        <groupId>org.apache.maven.plugins</groupId>
        <artifactId>maven-compiler-plugin</artifactId>
        <version>3.5.1</version>
        <configuration>
          <source>1.7</source>
          <target>1.7</target>
          <encoding>UTF-8</encoding>
        </configuration>
      </plugin>
      <plugin>
        <groupId>org.apache.tomcat.maven</groupId>
        <artifactId>tomcat7-maven-plugin</artifactId>
        <version>2.2</version>
        <configuration>
          <path>/</path>
          <port>9090</port>
          <uriEncoding>UTF-8</uriEncoding>
          <server>tomcat7</server>
          <!--添加忽略war包检查标签,否则启动时会跳过非war导致无法发布这个应用,
              设置忽略可以让tomcat7:run指令正常启动tomcat-->
          <ignorePackaging>true</ignorePackaging>
        </configuration>
      </plugin>
    </plugins>
  </build>

</project>
web.xml:主要进行DispatcherServlet和ContextLoaderListener的配置,同时引入全局配置contextConfigLocation加载
classpath:applicationContext.xml在DispatcherServlet中设置<load-on-startup>1</load-on-startup>使得tomcat启动时马上执行DispatcherServlet的init方法,对
<init-param>
  <param-name>contextConfigLocation</param-name>
  <param-value>classpath:spring.xml</param-value> <!--为空会有默认值-->
</init-param>
进行加载。
<?xml version="1.0" encoding="UTF-8"?>
<web-app version="2.4" xmlns:xsi="http://www.w3.org/2001/XMLSchema-instance">


  <!--springmvc配置过程中遇到的问题:
   1.需要有applicationContext.xml和spring.xml文件用于web.xml中;
   2.spring.xml需要开启springmvc相关功能声明以及包扫描;
   3.内置Tomcat7插件需要引入的依赖,以及需要添加忽略war包检查标签才能以jar方式发布起该工程,
     在插件中可以配置tomcat启动项目的信息;
   4.IDEAJ需要在工程run配置中,添加tomcat7:run命令
   -->

  <!--Spring MVC 配置 并添加监听-->
  <context-param>
    <param-name>contextConfigLocation</param-name>
    <param-value>classpath:applicationContext.xml</param-value>
  </context-param>

  <!-- ContextLoaderListener监听器配置:web应用启动时能加载Spring环境,
       由于是web应用没有main方法,因此使用这个监听器可被Tomcat启动时加载,作为程序入口 -->
  <listener>
    <listener-class>org.springframework.web.context.ContextLoaderListener</listener-class>
  </listener>

  <!-- DispatcherServlet转发器配置,会加载classpath:spring.xml -->
  <servlet>
    <servlet-name>springmvc</servlet-name>
    <servlet-class>org.springframework.web.servlet.DispatcherServlet</servlet-class>
    <init-param>
      <param-name>contextConfigLocation</param-name>
      <param-value>classpath:spring.xml</param-value> <!--为空会有默认值-->
    </init-param>
    <load-on-startup>1</load-on-startup><!--启动时马上执行DispatcherServlet的init进行初始化-->
  </servlet>
  <servlet-mapping>
    <servlet-name>springmvc</servlet-name>
    <url-pattern>/</url-pattern>
  </servlet-mapping>

  <!--welcome pages-->
  <welcome-file-list>
    <welcome-file>index.jsp</welcome-file>
  </welcome-file-list>

</web-app>
spring.xml:这是spring容器的配置。要开启springMVC的功能需要进行显示声明,
<!--启用spring的一些annotation -->
<context:annotation-config/>

<!-- 配置注解驱动 可以将request参数与绑定到controller参数上 -->
<mvc:annotation-driven/>
<!-- 自动扫描装配 -->
<context:component-scan base-package="com"/>在这里还可以配置视图解析器,消息转换器等组件。
<?xml version="1.0" encoding="UTF-8"?>
<beans xmlns="http://www.springframework.org/schema/beans"
xmlns:xsi="http://www.w3.org/2001/XMLSchema-instance"
xmlns:context="http://www.springframework.org/schema/context"
xmlns:mvc="http://www.springframework.org/schema/mvc"
xsi:schemaLocation="http://www.springframework.org/schema/beans
http://www.springframework.org/schema/beans/spring-beans.xsd
http://www.springframework.org/schema/context
http://www.springframework.org/schema/context/spring-context.xsd
http://www.springframework.org/schema/mvc
http://www.springframework.org/schema/mvc/spring-mvc.xsd">
<!--启用spring的一些annotation -->
<context:annotation-config/>
<!-- 配置注解驱动 可以将request参数与绑定到controller参数上 -->
<mvc:annotation-driven/>
<!-- 自动扫描装配 -->
<context:component-scan base-package="com"/>
<!-- 配置视图解析器 -->
<bean class="org.springframework.web.servlet.view.InternalResourceViewResolver">
<property name="prefix" value="/WEB-INF/jsp/"></property>
<property name="suffix" value=".jsp"></property>
</bean>
<!-- 配置消息转换器,fastjson中实现HttpMessageConverter接口的转换器 -->
<bean class="org.springframework.http.converter.StringHttpMessageConverter"/>
<!-- 配置fastjson中实现HttpMessageConverter接口的转换器 -->
<bean id="fastJsonHttpMessageConverter"
class="com.alibaba.fastjson.support.spring.FastJsonHttpMessageConverter">
<!-- 加入支持的媒体类型:返回contentType -->
<property name="supportedMediaTypes">
<list>
<!-- 这里顺序不能反,一定先写text/html,不然ie下会出现下载提示 -->
<value>text/html;charset=UTF-8</value>
<value>application/json;charset=UTF-8</value>
</list>
</property>
<property name="features">
<list>
<value>WriteMapNullValue</value>
<value>QuoteFieldNames</value>
</list>
</property>
</bean>
</beans>
上面的配置完成之后,一个基于XML配置的SpringMVC环境就搭建完成了,下面在com.myspringmvc.controller包下新建一个Controller类,进行相应注解配置就可以了:
MyController.java:在这个Controller上声明顶级@RequestMapping,并且定义3个处理请求的方法,分别添加@RequestMapping和@ResponseBody等注解,返回一个处理结果对象或modelAndView对象。其中/index返回一个index.jsp;/hi返回字符串对象给浏览器;/himap通过消息转换器转换返回一个map对象给浏览器。
package com.myspringmvc.controller;

import org.apache.http.HttpResponse;
import org.springframework.http.HttpRequest;
import org.springframework.stereotype.Controller;
import org.springframework.web.bind.annotation.RequestMapping;
import org.springframework.web.bind.annotation.RequestMethod;
import org.springframework.web.bind.annotation.ResponseBody;

import java.util.HashMap;
import java.util.Map;

@Controller
@RequestMapping(value="/web")
public class MyController {

    @RequestMapping(value="/index", method = RequestMethod.GET)
    public String indexPage(){
        return "index";
    }

    @RequestMapping(value="/hi", method = RequestMethod.GET)
    @ResponseBody
    public String sayHi(String name){
        System.out.println("sayHi调用了...");
        return "hello "+name;
    }

    @RequestMapping(value="/himap", method = RequestMethod.GET)
    @ResponseBody
    public Map sayHiMap(){
        System.out.println("sayHiMap调用了...");
        Map<String,String> map = new HashMap<String,String>();
        map.put("name","yang");
        map.put("age","30");
        return map;
    }


}
代码写完后,接下来就是通过pom.xml中定义的tomcat7插件启动这个应用,本文是通过IDEAJ工具则在该项目Edit Configurations中设置命令行:tomcat7:run即可。
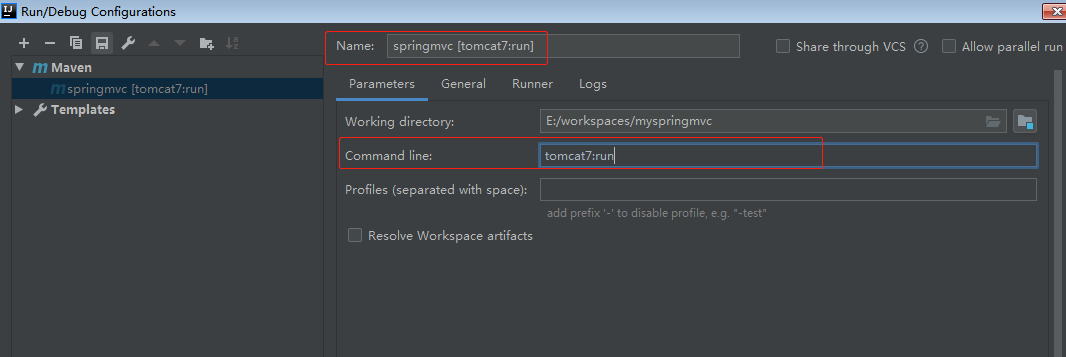
然后启动应用,可以看到内置tomcat顺利将该应用发布在配置的9090端口上:

在浏览器通过链接发送请求,可以得到相应的响应内容:
http://localhost:9090/web/index
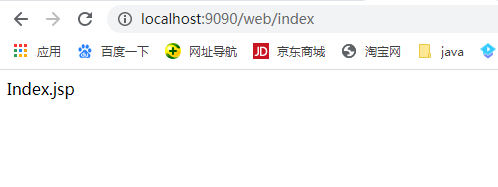
http://localhost:9090/web/hi?name=yang

http://localhost:9090/web/himap

至此,基于XML配置的SpringMVC基础搭建过程就完成了。下面我们思考一下能否不用XML配置的方式,也就是不需要web.xml的配置能否像XML配置一样将这个应用发布起来呢?当然是可以的。但是在介绍零XML配置方式之前,必须先介绍Servlet3.0 SPI规范,因为零XML配置是基于这个规范进行拓展的。
三.Servlet3.0的SPI规范?
SPI全称Service Provider Interface,是Java提供的一套用来被第三方实现或者扩展的API,它可以用来启用框架扩展和替换组件。Java SPI 是“基于接口的编程+策略模式+配置文件”组合实现的动态加载机制。

这个概念比较抽象,下面举一些例子来说明SPI规范使用场景非常广泛,
- 数据库驱动加载接口实现类的加载JDBC加载不同类型数据库的驱动
- 日志门面接口实现类加载SLF4J加载不同提供商的日志实现类
- Spring中大量使用了SPI,比如:对servlet3.0规范对ServletContainerInitializer的实现、自动类型转换Type Conversion SPI(Converter SPI、Formatter SPI)等
- Dubbo中也大量使用SPI的方式实现框架的扩展, 不过它对Java提供的原生SPI做了封装,允许用户扩展实现Filter接口
- tomcat加载执行onStartup方法
- eclipse插件
那么这个SPI规范是怎么定义的呢?
- 在resources/META-INF/services/目录中创建以
服务全限定名命名的文件,该文件内容为服务的实现类全限定名,文件中可以写多个服务的具体实现类 - 使用ServiceLoader类动态加载服务的具体实现类
- 服务具体的实现类必须有一个不带参数的构造方法
结合上面的定义,我们可以在SpringMVC应用中自己参照这个SPI规范也写一个自己的SPI实现。
首先在工程中新建com.myspringmvc.spi包用于放置自定义的SPI文件:
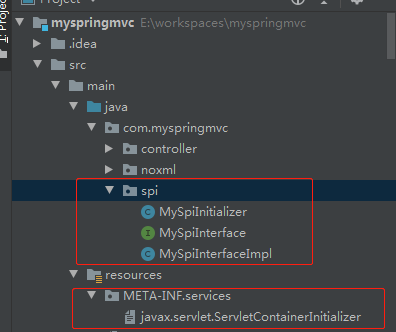
MySpiInitializer:按照tomcat加载servlet的SPI规定,tomcat扫描文件时如果发现存在实现了ServletContainerInitializer接口的实现类,那么就会调用实现类的的onStartup方法。因此为了能让tomcat执行,我们的自定义SPI实现类应该实ServletContainerInitializer接口,同时servlet的api还提供了@HandlesTypes(接口名)的注解,可以让tomcat执行除了这个实现类外的其它不同类型的实现类,这个扫描@HandlesTypes接口实现类并且执行实现类方法的逻辑在MySpiInitializer的onStartup方法里写。本例子的onStartup扫描逻辑是参考spring-web.5.0.8.jar的META-INF/services/org.springframework.web.SpringServletContainerInitializer拷贝过来修改的:package com.myspringmvc.spi;
import org.springframework.core.annotation.AnnotationAwareOrderComparator;
import org.springframework.lang.Nullable;
import org.springframework.util.ReflectionUtils;
import org.springframework.web.WebApplicationInitializer;
import javax.servlet.ServletContainerInitializer;
import javax.servlet.ServletContext;
import javax.servlet.ServletException;
import javax.servlet.annotation.HandlesTypes;
import java.lang.reflect.Modifier;
import java.util.LinkedList;
import java.util.List;
import java.util.Set;
/**
* 自定义SPI规范的实现。这个类在/META-INF/services中定义,这个onStartup会tomcat自动被执行。
* 同时可以通过servlet提供的@HandlesTypes来告诉tomcat等容器哪些实现了定义接口的文件,
* 在tomcat启动时是需要被加载的,这里同时声明MySpiInterface的实现类文件也会在tomcat启动时被加载
*/
@HandlesTypes(MySpiInterface.class)
public class MySpiInitializer implements ServletContainerInitializer {
/**
* 模仿Spring的SpringServletContainerInitializer,将onStartup逻辑拷贝过来,
* 扫描工程内所有实现了MySpiInterface接口的实现类,调用这些MySpiInterface实现类的onStartup()
* @param mySpiInitializerClasses tomcat扫描出的所有实现了MySpiInterface接口的实现类集合
* @param servletContext 应用上下文
* @throws ServletException
*/
@Override
public void onStartup(@Nullable Set<Class<?>> mySpiInitializerClasses, ServletContext servletContext)
throws ServletException {
System.out.println("我的自定义MySpiInitializer...");
List<MySpiInterface> initializers = new LinkedList<>();
if (mySpiInitializerClasses != null) {
for (Class<?> waiClass : mySpiInitializerClasses) {
// Be defensive: Some servlet containers provide us with invalid classes,
// no matter what @HandlesTypes says...
if (!waiClass.isInterface() && !Modifier.isAbstract(waiClass.getModifiers()) &&
MySpiInterface.class.isAssignableFrom(waiClass)) {
try {
initializers.add((MySpiInterface)
ReflectionUtils.accessibleConstructor(waiClass).newInstance());
}
catch (Throwable ex) {
throw new ServletException("Failed to instantiate WebApplicationInitializer class", ex);
}
}
}
}
if (initializers.isEmpty()) {
servletContext.log("No Spring WebApplicationInitializer types detected on classpath");
return;
}
servletContext.log(initializers.size() + " Spring WebApplicationInitializers detected on classpath");
AnnotationAwareOrderComparator.sort(initializers);
for (MySpiInterface initializer : initializers) {
initializer.onStartup();
}
}
}
定义MySpiInterface接口:
package com.myspringmvc.spi;

import javax.servlet.ServletContext;
import java.util.Set;

public interface MySpiInterface {

    public void onStartup();

}
定义MySpiInterface接口的实现类:
package com.myspringmvc.spi;

public class MySpiInterfaceImpl implements MySpiInterface{
    @Override
    public void onStartup() {
        System.out.println("关联的MySpiInterface接口实现类,在启动时也同时会被执行");
    }
}
然后遵照SPI的规定,在resources/META-INF/services/目录中创建以服务全限定名命名的文件,该文件内容为服务的实现类全限定名,文件中可以写多个服务的具体实现类。
这里文件名还是参照spring-web.5.0.8.jar的META-INF/services/org.springframework.web.SpringServletContainerInitializer文件拷贝过来,内容修改为自定义的SPI实现类全限定路径com.myspringmvc.spi.MySpiInitializer即可:
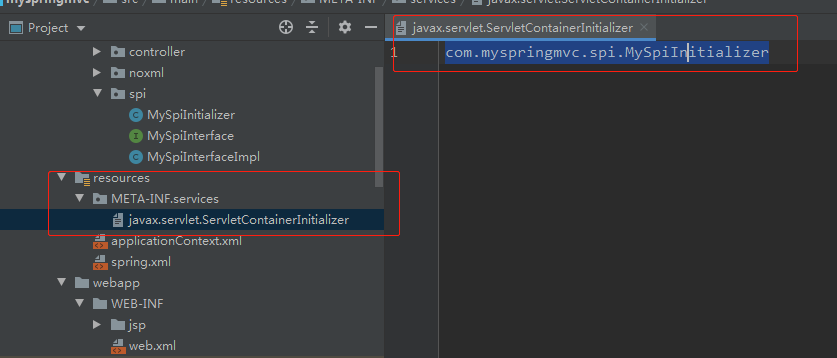
这样,一个自定义的SPI就完成了。怎么进行测试呢?刚才介绍到tomcat本身也是实现了这个SPI的规范,那么tomcat在启动时会根据META-INF/services/定义的全限定名类,帮我们自动扫描这个类并执行onStartup方法,在onStartup方法中对tomcat扫描出的实现了@HandlesTypes接口的实现类并作为参数传给onStartup方法,在onStartup方法里会全部调用这些实现类的onStartup方法。重新启动tomcat就会看到相关启动日志输出打印:

以上就是SPI在tomcat和SpringMVC中的应用知识,关于tomcat为什么可以发布一个web应用的原理会在后面学习tomcat底层原理时进行分享,这里暂时记住结论即可。基于此SPI规范就可以应用于零XML的配置场景。
四.零XML方式进行配置?
实际上所谓的零XML方式,本质上是将web.xml,spring.xml等配置文件中进行配置的信息,换了另外一种方式进行描述,这种方式就是使用Java代码来定义和声明。实际上这种方式在官方文档中也有介绍:https://docs.spring.io/spring/docs/current/spring-framework-reference/web.html#mvc-servlet-config。学习这种方式,我们需要将零XML方式和XML方式进行对比。
在XML方式中,tomcat启动时会帮我们自动加载解析web.xml文件(注意,web.xml文件是tomcat等容器自动帮我们解析的,而不是我们代码中进行解析的),但是tomcat是在什么时机帮我们自动加载解析web.xml呢?这一块关于tomcat的原理也会在后面进行解析,这里也暂且知道tomcat启动时会自动帮我们读取并解析web.xml即可,但是总是存在这么一个程序入口让tomcat来执行了并解析了web.xml内的相关配置信息。
但是,如果是零XML方式,那么这个程序入口就没有了。既然程序入口没有了那我们应用相关配置解析初始化等操作要怎么被tomcat执行到呢?那么上面提到的SPI规范就起作用了。
实际上,在pom.xml引入的org.springframework:spring-web:5.0.8.RELEASE包中的META-INF/services/javax.servlet.ServletContainerInitializer已经定义了Spring自己的SPI,这个javax.servlet.ServletContainerInitializer内定义的就是可以被tomcat进行识别的执行的程序入口:
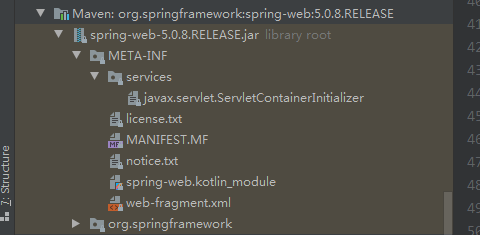
让我们点开这个javax.servlet.ServletContainerInitializer文件,可以看到文件内定义了一个全限定类名
org.springframework.web.SpringServletContainerInitializer
这个入口类实现了能被tomcat识别的ServletContainerInitializer接口,那么tomcat启动时就会加载这个SpringServletContainerInitializer实现类,并执行其onStartup方法。在SpringServletContainerInitializer实现类上还声明了@HandlesTypes(WebApplicationInitializer.class),并且SpringServletContainerInitializer实现类的onStartup(@Nullable Set<Class<?>> webAppInitializerClasses, ServletContext servletContext)方法内部逻辑就是判断所有实现了@HandlesTypes注解接口的实现类,执行这些实现类的onStartup方法:
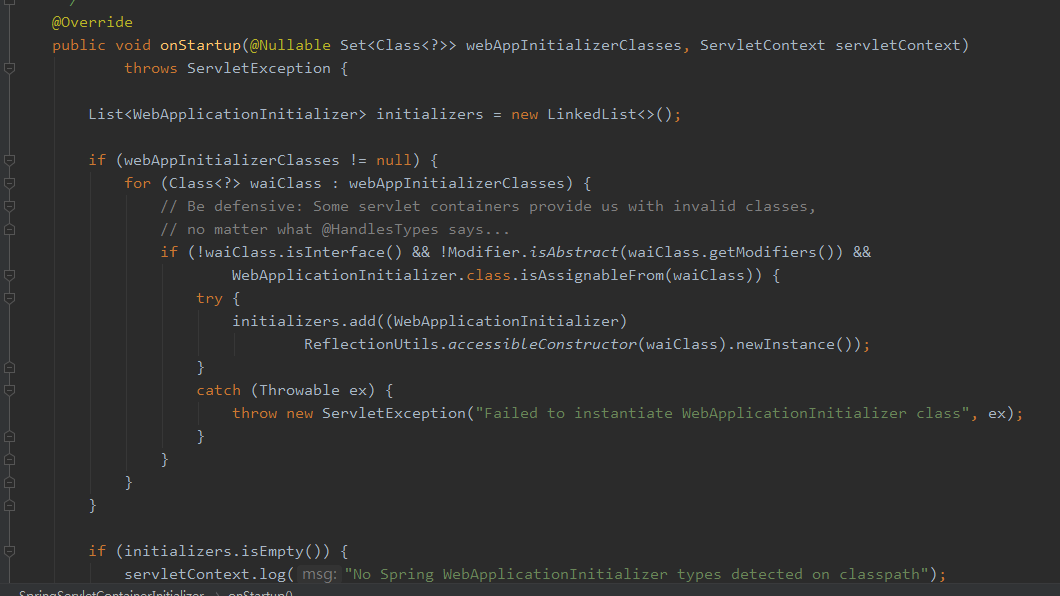
上面的逻辑和我们在第二点自定义SPI的例子是一样的。看到这里,我们很自然就可以创建一个实现类,实现WebApplicationInitializer接口,即可创建出一个程序入口,在这程序入口方法内完成相关的web.xml配置操作。实际上,从Spirngmvc的官方文档指南1.1.4Servlet Config章节中,可以看到零XML方式配置就是这么做的:
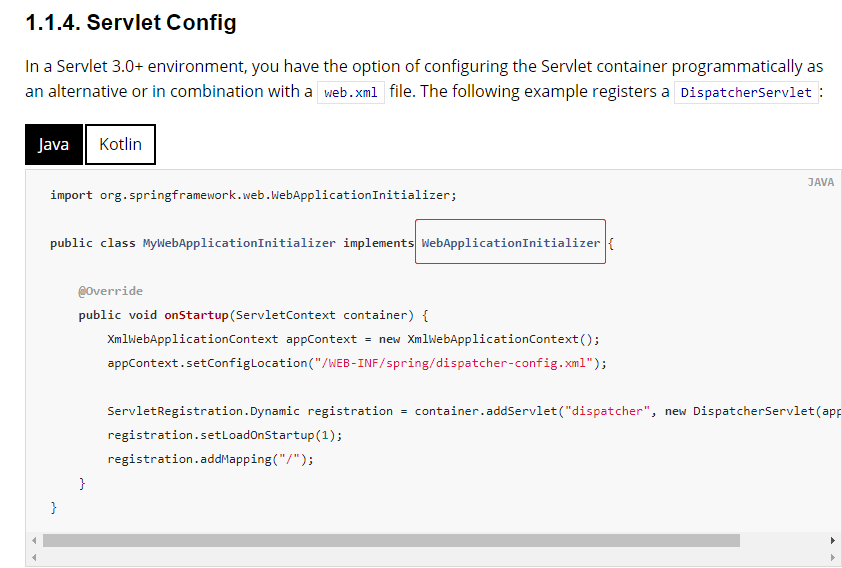
在这个样例中,我们可以看到需要一个实现了WebApplicationInitializer接口的实现类MyWebApplicationInitializer,这个实现类的任务就是初始化Spring容器,然后创建一个DispatcherServlet并注册到应用上下文ServletContext container中,这ServletContext 应用上下文就相当于一个web.xml,在web.xml中可以配置的信息都可以注册到这个ServletContext当中生效。
官方文档例子中是使用XmlWebApplicationContext来初始化一个Spring容器,并且创建一个DispatcherServlet再注册到应用上下文中。而我们使用零XML方式则不再使用XmlWebApplicationContext,而是使用AnnotationConfigWebApplicationContext的方式初始化Spring容器,再创建一个DispatcherServlet再注册到应用上下文中。代码如下:
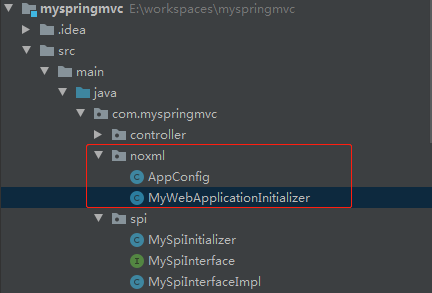
MyWebApplicationInitializer.java: 1)初始化spring容器,往spring容器中注册AppConfig配置类声明的bean
AnnotationConfigWebApplicationContext ac = new AnnotationConfigWebApplicationContext();
ac.register(AppConfig.class);2)创建一个DispatcherServlet和映射信息并注册到应用上下文中,相当于web.xml中配置一个DispatcherServlet。
DispatcherServlet servlet = new DispatcherServlet(ac);
ServletRegistration.Dynamic registration = servletCxt.addServlet("springmvc", servlet);
registration.setLoadOnStartup(1);
registration.addMapping("/");
package com.myspringmvc.noxml;

import org.springframework.web.WebApplicationInitializer;
import org.springframework.web.context.support.AnnotationConfigWebApplicationContext;
import org.springframework.web.servlet.DispatcherServlet;

import javax.servlet.ServletContext;
import javax.servlet.ServletRegistration;

/**
 * 零XML方式声明一个DispatcherServlet转发器配置,
 * WebApplicationInitializer接口是spring的,
 * tomcat启动时会调用这个接口的onStartup方法,因为该接口servlet实现了servlet3.0 SPI规范。
 * 注意这里pom引入的javax.servlet-api.jar必须是3.0版本以上的,才使用了SPI规范。
 */
public class MyWebApplicationInitializer implements WebApplicationInitializer {

    /**
     * 在tomcat启动时会自动被调用的方法,为什么呢?
     * @param servletCxt web上下文对象, servletCxt能做web.xml内的全部功能
     */
    @Override
    public void onStartup(ServletContext servletCxt) {

        System.out.println("MyWebApplicationInitializer onStartup执行了...");

        // 初始化spring容器
        AnnotationConfigWebApplicationContext ac = new AnnotationConfigWebApplicationContext();
        ac.register(AppConfig.class);

        // 创建一个DispatcherServlet并注册到应用上下文中,相当于web.xml中配置一个DispatcherServlet
        DispatcherServlet servlet = new DispatcherServlet(ac);
        ServletRegistration.Dynamic registration = servletCxt.addServlet("springmvc", servlet);
        registration.setLoadOnStartup(1);
        registration.addMapping("/");

        System.out.println("MyWebApplicationInitializer onStartup执行结束...");
    }

}
AppConfig.java:对于这个配置类,基本等同于XML配置方式中的spring.xml。
1)声明注解
@Configuration
@ComponentScan("com.myspringmvc")
@EnableWebMvc //该注解等同于xml配置中的<mvc:annotation-driven/>注解驱动
2)如果需要像spring.xml中配置视图解析器,消息转换器等配置,可以使这个配置类实现WebMvcConfigurer接口,然后重写对应的接口方法即可,具体接口方法说明可参考官方文档或百度查看说明。本例代码中配置了和上面XML方式一样的视图解析器和消息转换器:
package com.myspringmvc.noxml;
import com.alibaba.fastjson.support.spring.FastJsonHttpMessageConverter;
import org.springframework.context.annotation.ComponentScan;
import org.springframework.context.annotation.Configuration;
import org.springframework.http.converter.HttpMessageConverter;
import org.springframework.web.method.support.HandlerMethodArgumentResolver;
import org.springframework.web.method.support.HandlerMethodReturnValueHandler;
import org.springframework.web.servlet.HandlerExceptionResolver;
import org.springframework.web.servlet.config.annotation.*;
import java.util.List;
@Configuration
@ComponentScan("com.myspringmvc")
@EnableWebMvc //该注解等同于xml配置中的<mvc:annotation-driven/>注解驱动
/**
* 注解方式springMVC的配置类:开启注解驱动,
* 同时可以实现WebMvcConfigurer接口获取其它功能,如视图解析器,消息解析器等
*/
public class AppConfig implements WebMvcConfigurer {
/**
* 配置视图解析器,配置前缀和后缀
* @param registry
*/
@Override
public void configureViewResolvers(ViewResolverRegistry registry) {
registry.jsp("/WEB-INF/jsp/",".jsp");
}
/**
* 配置消息转换器,如map对象等往浏览器输出使用fastJson转换器,在fastJson包中已经有了,
* 直接new出来加到converters中就可以了。
* Controller返回对象时会扫描所有转换器匹配合适的转换器进行消息转换后通过response.write写往浏览器
* @param converters
*/
@Override
public void configureMessageConverters(List<HttpMessageConverter<?>> converters) {
FastJsonHttpMessageConverter fastJsonHttpMessageConverter = new FastJsonHttpMessageConverter();
converters.add(fastJsonHttpMessageConverter);
}
/**
* 剔除消息转换器的方法
* @param converters
*/
@Override
public void extendMessageConverters(List<HttpMessageConverter<?>> converters) {
}
@Override
public void configurePathMatch(PathMatchConfigurer configurer) {
}
@Override
public void configureContentNegotiation(ContentNegotiationConfigurer configurer) {
}
@Override
public void configureAsyncSupport(AsyncSupportConfigurer configurer) {
}
@Override
public void configureDefaultServletHandling(DefaultServletHandlerConfigurer configurer) {
}
@Override
public void addInterceptors(InterceptorRegistry registry) {
}
@Override
public void addResourceHandlers(ResourceHandlerRegistry registry) {
}
@Override
public void addViewControllers(ViewControllerRegistry registry) {
}
@Override
public void addArgumentResolvers(List<HandlerMethodArgumentResolver> resolvers) {
}
@Override
public void addReturnValueHandlers(List<HandlerMethodReturnValueHandler> handlers) {
}
@Override
public void configureHandlerExceptionResolvers(List<HandlerExceptionResolver> resolvers) {
}
@Override
public void extendHandlerExceptionResolvers(List<HandlerExceptionResolver> resolvers) {
}
}
为了达到和XML方式一样的效果,以上配置就是零XML方式的全部配置。重启tomcat后依旧可以通过上面几个访问链接得到相应的响应。实际上,SpringBoot对SpringMVC的自动装配用的就是基于JavaConfig的零XML配置方式,后面会对SpringBoot源码剖析进行分享。关于SpingMVC还有许多其它的应用这里只是抛砖引玉只做最简单的应用,本文目的是搭建最简单的应用用于后面对源码的学习。
五.SpringMVC应用怎么配置和使用内置Tomcat发布应用?
本例子中是使用maven的tomcat7插件来编译和启动一个内置tomcat的方式:
<dependency>
  <groupId>org.apache.tomcat.maven</groupId>
  <artifactId>tomcat7-maven-plugin</artifactId>
  <version>2.2</version>
  <scope>provided</scope>
</dependency>
<!-- Tomcat7插件,在工程运行配置命令 tomcat7:run -->
<build>
<plugins>
<!-- 编译插件 -->
<plugin>
<groupId>org.apache.maven.plugins</groupId>
<artifactId>maven-compiler-plugin</artifactId>
<version>3.5.1</version>
<configuration>
<source>1.7</source>
<target>1.7</target>
<encoding>UTF-8</encoding>
</configuration>
</plugin>
<plugin>
<groupId>org.apache.tomcat.maven</groupId>
<artifactId>tomcat7-maven-plugin</artifactId>
<version>2.2</version>
<configuration>
<path>/</path>
<port>9090</port>
<uriEncoding>UTF-8</uriEncoding>
<server>tomcat7</server>
<!--添加忽略war包检查标签,否则启动时会跳过非war导致无法发布这个应用,
设置忽略可以让tomcat7:run指令正常启动tomcat-->
<ignorePackaging>true</ignorePackaging>
</configuration>
</plugin>
</plugins>
</build>
需要注意的一点是,使用这种方式是以jar的形式启动应用,需要添加 <ignorePackaging>true</ignorePackaging>这个忽略war包检查标签,否则tomcat启动时会跳过非war那么就无法发布这个应用了。其它关于内置tomcat的知识工作中有需要再另行学习。
六.SpringMVC源码分析和SpringMVC知识点(如父子容器)?
现在我们已经搭建了一个SpringMVC处理请求的完整框架代码,那么接下来的全文核心就是深入学习SpringMVC处理请求的流程,对SpringMVC各个组件的内部底层实现及分工进行学习,中间穿插相关SpringMVC的知识点在对应新的文档链接进行介绍,最后进行图文总结整个过程经历的核心操作。限于篇幅,这一块源码解析的知识放在下面文档分享,文档请参考:
https://blog.csdn.net/qq_20395245/article/details/106321161
七.结合源码分析知识,手写一个自己的SpringMVC框架?
通过第六点对源码的分析学习,我们可以尝试自己实现一个简易版本的自定义SpringMVC框架并打包成jar供下载学习,目标是像org.framework.spring-mvc.jar一样导入工程即可进行配置使用,这里只进行代码的实现思路说明以及在源码解析过程中学习到相关组件用设计模式进行抽象的思想。具体代码实现细节文章不做讨论,详细代码和注释可以参考我的github地址:
代码实现中....
最后
以上就是傻傻超短裙最近收集整理的关于SpringMVC搭建应用(XML配置方式+零XML配置),Servlet3.0 SPI规范,SpringMVC源码分析及相关知识点,手写自己的SpringMVC框架jar发布使用的全部内容,更多相关SpringMVC搭建应用(XML配置方式+零XML配置),Servlet3.0内容请搜索靠谱客的其他文章。


发表评论 取消回复