欢迎fork我的github:https://github.com/zhaoyu611/DeepLearningTutorialForChinese
最近在学习git,所以正好趁这个机会,把学习到的知识实践一下~ 看完DeepLearning的原理,有了大体的了解,但是对于theano的代码,还是自己撸一遍印象更深 所以照着deeplearning.net上的代码,重新写了一遍,注释部分是原文翻译和自己的理解。 感兴趣的小伙伴可以一起完成这个工作哦~ 有问题欢迎联系我 Email: zhaoyuafeu@gmail.com QQ: 3062984605
#-*- coding:utf-8 -*-
#时间: 2016.7.13
#Email: zhaoyuafeu@gmail.com
'''
本教程介绍了使用theano实现降噪自编码的过程。

降噪自编码是堆栈自编码的组成模块。它是Bengio et al在2007年提出的。
假设自编码器的输入为x,将它映射到隐含层,y = f_{theta}(x) = s(Wx+b)
其中变量为theta={W,b}。 隐层输出y映射到重构矢量z in [0,1]^d: z = g_{theta'}(y) = s(W'y + b')
权重矩阵 W' 表示为W' = W^T, 所以自编码有约束权重。网络通过最小化重构误差(x和z的误差)来进行训练。

对于降噪自编码,在训练时,首先将x破损为 tilde{x},这里 tilde{x}是通过随机映射而部分破损的x。
然后,y的计算同自编码一样(使用 tilde{x}): y = s(Wtilde{x} + b) 同时 z 可以表示为 s(W'y + b').
重构误差是指z与未破损的x的误差,可以用交叉熵来表示:- sum_{k=1}^d[ x_k log z_k + (1-x_k) log( 1-z_k)]

参考文献:
    - P. Vincent, H. Larochelle, Y. Bengio, P.A. Manzagol: Extracting and
   Composing Robust Features with Denoising Autoencoders, ICML'08, 1096-1103,
   2008
   - Y. Bengio, P. Lamblin, D. Popovici, H. Larochelle: Greedy Layer-Wise
   Training of Deep Networks, Advances in Neural Information Processing
   Systems 19, 2007
'''

import cPickle
import gzip
import os
import sys
import time

import numpy

import theano
import theano.tensor as T
from theano.tensor.shared_randomstreams import RandomStreams

from logistic_sgd import load_data
from utils import tile_raster_images
import PIL.Image


class dA(object):
    """降噪自编码类(dA)
    降噪自编码器可以重构输入量,它首先将输入映射到隐层空间,在重新映射回输入空间。
    更多细节见incent et al.,2008。设x是输入,公式(1)通过随机映射q_D计算x的部分
    破损。公式(2)计算输入量到隐层的映射值。公式(3)计算x的重构量。公式(4)计算
    重构误差。
    .. math::

        tilde{x} ~ q_D(tilde{x}|x)                                     (1)

        y = s(W tilde{x} + b)                                           (2)

        x = s(W' y  + b')                                                (3)

        L(x,z) = -sum_{k=1}^d [x_k log z_k + (1-x_k) log( 1-z_k)]      (4)

    """
    def __init__(self,numpy_rng,theano_rng=None,input=None,
                 n_visible=784,n_hidden=500,
                 W=None,bhid=None,bvis=None):
        """
        初始化dA类,指定可见层单元的数量(输入量的维数d),隐层单元的数量 (隐层维数)

        numpy_rng: numpy.random.RandomState 用来产生随机权重的随机数
        theano_rng: RandomStreams theano产生的随机数
        input: TensorType 输入量的符号表示
        n_visible: int 输入单元数量
        n_hidden: int 隐层单元数量
        W: tensorType 权重的符号表示
        bhid: TensorType 隐层偏置的符号表示
        bvis: TensorType 可见层偏置的符号表示
        """
        self.n_visible=n_visible
        self.n_hidden=n_hidden
        #创建theano的随机数
        if not theano_rng:
            theano_rng=RandomStreams(numpy_rng.int(2**30))
        #注意:W'写做W_prime,b'写做b_prime
        if not W:
            #W的输初始值在-4*sqrt(6./(n_visible+n_hidden)) and
            # 4*sqrt(6./(n_hidden+n_visible))之间,
            # W的类型为thenao.config.floatX,所以代码可以在GPU运行
            initial_W=numpy.asarray(numpy_rng.uniform(
                        low=-4*numpy.sqrt(6./(n_visible+n_hidden)),
                        high=4*numpy.sqrt(6./(n_visible+n_hidden)),
                        size=(n_visible,n_hidden)),dtype=theano.config.floatX)
            W=theano.shared(value=initial_W,name='W',borrow=True)
        #定义可见层偏置
        if not bvis:
            bvis=theano.shared(value=numpy.zeros(n_visible,
                                                dtype=theano.config.floatX),
                              borrow=True)
        #定义隐含层偏置
        if not bhid:
            bhid=theano.shared(value=numpy.zeros(n_hidden,
                                                 dtype=theano.config.floatX),
                               name='b',
                               borrow=True)
        #定义权重
        self.W=W
        #定义b为隐含层偏置
        self.b=bhid
        #定义b_prime为可见层偏置
        self.b_prime=bvis
        #W_prime与W是捆绑权重,W_prime是W的转置
        self.W_pime=self.W.T
        #定义theano随机数
        self.theano_rng=theano_rng
        #定义输入量的符号表示,因为将每个样本都切分成很多块,所以用矩阵表示
        #每个样本是一行
        if input==None:
            self.x=T.dmatrix(name='input')
        else:
            self.x=input
        self.params=[self.W,self.b,self.b_prime]

    def get_corrupted_input(self,input,corruption_level):
        """
        定义破损输入函数:1-corruption_level表示原始输入,0-corruption_level表示完全随机输入
        注意:theano.rng.binomial的第一个参数是随机数的大小,
              第二个参数是???,第三个参数是概率

              binomial函数默认返回int64类型的数据,而int64与输入类型(floatX)进行运算,
              结果返回float64。为了确保所有float数据为float32类型,我们需要设置binomial函数
              类型类型为floatX。在本程序中,binomial函数的值为0或1,所以数据类型不改变结果。
              因为GPU目前只支持float32类型运算,所以我们有必要设置数据类型。
        """
        return self.theano_rng.binomial(size=input.shape,n=1,
                                        p=1-corruption_level,
                                        dtype=theano.config.floatX)*input
    #计算隐含层的值,激活函数为sigmoid
    def get_hidden_values(self,input):
        return T.nnet.sigmoid(T.dot(input,self.W)+self.b)

    #给出隐层的值,计算重构的输入值
    def get_reconstructed_input(self,hidden):
        return T.nnet.sigmoid(T.dot(hidden,self.W_pime)+self.b_prime)

    #计算代价和dA的每个步长的更新信息,返回代价值和更新列表
    def get_cost_updates(self,corruption_level,learnging_rate):
        tilde_x=self.get_corrupted_input(self.x,corruption_level)
        y=self.get_hidden_values(tilde_x)
        z=self.get_reconstructed_input(y)
        #注意:我们计算所有数据的和;如果使用minibatch,L则是矢量,
        #其中每个值表示minibatch中的样本的计算值,偏差用交叉熵来计算
        L=-T.sum(self.x*T.log(z)+(1-self.x)*T.log(1-z),axis=1)
        #注意:
        #此时L是一个矢量,每个元素是minibatch的交叉熵代价值
        cost=T.mean(L)
        #计算dA中变量的梯度
        gparams=T.grad(cost,self.params)
        #生成更新列表
        updates=[]
        for param,gparam in zip(self.params,gparams):
            updates.append((param,param-learnging_rate*gparam))
        return (cost,updates)

#-----定义主函数---------
def test_dA(learnging_rate=0.1,training_epochs=15,
            dataset='data/mnist.pkl.gz',
            batch_size=20,output_folder='dA_plot'):
    """
    测试数据是MNIST
    输入量:
    learning_rate: float 训练dA的学习率   training_epoch:int 用于训练的代数
    dataset: str 数据集    batch_size: int 每个batch的大小   output_folder: str 保存输出数据的文件夹
    """
    datasets=load_data(dataset) #加载数据
    train_set_x,train_set_y=datasets[0] #提取训练特征集和训练标签集
    #计算用于训练、验证和测试的minibatchs的个数
    n_train_batches=train_set_x.get_value(borrow=True).shape[0]/batch_size
    #定义符号变量
    index=T.lscalar() #minibatch的索引
    x=T.matrix('x') #输入为栅格化的图像

    #创建输出文件夹,并切换到该目录下
    if not os.path.isdir(output_folder):
        os.makedirs(output_folder)
    os.chdir(output_folder)
    ####################################
            # 创建无损输入的模型 #
    ####################################
    rng=numpy.random.RandomState(123)
    theano_rng=RandomStreams(rng.randint(2**30))
    #实例化dA类
    da=dA(numpy_rng=rng,theano_rng=theano_rng,input=x,n_visible=28*28,n_hidden=500)
    #计算cost,updates
    cost,updates=da.get_cost_updates(corruption_level=0,learnging_rate=learnging_rate)
    #构造训练函数
    train_da=theano.function([index],cost,updates=updates,
                             givens={x:train_set_x[index*batch_size:
                                                    (index+1)*batch_size]})
    start_time=time.clock() #对无损模型的训练开始计时
    ############
    # 开始训练 #
    ############
    for epoch in xrange(training_epochs):
        #遍历训练集合
        c=[] #代价函数列表
        for batch_index in xrange(n_train_batches):
            c.append(train_da(batch_index))
        print "Training epoch %d, cost " %epoch,numpy.mean(c)
    end_time=time.clock()
    training_time=(end_time-start_time)

    print >>sys.stderr,('The no corruption code for file '+
                        os.path.split(__file__)[1]+
                        ' ran for %.2fm')%(training_time/60.)
    image=PIL.Image.fromarray(
        tile_raster_images(X=da.W.get_value(borrow=True).T,
                           img_shape=(28,28),tile_shape=(10,10),
                           tile_spacing=(1,1)))
    image.save('filter_corruption_0.png')
    ####################################
            # 创建30%破损输入的模型 #
    ####################################
    rng=numpy.random.RandomState(123)
    theano_rng=RandomStreams(rng.randint(2**30)) #定义随机序列
    #创建dA实例
    da=dA(numpy_rng=rng,theano_rng=theano_rng,input=x,
          n_visible=28*28,n_hidden=500)
    #计算代价和更新列表
    cost,updates=da.get_cost_updates(corruption_level=0.3,learnging_rate=learnging_rate)
    #构造训练函数
    train_da=theano.function([index],cost,updates=updates,
                             givens={x:train_set_x[index*batch_size:(index+1)*batch_size]})
    #开始计时
    start_time=time.clock()
    ############
    # 开始训练 #
    ############
    #遍历训练代数
    for epoch in xrange(training_epochs):
        #设置训练集合
        c=[] #代价函数列表
        for batch_index in xrange(n_train_batches):
            c.append(train_da(batch_index))

        print "Training epoch %d,cost "%epoch,numpy.mean(c)
    end_time=time.clock()
    training_time=end_time-start_time
    print >> sys.stderr, ("the 30% corruption code for file "+os.path.split(__file__)[1]+
                          " ran for %.2fm" %(training_time/60.))
    image=PIL.Image.fromarray(tile_raster_images(
        X=da.W.get_value(borrow=True).T,
        img_shape=(28,28),tile_shape=(10,10),tile_spacing=(1,1)))
    image.save('filters_corruption_30.png')
    os.chdir('../')
#-----运行主函数---------
if __name__=='__main__':
    test_dA()
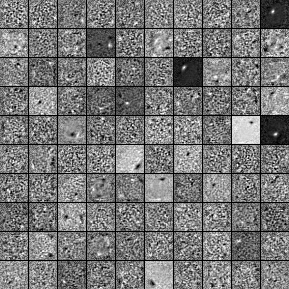
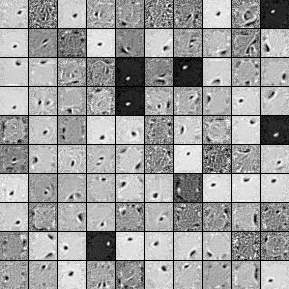
输出效果图

corruption为0的输出图:

corruption为30%的输出图:
从图中可以看出,当corruption为30%时,特征提取更加明显。
参考文献
[1] http://deeplearning.net/tutorial/dA.html#daa
[2] http://www.cnblogs.com/tornadomeet/p/3261247.html
[3] http://www.cnblogs.com/xueliangliu/archive/2013/06/09/3127197.html
最后
以上就是忧郁睫毛最近收集整理的关于theano学习指南---降噪自编码(源码)的全部内容,更多相关theano学习指南---降噪自编码(源码)内容请搜索靠谱客的其他文章。
本图文内容来源于网友提供,作为学习参考使用,或来自网络收集整理,版权属于原作者所有。


发表评论 取消回复