环境介绍
- Centos7
- Nginx 1.9.9
- openssl 1.0.2
- certbot
注意
有些 let’s Encrypt 证书安装方法需要用到 python2.7 及以上,centos6 默认是 python2.6 版本,需要做相应升级。CentOS7 可以直接跳过。
申请证书之前如果 80 或 443 端口被监听,例如 nginx 已经在使用,就必须把 nginx 停掉,不然会申请失败。
安装过程
先在/war下创建ssl文件夹,然后移到该目录下 cd /var/ssl
1.下载certbot
git clone https://github.com/certbot/certbot
cd certbot

# 查看帮助
./certbot-auto --help
# 查看详细帮助
./certbot-auto --help all
2. 生成证书
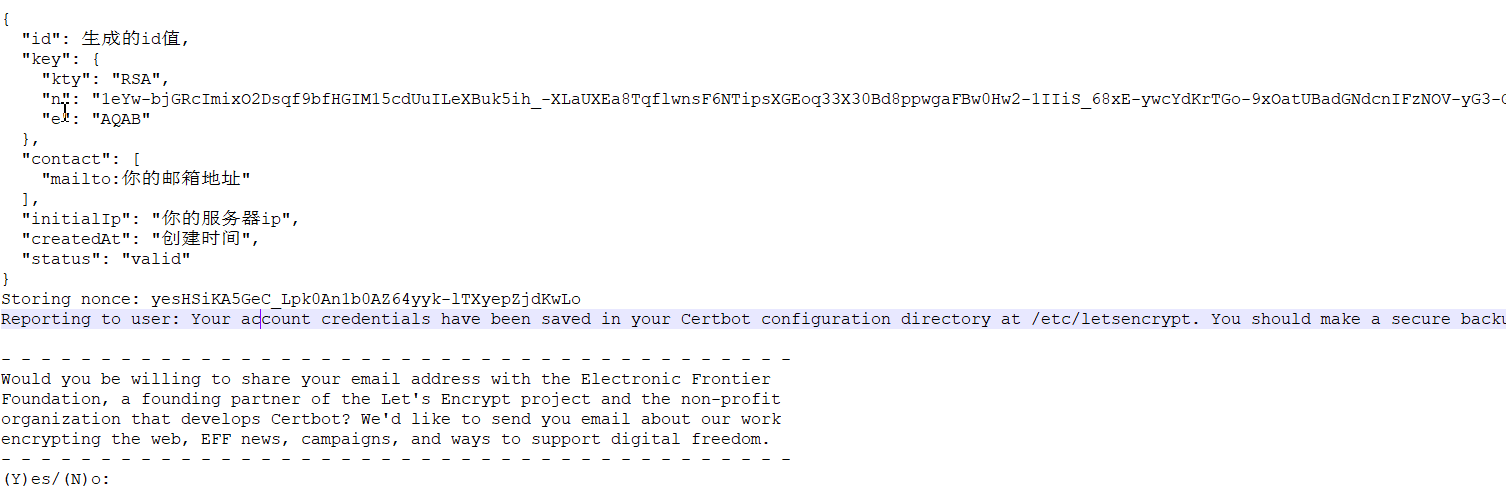
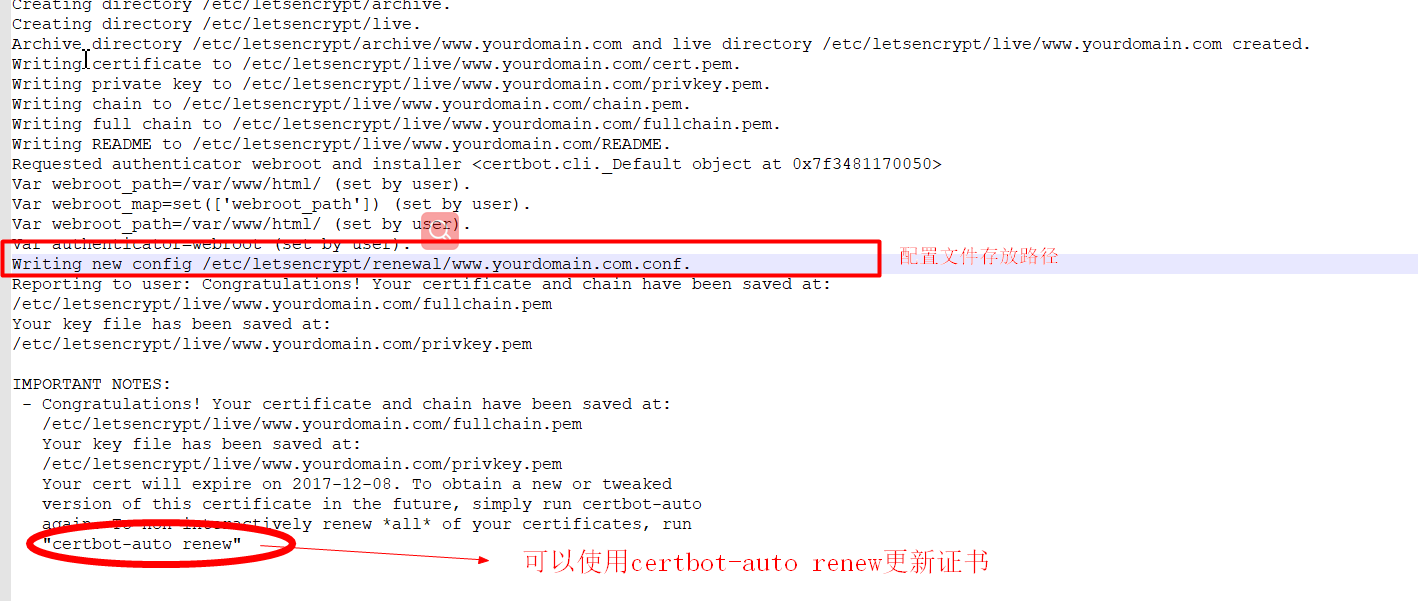
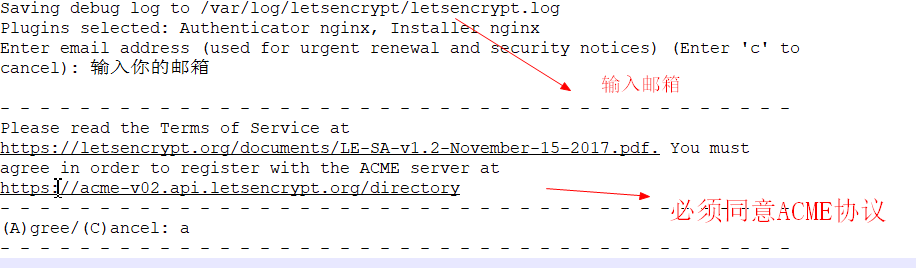
./certbot-auto certonly --webroot --agree-tos -v -t --email 邮箱地址 -w 网站根目录 -d 网站域名假设你的网站域名为www.yourdomain.com,则证书创创建过程记录如下:
3.参数介绍
-
certonly Obtain or renew a certificate, but do not install it (获取或更新证书,但不安装证书)
-
--webroot Place files in a server's webroot folder for authentication(在服务器的webroot文件夹下防止用于身份认证的文件)
-
--agree-tos Agree to the ACME Subscriber Agreement (default: Ask) (同意ACME订阅协议)
- -v, --verbose 显示详细信息
- --email 邮箱
-
--webroot-path WEBROOT_PATH, -w WEBROOT_PATH
public_html / webroot path. This can be specified multiple times to handle different domains; each domain will have the webroot path that preceded it. For instance: `-w /var/www/example -d example.com -d www.example.com -w /var/www/thing -d thing.net -d m.thing.net` (default: Ask) (-w 指定web服务器的根目录)
- -d DOMAINS Comma-separated list of domains to obtain a certificate for (-d 指定域名,多个域名之间用逗号分隔)
如果 --email和--agree-tos 省略,在第一次配置时会提示配置:
关于webroot
certbot提供了两种安装配置方式:
- webroot 在已存在的Nginx上配置https
standalonecertbot帮助创建带https的Nginx
证书位置
已申请的证书会放在 /etc/letsencrypt/archive下,而/etc/letsencrypt/live是指向最新版本的符号链接。web server中关于证书的配置建议指向live目录下的文件,以免证书更新后还需要更改配置。
每个域名一个目录,主要包含以下几个文件:
- cert.pem 申请的服务器证书文件
- privkey.pem 服务器证书对应的私钥
- chain.pem 除服务器证书外,浏览器解析所需的其他全部证书。比如根证书和中间证书
- fullchain.pem 包含服务器证书的全部证书链文件
遇到的问题:
FailedChallenges: Failed authorization procedure. www.yourdomain.com (http-01): urn:ietf:params:acme:error:connection :: The server could not connect to the client to verify the domain :: Fetching http://www.yourdomain.com/.well-known/acme-challenge/Xi0YebRxd6r49IxmSAkTHTHYV9nUIBnGmGhqxl8TIMY: Connection refused
Failed authorization procedure. www.yourdomain.com (http-01): urn:ietf:params:acme:error:connection :: The server could not connect to the client to verify the domain :: Fetching http://www.yourdomain.com/.well-known/acme-challenge/Xi0YebRxd6r49IxmSAkTHTHYV9nUIBnGmGhqxl8TIMY: Connection refused
解决方法:
配置nginx,启动nginx,保证能够正常访问nginx
如果跟换了域名,需要将原来https配置都先注释掉,先保证能够通过http正常访问nginx服务。
4.查看配置文件
[root@host certbot]# cat /etc/letsencrypt/renewal/www.yourdomain.com.conf 生成dhparams
使用 openssl 工具生成 dhparams
openssl dhparam -out /etc/ssl/certs/dhparams.pem 2048配置nginx
server {
    listen 443 ssl;
    server_name  你的域名;


    location / {
        root   /var/www/html;   # 根目录
        index  index.html;
    }


    ssl_certificate /etc/letsencrypt/live/你的域名/fullchain.pem;
    ssl_certificate_key /etc/letsencrypt/live/你的域名/privkey.pem;
    ssl_dhparam /etc/ssl/certs/dhparams.pem;
    ssl_protocols SSLv3  TLSv1 TLSv1.1 TLSv1.2;
    ssl_ciphers HIGH:!aNULL:!MD5;
    ssl_prefer_server_ciphers  on;
}
强制跳转https
# 强制跳转https(可选)
server {
    listen 80;
    server_name 你的域名;
    return 301 https://$server_name$request_uri;
}
然后重启nginx服务器即可
$service nginx restart
或者
$nginx -s reload
遇到的问题
Nginx如果未开启SSL模块,配置Https时提示错误
nginx: [emerg] the “ssl” parameter requires ngx_http_ssl_module in /usr/local/nginx/conf/nginx.conf:37
切换到源码包:
cd /usr/local/src/nginx-1.11.3查看nginx原有的模块
/usr/local/nginx/sbin/nginx -V在configure arguments:后面显示的原有的configure参数如下:
--prefix=/usr/local/nginx --with-http_stub_status_module
那么我们的新配置信息就应该这样写:
./configure --prefix=/usr/local/nginx --with-http_stub_status_module --with-http_ssl_module
运行上面的命令即可,等配置完
配置完成后,运行命令
make
这里不要进行make install,否则就是覆盖安装
然后备份原有已安装好的nginx
cp /usr/local/nginx/sbin/nginx /usr/local/nginx/sbin/nginx.bak
然后将刚刚编译好的nginx覆盖掉原有的nginx(这个时候nginx要停止状态)
cp ./objs/nginx /usr/local/nginx/sbin/
然后启动nginx,仍可以通过命令查看是否已经加入成功
/usr/local/nginx/sbin/nginx -V
Nginx 配置SSL安全证书重启避免输入密码
可以用私钥来做这件事。生成一个解密的key文件,替代原来key文件。
openssl rsa -in server.key -out server.key.unsecure
Nginx SSL性能调优
ssl_protocols TLSv1 TLSv1.1 TLSv1.2;
ssl_ciphers ECDHE-RSA-AES256-SHA384:AES256-SHA256:RC4:HIGH:!MD5:!aNULL:!eNULL:!NULL:!DH:!EDH:!AESGCM;
ssl_prefer_server_ciphers on;
ssl_session_cache shared:SSL:10m;
ssl_session_timeout 10m;
6.Let's Encrypt免费SSL证书续期
1、Let's Encrypt免费SSL证书有效期是90天,也就是每三个月你就得续期一次。采用官方的方法获取到的免费SSL证书,你不需要更改Apache和Nginx配置代码,执行以下代码即可自动替换证书为新的(注意修改域名和邮箱):
###./certbot-auto renew
./letsencrypt-auto certonly --renew-by-default --email didiok@foxmail.com -d read.didiok.com
只用renew的话,会先检查证书是否需要更新,大概是距离到期还有三天或者十几天之内才会执行更新,否则会提示不需要更
新。(昨天更新了证书,今天直接用renew,提示不允许更新)
2、采用上面脚本快速获取Let's Encrypt免费SSL证书的,在90天内再次执行命令即可:./letsencrypt.sh letsencrypt.conf。
3、cron 定时任务。每个月自动更新一次证书,可以在脚本最后加入 service nginx reload等重新加载服务。
定时器更新
##0 0 1 * * /home/soft/ssl/letsencrypt/certbot-auto renew>>/home/soft/ssl/letsencrypt/log.txt

0 0 1 * * /etc/nginx/certs/letsencrypt.sh /etc/nginx/certs/letsencrypt.conf >> /var/log/lets-encrypt.log 2>&1
最后
以上就是追寻老鼠最近收集整理的关于centos7 使用let's encrypt工具配置Nginx HTTPS的全部内容,更多相关centos7内容请搜索靠谱客的其他文章。


发表评论 取消回复