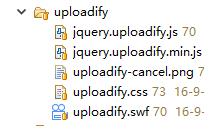
1、所需js、css、jar


Maven引用方法
<dependency>
     <groupId>commons-fileupload</groupId>
     <artifactId>commons-fileupload</artifactId>
     <version>1.3.1</version>
</dependency>
2、修改uploadify默认的按钮样式
 改为
改为
这边需要修改uploadify.css即可(注释为官网源码)
.uploadify-button {
    line-height:30px;
  height:30px;
  width:70px;
  color:#ffffff;
  background-color:#3ba354;
  font-size:16px;
  font-weight:normal;
  font-family:Arial;
  border:0px solid #dcdcdc;
  -webkit-border-top-left-radius:3px;
  -moz-border-radius-topleft:3px;
  border-top-left-radius:3px;
  -webkit-border-top-right-radius:3px;
  -moz-border-radius-topright:3px;
  border-top-right-radius:3px;
  -webkit-border-bottom-left-radius:3px;
  -moz-border-radius-bottomleft:3px;
  border-bottom-left-radius:3px;
  -webkit-border-bottom-right-radius:3px;
  -moz-border-radius-bottomright:3px;
  border-bottom-right-radius:3px;
  -moz-box-shadow: inset 0px 0px 0px 0px #ffffff;
  -webkit-box-shadow: inset 0px 0px 0px 0px #ffffff;
  box-shadow: inset 0px 0px 0px 0px #ffffff;
  text-align:center;
  display:inline-block;
  text-decoration:none;
}
.uploadify:hover .uploadify-button {
    background-color:#1c9439;
}
/*
.uploadify-button {
    background-color: #505050;
    background-image: linear-gradient(bottom, #505050 0%, #707070 100%);
    background-image: -o-linear-gradient(bottom, #505050 0%, #707070 100%);
    background-image: -moz-linear-gradient(bottom, #505050 0%, #707070 100%);
    background-image: -webkit-linear-gradient(bottom, #505050 0%, #707070 100%);
    background-image: -ms-linear-gradient(bottom, #505050 0%, #707070 100%);
    background-image: -webkit-gradient(
        linear,
        left bottom,
        left top,
        color-stop(0, #505050),
        color-stop(1, #707070)
    );
    background-position: center top;
    background-repeat: no-repeat;
    -webkit-border-radius: 30px;
    -moz-border-radius: 30px;
    border-radius: 30px;
    border: 2px solid #808080;
    color: #FFF;
    font: bold 12px Arial, Helvetica, sans-serif;
    text-align: center;
    text-shadow: 0 -1px 0 rgba(0,0,0,0.25);
    width: 100%;
}
.uploadify:hover .uploadify-button {
    background-color: #606060;
    background-image: linear-gradient(top, #606060 0%, #808080 100%);
    background-image: -o-linear-gradient(top, #606060 0%, #808080 100%);
    background-image: -moz-linear-gradient(top, #606060 0%, #808080 100%);
    background-image: -webkit-linear-gradient(top, #606060 0%, #808080 100%);
    background-image: -ms-linear-gradient(top, #606060 0%, #808080 100%);
    background-image: -webkit-gradient(
        linear,
        left bottom,
        left top,
        color-stop(0, #606060),
        color-stop(1, #808080)
    );
    background-position: center bottom;
}
 */
需要自定义样式可以到此网站在线制作http://www.buttoncssgenerator.com/
3、引用jquery.uploadify.js 和uploadify.css文件
<script type="text/javascript" src="${staticPath }/static/uploadify/jquery.uploadify.js" charset="utf-8"></script>
<link id="uploadify" rel="stylesheet" type="text/css" href="${staticPath }/static/uploadify/uploadify.css" />
4、jsp页面源码
<input name="filename" id="filename" type="hidden" />
                        <input name="filepath" id="filepath" type="hidden" />
                        <a onclick="javascript:$('#file_upload').uploadify('upload','*')" href="javascript:void(0);" class="easyui-linkbutton" data-options="plain:true,iconCls:'icon-upload'">开始上传</a>
                        <a onclick="javascript:$('#file_upload').uploadify('cancel','*')" href="javascript:void(0);" class="easyui-linkbutton" data-options="plain:true,iconCls:'icon-close'">取消上传</a>
                        <hr style="border-color:#fff;">
                        <div>
                            <table id="file" class="grid"></table>
                        </div>
                        <div id="uploadfileQueue">
                        </div><br/>
                       <input id="file_upload" name="file_upload"  type="file" class="easyui-linkbutton" data-options="plain:true,iconCls:'icon-upload'" />
js源码
$("#file_upload").uploadify({
            'auto':false,
            'successTimeout':99999,
            'buttonText':"选择文件",
            'swf': "static/uploadify/uploadify.swf",
            'cancelImg':"static/uploadify/uploadify-cancel.png",
            'queueID':'uploadfileQueue',
            'fileObjName':'pic',
            'uploader':'${path }/file/file',
            'width':'100',
            'height':'32',
            'fileTypeDesc':'支持的格式:*.jpg;*.jpge;*.gif;*.png',
            'fileTypeExts':'*.jpg;*.jpge;*.gif;*.png', //有哪些??
            'fileSizeLimit':'100MB',
            'queueSizeLimit' : 1,
            'onSelect' : function(file) {
                  //alert("123");
            },
            'onSelectError':function(file, errorCode, errorMsg){
                switch(errorCode) {
                    case -100:
                        $.messager.alert("提示", "上传的文件数量已经超出系统限制的"+$('#file_upload').uploadify('settings','queueSizeLimit')+"个文件!");
                        break;

                    case -110:
                        $.messager.alert("提示", "文件 ["+file.name+"] 大小超出系统限制的"+$('#file_upload').uploadify('settings','fileSizeLimit')+"大小!");
                        break;

                    case -120:
                        $.messager.alert("提示", "文件 ["+file.name+"] 大小异常!");
                        break;

                    case -130:
                        $.messager.alert("提示", "文件 ["+file.name+"] 类型不正确!");
                        break;
                }
            },
            //上传到服务器,服务器返回相应信息到data里
            'onUploadSuccess':function(file, data, response){
                var html = '<tr>'+
                                '<td>'+
                                    '<a href="javascript:void(0);" onclick="downFile(''+data+'');"  class="file">'+data+'</a>'+
                                '</td>'+
                                '<td class="delFile" style="text-align:center">'+
                                    '<a href="javascript:void(0);" onclick="delFile(''+data+'',this);"><img src="static/uploadify/uploadify-cancel.png" ></a>'+
                                    '<div style="display: none;">'+file.name+'</div>'+
                                '</td>'+
                            '</tr>';
                $("#file").append(html);
                $("#filename").val(file.name);
                $("#filepath").val(data);
                $.messager.alert("提示", "上传成功!");
            },
          //当单个文件上传出错时触发
            'onUploadError': function (file, errorCode, errorMsg, errorString) {
                if(errorCode == "-280"){
                    //$.messager.alert("操作提示", "上传文件取消!","info");
                }else{
                    $.messager.alert("提示", "上传失败!");
                }
            }
        });
controller源码(此处增加file字段是为了在上传文件的时候自定义区分文件夹)
@RequestMapping(value="/file",method=RequestMethod.POST)
    @ResponseBody
    public String file(@RequestParam("pic")CommonsMultipartFile pic,HttpServletRequest req,HttpServletResponse response) throws IOException{
        //获取自定义文件夹
        String file = req.getParameter("file");
        //设置文件保存的本地路径
        String filePath = req.getSession().getServletContext().getRealPath("/uploadFiles/");
        if(!"".equals(file) && file != null){
            filePath = filePath+file+"/";
        }
        String fileName = pic.getOriginalFilename();
        //String fileType = fileName.split("[.]")[1];
        //为了避免文件名重复,在文件名前加UUID
        //String uuidFileName = GetUUID.getUUID() + fileName;
        //为了避免文件名重复,在文件名后面加时间戳
        String uuidFileName = DateUtils.getDateTimes()+ "_" +fileName;
        //File f = new File(filePath+"/"+uuid+"."+fileType);
        //将文件保存到服务器
        FileUtil.upFile(pic.getInputStream(), uuidFileName, filePath);
        if(!"".equals(file) && file != null){
            return file+"/"+uuidFileName;
        }else{
            return uuidFileName;
        }
    }
工具类
package com.hezhikeji.utils;

import java.io.BufferedInputStream;
import java.io.BufferedOutputStream;
import java.io.File;
import java.io.FileInputStream;
import java.io.FileOutputStream;
import java.io.IOException;
import java.io.InputStream;
import java.io.OutputStream;

import javax.servlet.http.HttpServletResponse;

/**
 * 文件上传工具类
 * @author ALun
 *
 */
public class FileUtil {

    /**
     * 单个文件上传
     * @param is
     * @param fileName
     * @param filePath
     */
    public static void upFile(InputStream is,String fileName,String filePath){
        FileOutputStream fos = null;
        BufferedOutputStream bos = null;
        BufferedInputStream bis = null;
        File file = new File(filePath);
        if(!file.exists()){
            file.mkdirs();
        }
        File f = new File(filePath+"/"+fileName);
        try {
            bis = new BufferedInputStream(is);
            fos = new FileOutputStream(f);
            bos = new BufferedOutputStream(fos);
            byte[] bt = new byte[4096];
            int len;
            while((len = bis.read(bt))>0){
                bos.write(bt, 0, len);
            }
        } catch (Exception e) {
            e.printStackTrace();
        }finally {
            try {
                if(null != bos){
                    bos.close();
                    bos = null;
                }
                if(null != fos){
                    fos.close();
                    fos= null;
                }
                if(null != is){
                    is.close();
                    is=null;
                }
                if (null != bis) {
                    bis.close();
                    bis = null;
                }
            } catch (Exception e) {
                e.printStackTrace();
            }
        }
    }
}
最后
以上就是魁梧煎饼最近收集整理的关于Java String MVC框架使用uploadify上传文件的全部内容,更多相关Java内容请搜索靠谱客的其他文章。
本图文内容来源于网友提供,作为学习参考使用,或来自网络收集整理,版权属于原作者所有。


发表评论 取消回复