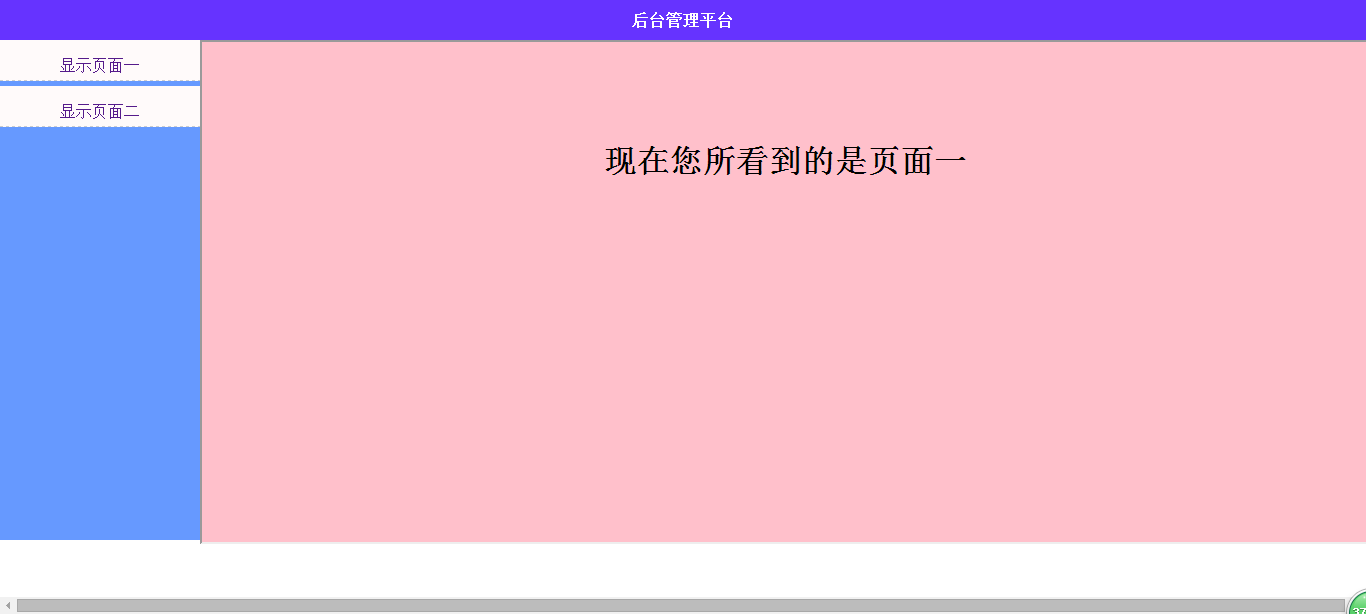
最终效果展示
一、首先先用HTML+CSS简单的将页面布局出来(上方一层,下方分左右两栏,左侧为点击事件区域,右侧为内容显示区域)代码如下:
<!DOCTYPE html PUBLIC "-//W3C//DTD XHTML 1.0 Transitional//EN" "http://www.w3.org/TR/xhtml1/DTD/xhtml1-transitional.dtd">
<html xmlns="http://www.w3.org/1999/xhtml">
<head>
<meta http-equiv="Content-Type" content="text/html; charset=utf-8" />
<title>后台管理布局</title>
<style>
* { margin:0; padding:0; list-style:none; text-decoration:none;}
.top { width:100%; height:40px; line-height:40px; text-align:center; font-weight:bold; background:#63F; color:#fff;}
.content { width:100%; height:500px; background:snow; }
.cleft { width:200px; height:500px;background:#69F; float:left;}
.cright { height:500px; background:pink; margin:0 0 0 200px;}
.cleft li { background:snow; width:100%; height:20px; line-height:10px; padding:20px 0 0 0px; margin:0 0 5px 0; text-align:center; border-bottom:1px dashed #ccc;}
</style>
</head>
<body>
<div class="container">
<div class="top">后台管理平台</div>
<div class="content">
<div class="cleft">
<ul>
<li><a href="page1.html" target="box">显示页面一</a></li>
<li><a href="page2.html" target="box">显示页面二</a></li>
</ul>
</div>
<div class="cright">
</div>
</div>
</div>
</body>
</html>
二、单独新建两个html页面(要在右侧显示的内容,这里我新建的是 page1.html和page2.html)
三、在右侧的盒子中加入如下代码(其中name属性是必须的,src后面跟着的是要显示的html路径,scrolling是决定是否要有滚动条。):
<div class="cright">
<iframe src="page1.html" width="100%" height="100%" name="box" scrolling="auto"></iframe>
</div>
注意:
iframe中的name属性要和左侧点击的a标签里的target的属性值一致。如上例子所示:name=”box”,target=”box”;
四、刷新本页面
$(function(){
var index = 1;
$(".cleft li").on("click",function(){
index = $(this).index() + 1;
})
$(".js-refresh").on("click",function(){
$("#iframe").attr("src","page"+index+".html");
})
})
最后
以上就是光亮花瓣最近收集整理的关于后台管理界面(内联框架的应用)的全部内容,更多相关后台管理界面(内联框架内容请搜索靠谱客的其他文章。
本图文内容来源于网友提供,作为学习参考使用,或来自网络收集整理,版权属于原作者所有。


发表评论 取消回复