个人感觉tensorflow的resize_image方法有个大坑,这里只是以双三次插值为例对图片进行缩放为例,对比opencv以及PIL算法的不同。之所以说tensorflow的插值算法有些坑,是因为他的resize算法,无论怎么配置,都无法和openc以及pil库提供的插值算法进行对齐,常用的视频编解码工具ffmpeg自带的双三次插值接近PIL效果。另外,三者的结果都不相同,opencv个人感觉最好,图像显得锐化一些;tensorflow也是有锐化效果,但是部分细节丢失严重,更加接近于最近邻插值算法。
由于tensorflow在1.0版本是静态图的形式,自定义插值算法变得不是很容易。在分析完三者之间的不同后,这里简单提供一个自定义tensorflow的resize_image方法,效果和opencv是一样的。
具体程序:
因为涉及到部分功能代码重复,我们分为三部分:一,读取yuv数据信息,包括帧数,长宽等。二,resize_image,对图像进行插值缩放。三,保存结果。
一,数据读取:
def getFrameNUm(filename, bitdepth, W, H):
bytesPerPixel = math.ceil(bitdepth / 8)
framePixels = bytesPerPixel * H * W * 3 // 2
fp = open(filename, 'rb')
fp.seek(0, 2)
maxFrameNum = fp.tell()
maxFrameNum = maxFrameNum // framePixels
return maxFrameNum
def readyuv420_byframe(filename, bitdepth, W, H, startframe, totalframe, show=False):
bytesPerPixel = math.ceil(bitdepth / 8)
seekPixels = startframe * H * W * 3 // 2
fp = open(filename, 'rb')
fp.seek(bytesPerPixel * seekPixels)
for i in range(totalframe):
Y = fp.read(H * W * bytesPerPixel)
U = fp.read(H // 2 * W // 2 * bytesPerPixel)
V = fp.read(H // 2 * W // 2 * bytesPerPixel)
Y = np.reshape(np.fromstring(Y, dtype=np.uint8), (H, W))
U = np.reshape(np.fromstring(U, dtype=np.uint8), (H // 2, W // 2))
V = np.reshape(np.fromstring(V, dtype=np.uint8), (H // 2, W // 2))
yield Y, U, V
# 具体读取部分
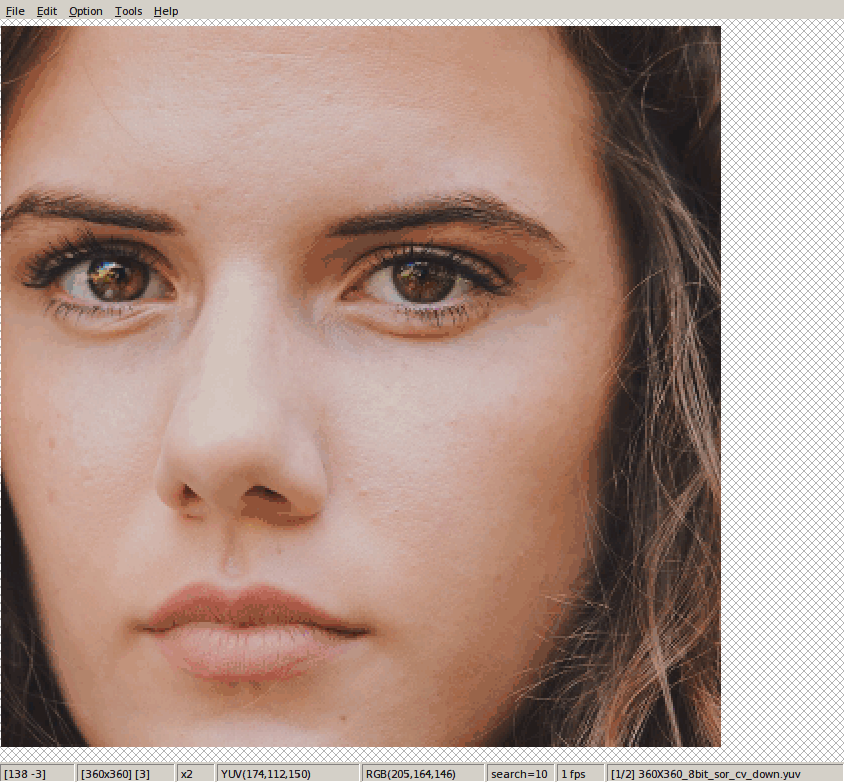
sdr_video = '/360X360_8bit_sor_cv_down.yuv'
save_hdr_video = '720X720_8bit_sor_cv_down_up.yuv'
sdrFrameNum = getFrameNUm(sdr_video, 8, 360, 360)
sdrF = readyuv420_byframe(sdr_video, 8, 360, 360, 0, sdrFrameNum)
width = 720
height = 720
dim_y_shape = (width, height)
dim_uv_shape = (width // 2, height // 2)
插值算法:
# PIL部分,from PIL import Image
for index in range(sdrFrameNum):
sdrY, sdrU, sdrV = sdrF.__next__()
img_y = Image.fromarray(sdrY)
img_y = img_y.resize(dim_y_shape, Image.BICUBIC)
img_y = np.array(img_y)
img_u = Image.fromarray(sdrU)
img_u = img_u.resize(dim_uv_shape, Image.BICUBIC)
img_u = np.array(img_u)
img_v = Image.fromarray(sdrV)
img_v = img_v.resize(dim_uv_shape, Image.BICUBIC)
img_v = np.array(img_v)
# opencv部分,import cv2
for index in range(sdrFrameNum):
sdrY, sdrU, sdrV = sdrF.__next__()
resize_img_y = cv2.resize(sdrY, dim_y_shape, interpolation=cv2.INTER_CUBIC)
resize_img_u = cv2.resize(sdrU, dim_uv_shape, interpolation=cv2.INTER_CUBIC)
resize_img_v = cv2.resize(sdrV, dim_uv_shape, interpolation=cv2.INTER_CUBIC)
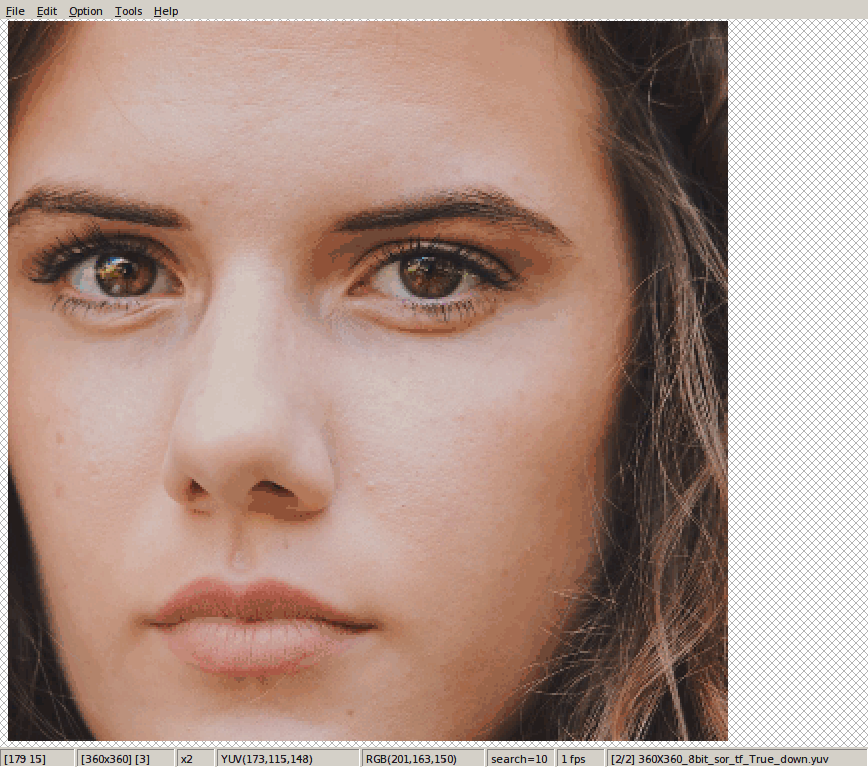
tensorflow部分
hdr_y = tf.placeholder(tf.float32, [None, None, None, 1], name='hdy_img')
hdr_u = tf.placeholder(tf.float32, [None, None, None, 1], name='hdu_img')
hdr_v = tf.placeholder(tf.float32, [None, None, None, 1], name='hdv_img')
input_y_s = tf.image.resize_image_with_pad(hdr_y, des_h, des_w, method=2)
input_u_s = tf.image.resize_image_with_pad(hdr_u, des_h//2, des_w//2, method=2)
input_v_s = tf.image.resize_image_with_pad(hdr_v, des_h//2, des_w//2, method=2)
# input_y_s = tf.image.resize_bicubic(hdr_y, [des_h, des_w], align_corners=False)
# input_u_s = tf.image.resize_bicubic(hdr_u, [des_h//2, des_w//2], align_corners=False)
# input_v_s = tf.image.resize_bicubic(hdr_v, [des_h//2, des_w//2], align_corners=False)
result_y = tf.clip_by_value(input_y_s, 0.0, 1.0)
result_u = tf.clip_by_value(input_u_s, 0.0, 1.0)
result_v = tf.clip_by_value(input_v_s, 0.0, 1.0)
with tf.Session(config=tf.ConfigProto(log_device_placement=False)) as sess:
for step in range(int(total_frame)):
sdrY_ori, sdrU, sdrV = sdrF.__next__()
sdrY = np.reshape(sdrY_ori, (1, src_h, src_w, 1))
sdrU = np.reshape(sdrU, (1, src_h // 2, src_w // 2, 1))
sdrV = np.reshape(sdrV, (1, src_h // 2, src_w // 2, 1))
hy_value, hu_value, hv_value = sdrY / 255.0, sdrU / 255.0, sdrV / 255.0
feed_dict = {hdr_y: hy_value, hdr_u: hu_value, hdr_v: hv_value}
hdr_y_r, hdr_u_r, hdr_v_r = sess.run([result_y, result_u, result_v], feed_dict=feed_dict)
hdrY_pred_img = np.around(hdr_y_r[0, :, :, 0] * 255.0).astype(np.uint8)
hdrU_pred_img = np.around(hdr_u_r[0, :, :, 0] * 255.0).astype(np.uint8)
hdrV_pred_img = np.around(hdr_v_r[0, :, :, 0] * 255.0).astype(np.uint8)
数据保存:
writeyuv420p(save_pre_video, des_w, des_h, hdrY_pred_img, hdrU_pred_img, hdrV_pred_img)

def writeyuv420p(filename, W, H, Y, U, V):
    fp = open(filename, 'wb')
    fp.write(Y)
    fp.write(U)
    fp.write(V)
    fp.close()

def writeyuv420p_add(filename, W, H, Y, U, V):
    fp = open(filename, 'ab+')
    fp.write(Y)
    fp.write(U)
    fp.write(V)
    fp.close()
tensorflow有三种插值算法:
一:# 2代表双三次插值 bicubic
tf.image.resize_image_with_pad(hdr_y, des_h, des_w, method=2)
二:
tf.image.resize_bicubic(hdr_y, [des_h, des_w], align_corners=False)
三:
tf.image.resize_bicubic(hdr_y, [des_h, des_w], align_corners=True)
结论
这里值讨论由于插值而产生的移位情况。这里以opencv和PIL的结果作为标准(不看效果,只看是否移位),为何以这两个为标准?主要是因为他的效果和ffmpeg的结果一致,没有发生移位情况。
一:下采样插值
对于tensorflow下采样,
tf.image.resize_image_with_pad(hdr_y, des_h, des_w, method=2)
tf.image.resize_bicubic(hdr_y, [des_h, des_w], align_corners=False)
这两种设置方法,得出的结果是一样的。但是相较于opencv和PIL(以后只以opencv为例),整体像右下角偏移一个像素左右。
相比于:
tf.image.resize_bicubic(hdr_y, [des_h, des_w], align_corners=True)这种设置方法相比于opencv,是往中间进行偏移。直观看,就是四个角或边都往中心方向移位。
这是下采样的结论。
对于上采样,要对比的就比较多了,主要是上采样回去以后,是要和groundtruth相比,也就是和源图像比是否产生了移位。那么对于待采样图像,他是由原图像进行下采样得到,下采样是通过opencv和tensorflow的三种方法得到的结果(除去一个相同的)。
opencv下采样结果,进行上采样
首先对于opencv下采样后,用三种方法进行上采样。采用opencv上采样插值后,没有发生移位(这个我们之前就提到过)
对于一下这两种方法,他们两个结果一样
tf.image.resize_image_with_pad(hdr_y, des_h, des_w, method=2)
tf.image.resize_bicubic(hdr_y, [des_h, des_w], align_corners=False)
tensorflow的这两种方法,相对于groundtruth,是有一个左上角的偏移。
在这里你可能也想到了,既然上面的结论,下采样会右下,上采样会左上,那么:
tf.image.resize_bicubic(hdr_y, [des_h, des_w], align_corners=False)
tensorflow的是向四周进行移位的。
几种组合方式的上下采样其实也可以猜想一下了。因为tensorflow的下采样,要么向左下角偏移,要么向中心偏移;上采样偏移正好相反。
为什么会出现这种情况?这是因为在插值过程中需要确定用到原图中的哪几个点,而确定方法有所不同。
目标图像的每一个像素点都需要原图中几个点的信息。需要原图像的那几个点应当首先确定:目标图像的像素点在原图像的哪个位置。
   srcX=dstX* (srcWidth/dstWidth)
  srcY = dstY * (srcHeight/dstHeight)
  中心对齐(OpenCV也是如此):
  SrcX=(dstX+0.5)* (srcWidth/dstWidth) -0.5
  SrcY=(dstY+0.5) * (srcHeight/dstHeight)-0.5
# 其中,dstX 为rang(0,dstWidth),detY为rang(0,desHeight)
由上面两种公式来进行确定,也就是因为这两种不同的确定方法而导致的位置偏移。其部分详细解释可参考该篇文章
双三次插值
双三次插值的具体算法可以参考这里,主要解释一下这里的权重公式
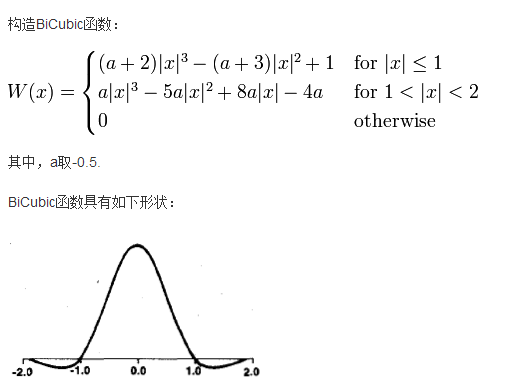
这里的x是目标图像的某像素点距离原图像参考像素点的位置(16个哦)。并且,每一个还分为x和y两个分量。
这里将双线性插值和双三次插值的Python代码列出,结果比C版本的要慢很多。具体原因待查。并且这里主要是为了理解这些插值的算法公式原理,在边缘方面没有做详细处理。
# 最近邻
def NN_interpolation(img,dstH,dstW):
    scrH,scrW,_=img.shape
    retimg=np.zeros((dstH,dstW,3),dtype=np.uint8)
    for i in range(dstH):
        for j in range(dstW):
            scrx=round((i+1)*(scrH/dstH))
            scry=round((j+1)*(scrW/dstW))
            retimg[i,j]=img[scrx-1,scry-1]
    return retimg
#双线性
def BiLinear_interpolation(img,dstH,dstW):
    scrH,scrW,_=img.shape
    img=np.pad(img,((0,1),(0,1),(0,0)),'constant')
    retimg=np.zeros((dstH,dstW,3),dtype=np.uint8)
    for i in range(dstH):
        for j in range(dstW):
            scrx=(i+1)*(scrH/dstH)-1
            scry=(j+1)*(scrW/dstW)-1
            x=math.floor(scrx)
            y=math.floor(scry)
            u=scrx-x
            v=scry-y
            retimg[i,j]=(1-u)*(1-v)*img[x,y]+u*(1-v)*img[x+1,y]+(1-u)*v*img[x,y+1]+u*v*img[x+1,y+1]
    return retimg

def BiBubic(x):
    x=abs(x)
    if x<=1:
        return 1-2.5*(x**2)+(x**3)*1.5
    elif x<2:
        return 2-4*x+2.5*(x**2)-(x**3)*0.5
    else:
        return 0
#双三次
def BiCubic_interpolation(img,dstH,dstW):

    scrH,scrW,_=img.shape
    retimg=np.zeros((dstH,dstW,3),dtype=np.uint8)
    for i in range(dstH):
        print('one pixel:',i,'total:',dstH)
        for j in range(dstW):
            scrx=(i+0.5)*(scrH/dstH) - 0.5
            scry=(j+0.5)*(scrW/dstW) - 0.5
            x=math.floor(scrx)
            y=math.floor(scry)
            u=scrx-x
            v=scry-y
            tmp=0
            for ii in range(-1,3):
                for jj in range(-1,3):
                    if x+ii<0 or y+jj<0 or x+ii>=scrH or y+jj>=scrW:
                        continue
                    tmp+=img[x+ii,y+jj]*BiBubic(ii-u)*BiBubic(jj-v)
            retimg[i,j]=np.clip(tmp,0,255)
    return retimg
INTER_AREA
area插值算法简单说一下其原理,引自这里
总之:
缩图的时候相当于均值滤波,如果目标缩放倍数不是整数,那么通过举例来算权重:

如果是放大的话,接近于双线性插值算法。这个在opencv官方介绍中有这么一句话
when the image is zoomed, it is similar to the INTER_NEAREST method
自定义tensorflow的双三次插值
这里只能选择上采样两倍的固定倍率,单通道正方形的灰度图,并采用了卷积的方式进行实现。这是因为一个原点变成四个目标像素点,并且距离不会变化。
def caculate_bic_weight():

    x = [1.75, 0.75, 0.25, 1.25]
    y = [1.75, 0.75, 0.25, 1.25]

    # x = [1.25, 0.25, 0.75, 1.75]
    # y = [1.75, 0.75, 0.25, 1.25]

    # x = [1.75, 0.75, 0.25, 1.25]
    # y = [1.25, 0.25, 0.75, 1.75]

    # x = [1.25, 0.25, 0.75, 1.75]
    # y = [1.25, 0.25, 0.75, 1.75]

    total = 0
    for x_idx in range(4):
        for y_idx in range(4):
            # print("按列排列")
            x_weight = bicubic_kernel(x[x_idx])
            y_weight = bicubic_kernel(y[y_idx])
            xy_weight = x_weight*y_weight
            print(xy_weight)
            total += xy_weight
    print(total)
这里四组x,y,相当于u、v的值,两个权重相乘得到对应源图像上像素的权重。如果确定的目标图像像素在原图像像素的位置就会发现,一个源图像周围分布四个目标像素。四组x,y分别表示左上,右上,左下,右下,在高宽上的权重分量。
def cus_bicubic_center_tf_up_X2(sdr_video,save_hdr_video,mulit_channel=True):

    if mulit_channel:

        img_y = Image.open(sdr_video).convert('RGB')
        img = tf.placeholder(tf.float32, [None, None, None, 3], name='hdy_img')
        img_data = np.array(img_y)
        img_data = np.expand_dims(img_data, axis=0)

    else:

        img_y = Image.open(sdr_video).convert('L')
        img = tf.placeholder(tf.float32, [None, None, None, 1], name='hdy_img')
        img_data = np.array(img_y)
        img_data = np.expand_dims(img_data, axis=-1)
        img_data = np.expand_dims(img_data, axis=0)

    pad1 = np.array([[0, 0], [2, 1], [2, 1], [0, 0]])
    pad2 = np.array([[0, 0], [2, 1], [1, 2], [0, 0]])
    pad3 = np.array([[0, 0], [1, 2], [2, 1], [0, 0]])
    pad4 = np.array([[0, 0], [1, 2], [1, 2], [0, 0]])

    filter_bic_1 = tf.constant([[[[0.00054931640625, -0.00531005859375, -0.02032470703125, 0.00164794921875],
                                  [-0.00531005859375, 0.05133056640625, 0.19647216796875, -0.01593017578125],
                                  [-0.02032470703125, 0.19647216796875, 0.75201416015625, -0.06097412109375],
                                  [0.00164794921875, -0.01593017578125, -0.06097412109375, 0.00494384765625]]]])

    filter_bic_2 = tf.constant([[[[0.00164794921875, -0.02032470703125, -0.00531005859375, 0.00054931640625],
                                  [-0.01593017578125, 0.19647216796875, 0.05133056640625, -0.00531005859375],
                                  [-0.06097412109375, 0.75201416015625, 0.19647216796875, -0.02032470703125],
                                  [0.00494384765625, -0.06097412109375, -0.01593017578125, 0.00164794921875]]]])

    filter_bic_3 = tf.constant([[[[0.00164794921875, -0.01593017578125, -0.06097412109375, 0.00494384765625],
                                  [-0.02032470703125, 0.19647216796875, 0.75201416015625, -0.06097412109375],
                                  [-0.00531005859375, 0.05133056640625, 0.19647216796875, -0.01593017578125],
                                  [0.00054931640625, -0.00531005859375, -0.02032470703125, 0.00164794921875]]]])

    filter_bic_4 = tf.constant([[[[0.00494384765625, -0.06097412109375, -0.01593017578125, 0.00164794921875],
                                  [-0.06097412109375, 0.75201416015625, 0.19647216796875, -0.02032470703125],
                                  [-0.01593017578125, 0.19647216796875, 0.05133056640625, -0.00531005859375],
                                  [0.00164794921875, -0.02032470703125, -0.00531005859375, 0.00054931640625]]]])

    filter_bic_1 = tf.reshape(filter_bic_1, [4, 4, 1, 1])
    filter_bic_2 = tf.reshape(filter_bic_2, [4, 4, 1, 1])
    filter_bic_3 = tf.reshape(filter_bic_3, [4, 4, 1, 1])
    filter_bic_4 = tf.reshape(filter_bic_4, [4, 4, 1, 1])


    img_pad_1 = tf.pad(img, pad1, mode='SYMMETRIC',  name='pad_hdrx1')
    img_pad_2 = tf.pad(img, pad2, mode='SYMMETRIC',  name='pad_hdrx2')
    img_pad_3 = tf.pad(img, pad3, mode='SYMMETRIC', name='pad_hdry1')
    img_pad_4 = tf.pad(img, pad4, mode='SYMMETRIC', name='pad_hdry2')

    if mulit_channel:
        filter_bic_mui_1 = tf.concat([filter_bic_1, filter_bic_1, filter_bic_1], axis=2)
        filter_bic_mui_2 = tf.concat([filter_bic_2, filter_bic_2, filter_bic_2], axis=2)
        filter_bic_mui_3 = tf.concat([filter_bic_3, filter_bic_3, filter_bic_3], axis=2)
        filter_bic_mui_4 = tf.concat([filter_bic_4, filter_bic_4, filter_bic_4], axis=2)

        hdr_pad_1 = tf.nn.depthwise_conv2d(img_pad_1, filter=filter_bic_mui_1, strides=[1, 1, 1, 1], padding='VALID')
        hdr_pad_2 = tf.nn.depthwise_conv2d(img_pad_2, filter=filter_bic_mui_2, strides=[1, 1, 1, 1], padding='VALID')
        # axis y
        hdr_pad_3 = tf.nn.depthwise_conv2d(img_pad_3, filter=filter_bic_mui_3, strides=[1, 1, 1, 1], padding='VALID')
        hdr_pad_4 = tf.nn.depthwise_conv2d(img_pad_4, filter=filter_bic_mui_4, strides=[1, 1, 1, 1], padding='VALID')
    else:

        hdr_pad_1 = tf.nn.conv2d(img_pad_1, filter=filter_bic_1, strides=[1, 1, 1, 1], padding='VALID')
        hdr_pad_2 = tf.nn.conv2d(img_pad_2, filter=filter_bic_2, strides=[1, 1, 1, 1], padding='VALID')

        hdr_pad_3 = tf.nn.conv2d(img_pad_3, filter=filter_bic_3, strides=[1, 1, 1, 1], padding='VALID')
        hdr_pad_4 = tf.nn.conv2d(img_pad_4, filter=filter_bic_4, strides=[1, 1, 1, 1], padding='VALID')

    hdr_result = tf.concat([hdr_pad_1, hdr_pad_2, hdr_pad_3, hdr_pad_4],axis=-1)

    hdr_result = tf.depth_to_space(hdr_result, 2)

    # hdr_result = SubpixelConv2d(hdr_result, 2)
    hdr_result = tf.clip_by_value(hdr_result, 0.0, 1.0)

    with tf.Session() as sess:

        sess.run(tf.initialize_all_variables())

        feed_dict = {img: img_data/255.0}

        hdr_result_re = sess.run(hdr_result,feed_dict= feed_dict)
        hdr_result_re = hdr_result_re[0]*255.0

        if mulit_channel:
            hdr_result_re = hdr_result_re.astype(np.uint8)
            hdr_result_re = cv2.cvtColor(hdr_result_re, cv2.COLOR_RGB2BGR)

        cv2.imwrite(save_hdr_video,hdr_result_re)
将四个点堆放成四个通道,然后通过subpixel操作。tf.depth_to_space,可以也可以通过该方法实现:
def SubpixelConv2d(inputs, scale=2, n_out_channel=1):
    shape_img = tf.shape(inputs)
    y = tf.reshape(inputs, [-1, shape_img[2], scale, scale * n_out_channel])
    y = tf.transpose(y, [0, 2, 1, 3])
    y = tf.reshape(y, [-1, shape_img[1] * scale, shape_img[2] * scale, n_out_channel])

    return y
这里的tf的padding方式也挺有讲究。不过只要理解了双三次插值的具体方法以及边界处理方式,还是挺好想象的。
这里只是单通道的灰度图,如果想采用多通道的可以将filter_bic通过concat进行连接,并且使用
tf.nn.depthwise_conv2d()
总结:
这种只能固定整数倍缩放才能够实现通过卷积的方式进行上下采样。这是因为在求各元素权重比例时是根据u、v的来确定的。
 scrx=(i+0.5)*(scrH/dstH) - 0.5
 scry=(j+0.5)*(scrW/dstW) - 0.5
 x=math.floor(scrx)
 y=math.floor(scry)
 u=scrx-x
 v=scry-y
只要u、v确定了,其权重也就确定了。那么就可以组成filter_bic。
最后
以上就是羞涩香菇最近收集整理的关于自定义tensorflow的tf.image.resize_bicubic方法的全部内容,更多相关自定义tensorflow内容请搜索靠谱客的其他文章。


发表评论 取消回复