SpringBoot 配置文件位置的加载顺序
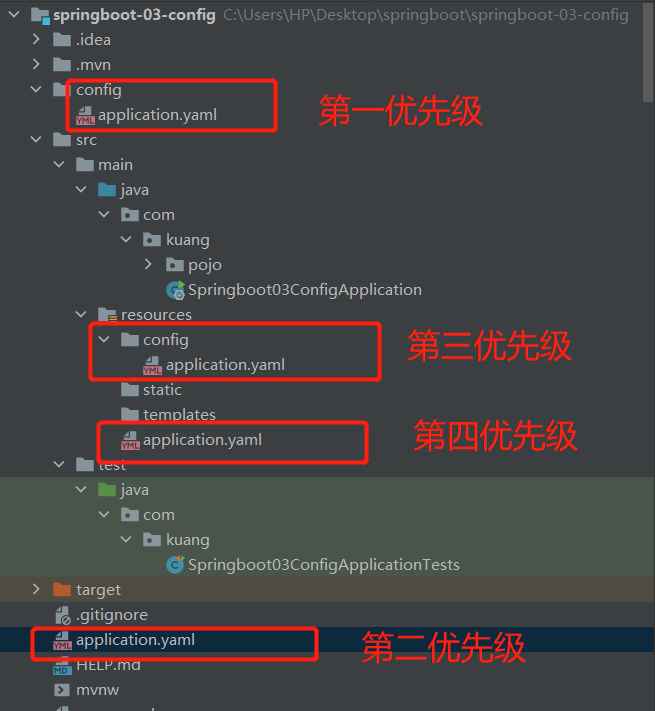
1.file:./config
2.file:./
3.classpath:/config/
4.classpath:/(默认)
项目录的config优先级最高。
项目录的配置文件优先级第二。
resources下的config优先级第三。
resources下的配置文件优先级最低。
优先级由高到低,高优先级的配置会覆盖低优先级的配置;
SpringBoot会从这四个位置全部加载主配置文件;互补配置;
我们在最低的配置文件中设置一个项目访问路径的配置来测试互补问题;
# 配置项目的访问路径
server:
  servlet:
    context-path: /kuang
server.servlet.context-path=/kuang
我们还可以通过spring.config.location来改变默认的配置文件位置
项目打包好后,我们可以使用命令行参数的形式,启动项目的时候来指定配置文件的新位置;
这种情况,一般是后期运维做的多,相同配置,外部指定的配置文件优先级最高。
java -jar spring-boot-config.jar --spring.config.location=F:/application.properties
外部加载配置文件的方式十分多,我们选择最常用的即可,在开发的资源文件中进行配置。
多环境切换
profile是spring对不同环境提供不同配置功能的支持,可以通过激活不同的环境版本,实现快速切换环境。
方式一: 多配置文件
我们在主配置文件编写的时候,文件名可以是application-{profile}.properties/yml,用来指定多个环境版本。
例如:application-test.properties代表测试环境配置 application-dev.properties代表开发环境配置
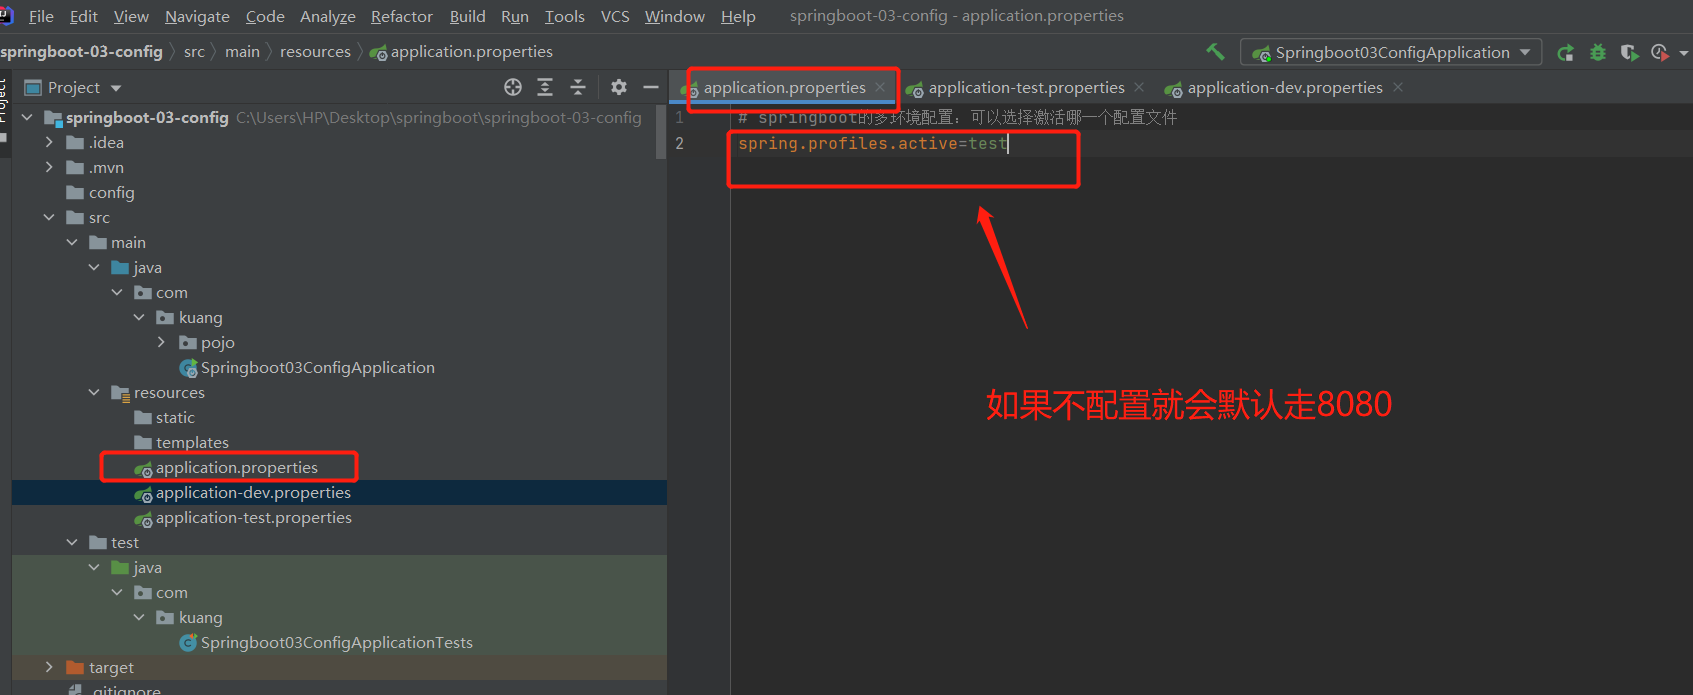
但是SpringBoot并不会直接启动这些配置文件,它默认使用application.properties主配置文件;
我们需要通过一个配置来选择需要激活的环境;
# 比如在配置文件中指定使用dev环境,我们可以通过设置不同的端口号进行测试
# 我们启动springboot,就可以看到已经切换到dev下的配置了
spring.profiles.active=dev
# springboot的多环境配置:可以选择激活哪一个配置文件
spring.profiles.active=test
方式二:yml的多文档块
和properties配置文件,但是使用yml去实现不需要创建多个配置文件,更加方便。
server:
  port: 8081
spring:
  profiles:
    active: dev
---
server:
  port: 8082
spring:
  profiles: dev
---
server:
  port: 8083
spring:
  profiles: test
注意:如果yml和properties同时配置了端口,并且没有激活其他环境,默认使用proerties配置文件的!
@Conditional
自动配置类必须在一定的条件下才能生效;
@Conditional 派生注解(Spring注解版原生的@Conditional作用)
作用:必须是@Conditional指定的条件成立,才给容器添加组件,配置配里面的内容才生效。
| @Conditional扩展注解 | 作用(判断是否满足当前指定条件) |
|---|---|
| @ConditionalOnJava | 系统的JAVA版本是否符合要求 |
| @ConditionalOnBean | 容器中存在指定Bean |
| @ConditionalOnMissingBean | 容器中不存在指定的Bean |
| @ConditionalOnExpression | 满足SpEL表达式指定 |
| @ConditionalOnClass | 系统中有指定的类 |
| @ConditionalOnMissingClass | 系统中没有指定的类 |
| @ConditionalOnSingleCandidate | 容器中只有一个指定的Bean,或者这个Bean是首选Bean |
| @ConditionalOnProperty | 系统中指定的属性是否有指定的值 |
| @ConditionalOnResource | 类路径下是否存在指定资源文件 |
| @ConditionalOnWebApplication | 当前web环境 |
| @ConditionalOnNotWebApplication | 当前不是web环境 |
| @ConditionalOnJndi | JNDI存在指定项 |
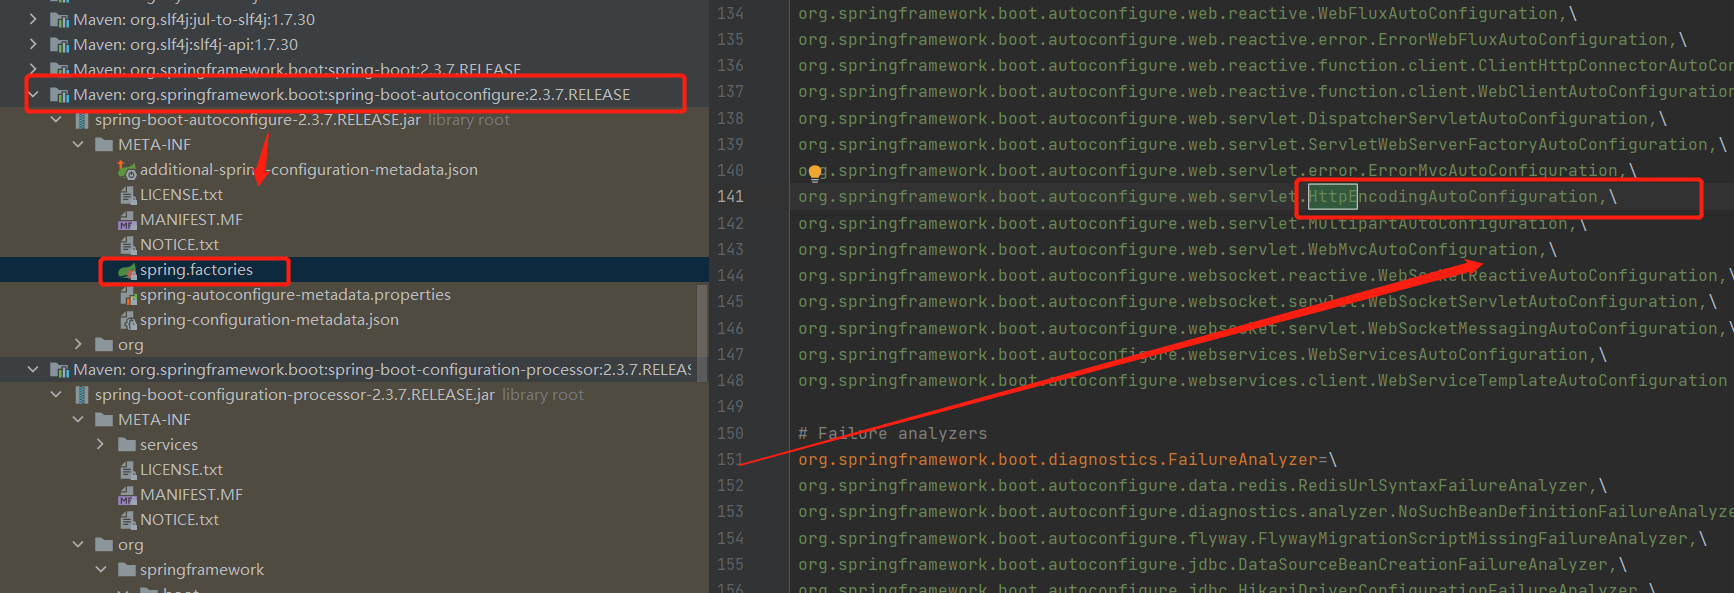
那么多的自动配置类,必须在一定的条件下才能生效,也就是说,我们加载了这么多的配置类,但不是所有的都生效了。
我们怎么知道哪些自动配置类生效;我们可以通过启用debug=true属性;来让控制台打印自动配置报告,这样我们就可以很方便的知道哪些自动配置类生效;
#开启springboot的调试类
debug=true
positive matches:(自动配置类启用的:正匹配)
Nagative matches:(没有启动,没有匹配成功的自动配置类:负匹配)
Unconditional classes:(没有条件的类)
每一个这样的xxxAutoConfiguration类都是容器中的一个组件,最后都加入到容器中;用他们来做自动配置;
每一个自动配置类可以进行自动配置功能。
总结:根据当前不同的条件判断,决定这个类是否生效
一旦这个配置类生效;这个配置类就会给容器中添加各种组件,这些组件的属性是从对应的properties类中获取的,这些类里面的每一个属性又是和文件绑定的;
所有在配置文件中能配置的属性都是在xxxProperties类中封装者;配置文件能配置什么就可以参照某个功能对应的属性。
精髓:
- SpringBoot启动会加载大量的配置类
- 我们看我们需要的功能有没有在SpringBoot默认写好的自动配置类当中
- 我们再来看这个自动配置类中到底配置了哪些组件;(只要我们要用的组件存在在其中,我们就不需要再手动配置了)
- 在容器中自动配置类添加组件的时候,会从properties类中获取某些属性。我们只要在配置文件中指定这些属性的值即可。
- xxxxAutoConfiguration: 自动配置类;给容器中添加组件
- xxxxProperties:封装配置文件中相关属性。
# 在我们这配置文件中能配置的东西,都存在一个固有的规律 xxxAutoConfiguration: xxxProperties与配置文件绑定 我们就可以使用自定义的配置了
SpringBoot Web开发
自动装配:
1.创建应用,选择模块。
springboot到底帮我们配置了些什么? 我们能不能修改?能修改哪些东西?能不能扩展?
- xxxAutoConfiguration…向容器中自动配置组件
- xxxProperties:自动配置类,装配配置文件中自定义的一些内容。
要解决的问题:
- 导入静态资源
- 首页
- jsp,模板引擎Thymeleaf
- 装配扩展SpringMVC
- 增删改查
- 拦截器
- 国际化。
静态资源
在IDEA页面查找文件的快捷键: 双击shift, 然后你要在文档里面找东西 快捷键 ctrl+F
源码:
public void addResourceHandlers(ResourceHandlerRegistry registry) {
            if (!this.resourceProperties.isAddMappings()) {
                logger.debug("Default resource handling disabled");
            } else {
                Duration cachePeriod = this.resourceProperties.getCache().getPeriod();
                CacheControl cacheControl = this.resourceProperties.getCache().getCachecontrol().toHttpCacheControl();
                if (!registry.hasMappingForPattern("/webjars/**")) {
                    this.customizeResourceHandlerRegistration(registry.addResourceHandler(new String[]{"/webjars/**"}).addResourceLocations(new String[]{"classpath:/META-INF/resources/webjars/"}).setCachePeriod(this.getSeconds(cachePeriod)).setCacheControl(cacheControl));
                }

                String staticPathPattern = this.mvcProperties.getStaticPathPattern();
                if (!registry.hasMappingForPattern(staticPathPattern)) {
                    this.customizeResourceHandlerRegistration(registry.addResourceHandler(new String[]{staticPathPattern}).addResourceLocations(WebMvcAutoConfiguration.getResourceLocations(this.resourceProperties.getStaticLocations())).setCachePeriod(this.getSeconds(cachePeriod)).setCacheControl(cacheControl));
                }

            }
        }
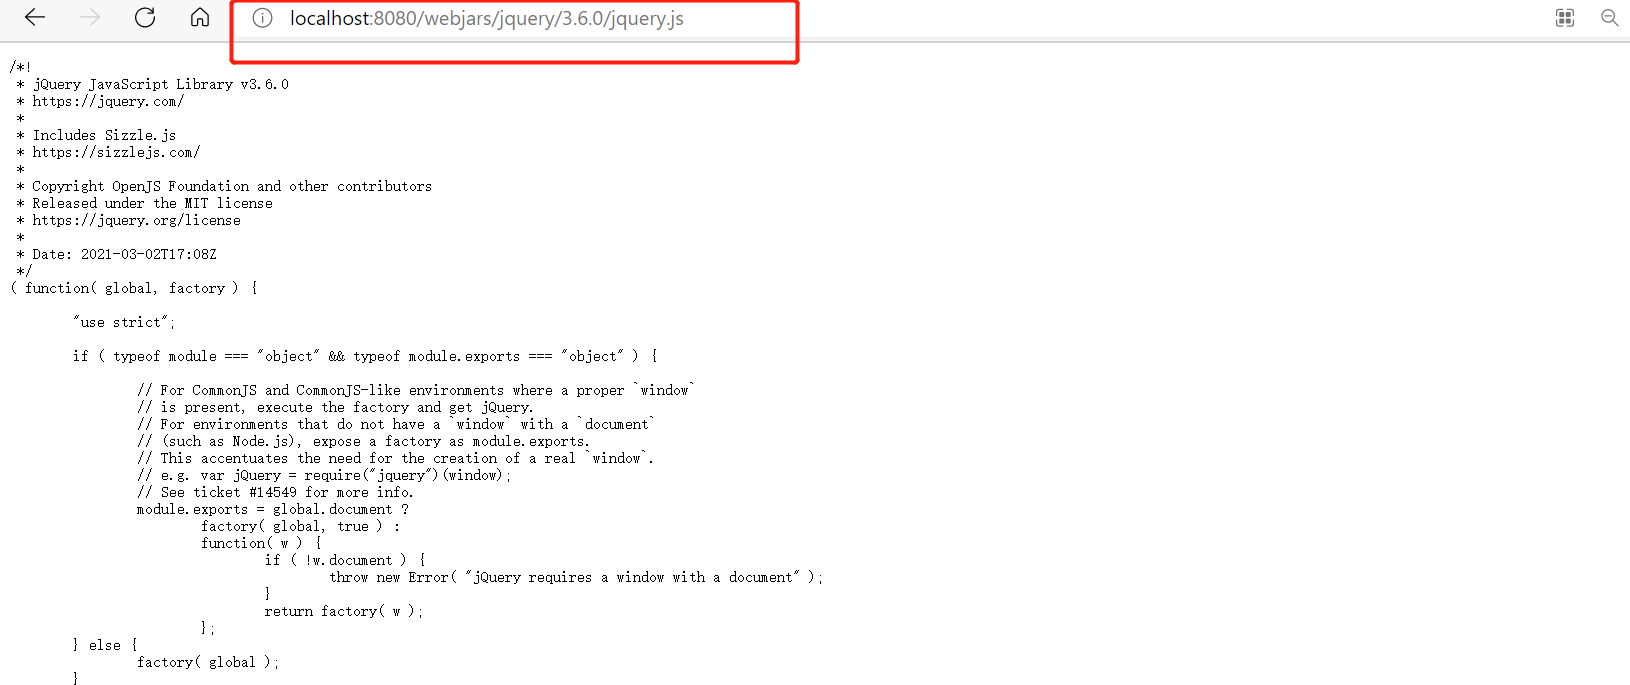
什么是webjars:官网地址:https://www.webjars.org/ 可以在里面找maven依赖。
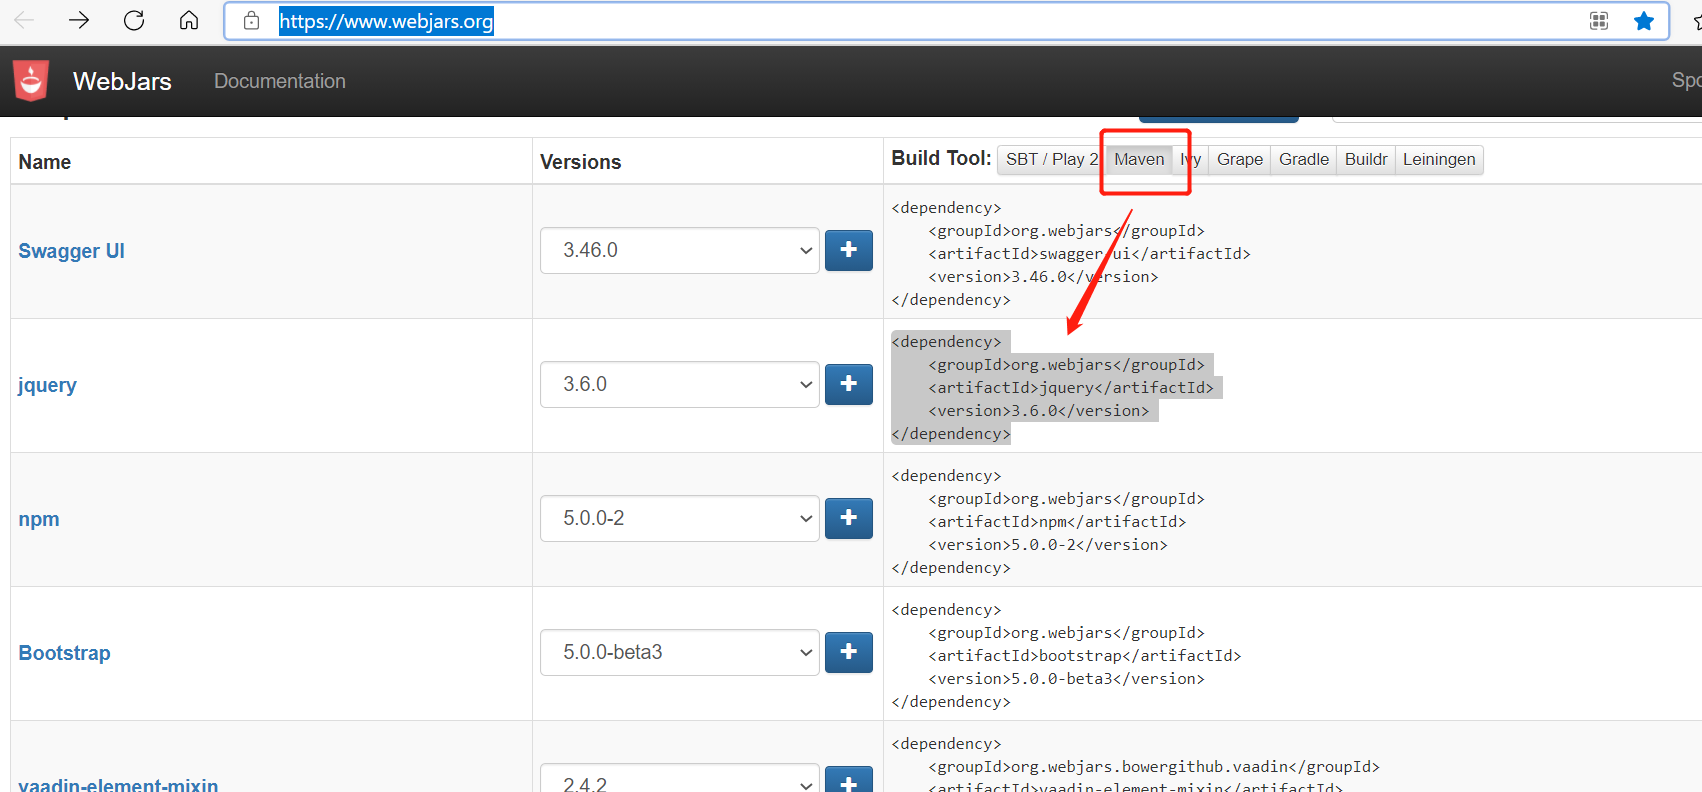
出现的问题:Dependency ‘org.webjars:jquery:3.6.0’ not found,然后降低了版本也是爆红
解决办法:原本我的pom.xml中没有parent 然后我自己手动加了一个 ,当我把这个去掉的时候就可以把依赖加进去了。
   <dependency>
            <groupId>org.webjars</groupId>
            <artifactId>jquery</artifactId>
            <version>3.6.0</version>
        </dependency>

通过访问http://localhost:8080/webjars/jquery/3.6.0/jquery.js可以拿到文件
private static final String[] CLASSPATH_RESOURCE_LOCATIONS = new String[]{"classpath:/META-INF/resources/", "classpath:/resources/", "classpath:/static/", "classpath:/public/"};
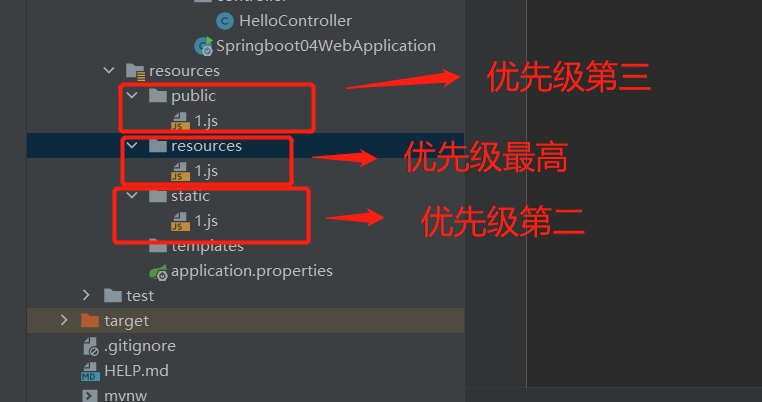
通过访问:http://localhost:8080/1.js确定优先级。
总结:
1.在springboot,我们可以使用以下方式处理静态资源
- webjars
localhost:8080/webjars/ - public, static, /**,resources 映射到localhost:8080/
2.优先级:resources>static: 存放静态资源 (默认)>public
首页如何定制
源码:
 @Bean
        public WelcomePageHandlerMapping welcomePageHandlerMapping(ApplicationContext applicationContext, FormattingConversionService mvcConversionService, ResourceUrlProvider mvcResourceUrlProvider) {
            WelcomePageHandlerMapping welcomePageHandlerMapping = new WelcomePageHandlerMapping(new TemplateAvailabilityProviders(applicationContext), applicationContext, this.getWelcomePage(), this.mvcProperties.getStaticPathPattern());
            welcomePageHandlerMapping.setInterceptors(this.getInterceptors(mvcConversionService, mvcResourceUrlProvider));
            welcomePageHandlerMapping.setCorsConfigurations(this.getCorsConfigurations());
            return welcomePageHandlerMapping;
        }

        private Optional<Resource> getWelcomePage() {
            String[] locations = WebMvcAutoConfiguration.getResourceLocations(this.resourceProperties.getStaticLocations());
            return Arrays.stream(locations).map(this::getIndexHtml).filter(this::isReadable).findFirst();
        }

        private Resource getIndexHtml(String location) {
            return this.resourceLoader.getResource(location + "index.html");
        }

        private boolean isReadable(Resource resource) {
            try {
                return resource.exists() && resource.getURL() != null;
            } catch (Exception var3) {
                return false;
            }
        }
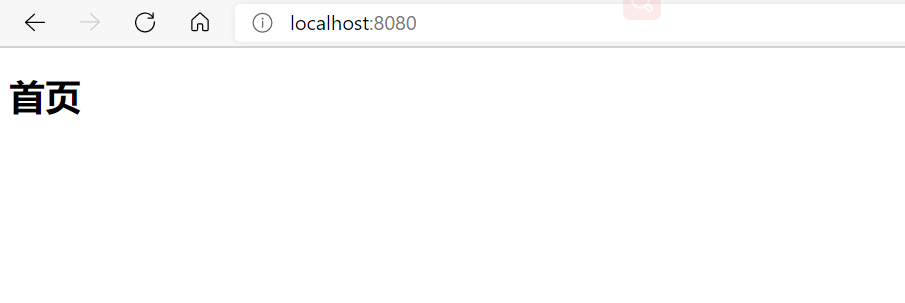
这些目录下index都会识别:
private static final String[] CLASSPATH_RESOURCE_LOCATIONS = new String[]{"classpath:/META-INF/resources/", "classpath:/resources/", "classpath:/static/", "classpath:/public/"};

模板引擎
前端交给我们的页面,是html页面。如果是以前的开发,需要把他们专程jsp页面,jsp好处就是当我们查出一些数据转发到JSP页面以后,我们可以用jsp轻松实现数据的显示,及交互等。jsp支持非常强大的功能,包括能写java代码,但是,现在的情况是,springboot这个项目首先是以jar方式,不是war,第二,我们用的还是嵌入式的Tomcat,所以他现在默认是不支持jsp的。
不支持jsp,所以springboot推荐可以使用模板引擎。
模板引擎,其实jsp就是一个模板引擎,还有以用的比较多的freemarker,包括springboot给我们推荐的Thymeleaf,模板引擎有非常多,但再多的模板引擎,其思想是一样的。
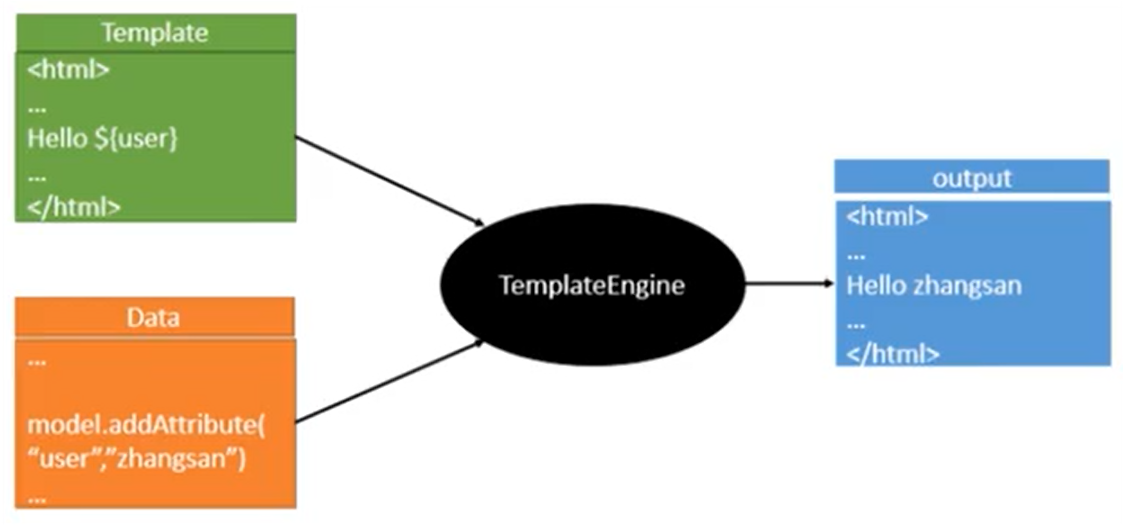
模板引擎的作用就是我们来写一个页面模板,比如有些值呢,是动态的,我们写一些表达式。而这些值,从哪来呢?我们组装一些数据,我们把这些数据找到,然后把这个模板和这个数据交给我们模板引擎,模板引擎按照我们这个数据帮你把这些表达式解析,填充到我们指定的位置,然后把这个数据最终生成一个我们想要的内容给我们写出去,这就是模板引擎。
thymeleaf:https://www.thymeleaf.org/
thymeleaf文档pdf版下载网站:https://www.thymeleaf.org/doc/tutorials/3.0/usingthymeleaf.pdf
可以去官网maven里面找这些依赖
https://mvnrepository.com/artifact/org.thymeleaf/thymeleaf-spring5/3.0.12.RELEASE
<!--        Thymeleaf,我们都是基于3.x开发-->
        <dependency>
            <groupId>org.thymeleaf</groupId>
            <artifactId>thymeleaf-spring5</artifactId>
        </dependency>
        <!-- https://mvnrepository.com/artifact/org.thymeleaf.extras/thymeleaf-extras-java8time -->
        <dependency>
            <groupId>org.thymeleaf.extras</groupId>
            <artifactId>thymeleaf-extras-java8time</artifactId>

        </dependency>
源码:
public class ThymeleafProperties {
    private static final Charset DEFAULT_ENCODING;
    public static final String DEFAULT_PREFIX = "classpath:/templates/";
    public static final String DEFAULT_SUFFIX = ".html";
结论:只需要使用thymeleaf,只需要导入对应的依赖就可以了。我们将html放在我们的templates目录下即可。
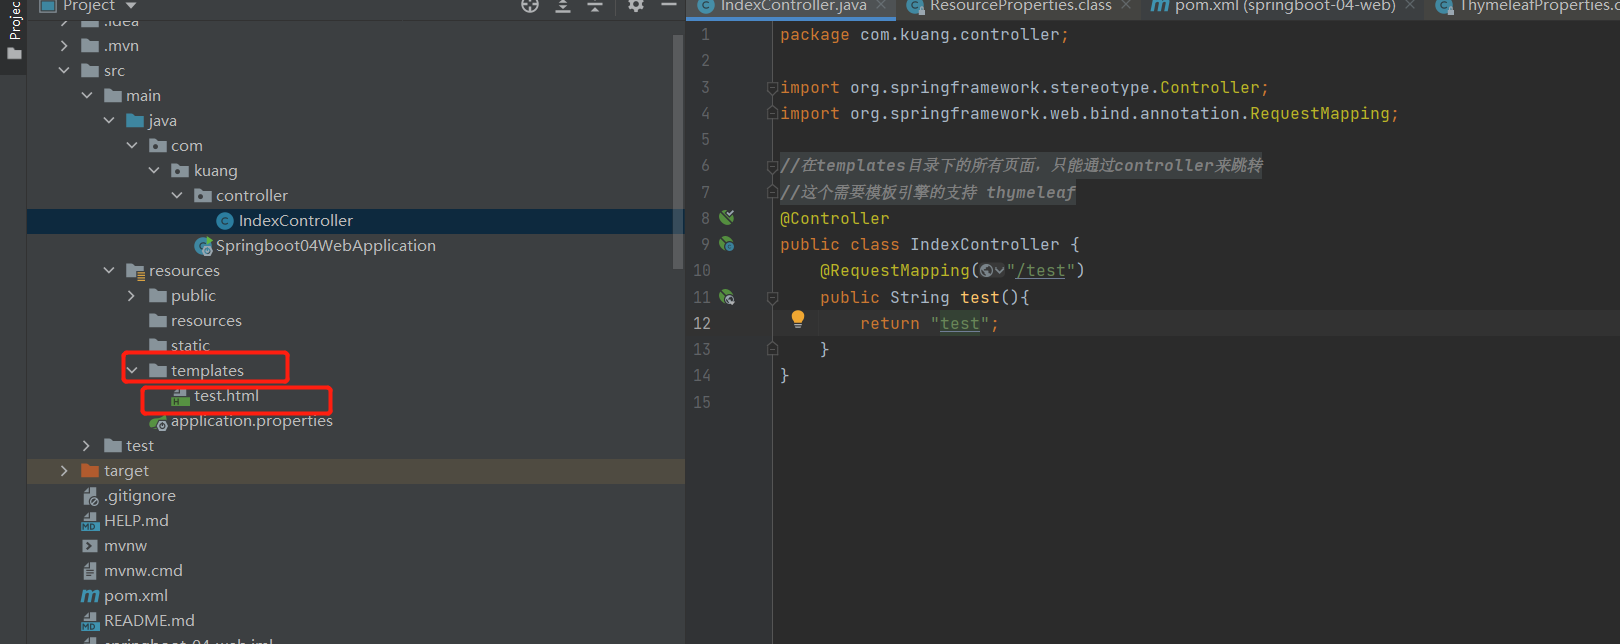
测试:
IndexController.java
package com.kuang.controller;

import org.springframework.stereotype.Controller;
import org.springframework.ui.Model;
import org.springframework.web.bind.annotation.RequestMapping;

@Controller
public class IndexController {
    @RequestMapping("/test")
    public String test(Model model){
        model.addAttribute("msg","hello,springboot");
        return "test";
    }

}
test.html
<!DOCTYPE html>
<html lang="en" xmlns:th="http://www.thymeleaf.org">
<head>
    <meta charset="UTF-8">
    <title>Title</title>
</head>
<body>
<!--所有的html元素都可以被thymeleaf替换接管   th: 元素名-->
<div th:text="${msg}"></div>
</body>
</html>
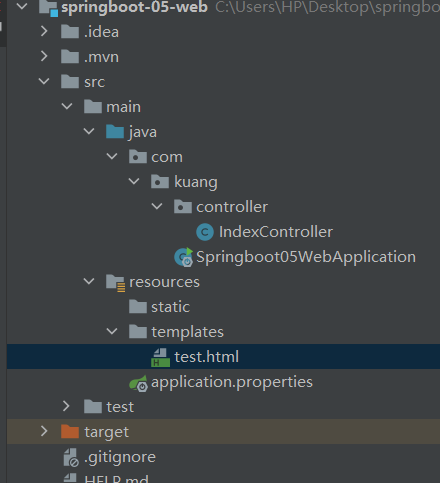
目录:
测试时出现的问题:ERROR 9404 — [nio-8080-exec-1] o.a.c.c.C.[.[.[/].[dispatcherServlet] : Servlet.service() for servlet [dispatcherServlet] in context with path [] threw exception [Circular view path [test]: would dispatch back to the current handler URL [/test] again. Check your ViewResolver setup! (Hint: This may be the result of an unspecified view, due to default view name generation.)] with root cause
解决办法: 代码也没有写错 然后就多试了几次 然后重建项目成功 目前没有找到其他方法解决。
测试语法:
IndexController:
package com.kuang.controller;

import org.springframework.stereotype.Controller;
import org.springframework.ui.Model;
import org.springframework.web.bind.annotation.RequestMapping;

import java.util.Arrays;

@Controller
public class IndexController {
    @RequestMapping("/test")
    public String test(Model model){
        model.addAttribute("msg","<h1>hello,springboot</h1>");
        model.addAttribute("users", Arrays.asList("qinjiang","kuangshen"));
        return "test";
    }

}
test.html
<!DOCTYPE html>
<html lang="en" xmlns:th="http://www.thymeleaf.org">
<head>
    <meta charset="UTF-8">
    <title>Title</title>
</head>
<body>
<!--所有的html元素都可以被thymeleaf替换接管   th: 元素名-->
<div th:text="${msg}"></div>
<div th:utext="${msg}"></div>

<hr>
<h3 th:each="user:${users}" th:text="${user}"></h3>
</body>
</html>
第二种写法:
<!DOCTYPE html>
<html lang="en" xmlns:th="http://www.thymeleaf.org">
<head>
    <meta charset="UTF-8">
    <title>Title</title>
</head>
<body>
<!--所有的html元素都可以被thymeleaf替换接管   th: 元素名-->
<div th:text="${msg}"></div>
<div th:utext="${msg}"></div>

<hr>
<!--<h3 th:each="user:${users}" th:text="${user}"></h3>-->
<h3 th:each="user:${users}">[[${user}]]</h3>
</body>
</html>
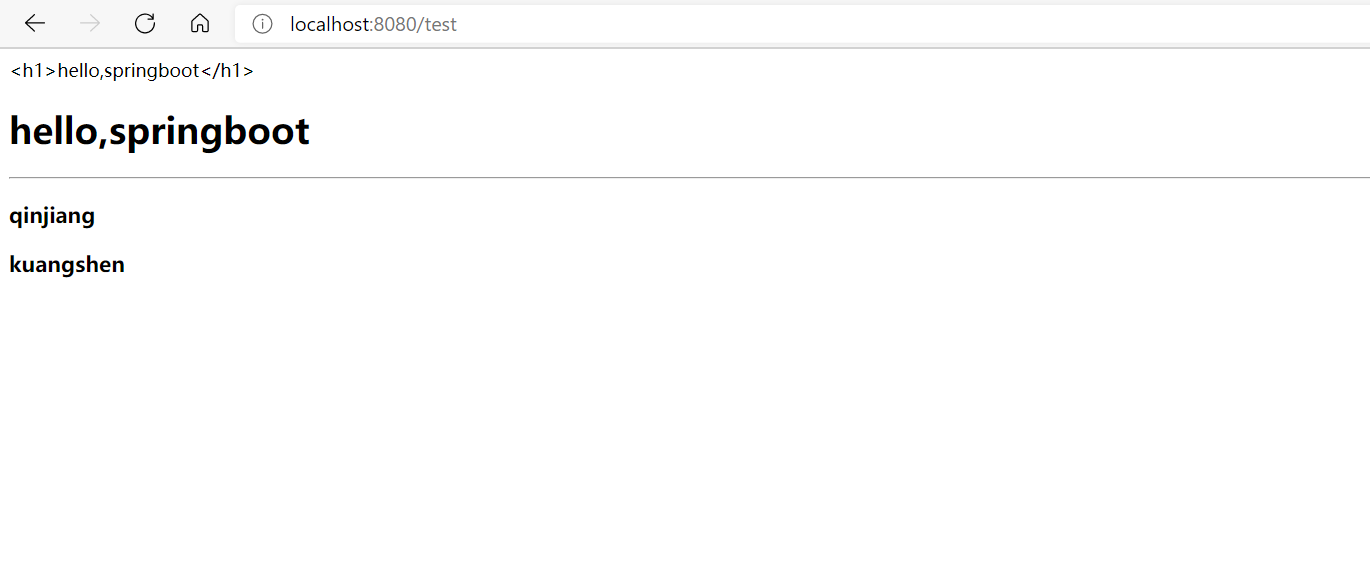
结果:
最后
以上就是无限小猫咪最近收集整理的关于第100天学习打卡(SpringBoot 配置文件位置的加载顺序 多环境切换 springboot web开发 静态资源 首页如何定制 模板引擎)的全部内容,更多相关第100天学习打卡(SpringBoot内容请搜索靠谱客的其他文章。


发表评论 取消回复