我是靠谱客的博主 安详酸奶,这篇文章主要介绍SpringBoot之使用Thymeleaf以及WebJars第一步:在IDEA中使用Spring Initializr快速创建SpringBoot,添加Web模块第二步:引入相关依赖第三步:使用Thymeleaf以及引入js相关配置,现在分享给大家,希望可以做个参考。
第一步:在IDEA中使用Spring Initializr快速创建SpringBoot,添加Web模块
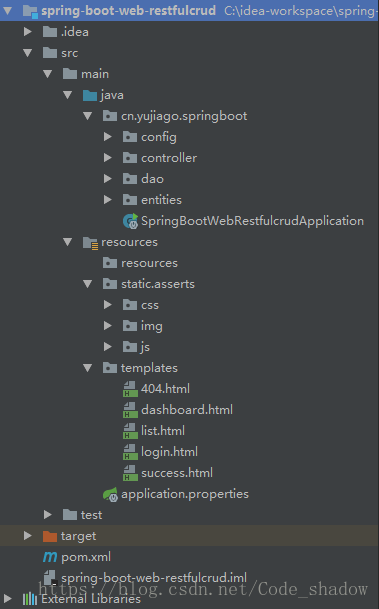
工程目录:

第二步:引入相关依赖
pom.xml
<?xml version="1.0" encoding="UTF-8"?>
<project xmlns="http://maven.apache.org/POM/4.0.0" xmlns:xsi="http://www.w3.org/2001/XMLSchema-instance"
	xsi:schemaLocation="http://maven.apache.org/POM/4.0.0 http://maven.apache.org/xsd/maven-4.0.0.xsd">
	<modelVersion>4.0.0</modelVersion>

	<groupId>cn.yujiago</groupId>
	<artifactId>spring-boot-web-restfulcrud</artifactId>
	<version>0.0.1-SNAPSHOT</version>
	<packaging>jar</packaging>

	<name>spring-boot-web-restfulcrud</name>
	<description>Demo project for Spring Boot</description>

	<parent>
		<groupId>org.springframework.boot</groupId>
		<artifactId>spring-boot-starter-parent</artifactId>
		<version>2.0.3.RELEASE</version>
		<relativePath/> <!-- lookup parent from repository -->
	</parent>

	<properties>
		<project.build.sourceEncoding>UTF-8</project.build.sourceEncoding>
		<project.reporting.outputEncoding>UTF-8</project.reporting.outputEncoding>
		<java.version>1.8</java.version>
		<thymeleaf.version>3.0.9.RELEASE</thymeleaf.version>
		<!-- 布局功能的支持程序  thymeleaf3主程序  layout2以上版本 -->
		<!-- thymeleaf2   layout1-->
		<thymeleaf-layout-dialect.version>2.2.2</thymeleaf-layout-dialect.version>
	</properties>

	<dependencies>
		<dependency>
			<groupId>org.springframework.boot</groupId>
			<artifactId>spring-boot-starter-web</artifactId>
		</dependency>
        <!-- thymeleaf -->
		<dependency>
			<groupId>org.springframework.boot</groupId>
			<artifactId>spring-boot-starter-thymeleaf</artifactId>
		</dependency>
		<!-- jquery -->
		<dependency>
			<groupId>org.webjars</groupId>
			<artifactId>jquery</artifactId>
			<version>3.3.1</version>
		</dependency>
        <!-- bootstrap -->
		<dependency>
			<groupId>org.webjars</groupId>
			<artifactId>bootstrap</artifactId>
			<version>4.0.0</version>
		</dependency>

		<dependency>
			<groupId>org.springframework.boot</groupId>
			<artifactId>spring-boot-starter-test</artifactId>
			<scope>test</scope>
		</dependency>
	</dependencies>
	<build>
		<plugins>
			<plugin>
				<groupId>org.springframework.boot</groupId>
				<artifactId>spring-boot-maven-plugin</artifactId>
			</plugin>
		</plugins>
	</build>
</project>
第三步:使用Thymeleaf以及引入js
html
<!DOCTYPE html>
<html lang="en" xmlns:th="http://www.thymeleaf.org">
<head>
    <meta charset="UTF-8">
    <title>Signin Template for Bootstrap</title>
	<!-- Bootstrap core CSS -->
	<link href="../static/asserts/css/bootstrap.min.css" th:href="@{/webjars/bootstrap/4.0.0/css/bootstrap.css}" rel="stylesheet">
	<!-- Custom styles for this template -->
	<link href="../static/asserts/css/signin.css" th:href="@{/asserts/css/signin.css}" rel="stylesheet">
</head>
<body>
</body>
</html>
PS:这里th标签会覆盖相应的属性值
注意:只需要将需要Thymeleaf渲染的文件放到/templates下即可交由Thymeleaf引擎渲染
原理:
@ConfigurationProperties(
    prefix = "spring.thymeleaf"
)
public class ThymeleafProperties {
    private static final Charset DEFAULT_ENCODING;
    public static final String DEFAULT_PREFIX = "classpath:/templates/";
    public static final String DEFAULT_SUFFIX = ".html";
    private boolean checkTemplate = true;
    private boolean checkTemplateLocation = true;
    private String prefix = "classpath:/templates/";
    private String suffix = ".html";
    private String mode = "HTML";
相关配置
#thymeleaf
spring.thymeleaf.encoding=UTF-8
spring.thymeleaf.suffix=.html
#默认严格检查
#spring.thymeleaf.mode=HTML5
#非严格检查
spring.thymeleaf.mode=LEGACYHTML5
《Thymeleaf使用文档》
最后
以上就是安详酸奶最近收集整理的关于SpringBoot之使用Thymeleaf以及WebJars第一步:在IDEA中使用Spring Initializr快速创建SpringBoot,添加Web模块第二步:引入相关依赖第三步:使用Thymeleaf以及引入js相关配置的全部内容,更多相关SpringBoot之使用Thymeleaf以及WebJars第一步:在IDEA中使用Spring内容请搜索靠谱客的其他文章。
本图文内容来源于网友提供,作为学习参考使用,或来自网络收集整理,版权属于原作者所有。


发表评论 取消回复