文章目录
- 1.协议的引入
- 2. HTTP协议的编解码实现
- 3. 自定义协议
- 3.1自定义协议的要素
- 3.2 自定义协议通过Netty进行编解码
- 4. 啥时候用@Sharable
参考黑马程序员
1.协议的引入
协议就是客户端向服务端发送消息的时候,双方约定俗成的一套规矩,比如我在redis中创建一个key,value。按理说要用到这个命令,set key value。这个命令在发送的时候会被解析成redis服务器能看懂的形式。比如说set name zhangsan你看到的只是一条命令,实际上向服务端发送的是这样的
    /*
    set name zhangsan
    *3
    $3
    set
    $4
    name
    $8
    zhangsan
     */
- *后面是3意思是,这个数组里有3个元素set key value正好3个元素。
- $意思是这个元素有几个字节
- 然后添加发送的内容
- 每发送一条都要添加回车换行符
我们通过程序测试一下按照这个协议发送对还是不对。
    public static void main(String[] args) {
        final byte[] LINE = {13, 10};
        NioEventLoopGroup worker = new NioEventLoopGroup();
        try {
            Bootstrap bootstrap = new Bootstrap();
            bootstrap.channel(NioSocketChannel.class);
            bootstrap.group(worker);
            bootstrap.handler(new ChannelInitializer<SocketChannel>() {
                @Override
                protected void initChannel(SocketChannel ch) {
                    ch.pipeline().addLast(new LoggingHandler());
                    ch.pipeline().addLast(new ChannelInboundHandlerAdapter() {
                        @Override
                        public void channelActive(ChannelHandlerContext ctx) {
                            ByteBuf buf = ctx.alloc().buffer();
                            buf.writeBytes("*3".getBytes());
                            buf.writeBytes(LINE);
                            buf.writeBytes("$3".getBytes());
                            buf.writeBytes(LINE);
                            buf.writeBytes("set".getBytes());
                            buf.writeBytes(LINE);
                            buf.writeBytes("$4".getBytes());
                            buf.writeBytes(LINE);
                            buf.writeBytes("name".getBytes());
                            buf.writeBytes(LINE);
                            buf.writeBytes("$8".getBytes());
                            buf.writeBytes(LINE);
                            buf.writeBytes("zhangsan".getBytes());
                            buf.writeBytes(LINE);
                            ctx.writeAndFlush(buf);
                        }

                        @Override
                        public void channelRead(ChannelHandlerContext ctx, Object msg) throws Exception {
                            ByteBuf buf = (ByteBuf) msg;
                            System.out.println(buf.toString(Charset.defaultCharset()));
                        }
                    });
                }
            });
            ChannelFuture channelFuture = bootstrap.connect("localhost", 6379).sync();
            channelFuture.channel().closeFuture().sync();
        } catch (InterruptedException e) {
            log.error("client error", e);
        } finally {
            worker.shutdownGracefully();
        }
    }
然后我们启动redis清空所有的key value看看到底添没添加key value。handler我们添加两个一个是channelActive,负责向服务器发送数据,一个是channelRead,负责接收服务端的回复。
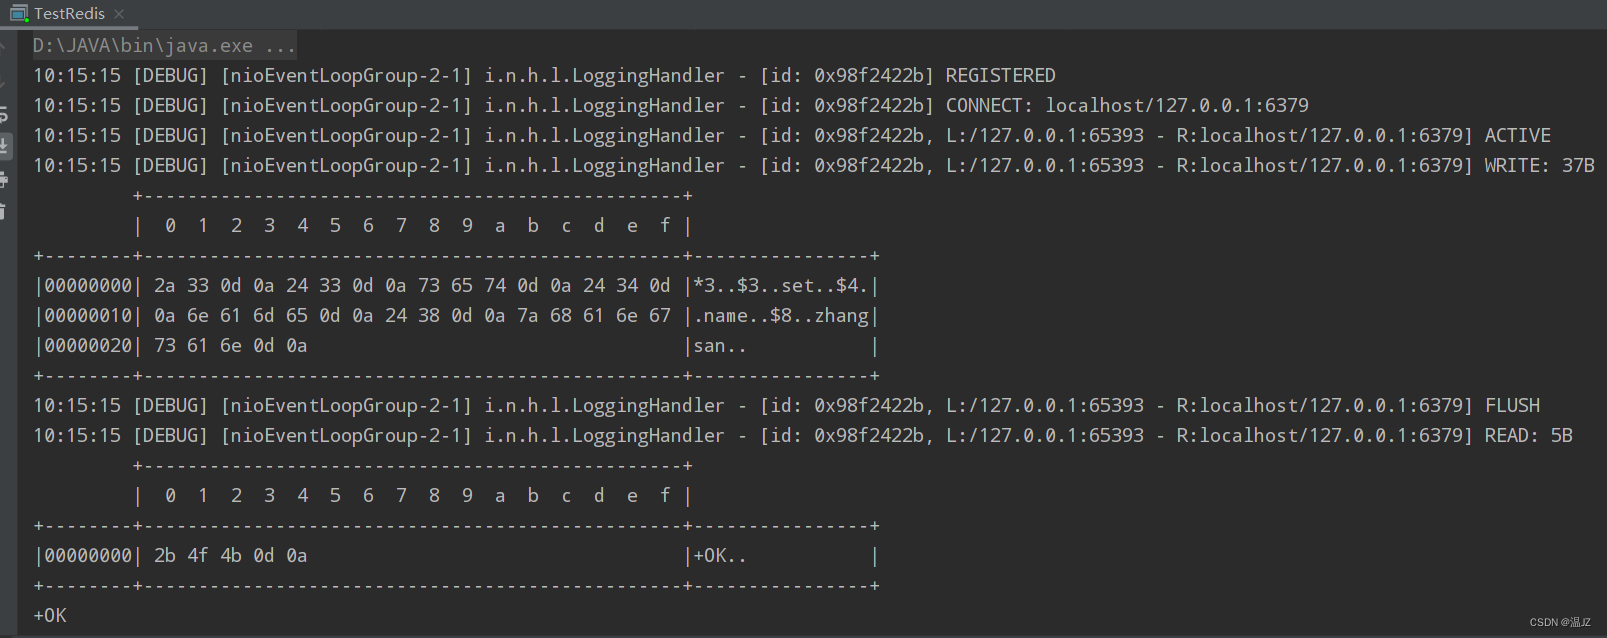
我们能看到服务端给我们返回了一个ok说明这条数据已经被添加了。我们看看redis能不能查到这条数据。
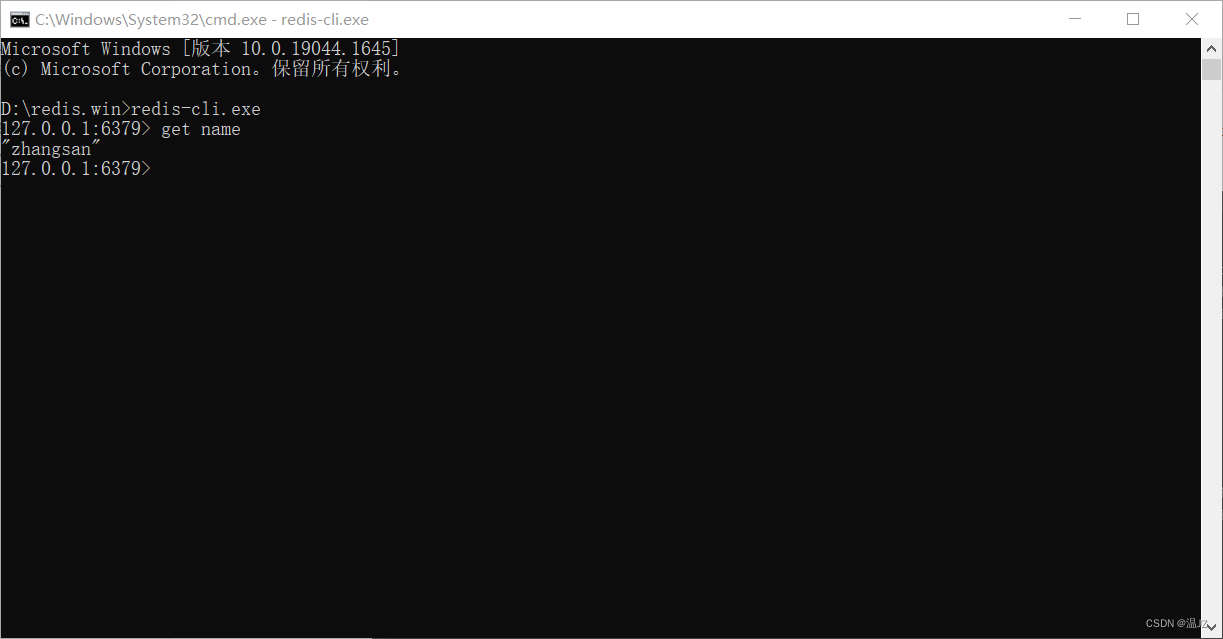
如图所示我们能在redis中拿到这条key-value。
综上所述客户端和服务端之间想要进行通信,要约定好规则。这个规则就是协议。
2. HTTP协议的编解码实现
HTTP协议的实现比较复杂,但是Netty已经帮我们把HTTP的编解码器实现好了,我们只需要简单配置即可使用。我们可以在服务端添加Http的编解码器HttpServerCodec来实现对接收消息的解码和对发送消息的编码。来看一下HttpServerCodec声明。
public final class HttpServerCodec extends CombinedChannelDuplexHandler<HttpRequestDecoder, HttpResponseEncoder>
        implements HttpServerUpgradeHandler.SourceCodec
我们可以看到它继承了一个组合编码器里面既有HttpRequestDecoder也有HttpResponseEncoder所以它既可以对数据进行编码也可以对数据进行解码。
    public static void main(String[] args) {
        NioEventLoopGroup boss = new NioEventLoopGroup();
        NioEventLoopGroup worker = new NioEventLoopGroup();
        try {
            ServerBootstrap serverBootstrap = new ServerBootstrap();
            serverBootstrap.channel(NioServerSocketChannel.class);
            serverBootstrap.group(boss, worker);
            serverBootstrap.childHandler(new ChannelInitializer<SocketChannel>() {
                @Override
                protected void initChannel(SocketChannel ch) throws Exception {
                    ch.pipeline().addLast(new LoggingHandler(LogLevel.DEBUG));
                    ch.pipeline().addLast(new HttpServerCodec());
                    ch.pipeline().addLast(new ChannelInboundHandlerAdapter() {
                        @Override
                        public void channelRead(ChannelHandlerContext ctx, Object msg) throws Exception {
                            log.debug("{}", msg.getClass());
                        }
                    });
                }
            });
            ChannelFuture channelFuture = serverBootstrap.bind(8080).sync();
            channelFuture.channel().closeFuture().sync();
        } catch (InterruptedException e) {
            log.error("server error", e);
        } finally {
            boss.shutdownGracefully();
            worker.shutdownGracefully();
        }
    }
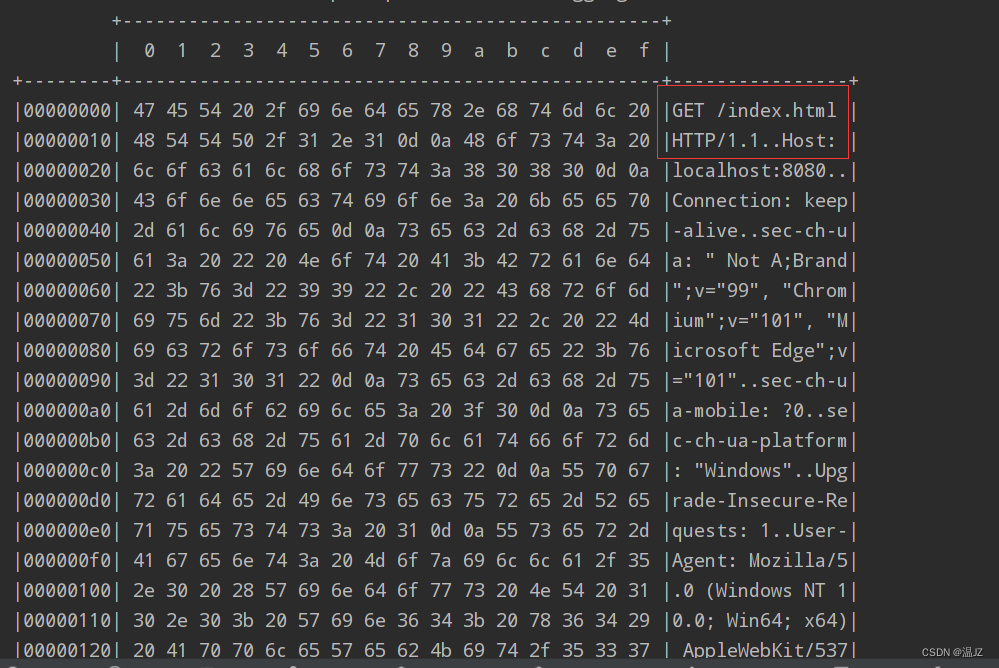
如图所示上面是请求行,包含了请求类型,请求路径,请求协议。然后底下一大堆就是请求体了。然后我们看看消息是什么类型的。

我们可以看到接收到的消息类型一个是DefaultHttpRequest,即请求头,另一个是LastHttpContent$1,即请求体。如果你想对这两种消息分别处理可以使用SimpleChannelInboundHandler泛型后面添加你感兴趣的消息的类。对该消息进行处理。
                    ch.pipeline().addLast(new SimpleChannelInboundHandler<HttpRequest>() {
                        @Override
                        protected void channelRead0(ChannelHandlerContext ctx, HttpRequest msg) throws Exception {
                            // 获取请求
                            log.debug(msg.uri());

                            // 返回响应
                            DefaultFullHttpResponse response =
                                    new DefaultFullHttpResponse(msg.protocolVersion(), HttpResponseStatus.OK);

                            byte[] bytes = "<h1>Hello, world!</h1>".getBytes();
                            // 规定好返回数据的长度,返回之后浏览器就会结束不会等了。
                            response.headers().setInt(CONTENT_LENGTH, bytes.length);
                            response.content().writeBytes(bytes);

                            // 写回响应
                            ctx.writeAndFlush(response);
                        }
                    });
比如你想获得HttpRequest类型的消息,你就可以泛型上添加HttpRequest类型。这里我获取请求的uri并打印出来。然后返回响应,响应给浏览器Hello,world!然后我们再次打开浏览器向服务端发送请求。

3. 自定义协议
3.1自定义协议的要素
- 魔数,用来在第一时间判定是否是无效数据包
- 版本号,可以支持协议的升级
- 序列化算法,消息正文到底采用哪种序列化反序列化方式,可以由此扩展,例如:json、protobuf、hessian、jdk
- 指令类型,是登录、注册、单聊、群聊… 跟业务相关
- 请求序号,为了双工通信,提供异步能力
- 正文长度
- 消息正文
3.2 自定义协议通过Netty进行编解码
我们自己设计一个协议就要按照上面协议的要素进行设计,首先我们先抽象出来一个消息类型,MyMessage,然后通过里面的消息类型来辨别他是哪种消息。不同的消息单独写一个具体的类然后继承自父类MyMessage。
MyMessage
@Data
public abstract class MyMessage implements Serializable {
    // 请求消息
    public final static int REQUEST_MESSAGE = 0;
    // 响应消息
    public final static int RESPONSE_MESSAGE = 1;

    // 请求序号
    private int sequenceId;
    public abstract int getMessageType();

}
这个Message必须实现序列化接口
MyRequestMessage
@Data
@ToString(callSuper = true)
@AllArgsConstructor
@NoArgsConstructor
public class MyRequestMessage extends MyMessage{
    private String name;
    private int age;


    @Override
    public int getMessageType() {
        return REQUEST_MESSAGE;
    }
}
因为我们这个是请求的消息,气球内容包括姓名和年龄,然后继承父类MyMessage,重写里面的获取消息类型的方法,返回请求消息。
然后我们需要实现对MyMessage的编解码。
@Slf4j
public class MyMessageCodec extends ByteToMessageCodec<MyMessage> {
    @Override
    public void encode(ChannelHandlerContext ctx, MyMessage msg, ByteBuf out) throws Exception {
        // 4字节的魔数
        out.writeBytes(new byte[]{1,2,3,4});
        // 1字节的版本
        out.writeByte(1);
        // 1字节的序列化方式
        out.writeByte(0);
        // 1字节的指令类型
        out.writeByte(msg.getMessageType());
        // 4字节的请求序号
        out.writeInt(msg.getSequenceId());
        // 无意义,对齐填充,如果不填充就是15字节填充一下变成2的n次方
        out.writeByte(0xff);
        // 获取内容的字节数组
        ByteArrayOutputStream bos = new ByteArrayOutputStream();
        ObjectOutputStream oos = new ObjectOutputStream(bos);
        oos.writeObject(msg);
        byte[] bytes = bos.toByteArray();
        // 7. 长度
        out.writeInt(bytes.length);
        // 8. 写入内容
        out.writeBytes(bytes);
    }

    @Override
    public void decode(ChannelHandlerContext ctx, ByteBuf in, List<Object> out) throws Exception {
        int magicNum = in.readInt();
        byte version = in.readByte();
        byte serializerType = in.readByte();
        byte messageType = in.readByte();
        int sequenceId = in.readInt();
        in.readByte();
        int length = in.readInt();
        byte[] bytes = new byte[length];
        in.readBytes(bytes, 0, length);
        ObjectInputStream ois = new ObjectInputStream(new ByteArrayInputStream(bytes));
        MyMessage message = (MyMessage) ois.readObject();
        log.debug("{}, {}, {}, {}, {}, {}", magicNum, version, serializerType, messageType, sequenceId, length);
        log.debug("{}", message);
        out.add(message);
    }
}
然后我们对他进行测试
public class TestMyMessageCodec {
    public static void main(String[] args) throws Exception {
        EmbeddedChannel channel = new EmbeddedChannel(
                new LoggingHandler(),
                new LengthFieldBasedFrameDecoder(
                        1024, 12, 4, 0, 0),
                new MyMessageCodec()
        );
        // encode
        MyRequestMessage message = new MyRequestMessage("wjz",21);
        // decode
        ByteBuf buf = ByteBufAllocator.DEFAULT.buffer();
        new MyMessageCodec().encode(null, message, buf);
        channel.writeInbound(buf);
    }
}
这边我们通过writeInboud的方式向channel中写入数据,然后channel中添加handler添加一个LoggingHandler为了打印日志。LengthFieldBasedFrameDecoder负责防止粘包和半包。然后就是我们自己的编解码器。最终我们看一下结果。
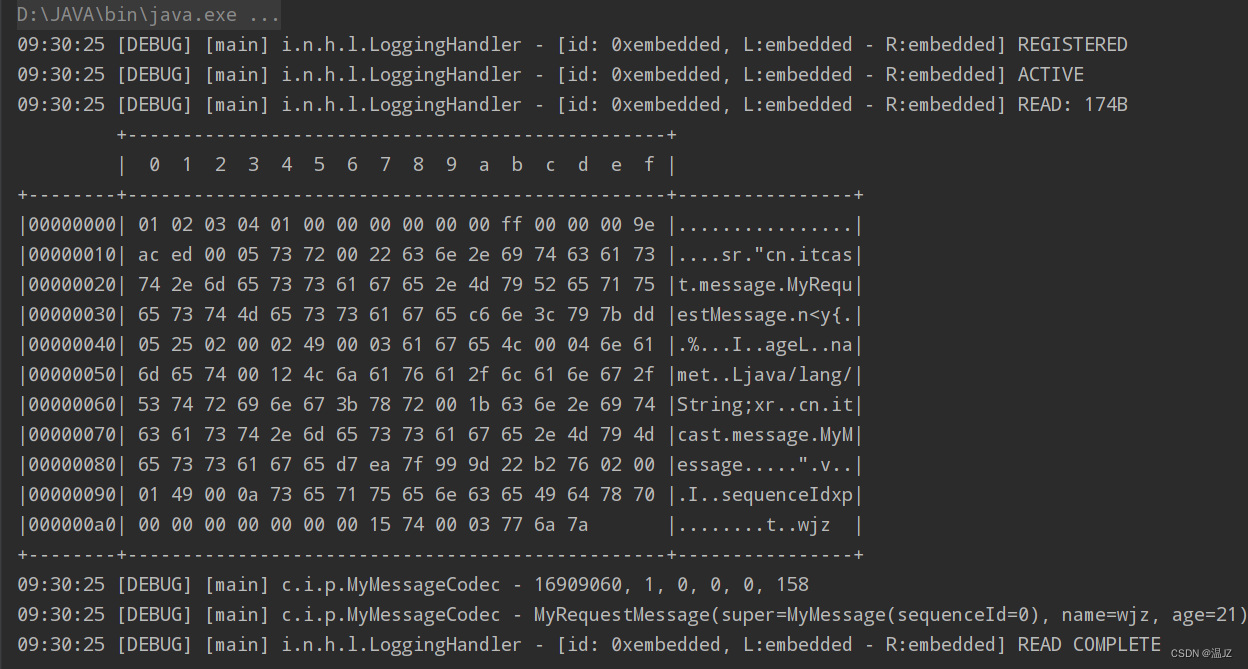
我们解析出来结果看到请求的消息被完全接收到。然后第一排就是我们的具体对象之前的内容。比如说这里的16909060实际上就是01 02 03 04,之后的01是版本号,00是序列化算法我们这里是jdk,00是请求类型,然后就是序列号00 00 00 00 我们没有设置就全是0,然后就是ff填充的,最后四个字节就是我们真正的消息长度。
4. 啥时候用@Sharable
我们在添加handler时总是new LoggingHandler或者new LengthFieldBasedFrameDecoder也就是说我们每次都要new一个新的handler,但是在有些时候我们可以让多个channel共用一个handler,比如说new LoggingHandler。但是有些时候我们就不能让多个channel共用一个handler,比如说LengthFieldBasedFrameDecoder。
如图所示
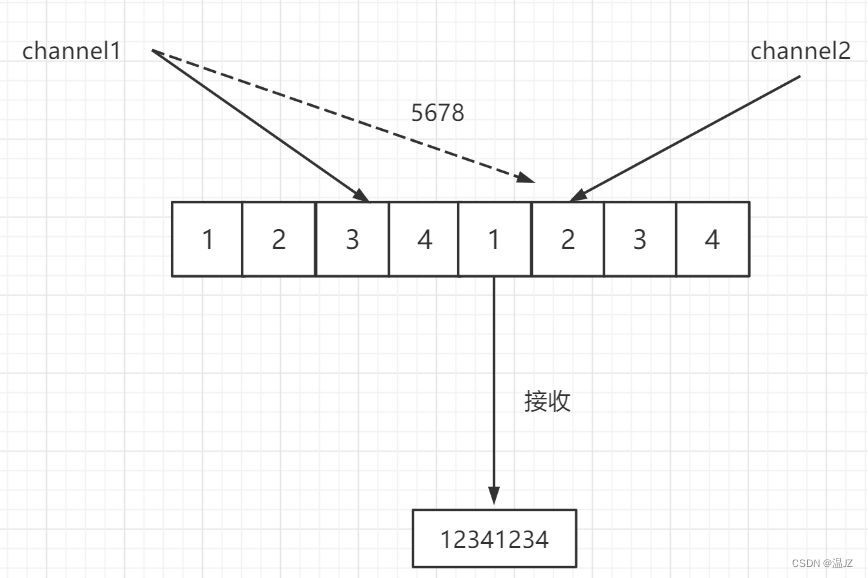
我两个channel共用一个解码器,这个是按长度解析的,8字节一条数据。首先channel要解析出来的数据应该是12345678,但是在channel1先把1234给到这个解码器之后,channel2也过来把他的数据交给了解码器,正好达到了8字节,所以输出的时候就是12341234,这就出问题了,所以LengthBasedFieldFrameDecoder就不能sharable。否则容易出现线程不安全的问题。
因此当handler不保存状态的时候它是可以被sharable的,如果handler保存了状态他就不能被sharable,会引发线程不安全问题。
最后
以上就是帅气河马最近收集整理的关于Netty协议的设计与解析的全部内容,更多相关Netty协议内容请搜索靠谱客的其他文章。


发表评论 取消回复